

All Activity
- Past hour
-
 Welcome aboard. That's a very nice bonus. Best thing to do is read the manual (more than once) and get familiar with how it operates, watch the movement of the various parts and don't force anything if something feels like it's binding. Fun times ahead.
 -
 I am literally reading through the manual now well trying to. But it says specifically where to oil and stuff! one thing read said, it may just need a break in period? Like to run consistently for a while. Could it just be that ya think? This one has never really been used at all. It’s essential brand new, no one one just had time to mess with it. my biggest issue is I don’t know how it’s “supposed” to run. I’ve never used one in good working order haha
 - Today
-
 To find out what is binding up, you can turn the handwheel very slowly and pay attention to which part of the circle it binds at. Binding typically means something is trying to move farther than there is space to move. You can start taking inspection covers off to see the linkages that are at work. I've had a machine bind when it tried to lift the needle bar too high, and the needle bar ran into the head unit. Or when the latch opener tried to open wider than there was room for. Not sure what you'll find on this machine, but if you start exploring hopefully you can find some clues. While you're at it, you can oil the linkages 😀
 -
Thank you! Im so excited! I think it will be a good one to learn sewing machine mechanics on too!
-
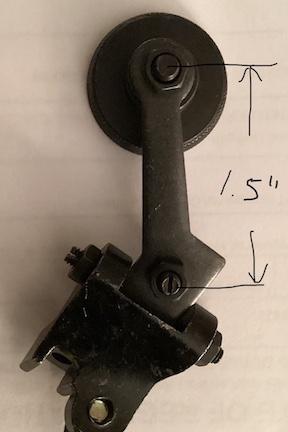
Maybe. this is the one I bought that is "too long". The arm from center of screw to center of screw is 1.5 in. The shank length on the machine is 1" Here's a pic of what I bought (that doesn't fit): I think a 1/4 in shorter would work
-
 I bought a resin 3D printer mainly for the purpose of making stamps. Its a white elephant right now
 -
There nowt wrong with that s/m. They work great and last a long time. Plenty of folks on here use them or the Chinese clones. Somebody will be along to help you
-
@SUP To misquote Julius Caesar, venerunt, viderunt, laboraverunt, They arrived at 07.30 and away by 14.50, Very much quicker than I thought, By several days! I might get things sorted by Tuesday and get back to this properly. But in the meantime I've got to knock-up a new belt for #1 son
-
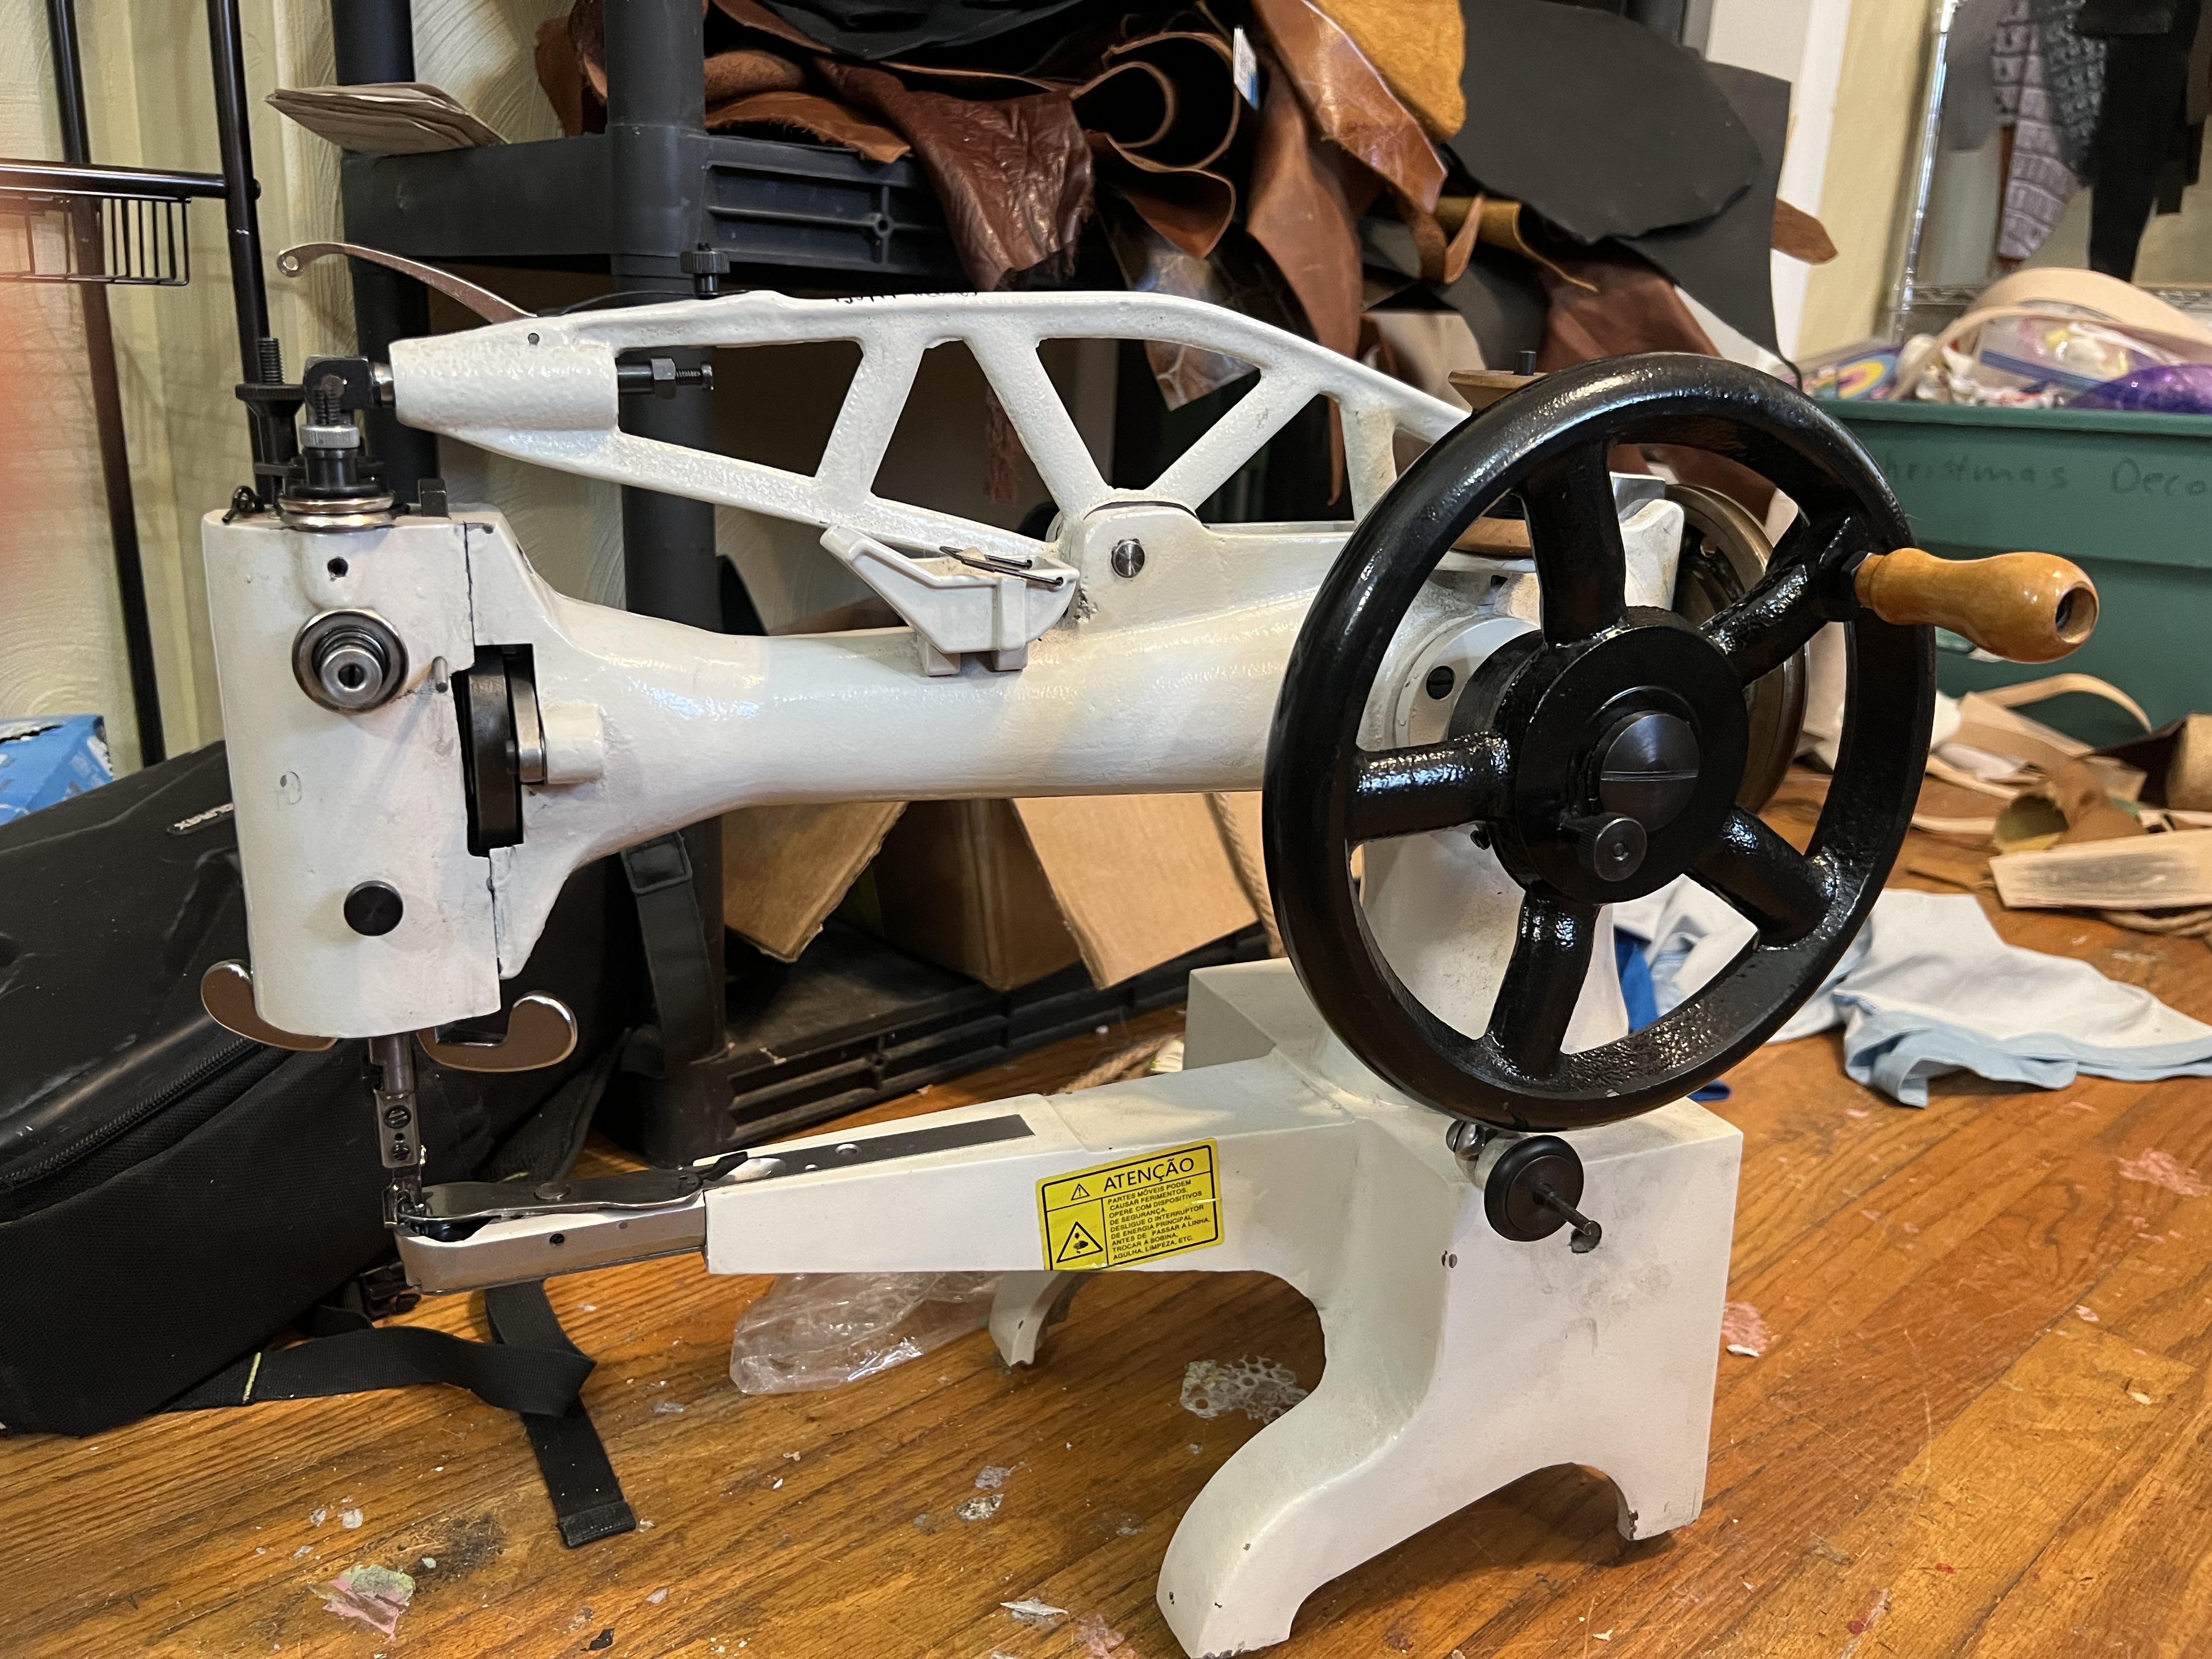
First time posting! Today I met a cool guy through a Facebook purchase. Owns a Shoe Repair shop about an hour an away. I went to buy an old Landis 5 in 1, but left with alot more. He gifted me a shoe patcher machine, he said it was a singer or Adler clone. It’s not the green one that around $100, it’s the white one that’s around $400. It’s brand new, he just said the wants to lock up. I don’t have it threaded or anything. But the wheel cranks fine just meets a little resistance at first. But after a full rotation it seems fine. I’m so new, I don’t even know where to start. I’m really looking forward to for help trying to find some decent videos on them and such. I’m not sure on how to add a photo but here is a link to and identical one on Amazon. https://a.co/d/1q9SAgj and and all advice would be appreciated. Just remember this was a gift, and I want to get this specific machine to work. I know I want a better machine in the long run! Haha
- Yesterday
-
Would these work???? kgg
(1).jpg.d107e79a81dd7a2d11f165752ac22f74.jpg)
-
 Yes I use my 3D printer ( Bambu Lab x 1 Carbon ) for belt hole guides, stamps, table top attachments for Juki LS-341 and Juki TSC-441 clones, binding attachments, templates, hand press guides, molds for wet forming to name a few and on various other prototype items before turning it into a piece of equipment. I find 3D design and printing opens up avenues where something isn't available, it's more cost effective to 3D print or both. Stamps why pay $50 for a stamp when you can do it for 50 cents or less. kgg
 -
Todd, I'm curious about your process for making that stamp as I'm assuming you either scanned the logo or photographed it? How did you turn it into the .stl file?
-
I'm trying to find a roller foot for a Singer 44-10. I bought one on Amazon but the arm the roller is attached to is too long and I'm not able to move it into position. Any help is appreciated. Thanks!
-
I can see where the one on the right could work well, the curving edge should allow for an easier/smoother slicing action. I might have to pinch the idea.
-
 I just use regular PLA, for the depth I just experimented a couple times. I am not sure how many mm I am pressing it in. I will try to remember to take a picture of the stamp itself tonight and measure the depth on it. Todd
 -
 That's awesome! Do you use TPU or a different material for the stamp face? Also curious—how do you ensure the right depth and clarity for the imprint?
 -
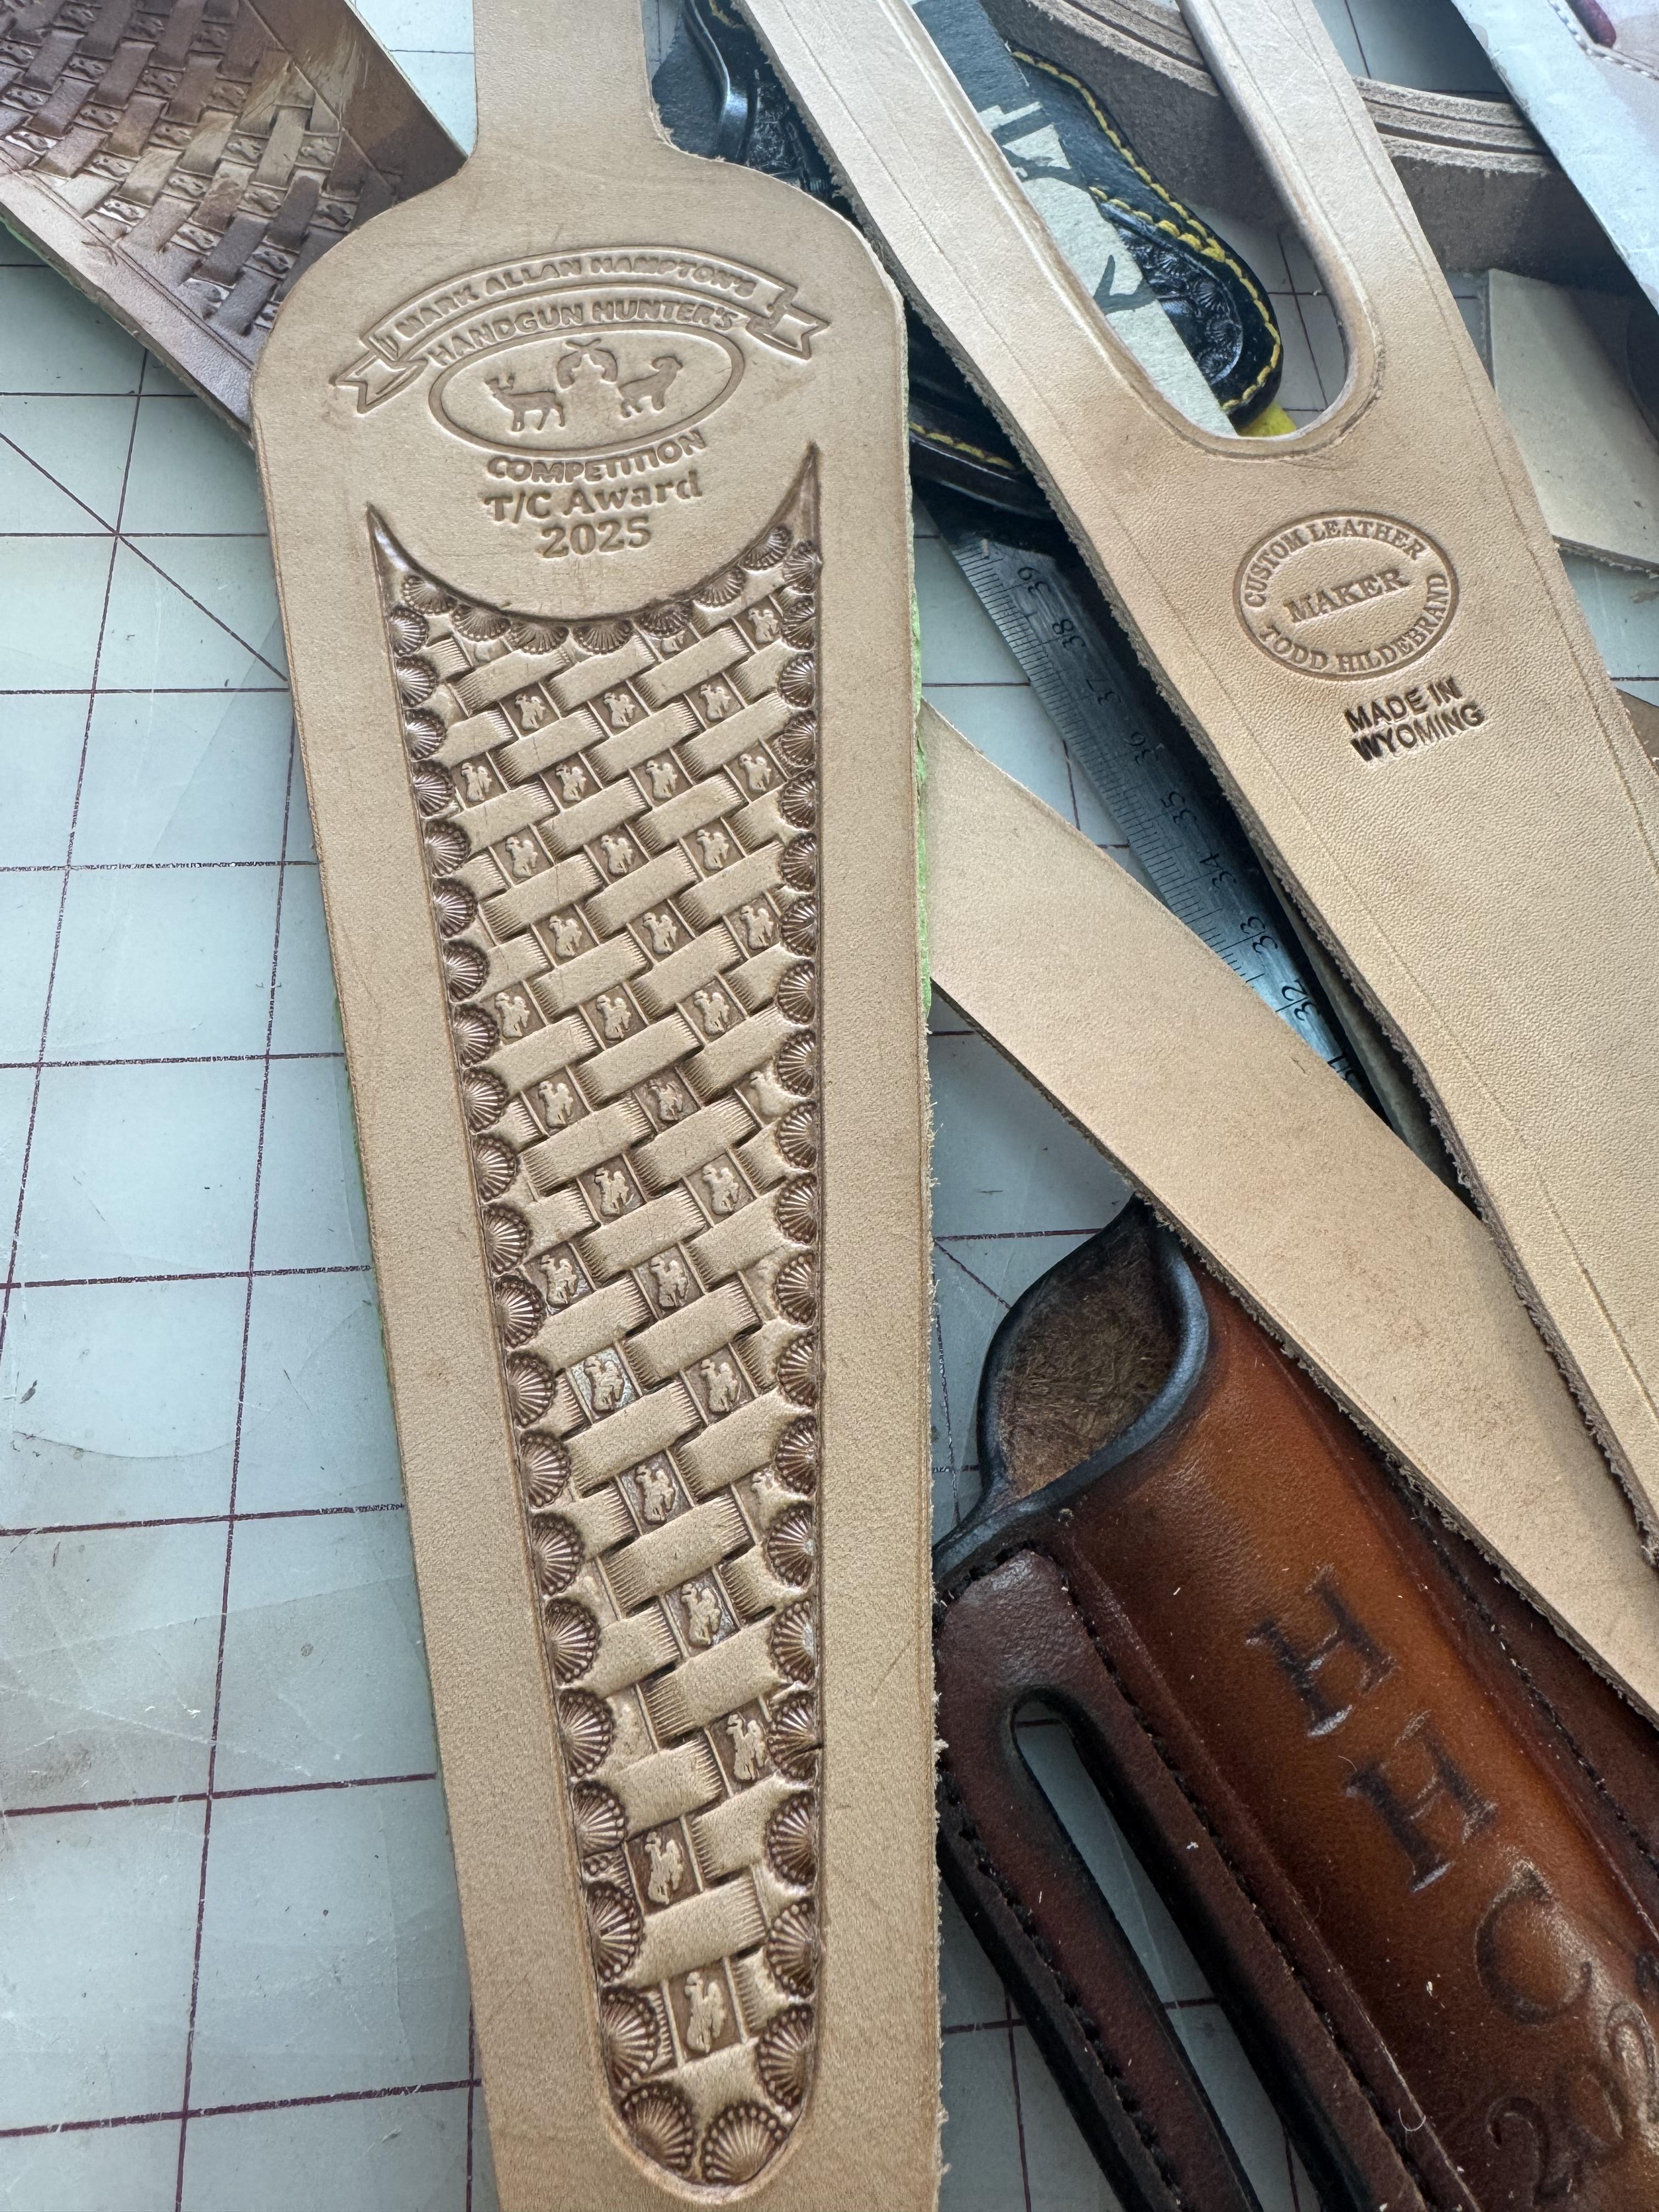
I use 3d Printing to make 1 off stamps. I have been doing some prizes for events and I was able to get the logo from the event and 3d print a stamp to customize the prize. I did not print the makers stamp just the Mark Allen Hampton Stamp on the left. Todd
-

Learning to do Portraits of People
RidgebackCustoms replied to RidgebackCustoms's topic in Figure Carving
It's definitely on my list to integrate into my work, but no pyrography experience on leather. Are you a trial and error guy or do you know any tutorials I should check out? -
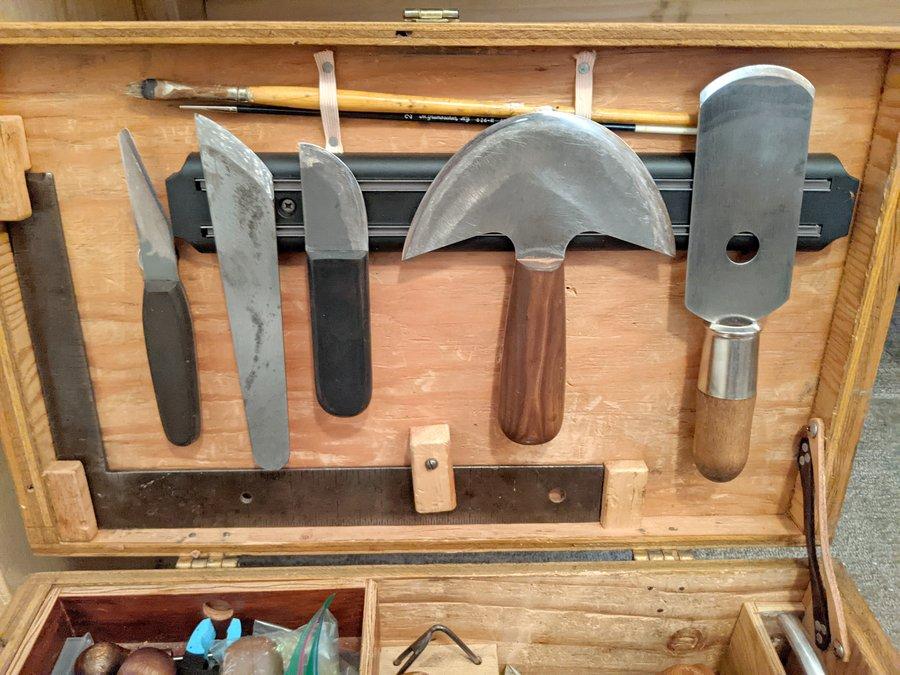
I've made all these from saw blades. I use the one on the right for skiving more than the rest although the two on the left work good, too, depending on the type of skiving I need to do. You can find good Japanese made knives of similar designs on ebay or Amazon that hold an edge well.
-
Hey everyone, I’ve been working on some custom fabrication ideas to make my leather belt projects a bit easier and more repeatable. So far, I’ve used a 3D printer to make edge beveling guides and a punch spacing jig, and I’m thinking of using a laser cutter to create acrylic templates for consistent belt tip shapes and buckle slots. Curious—anyone else using 3D printing or laser cutting to assist with leather belts or other projects? Would love to see how others are blending tech with traditional work!
-

Learning to do Portraits of People
chuck123wapati replied to RidgebackCustoms's topic in Figure Carving
Those are looking good, my friend. I haven't done many human portraits in leather, but I did do my Beagle. I used pyrography and less modeling. But i'll bet they could go well together.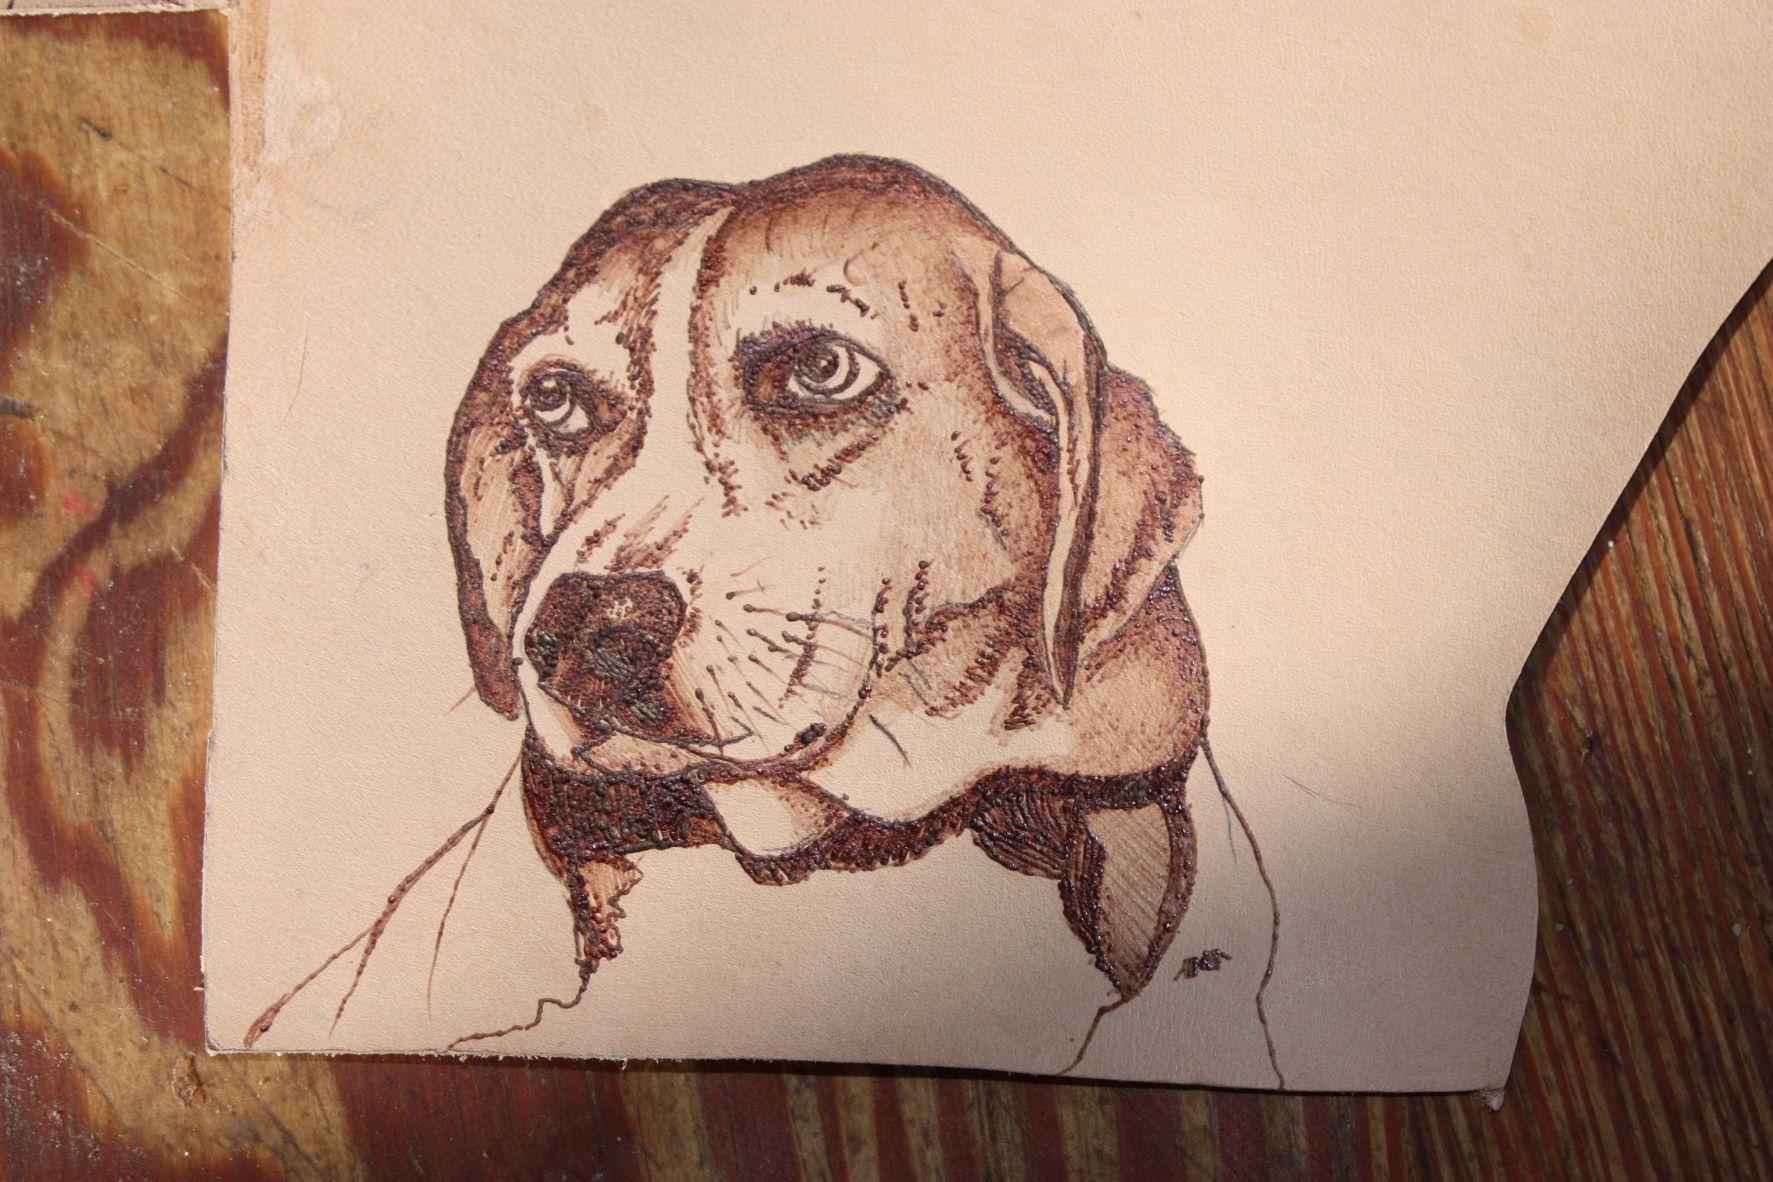
-
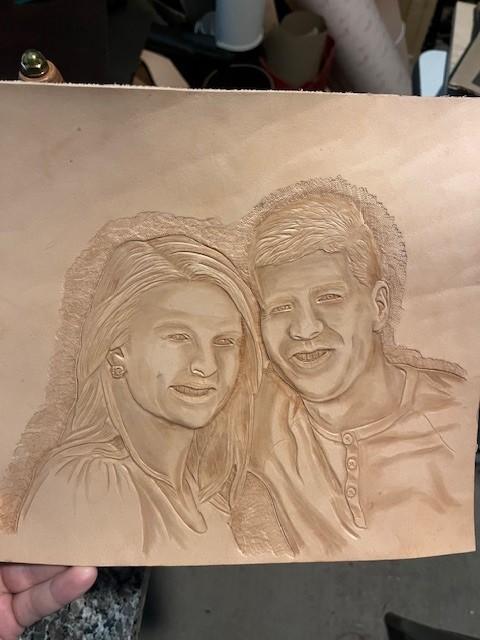
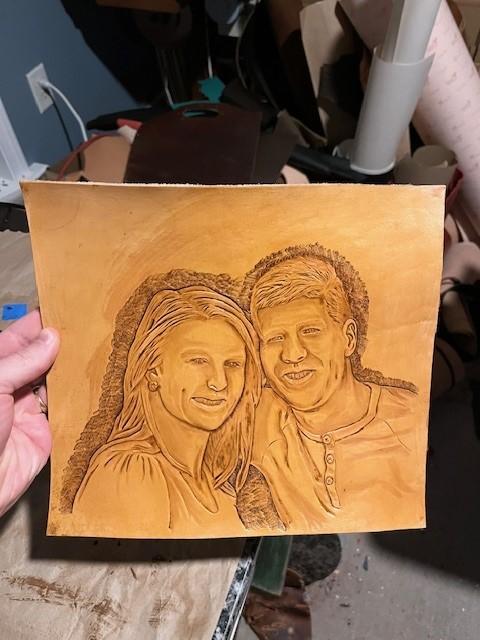
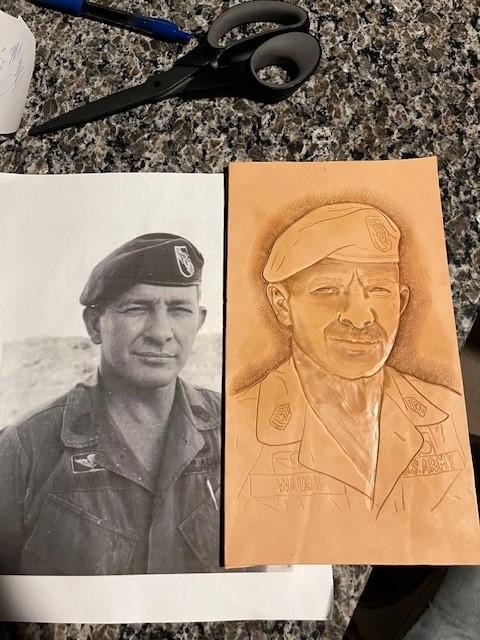
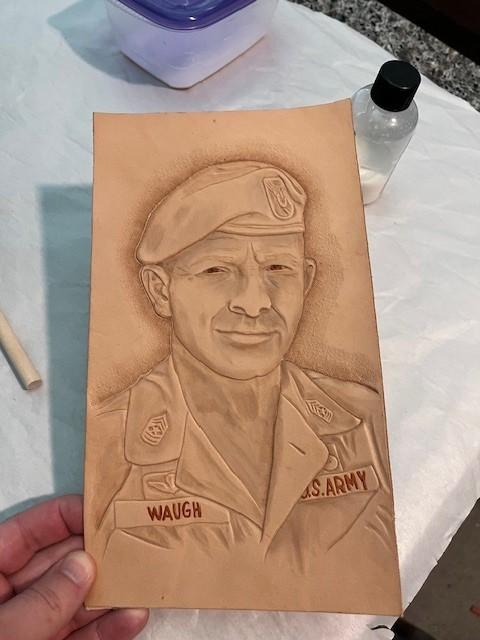
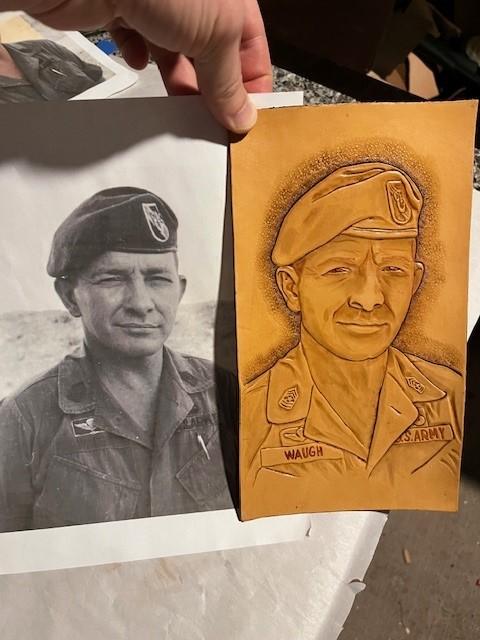
Rather than post a new thread for each project (posted 2 in the show-off thread), figured I'd just start a thread I and others could add to. I'm learning to do portraits. I started down the rabbit hole doing comic book art carvings. I struggled with the faces, so started researching how to do it better and that effort expanded into pursuing realistic portraits. I've really enjoyed the learning process. I'm hoping this thread can turn into lessons learned, progress photos, and a place for others that may be pursuing the same goal to ask questions. My number one tool I've found besides practice is the videos from Elk Track Studios by Annie Libertini. I've downloaded and used those, but was also fortunate to be able to take one of her live classes in 2024 at Sheridan. The first photos here are a self-portrait of me and my wife and a portrait of CSM Billy Waugh. Annie recommends not doing portraits with teeth, as they look weird. After doing the self-portrait, I can confirm. Would definitely recommend not doing toothy smiles. CSM Billy Waugh is an amazing figure in military history. If you don't know who it is and you want to kill > 1 hour of time check out the video. (The video contains a lot of military humor / crass humor, so be forewarned).
-
However, if I have 2 stitch lines of equal length, the same spi and the same strength of thread, they have the same breaking breaking strength. I can see the argument that the saddle stitch might be more durable in the face of 1 broken thread. But 2 seams of the same length, same thread, same SPI and length should be equally strong. I'm not campaigning against the saddle stitch. I just don't see the persistent argument that it's "stronger". I think it's the same.
-
Everyone has a two arm pits . . . as well as a couple of opinions . . . and depending on the circumstances . . . they all stink. But in this debate . . . the saddle stitch will always be the better route . . . simply because even when one thread breaks . . . the other "may" still hold . . . any "non" saddle stitch does not have that backup. If the saddle stitch is done correctly with an overhand knot being tied in every hole . . . it is not only very time consuming . . . but it is also much stronger than any of the others. To say differently is only posting an ugly and stinky opinion . . . because it simply is a statement that does not hold water. Anyone with two pieces of leather . . . some thread . . . and two needles . . . can do the saddle stitch . . . and any or all others . . . and then put them all to a series of beat down tests . . . the saddle stitch will be the last one to give away . . . and that goes double if the thread was both waxed and the overhand knot tied at each stitch hole. May God bless, Dwight
-
I stick a bit of paper masking tape underneath my machine's feet to smooth out the teeth if needed. Most of the time I sew lightweight things and I use a very small walking foot (aound 2x3mm smooth footprint), which I think is intended to sew near zippers or around magnets/buttons.


