

All Activity
- Today
-
Wow! Very nice!
-

How to ease when sewing leather on a 1341?
joetroba replied to joetroba's topic in Leather Sewing Machines
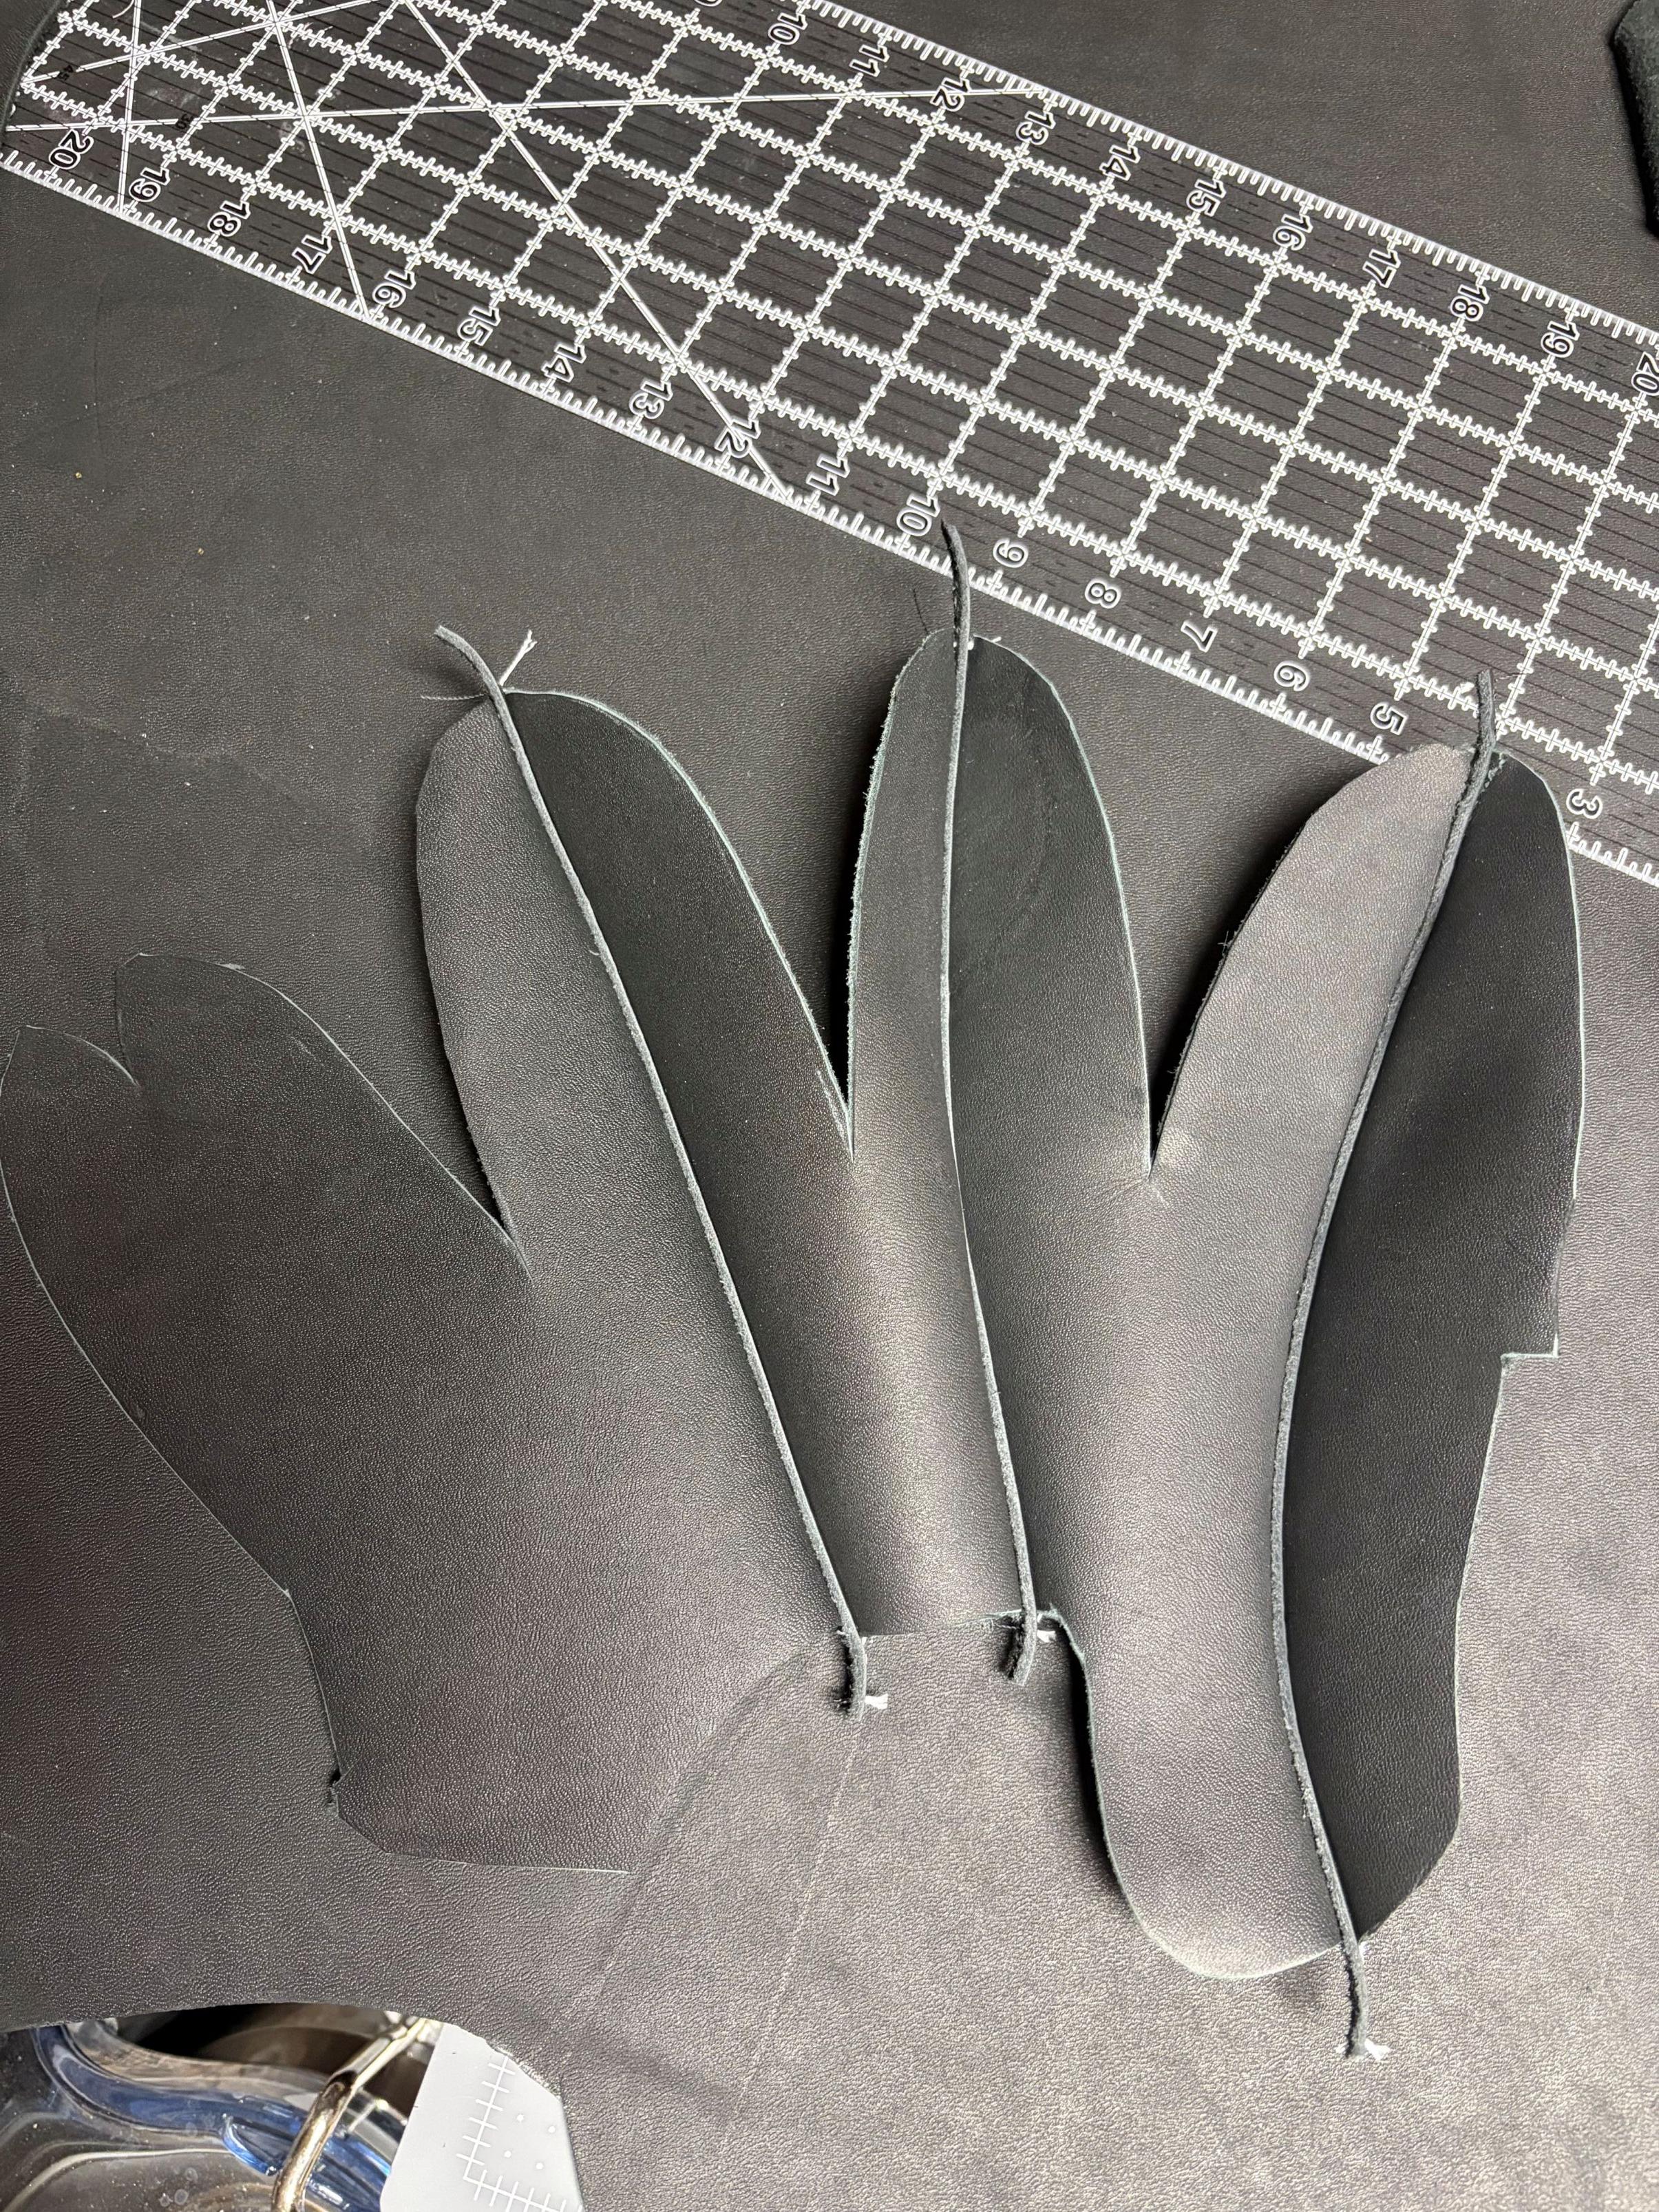
So, after several attempts (and wrestling) I think I have made some decent progress. I think the addition of a bell skiver made a world of difference. The one photo is of the finger backs I sewed. You can see a decent curve on the pinky side. Now I am fighting the thumb pieces, in other photo. That has a much larger curve. Making progress though.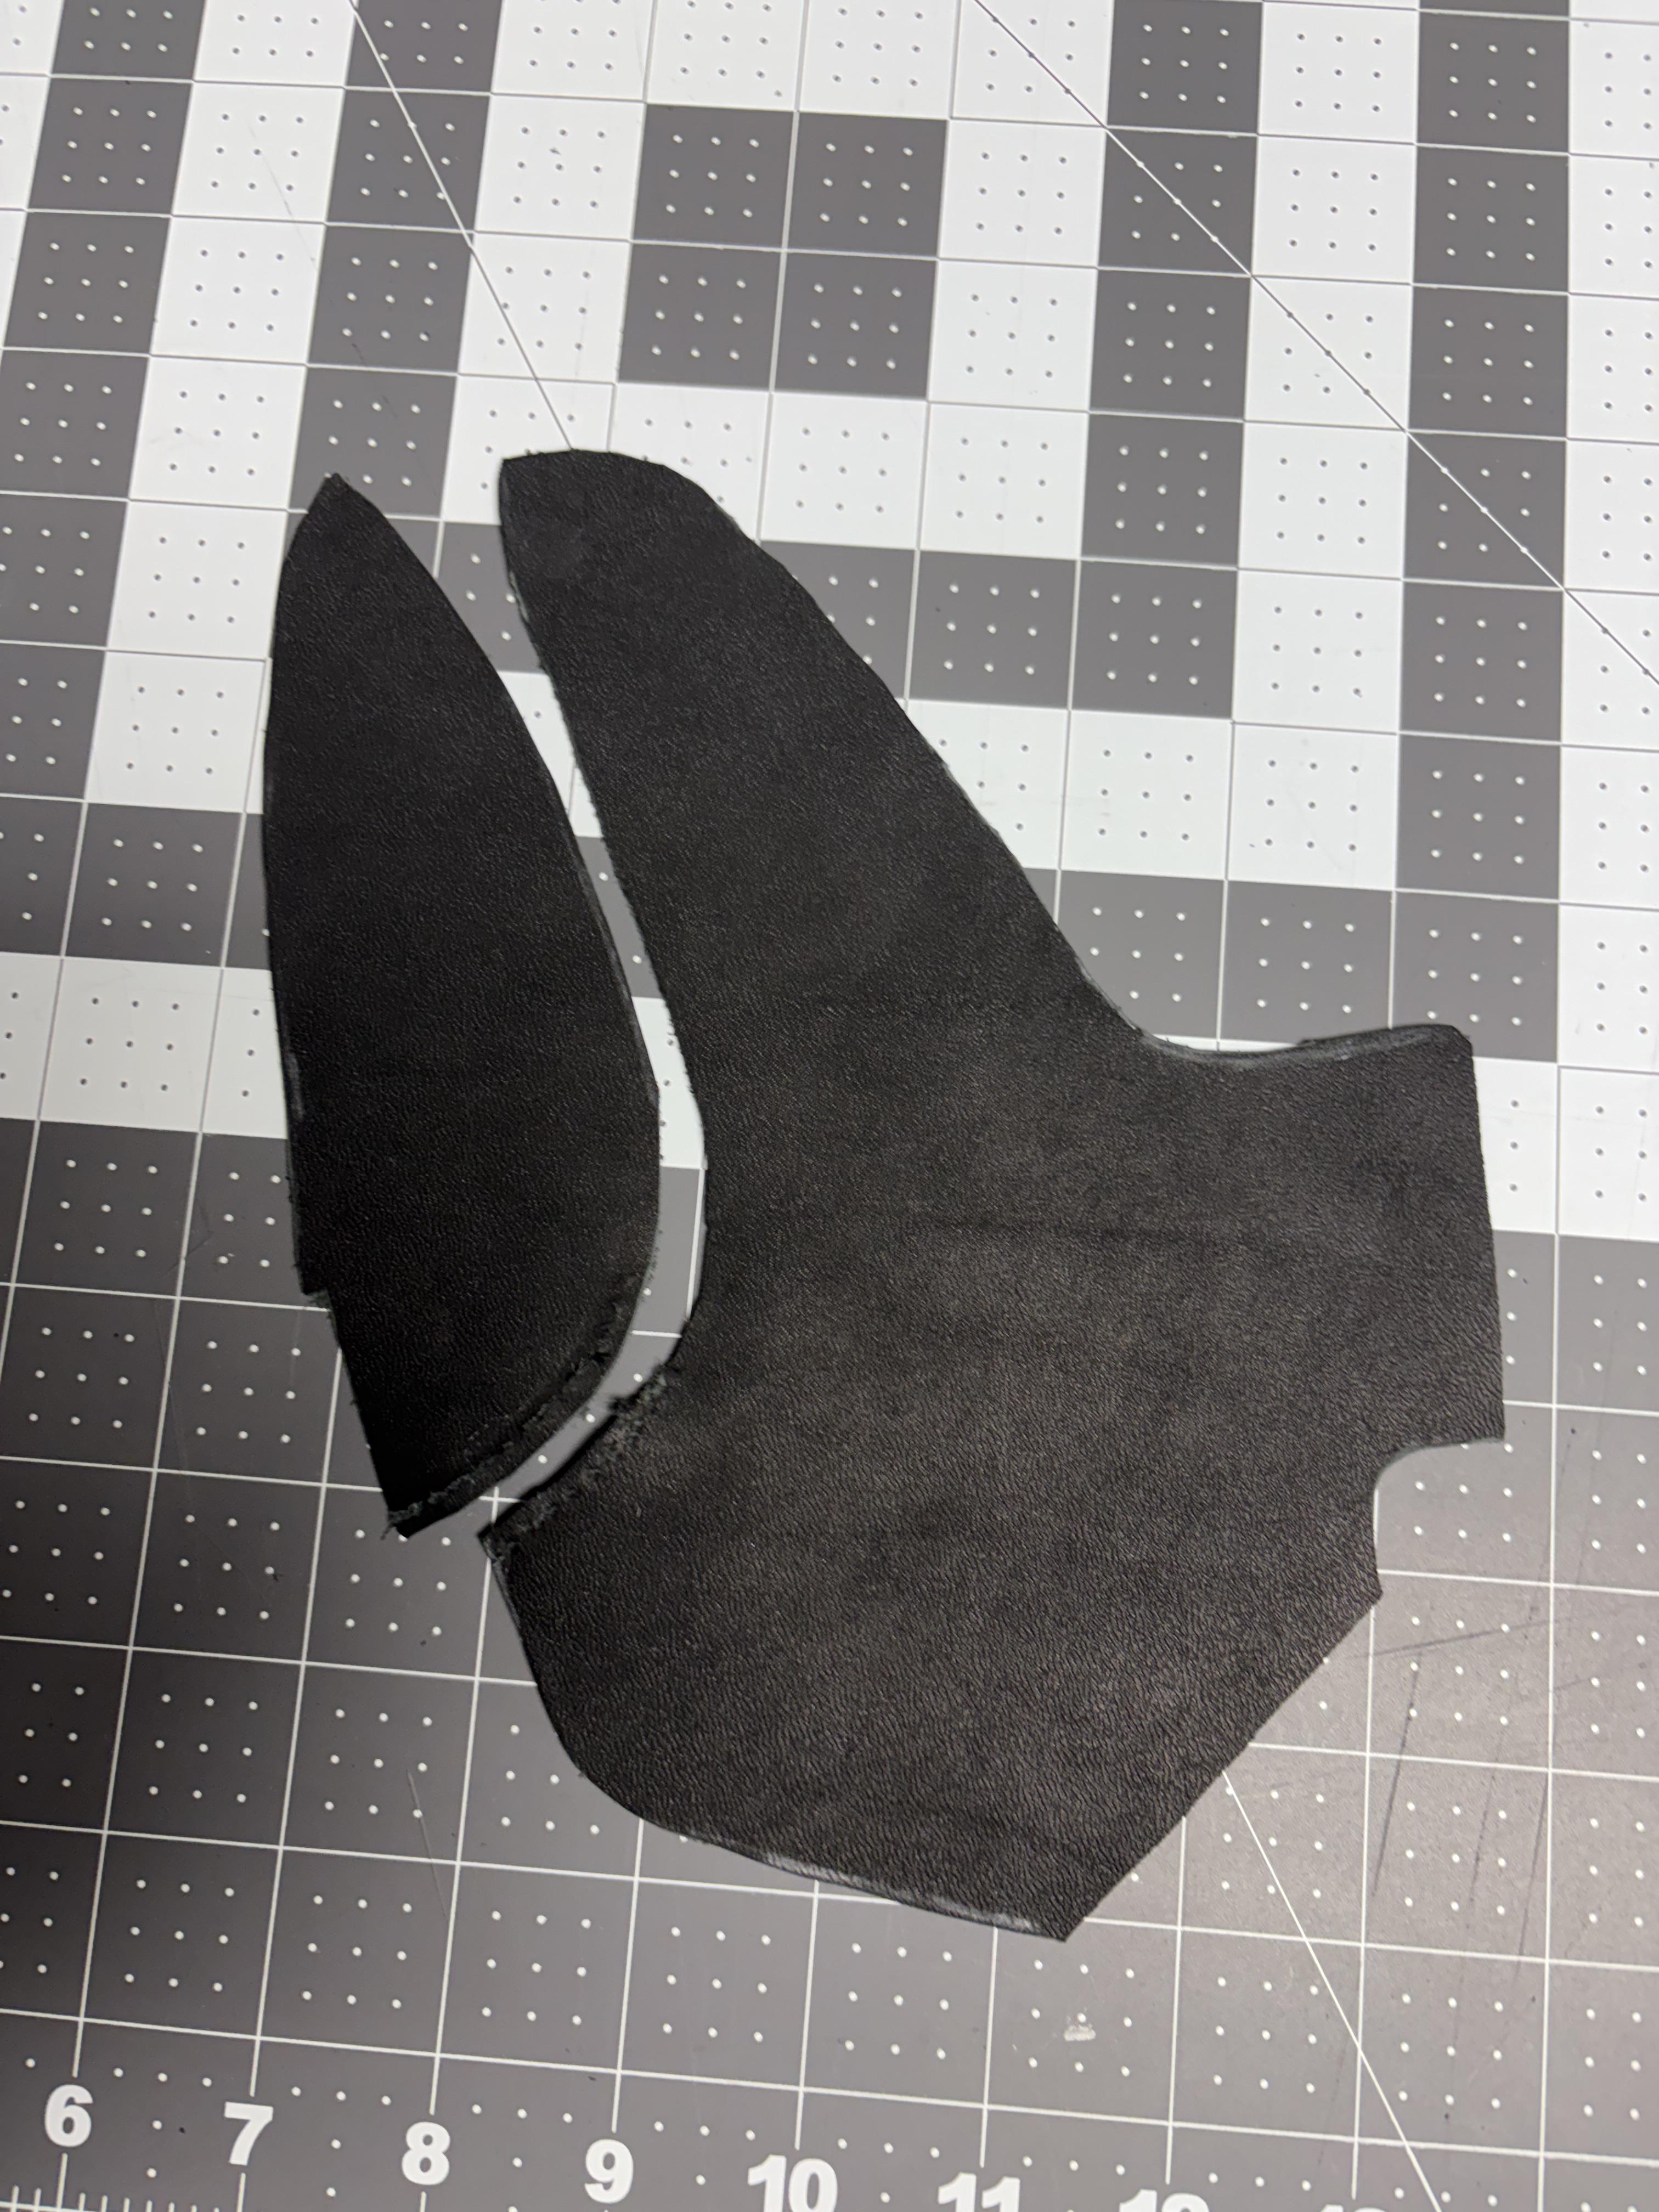
-
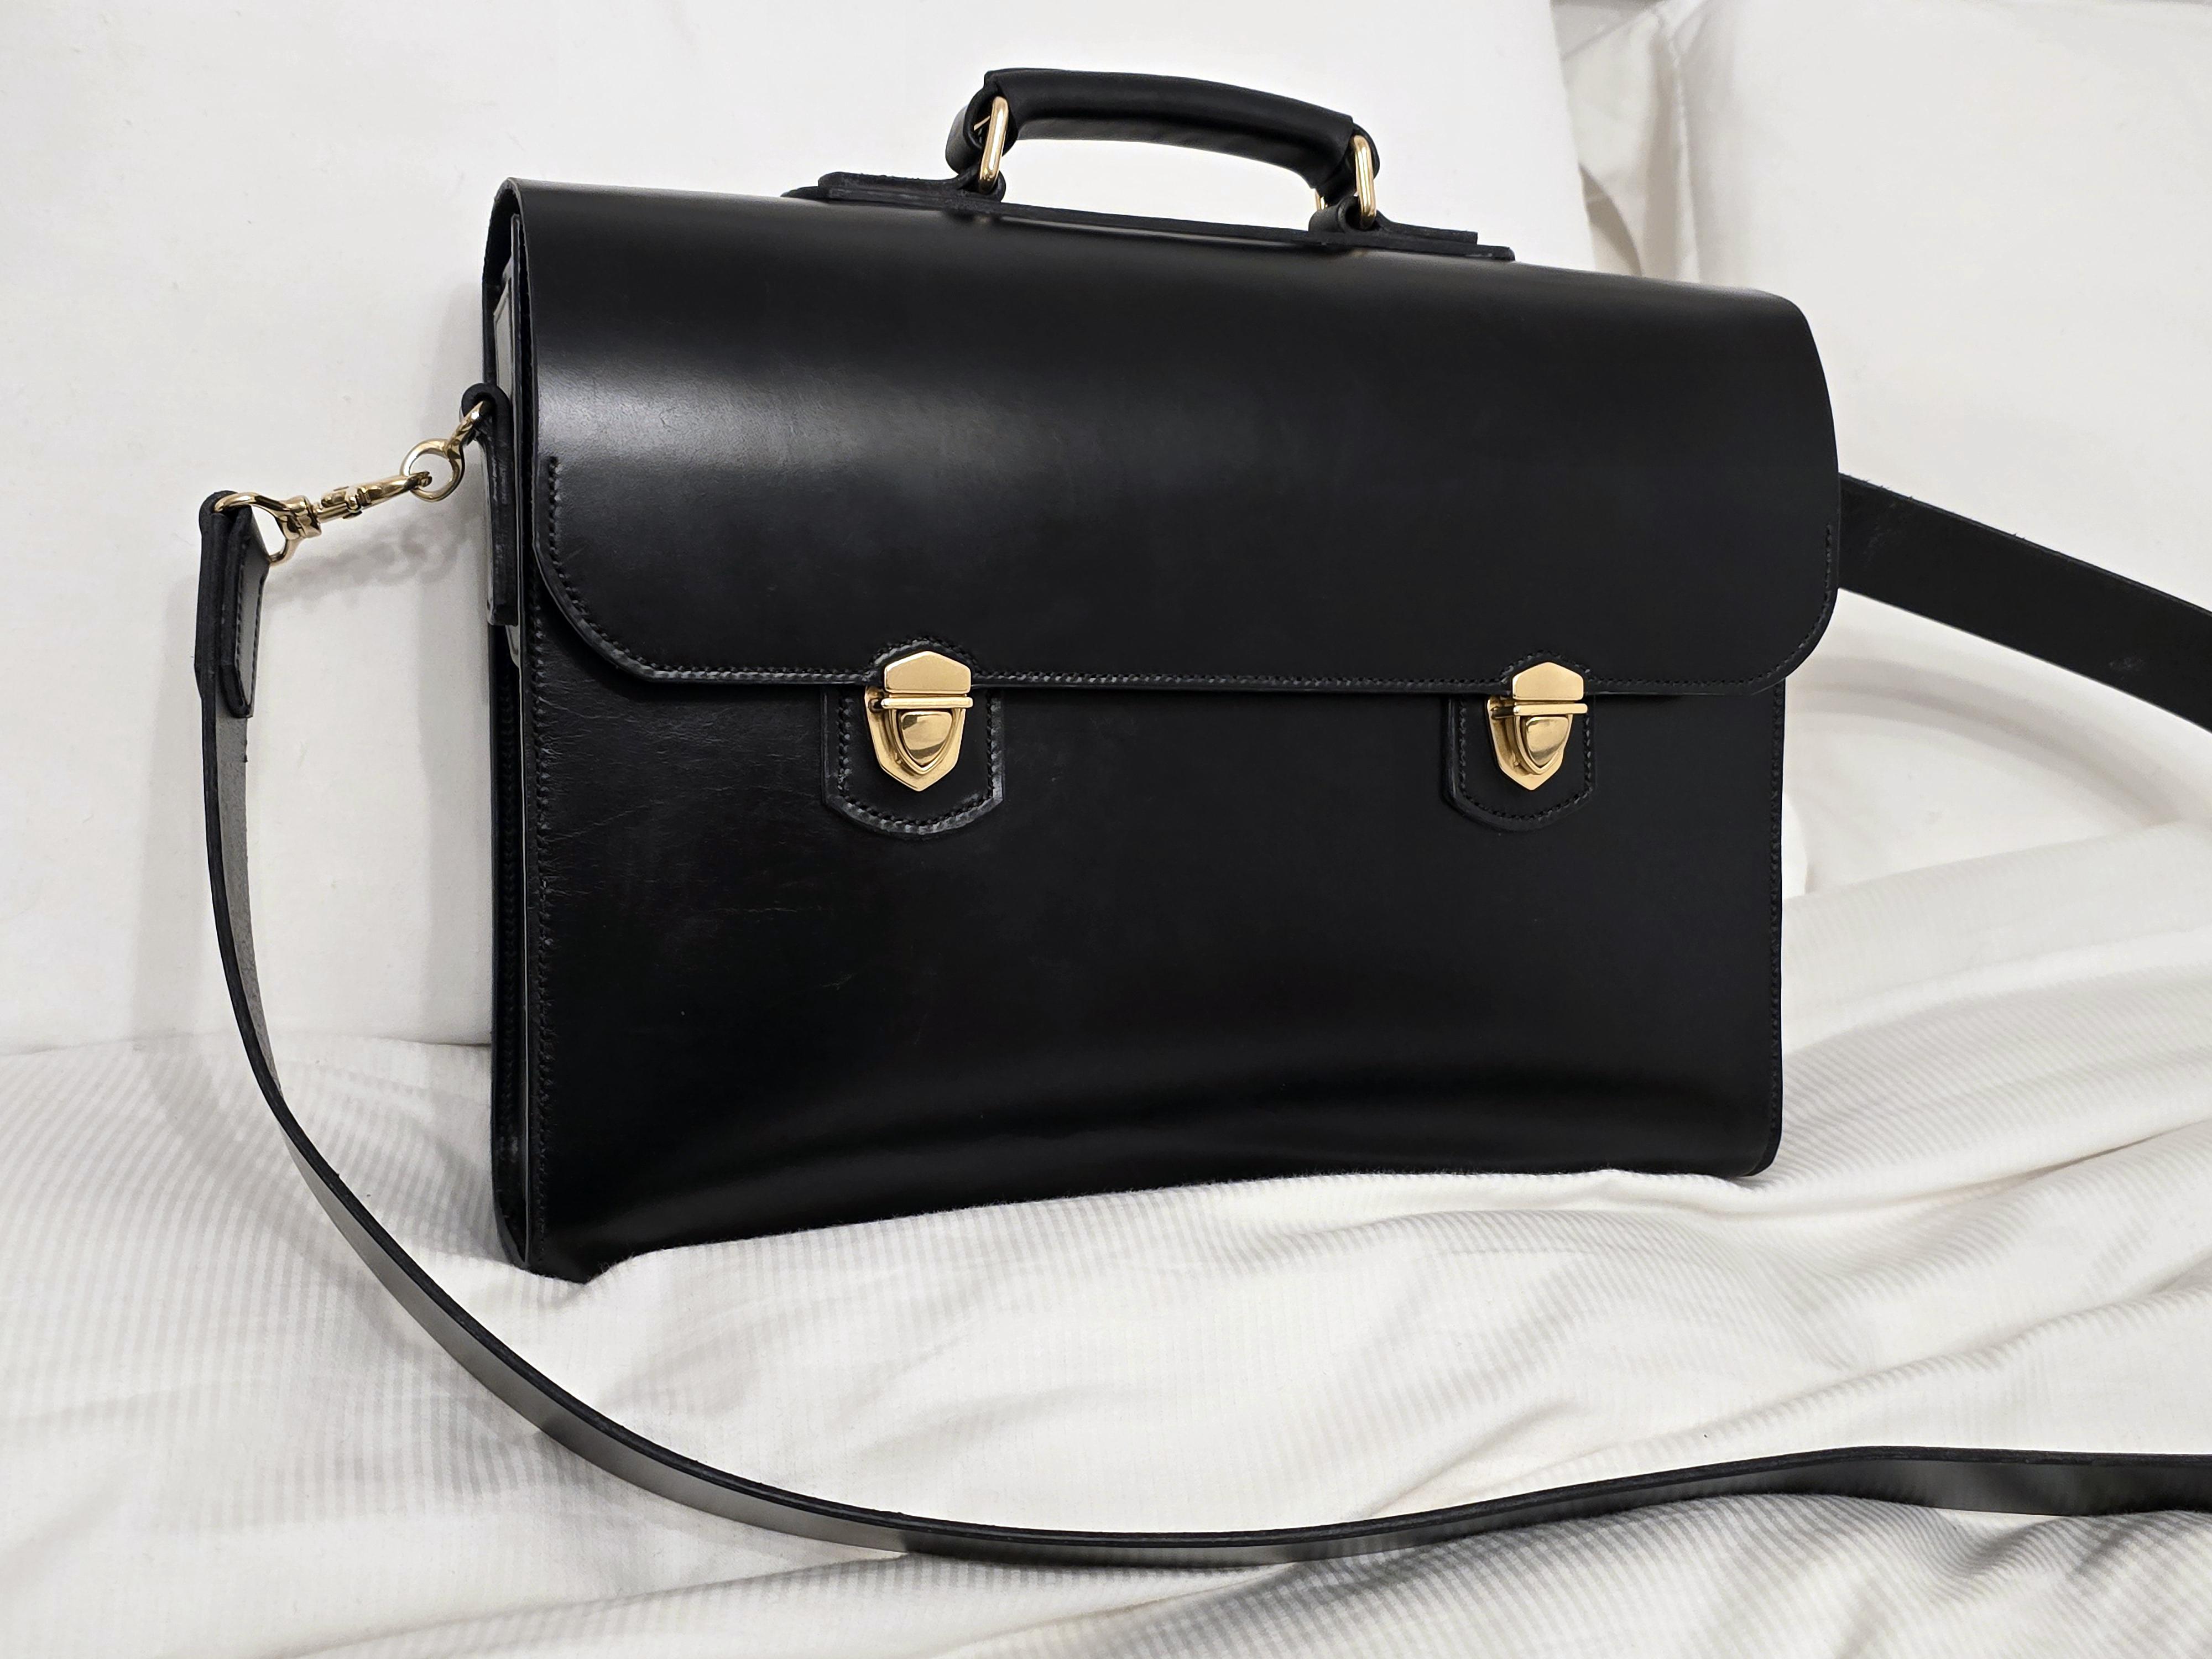
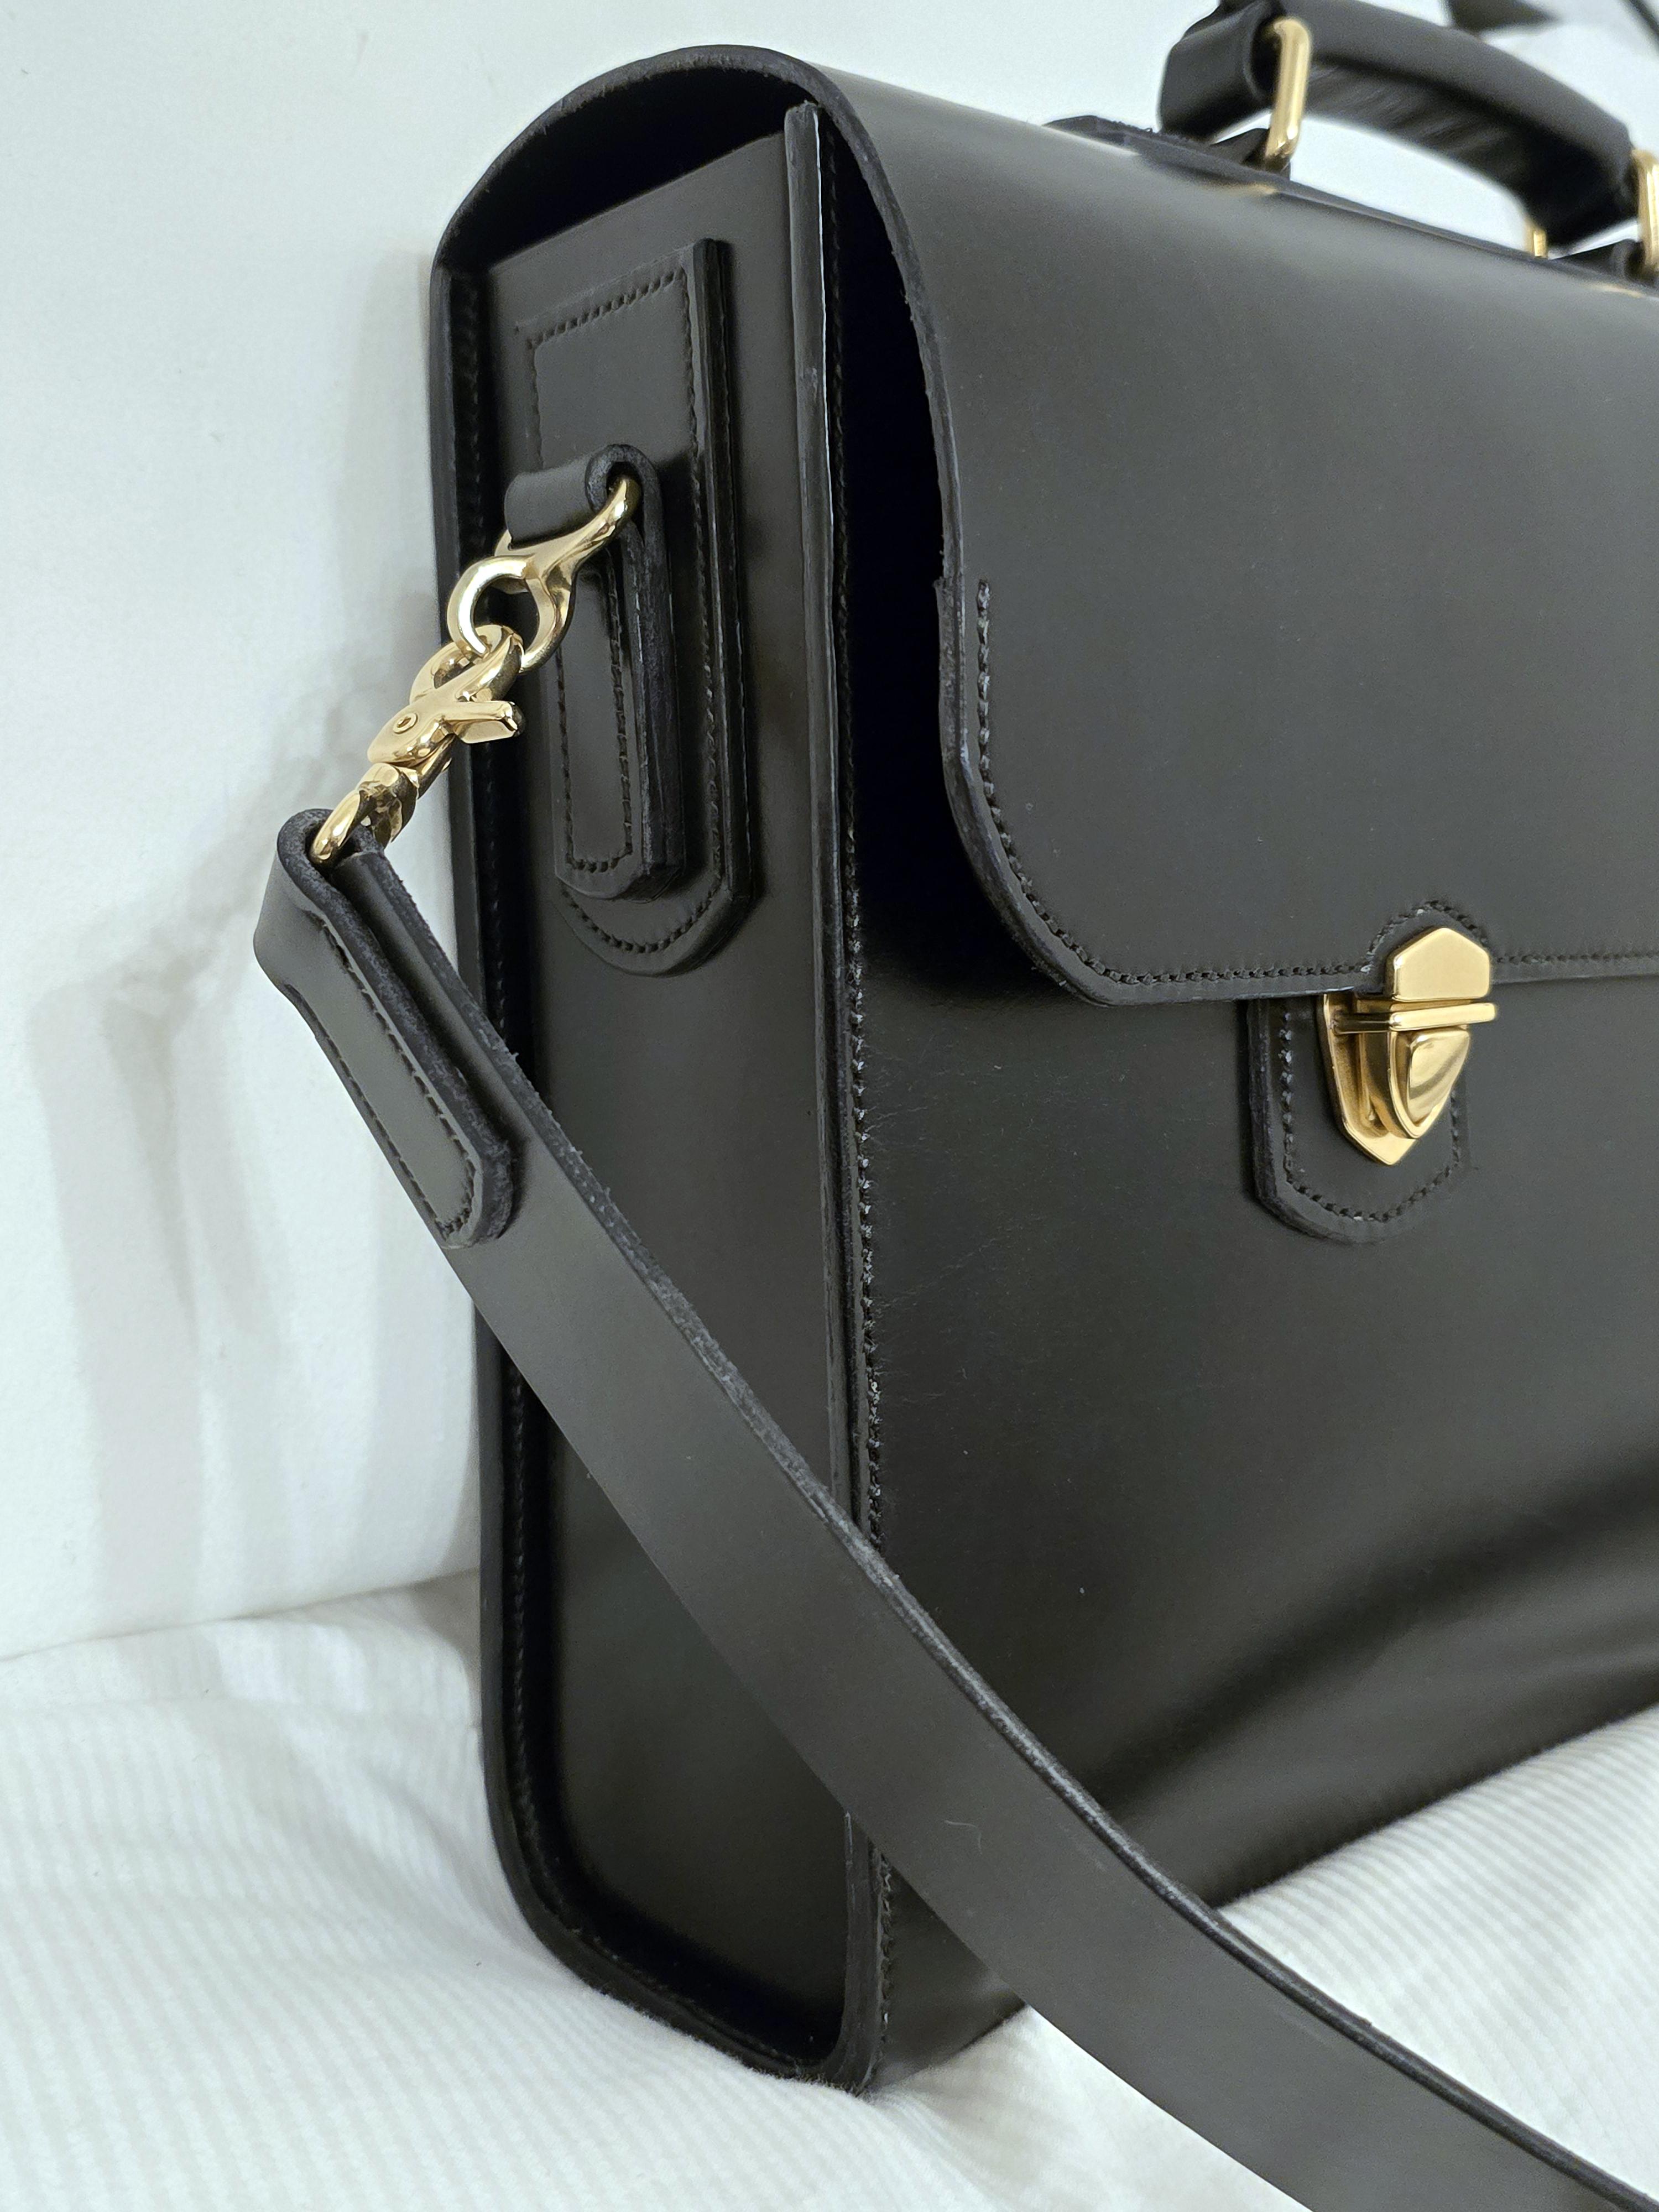
Just 3 layers. The extra layer serves three purposes: I sewed the loops to it, not too worried if the stitching on the back was perfectly straight, then sewed the sub-assembly to the end of the bag. Sewing through only two layers its easy to get the seams straight on both sides. The second purpose is extra rigidity, worth having since I wear such bags cross-body so the strain on those loops is diagonal and the end of the bag could deform. The third purpose is as a spacer to make sure the brass fittings don't rub the edge of the flap. All in all, those extra bits of leather are doing a lot of work. I could probably claim a fourth purpose: Aesthetics, because I really like the look of it, but that's subjective.
-
@chuck123wapati Cinnamon rolls sound delish 😋 Even my dog had a happy Christmas, she got a long rawhide chewy thingy , " hours of fun ",...... it lasted an hour . She also had turkey, ham, potato's etc. I am now sipping on a nice ex$y whisky that i bought for myself, , a rare Christmas treat. Enjoy the Cinnamon rolls 😋 HS
-
Amazing, 12 hrs hand sewing isn't easy, you're a monster. It's really nice!! Did you sew those strap loops through all four layers? They look awesome!!
-
Call it a laptop tote bag . . . one of my next projects. Got a keyboard giving me fits . . . have to get that settled before I do anything else though. It's not exactly the design I will use . . . but thanks AndrewWR for the pictures . . . I'm getting closer to my project with your example. Good job by the way . . . May God bless, Dwight
-
Thanks, Bruce, and Merry Christmas!! Edgers are underrated and the differences somewhat confusing, but a nicely finished edge makes a project look far better and much more professional IMO. I edge, depending on the design of the project, and put as much thought into them as other parts of the work. I think of them as part of the overall design, and also how life will react to the edge, belt loops for example. An edge for lace work is another example; the shape of the leather edge underneath the lace will dictate the overall shape of the lace braid.
-
 Hassan Vahed joined the community
 -
Edge beveling seems to be an under addressed area for the rookie leather crafter. I would have liked to run into this rule of thumb early on, to start with a third to half the thickness of my leather and adjust to taste. Such a bewildering array of expensive bevelers to choose from in the market, I've just stuck with the small one that came in my original tool set. Thanks for this post.
-
Another one of those projects I wish I had an excuse to build. Well planned and nicely executed.
-
 banksia joined the community
 -
Seeking a U.S. maker who does true round/rig-plait braided leather belts (3-D, not flat), ~1.5″ wide, cowhide, braid-through buckle — recommendations?
-
Mike, Thanks for catching that! Yes, 3/64 inch edger and I went back corrected that. Merry Christmas to you and yours!
-
If you're looking for proper leather then I have to point out that a cow is only so long so yardage might be problematical. However, sites like Temu or Ali Express might sell rolls of what they call leather or faux leather. Might be cheaper than Ebay or Amazon. Be aware that some might be pre-folded to give a clean edge.
-
Bruce, for 8 oz. do you mean 3/32" or 3/64"? Merry Christmas! Mike
- Yesterday
-
OK, so I started a few days ago with pre-cutting and wet moulding a couple of pieces but the build of this bag started this morning about 8ish (its December 25th). A bit over 12 hours work later and... I figure there is still some burnishing to do when I get some daylight but I'm pretty happy with the outcome and it sure as heck beats the traditional activity of trying to set a new personal best for carbs consumption. I couldn't get a photo of the inside because it just looked like a black hole but it's a single compartment in unlined bridle hide. The style is very much like an offering on Tool & Hide's website (Canadian bag maker) but a bit bigger (250mm x 360mm x 100mm vs 230mm x 330mm x80mm). The hardware is obviously solid brass and the stitching is all by hand. Wishing you all the very best for what's left of the holidays and a happy an d healthy new year.
-
 DarbukaDave joined the community
 -
Merry Christmas to all the fellow leather workers here!😃
-
 TLepik joined the community
 -

When u design a new holster pattern
Dwight replied to rccolt45's topic in Gun Holsters, Rifle Slings and Knife Sheathes
I use either marine grade vinyl ( about 25 bucks for a piece that is 36 x 48 . . . OR . . . I use yellow manila folder stock. The vinyl gives me a really good shot at what I need . . . and is best for some unique do dad . . . but in the end I use the cut piece of leather to mark out and cut the pattern on manila folder stock for future reference. I always make the first cut 1/2 inch wide in all directions . . . and trim as needed. It is very seldom that 1/2 inch margin doesn't do the trick. May God bless, Dwight -
 Just Deb joined the community
 -
I am looking for thin leather 1/2” - 1” for making my own leather piping. I am looking to purchase it by the roll. I know I can purchase straps, very thin but I am looking for yardage. Any help will be appreciated.
-
Good information Bruce. I knew size numbers varied by mfr, but didn't know where was a method behind their madness.
-

When u design a new holster pattern
AlZilla replied to rccolt45's topic in Gun Holsters, Rifle Slings and Knife Sheathes
I like 1/8th" craft foam. It's about the thickness of 8 ounce leather and gives me a good idea how things are going to align and fit together. I don't sew anything or make a full prototype. Once I get it satisfactory, I have a craft foam pattern. -
 Except I go for it all the way, tooling and finishing to boot, if it's good first time around that a win, if it's not then it's a lot of good practice for the whole project. I usuallypractice my tooling and finishing a couple of times on scrap beforehand to help make that good first try.
 -
.thumb.jpg.327685d8c1787fa894323fed9a6b2dac.jpg)
Happy Christmas 2025
DoubleKCustomLeathercraft replied to Handstitched's topic in All About Us and Off Topic
Merry Christmas to you and yours, and everyone here. -
Merry Christmas to all! Even that chick in Canada!
-
The whole topic of edgers came up in an email yesterday. I made the reply that edgers could be an hour long topic in a class (easily). I did a thumbnail reply in another thread about types of edgers. Besides type, the other common question with edgers is "What size?" Here is my take. There are no standards for the number sizing for edgers between makers. One makers #2 may be different than another maker's #2. Even among a single maker the measured size/number may vary between styles of edgers. Historically the Gomph, HF Osborne, and vintage CS Osborne edgers were all 1/16 inch of cut per size number. For example the #1 was 1/16" of cut, the #3 was 3/16 inch of cut. Somewhere along the line, the sizes changed and a #3 now from a maker might be 3 mm, 1/16 inch, or some other measurement. The key is to know the maker edger style and then the actual cut measurement. What size of cut edger do you need? Everybody has a preference but here is mine. For most work like flat goods, belts, etc. I want my edger to have a cut width around 1/3 the thickness of the leather for edging top and bottom. For a 12 ounce piece (3/16 inch) I grab a 1/16 inch edger. For an 8 ounce piece (8/64") then I go with something like 3/64 inch of cut. These widths do two things - 1) they don't get into my stitch line on edges and 2) they round off the square edges and leave about half the edge of the piece square. By the time you rub that edge it will compress and shape some and that 1/2 thickness remaining square rounds over more. I like that look and feel for most work. If you want a heavier rounded edge for some applications (saddle horn or skirts) then choose an edger around half the thickness of the leather.
-
It was very handy to be able to adjust it in increments. I had been breaking needles attempting to stitch through a 1/2" (12mm) stack of vinyl and foam (auto upholstery project). So I disconnected the belt and ran a few stitches by hand on a thick test piece and it wasn't very many stitches by hand before the hook point tried to bisect the needle. Ah-ha! After that discovered the needle guard adjustment screw, put some medium strength thread-locker on it, and backed the set screw out until the needle guard mostly prevented contrived collisions of the same sort. Then put it back together and stitched that troublesome seam in one pass (relief!). Not seeing any skipped stitches or unraveled thread yet (If I did I would think I had gone too far with the adjustment.)
-

When u design a new holster pattern
Thadrick replied to rccolt45's topic in Gun Holsters, Rifle Slings and Knife Sheathes
I use the leather I would normally use but I don't spend any time with carving it. A holster uses very little leather, maybe $30? If it's a failure, I throw it away and if it's good to go then I have a knock around holster for camping and such.

.thumb.jpg.4ed1dbae8dada980d06392d599329b6e.jpg)


