All Activity
- Today
-
Sorry, friend. Hope you're finding ways to live a happy life. Best wishes.
-
 A couple years ago I made a leather tote bag for a friend with some chrome tan leather in a beautiful shade of blue. Somehow a water bottle dumped a liter of water into the bag, soaked it, and when finally discovered, the lower left quarter of the bag was dried out hard as a rock. Unfortunately I don't have that blue anymore, so I can't rebuild the panels. So I have been trying to bring it back to life with conditioner. Someone recommended not using neatsfoot oil, fearing it would darken the leather, instead suggesting a product called "Leather Honey." So I bought a bottle of that. First attempt I just applied from the grain side and tried to rub it in. Achieved nothing after multiple coats. Next I was suggested to soak the bag in some warm water to re-loosen the leather fibers, then reapply. I did this, applied more coats, and still little/no improvement. I also tried warming the leather with a hair dryer as I rubbed in the conditioner. Also pointless. So I bit the bullet and tore into the liner, flipped the bag inside out, so that I could apply directly to the flesh side. So last weekend I rubbed quite a bit into the flesh side and let it sit for the week. I came back to the workshop this weekend, and there is little trace of the conditioner and I can't say that I notice a ton of difference in the "(not) suppleness" of the leather. So, enough asking AI and getting nowhere. I recovered my old password to leatherworker and though to ask real Flesh and Blood for advice on where to go from here. The leather is roughly 1.8mm thick (just under a 1/16").
 -
 You don't mention if you looked at the check spring, suggested earlier. Here's a recent treatise on all things Check Spring from Wizcrafts. Proper check spring function is critical:
 -
 A skipped stitch is a full miss. Guess what a half miss is......it's frayed thread. If the needle is too far away from the hook on that particular stitch, it will skip. If it's not quite that far away, the hook point will attempt to bisect the thread, resulting in a fray. Sometimes frays correct themselves (as is the case with UNbonded thread if the hook point gracefully catches one or two strands but not all three). Other times one or more strands break and you are left with a mess. Once you've tilted the head back and watched some skipped stitches (or frayed stitches) happen in slow motion, you will understand more of what's happening. And with thick material, the needle doesn't come down in the same place every time. The best defense against this phenomenon is to stuff the hook.
 -

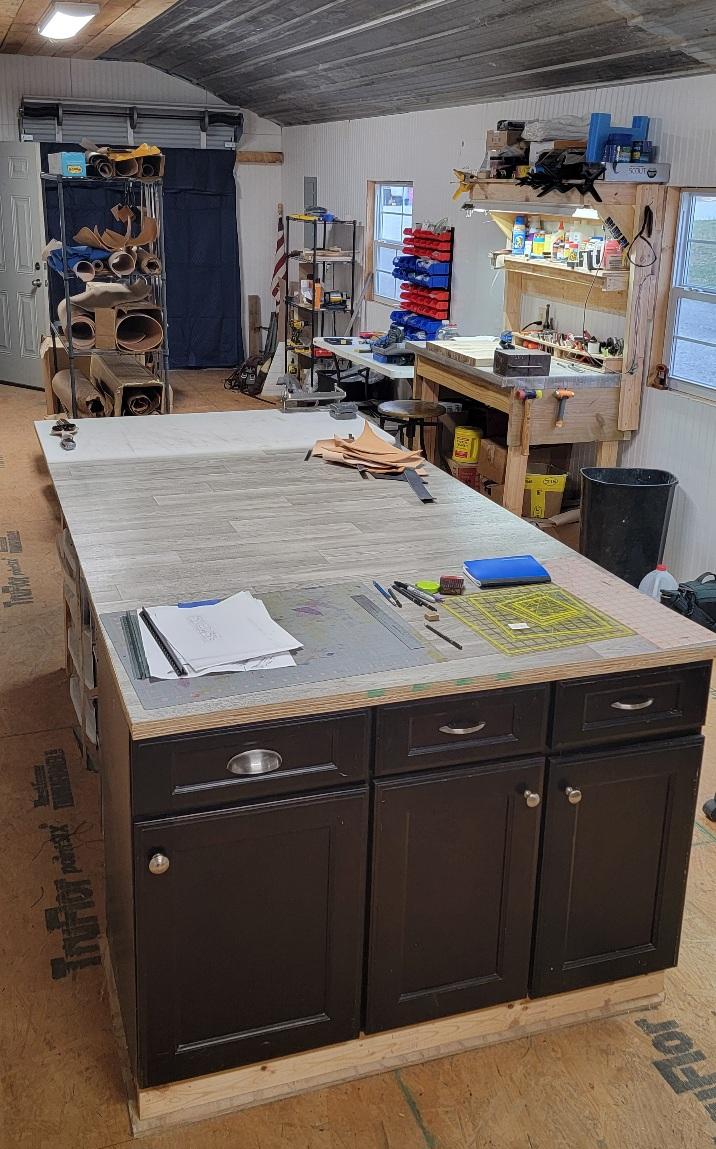
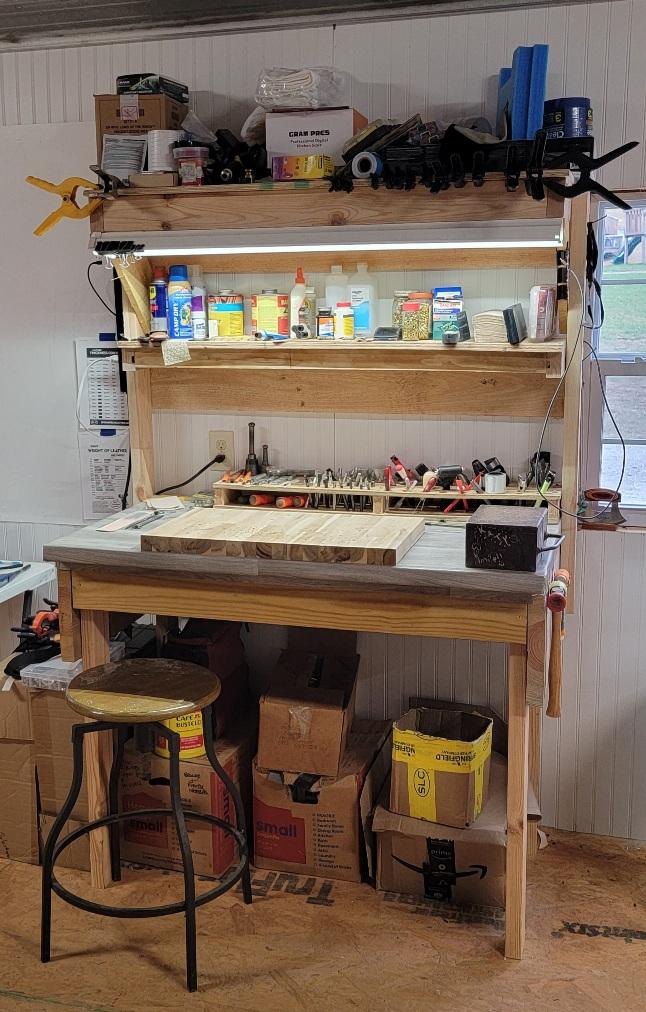
Setting up & organizing the work bench
BlackDragon replied to cspeedyrun's topic in Leatherwork Conversation
It's really going to depend on what you do the most. If you do a lot of tooling then your stamps and mauls should be easiest to access on your bench. I use drawers for storing supplies and things I don't often use. I have stations. I have a dedicated tooling bench where I do tooling and the occasional hand stitching. I have a large station where I can roll out a side to cut. My knives are usually sitting on my cutting board. I do most of my layouts and design work on here as well. I have a hardware area where I do things like rivets and anything that requires a little more aggressive work. I also have a dye area where I do any wet work.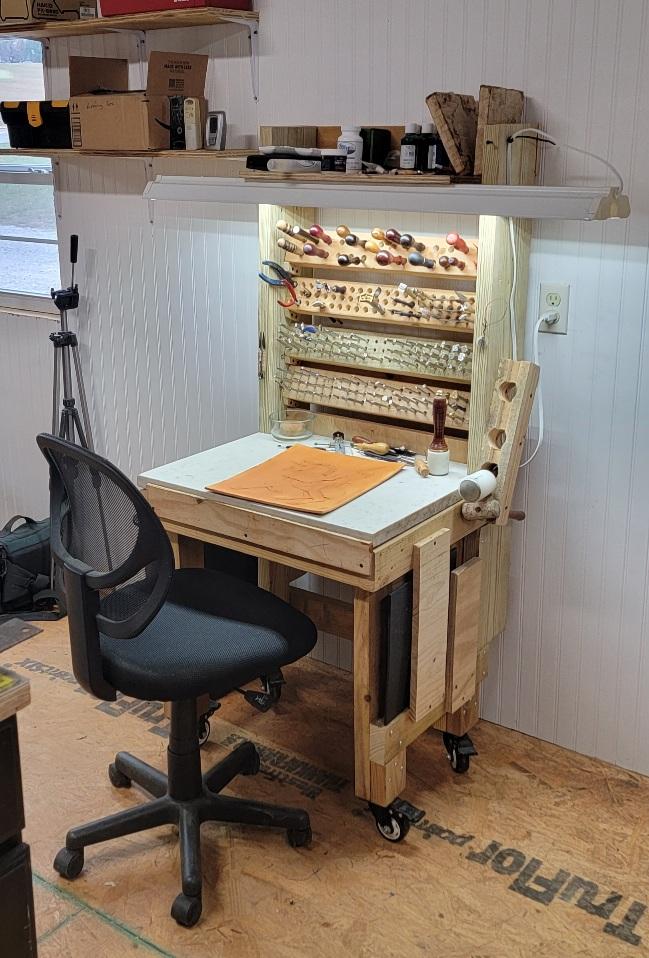
-
 Update...Okay, I ordered Amann TEX 90 Outdoor Pro Polyester Bonded thread and pre-wound bobbins from Wawak. Also, I ordered Schmetz Leather Needles: 135x16x20, 135x16x21, & 135x16x22. I threaded the machine and tried out all the needle sizes. The result was frayed polyester thread on top near the last thread guide and the needle. The poly snapped several times as well. Tension could have been too tight...or it could have been a burr...or a combination of them both??? Played with different tensions for about 2.5 hours. Never could get it right. Became super frustrated, put back on the 69# Nylon and tested with various needles (the leather needles as well as my existing 135x17 in size 18, 20, & 22). Eventually, the 135x17x18 worked best. It might be working better than before. The topstitching isn't skipping stitches like before. So, any idea on why my machine hates Poly?
 -
Bob, the owner Toledo Industrial Sewing Machine, now goes by CowboyBob, not sewmun. Sorry for the blunder.
-
 Thank you, I’ve been trying to step my game up on finishing techniques, but I need to learn more about this filler that you speak of. Always great to hear from pros (not knocking any amateur in the slightest, but when someone’s livelihood is dependent on the quality of their work…). AZR
 -

Can a worn case/hook prevent adjustment of case opener lever.
beefy replied to beefy's topic in Leather Sewing Machines
Yeah, I'm trying to get at my sewing machines but a few other tasks are ahead. Apart from that, excess heat is my problem here in Australia LOL. Would a 5Kw Chinese diesel heater be big enough to heat your craft area. I love those little toys. Want to put one in my boat when I make the fabric cabin so I can go out in freezing winter and be toasty warm. -
Thanks, wasn’t quite sure.
- Yesterday
-

Equipe saddle, repair of worn saddle flap
Scoutmom replied to Mulesaw's topic in Saddle Identification, Restoration & Repair
nice -
I don't know of any other than what I could find via search engine. This search turned up a lot of places claiming to sell used industrial sewing machines. You'd have to do your usual due diligence when dealing with unknown sellers on the internet, of course. https://duckduckgo.com/?q=industrial+sewing+machine+dealer+used&t=brave&ia=web I would say that anybody who advertises here should be above average. Boss Lady is pretty picky about who she lets on board. The owner of Techsew USA is a long time member here (TechsewRon) and seems to be very helpful. I don't know if they sell used machines but it might be worth reaching out. Sorry I can't be more help.
-
 VickeryLeather joined the community
 -
 mcleandesign joined the community
 -
Well, that's probably the best way then, until we see if if defaults can be changed for new users.
-

Setting up & organizing the work bench
DieselTech replied to cspeedyrun's topic in Leatherwork Conversation
I found it easier & more efficient for me, to have my most used tools hanging on a tool board or in tool holders/racks on the back side of the bench. I keep the stuff i use the least amount in the drawers. -
 DelRock83 joined the community
 -
Or send the new user a DM after we reply to their new topic. (New users do get email notifications for direct messages.)
-

New to the forum and wanted to introduce myself
rleather replied to Second_Chance_Leather's topic in Member Gallery
You are right about needing a plan to keep you going thru retirement. You need to stay mentally and physically sharp. If you plan on sticking with leather work, think about trying out a local market to get your feet wet and then move on to craft shows, if it floats your boat. Please keep us up to date on your journey. Welcome to the forum , we are glad you are here! -
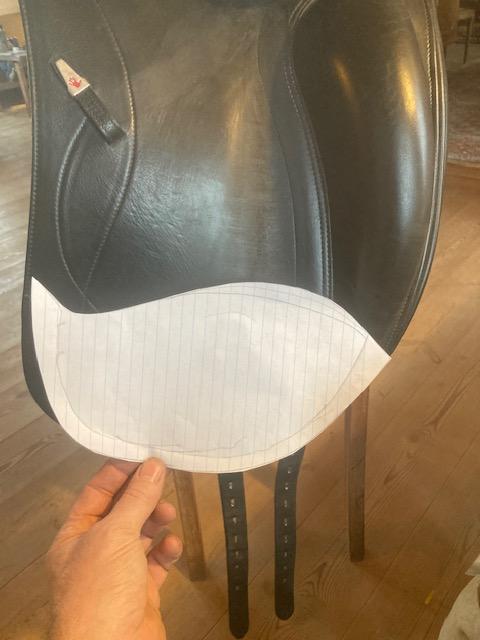
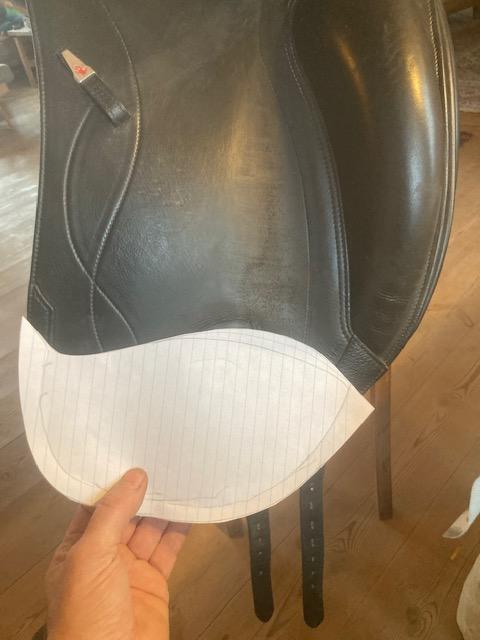
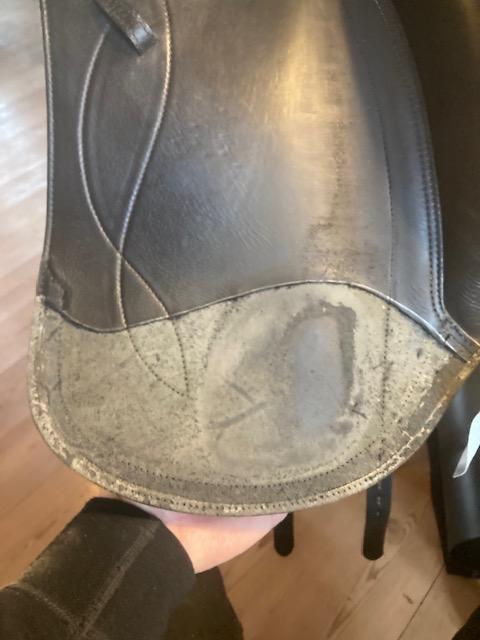
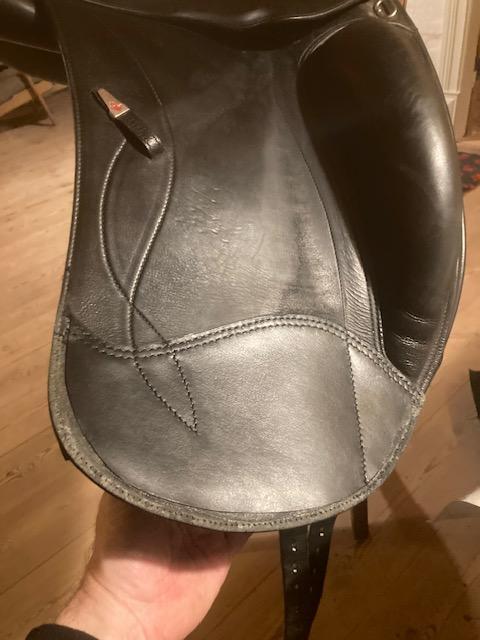
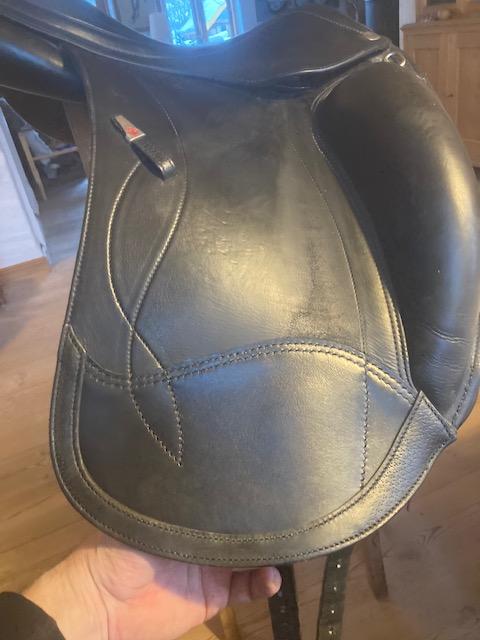
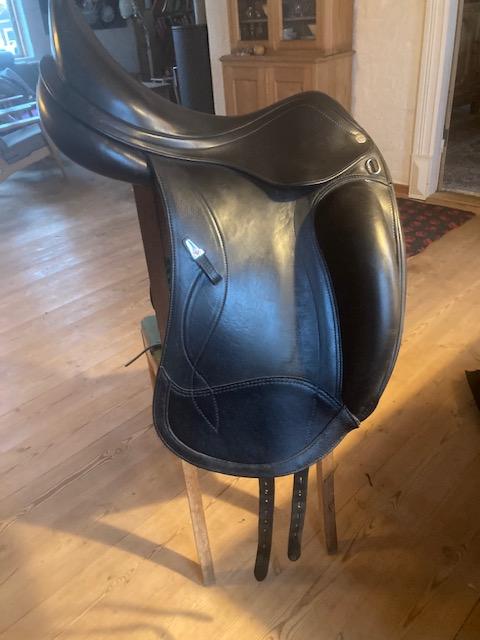
 This time at home, one of my customers asked if I could repair the saddle flap of an Equipe saddle, where the outer layer of leather had been worn through. She had bought the saddle second hand since it fit both her and her horse perfectly, so she is not the one who has managed to wear the saddle flap to this extent. Actually I am kind of puzzled as to why it was only worn through on the right hand side of the saddle, but the left side had just a bit of normal wear, so either the previous owner must have had used her right leg more, or perhaps have used some abrasive things on her right leg, like an unprotected zipper? For once I have managed to take pictures through the process, to help giving an idea of how I did the repair job. In total the job took 8 hours, so it is not a super fast job, but I never expected it to be. The value of the saddle still makes it worth making a repair like this, and difficult work holding/handling and hand sewing is the main reason for the time consumption. If I had a cylinder arm walking foot sewing machine, I might have been able to pull it off a bit faster, but I am only guessing. A saddle is fairly awkward to move around, and It only takes one slip to make the stitch line look bad and making matters worse, so I think that I would probably still go with hand sewing in this case. 1) outer layer of thin leather on the saddle flap is worn through. 2) A pleasing curve shape was cut on some paper. The inspiration for the curve came from the sides of the seat, and I wanted the ends to correspond to the angles of the lower reinforcement piece. 3)The curve is lowered to show the corresponding ends of the lower reinforcement piece. 4) A piece of thin leather (approx 2 mm thick) is cut out in the correct shape. It is deliberately made so that the lower part leaves a 3/8" gap towards the lower part of the saddle flap. (This is similar to how the original worn piece was made, to give a nice smooth transition for the lower reinforcement piece) 5) The repair piece is skived along all edges. approximately 5/8" wide. 6) The stitching for the lower part of the saddle flap is cut plus the lower part of the decorative stitches. The lower reinforcement piece is carefully removed and put aside to be used again. The worn piece of the saddle is cut of, following a curve matching the repair piece. Leaving approximately 5/8" overlap. 7) The repair piece is glued on using contact cement and hand sewn along the upper part. The decorative stitching is continued as well. (I sew over the first and last 3 original stitches to lock them in place) 8 ) The lower reinforcement piece is sewn in place again. Hand sewing since I don't have a sewing machine that could do it easily and allow me to maneuver the saddle easily around. I tried my best to use the existing holes in the heavy part of the flap. 9) The completed repair job.
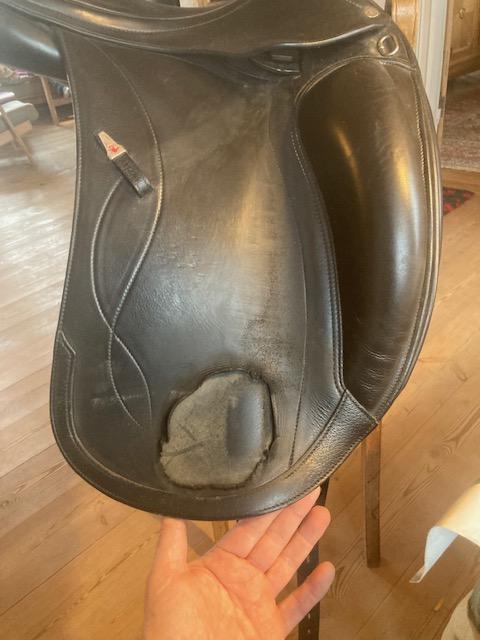

-
Any other places?
-
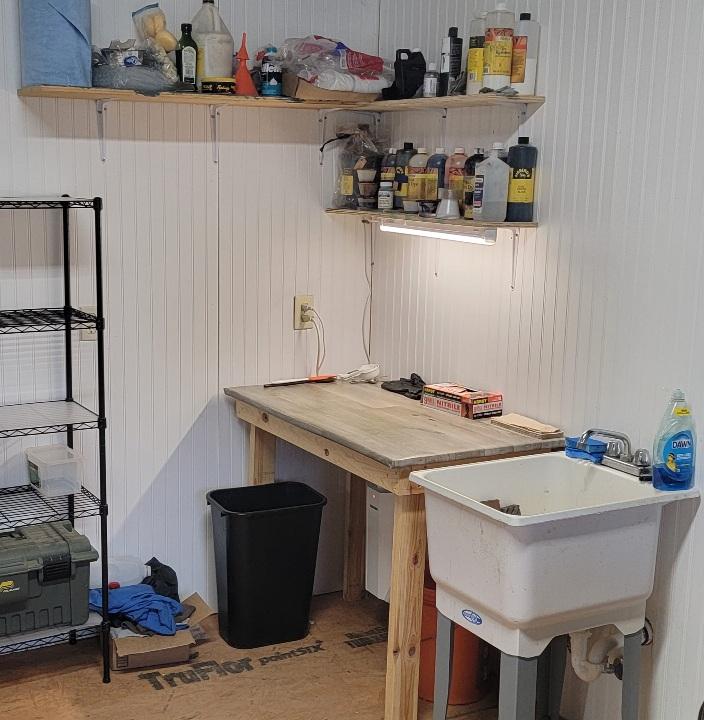
I have been dabbling in leatherwork for years, but never took it seriously or to the next level. Recently, I've found I have more time on my hands, and I want to get serious about improving my skills. Years ago, my father built me a great workbench to put in my tack room, but I just had tools randomly stored in the drawers. I've taken the time to sort things out and grouped my tools into "categories" (for a lack of a better term). Here's my question to all of you... How would you arrange these "categories" in your bench drawers? Sharpening Measure Cutting Skiving End Punches Press Punches Hole Punches Tooling Dying Gluing Zipper Setters Stitching (Hand) Thread (both hand & machine) Edger's & Groover's Burnishing Hardware Setting Miscellaneous (like a thread spool holder, belt trimmer, etc.) Stitching Pony's (small item only, not my large one) Keep in mind that I have hardware and stamping tools in dedicated spots on top of my bench. Thanks in advance for any and all suggestions!
-
 ku77788 joined the community
 -
 Hey, I have some advice straight from a saddler’s workshop Apply edge paint in the direction of the cut, using light pressure, so loose fibers are pushed flat before the paint sets. You’re smoothing mechanically, not burnishing. Use a sponge; for very thin edges, an old awl or a small brush works well. Both give you more control. Wipe off excess with a cotton cloth (e.g old t-shirt), again in the same direction, to avoid lifting fibers. Work in thin layers and let each one dry properly. No burnishing beforehand. Sanding isn’t needed if the edge is clean and even, but lightly sanding helps a lot if layers meet or the edge is rough. Some people use an edge filler where two layers meet to level the edge before painting—that can help get a very clean result. I can't tell you more about this, but also want to try it out in the future. Hope this helps Best Tove
 -
I think dyes, stains, etc is the right place for edge paint questions. Moved it.
-
Beautiful job, thanks for showing it.
-
Wow, beautiful job, like all of your work.
-
 SHaenel joined the community
 -
nice
-
So to start, outside of a few coasters that I made months ago, I’ve never used edge paint, so I have some basic questions… Do I still slick the edge with gum trag before applying (I also spit shine after the gum trag)? Will I need to buff to a shine again, or will the neutral/clear paint (EcoFlo Edge Flex) let the shine through? If I have to to buff again, do I need to worry about accidentally damaging/cracking/removing the paint? Do I use my slicker or something else? Sorry, it’s my first rodeo with edge paint. Thanks for any and all advice and wisdom, and may you never burn your bacon, AZR