

All Activity
- Past hour
-
The water based with one coat is Very interesting. The problem with the Aquilim 315 is the cost. It is about 1.6 times the cost of a heavy duty clear contact cement from your local hardware store. kgg
-
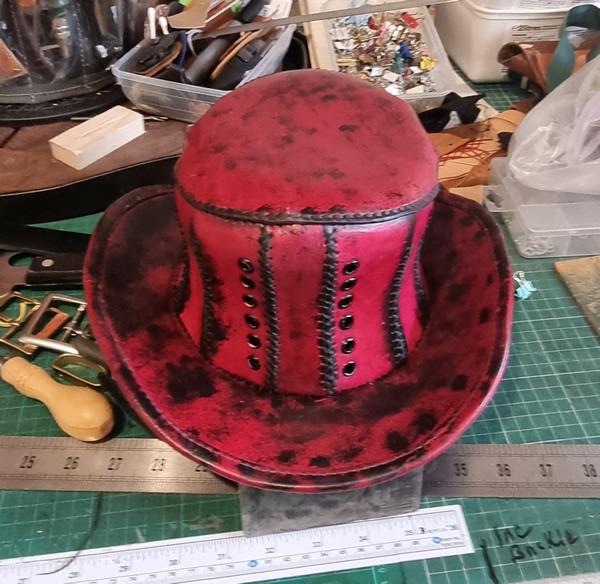
The bottom one just needed a little messing and re dying so I only had to do two. Still waiting for some cord to finish my corset hat.
-
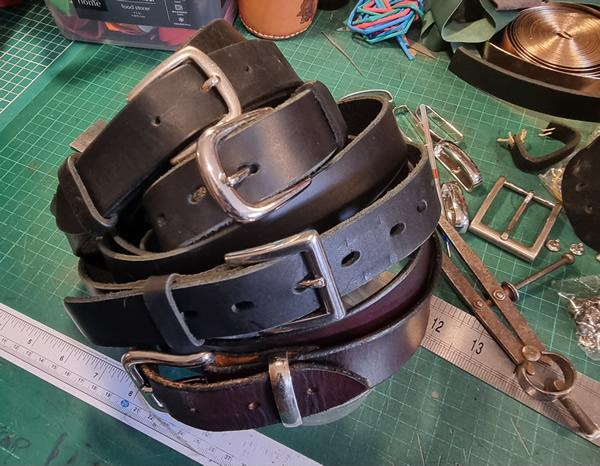
I would be interested in seeing the belts. Me I have two belts. A store bought "genuine" leather black dress belt which I figure I have worn maybe a dozen times in the last 8 years and my daily 13 oz medium brown chrome tan. kgg
- Today
-

Veg tan tooling with chrome tan projects
kgg replied to Blitz Thunderlungs's topic in How Do I Do That?
I find getting chrome tan to another colour can be a challenge. There are a lot of factors, who the manufacturer of the leather was, the original dying process, the colour you are trying to change, who the manufacturer of the dye is, etc. I have some medium brown pre-dyed 6 1/2 oz chrome tan that I want to redye to a colour close to Oxblood. I have experimented with a few cutoffs with different colours (rouge, wine and oxblood), and dye from three manufacturers. What I finally settle on was oiling first with Promise 100% Pure Organic Jojoba Oil, leaving it for 24 hours to soak in, then wiping the excess oil off and then applying Fiebings Oxblood dye so far is giving me a decent result. kgg -
 S. Kaplan Sewing Machine joined the community
 -

Veg tan tooling with chrome tan projects
Blitz Thunderlungs replied to Blitz Thunderlungs's topic in How Do I Do That?
That was plan B for me. I was hoping someone had some sort of magical chart figured out. This dye, with this chrome tan sort of thing. Thank you. -
That's why in my "wardrobe" . . . there are no less than 8 or 9 belts. Generally speaking . . . I wear the one I have on . . . and have for over 20 years . . . will probably kick the bucket some day and it will still be serviceable. But that's OK . . . pass it on to someone who needs one. May God bless, Dwight
-

Disgusted with my belt situation.
chuck123wapati replied to toxo's topic in Leatherwork Conversation
Good luck!! -
After years of taking my one belt from one pair of trousers to use on another pair, bearing in mind what I do I finally got disgusted enough with myself to start on three more. Bearing in mind that my world is practical and not for the benefit of others, it will just be one layer and rivets so I should be finished by the end of today.
-
https://www.defense.gov/Resources/Branding-and-Trademarks/ i don't mind laser engraving it has its place i guess but not on my hand made leatherwork it really makes things look cheap and factory made, not clean and stylish IMO. But if your in competition with the Chinese or Walmart, then have at it. The problem I have with it is that it's very easy to just steal intellectual property from others to fill your own pocket. It's a crime to use other people's artwork or logos without permission. Yes even the Marine Corps emblem is a legal logo, and it's against the law to reproduce it for sale without paying the gubment. I have three artists in my familly and all, including me have had our work stolen and reproduced by others at one time or another, its really not cool, fun, or enjoyable to see something that took days to produce on a t shirt someone else prints in minutes and is selling for themselves and taking credit for the work. I'm sorry but printing out patches and sewing them on hats is one of the most uncreative things i can think of doing with my time. I'll get off my soap box now ans say those are swell!!! And just as good as they sell at Walmart and the gubment has a website you can actually buy the rights to copy and reprint for sale thier military logos Let's be good citizens of our communities and not do shady things just because "everyone else does".
-
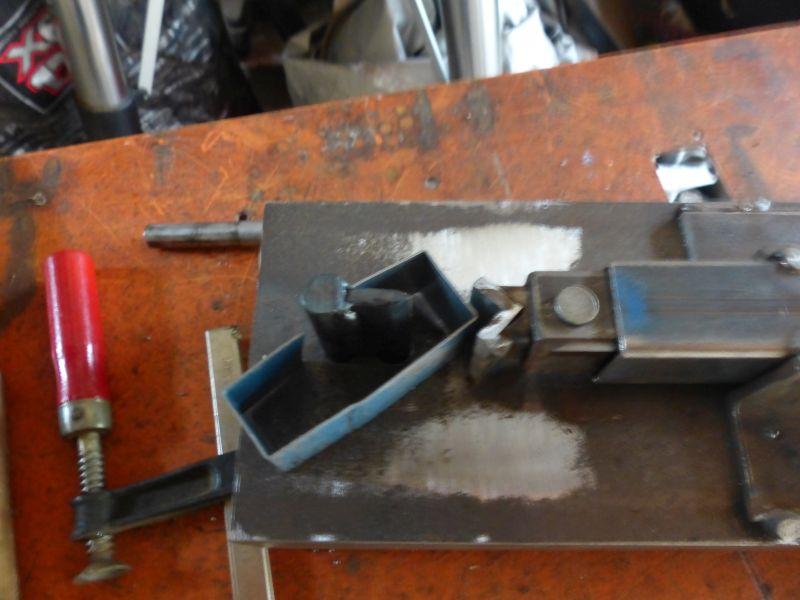
Forgive me dikman if I'm teaching granny to suck eggs but I can't help myself if I see a way to help someone. A few thoughts. If you run a disc cutter down the web of the angle iron but not all the way through will allow you to the angle gradually until you get it where you want, Bear in mind if you use an over angle you can always stop before fully closing. The one I showed above is 60 degrees. I do have a 90 degree but ill often use the 60 for this reason. Are you planning on welding or a wooden core? If wooden you have to think about getting the leather out. This can be a hole that you can poke through or you can glue some foam rubber under the core that will automatically eject the leather after cutting it. If using foam make sure that after leaving enough knife below the core to cut your thickest leather, you might need slightly more to allow for the compressed foam. You can use thin foam and glue on extra layers until it does the job If using wood cut slight smaller to allow for the thickness of the knife. Bear in mind the screws will help with slight anomalies. If welding you'll need an accurate (paper pattern) to test on as you bend If using wood and it finishes flush with the top of the knife it'll be robust enough to walk around some quite big patterns under the press. Looking forward to seeing your first makings from your own dies.
-
 Alec Steele YouTube blacksmith that occasionally does other things just for fun. This one caught my eye a day or so ago. Not necessarily anything useful for us, but entertaining to watch in any case! - Bill
 -
Regarding the glueing of hides. Don Gonzales published an interesting-to-me video on glue strengths. The Aquilim 315 water-based contact cement produced a strong bond when applied to one surface and immediately assembled without drying. I use Barge but think I'll give this a try. I like cutting straps one at a time so I can check the quality and decide how to use each strap.
-
 Negative. Bought one that i will.use as guide for measurements and features if I ever stop using it to carry by side by side!
 -
 Freaksta joined the community
 -
 Nachman joined the community
 -
 Not a bad idea. I think I'll give a longer buckle a go.
 -
I'm within a degree or two of a right angle! I used the mill to square up the inside of the first angle iron bender and cut the excess off the sides as looking at toxo's video it's obvious it doesn't need to be big. A bit more work with a triangular file to deepen it and change the angle a little bit should do it (stupid camera has a focus problem!).
-
Laser-engraved leather patches give hats a clean and stylish look.
-
Hello, Im interested to learn if anyone has a source for saddle trees they are happy with? thanks, Jonathan
-
Thank you Double K! Yes, you understood my question correctly and your explanation/advise was very helpful. Thank you!
-
That kind of thickness stacked - a plough gauge slight maybe but eat a good breakfast, a draw gauge - better have a grip on the strap and the gauge and a sharp a*s blade. I'm not sure how far you are from any draft or pulling harness makers because I don't think we have any on the forum. I would get with one of those guys and ask how they do it. I'm betting one piece at a time and then stack them though.
-

The perfect oval punch.
DoubleKCustomLeathercraft replied to bsshog40's topic in Leatherwork Conversation
I know you ended up buying something since the original post. But for future reference. Weaver make a 1¾" trace punch which is perfect for holster slots. They're spendy, $205. I make a ton of holsters. I should really consider investing in one myself, but I'm a cheapa** 😆 -
Fortunately I've only had two real bad cases of over oiling. I tried kitty litter and corn starch. Neither worked. Never removed a bit of oil
-

Veg tan tooling with chrome tan projects
fredk replied to Blitz Thunderlungs's topic in How Do I Do That?
I'd stay with basic brown. Chrome tan pre-dyed in brown and veg tan accents dyed any shade of brown -
I had a costumer that wanted a new belt with his nickname and some tooling on it. I primarily make holsters and I'll cut a few straps for belts out of a side before I go to town on holster making. Well I ran out if belt straps quicker than I did the rest of the side, and didn't need or want to down 330 bucks on a side right now since I'm stocked up with what I need. I went onto weaver's site and found that they're selling Hermann Oak English bridle belt straps, which are veg tanned. It took me awhile to find the information here on how to properly case bridle leather. It's not the same as HO strap or holster tanned sides at all. I soaked the strap, left it in the fridge overnight like I would with regular veg tan. All that did was make it super stiff almost frozen feeling almost frozen. I did since more digging on the site here, and asked for input. Figured out that because of the waxes and oils in English bridle, cold is not what you want. Heat. Some say heat the tools, others say use a great gun on the strap. It's been warm, so i left it overnight again soaked. Pulled it out the next morning and it felt like I expected it to the first time. Left it hanging for about an hour to dry to the right moisture feel and went to town. It's harder to tool than any leather I've worked with, but I'm the end I think it all worked out great. I don't think I'll tool English bridle again though. It's a nice belt, great feel but not different enough to justify the extra hours to tool
.jpg.c9e6b26242b58785330330c8a6218284.jpg)
.jpg.a36c47e4ab6657b3e7941130d9e135f7.jpg)
.jpg.5bbfd1490aaa3478305a78c07b837b63.jpg)
-
The centre. Personally I am more hands on then my example. I hand cut my leather with a utility knife, use a standard oblong, round or corner punch with a hammer but I do use templates when I can and I do use a sewing machine as I don't have the temperament needed to sew by hand. Since I am artistically challenged I will use an embosser once I complete building it. To me hand sewn is literally when needles and thread are used manually to create a seam not a sewing machine. kgg
-
Strap construction and stitch alignment
DoubleKCustomLeathercraft replied to JZC's topic in How Do I Do That?
I'm having trouble understanding exactly what you're asking. You are attaching a leather billet as a loop to a strap? This billet is looped through the bag slot, and back to the strap with both ends sandwich said strap? If this is the case, I would stitch the section that's looped and not attached to the start first. That way you're not stitching the loop closed or having to deal with a tight area that regular needles are too long for. As for making the stitch look good on both sides. All I can say is punch your holes straight and perpendicular. They do have diamond stitching chisels are "backwards" so you can punch clean stitch holes from both sides of the project. You can use your awl also. I end up using my awl all the time because, and I hate it! Wish I had longer chisels but then they'd bend. It takes practice to get stitches straight front to back. What I do on something long like a belt is I'll use my 6 prong chisel, make sure I have it lined up so that it goes through evenly from the edge. Then I'll set 3 of those 6 prongs into the already punched stitches. This helps keep the tool at the same angle eliminating the misaligned stitch holes on the back side. That's what's worked for me to get front and back stitching that looks good in either direction.


.thumb.jpg.df03483a8f149b5c3635266f3ce9bbac.jpg)


