All Activity
- Past hour
-
That is a great idea. kgg
-
 cannot edit anymore. Here are some pictures:
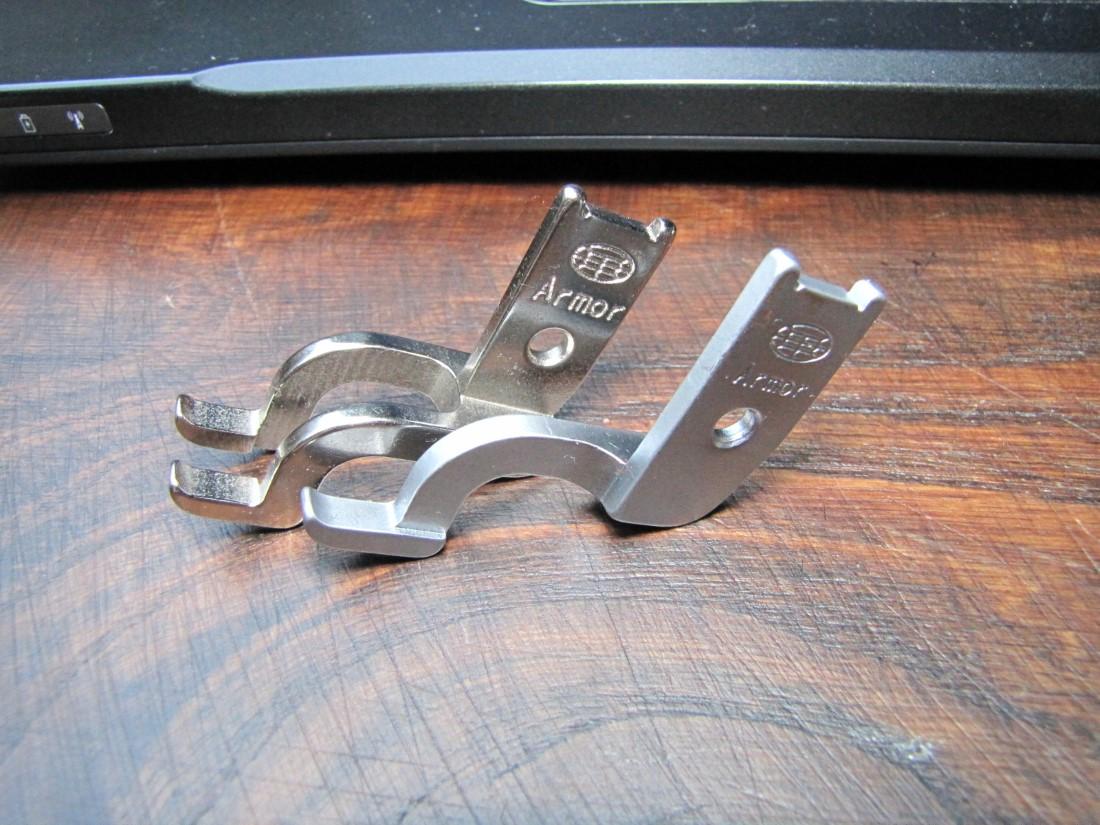
-
Thank you But don't be thinking #1 son is a wee child - he was 36 when I gave him this set for a Christmas prezzie
- Today
-
 Looks to me like you can use that 'un either way. The blades are thin enough to not leave a gaping hole on the top side if you're going all the way through. The tips are wide enough to give decent guidance for an awl. Best o' both worlds. - Bill
 -

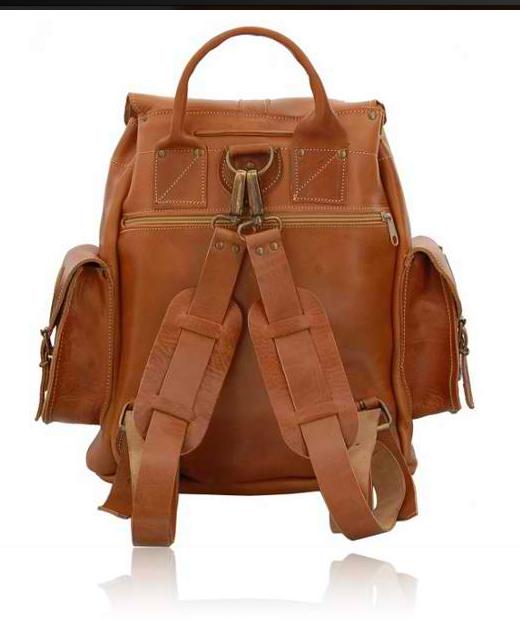
Help wanted for designing a Leather Backpack
Dwight replied to Black Phoenix's topic in How Do I Do That?
I would take my cell phone / camera . . . and go visit a half dozen camper / hunter supply stores. They have oodles of back packs in there . . . Take a bunch of pictures . . . print em when you get home . . . then cut and paste the parts you like best. Personally . . . all my back packs have two main compartments . . . both the full length and width . . . but separated in the middle to only give me half the depth. As well there are two pockets on each side . . . a larger bottom pocket in the back . . . and a smaller one also in the back. As well there is a little slip pocket on the flap cover . . . it lays up on the top . . . for papers / permits / licenses etc. Multiple pockets means you have to fold stuff up tight . . . but you also don't have to sort thru the whole pocket to find just one thing. Kind of a "file cabinet" back pack. I would also consider the one in the pictures if I was in a hurry . . . as it is less complicated to make. But to each his own . . . May God bless, Dwight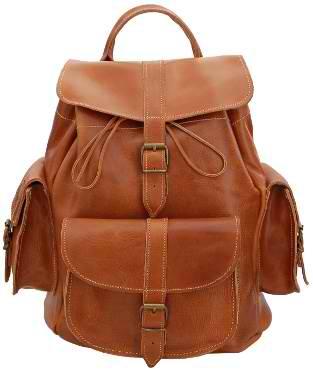
-
Using that pattern . . . I get an end product that I really like . . . as the piece making the front of the belt loop has the hair side showing. A lot of others don't and while it won't hurt the function . . . the flesh side to me is just not as desirable. I think it is "purtyer" this way. I took the knife blade . . . used it for the back template . . . then used that for the template for the front . . . and for a wedge that goes all the way around in the stitching of the sheath. That blade was really thick . . . and I just didn't want to do a fold over . . . so the bottom is three pieces. May God bless, Dwight
-
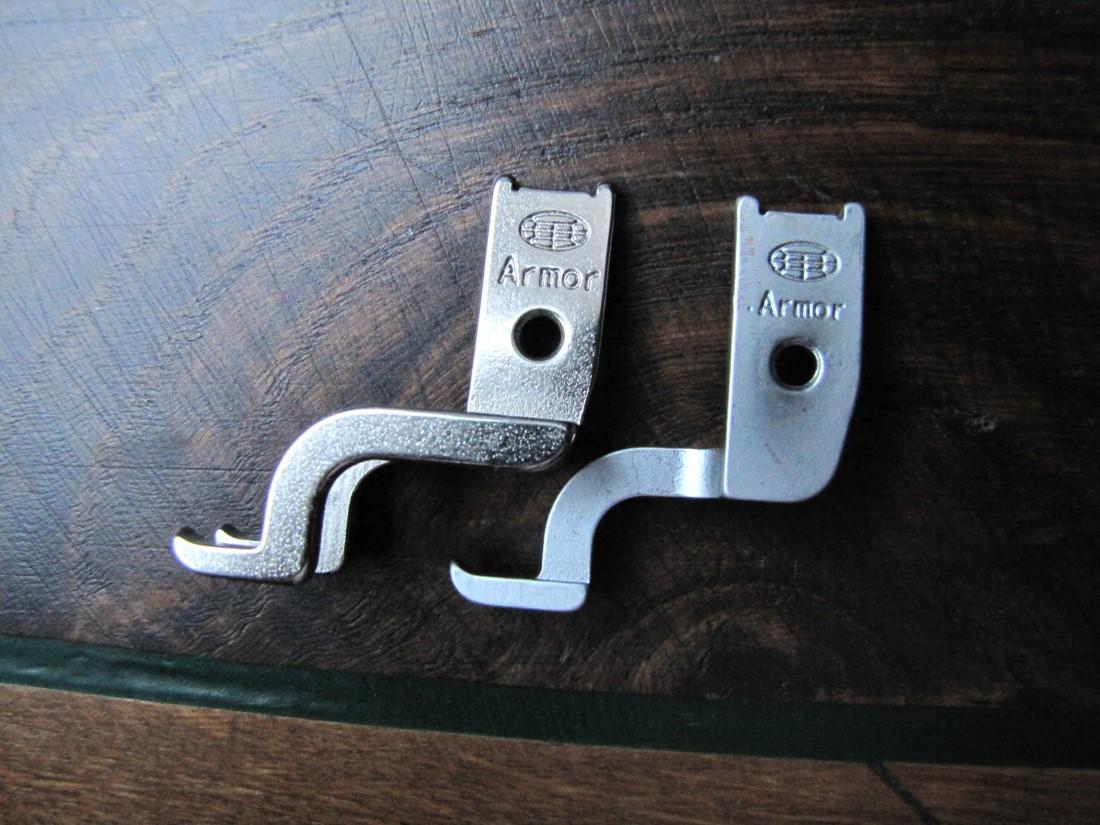
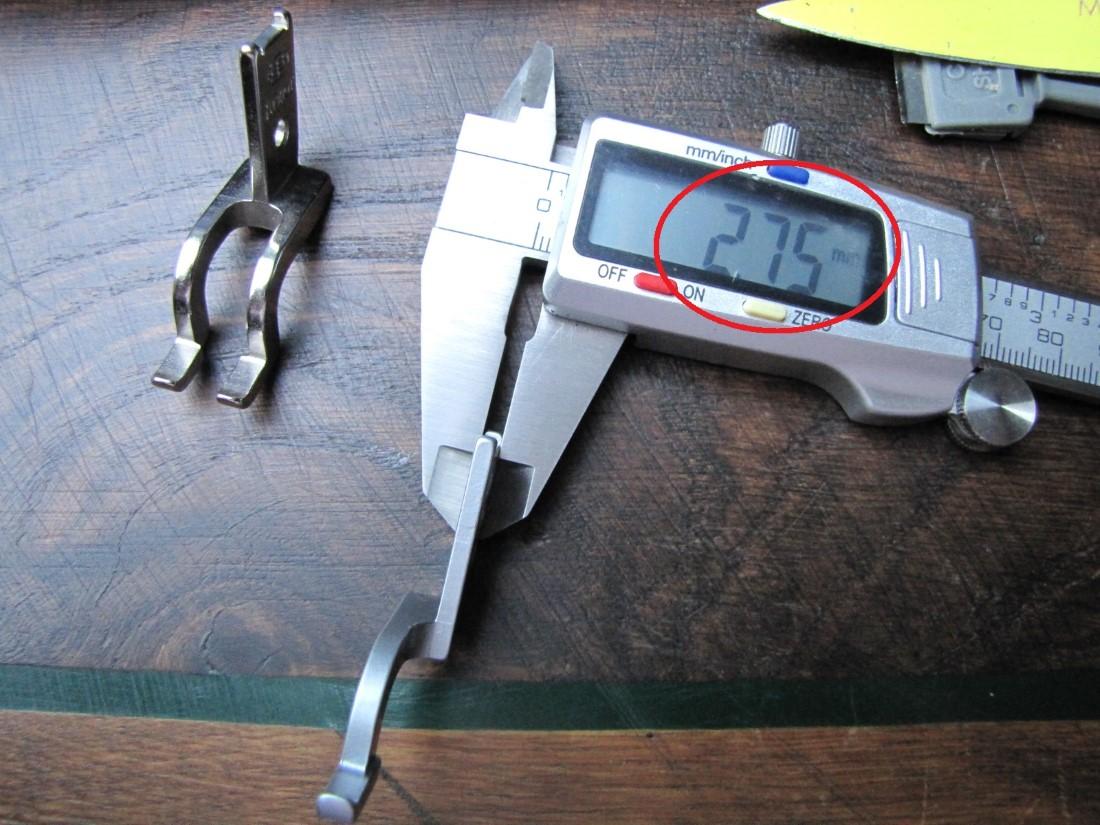
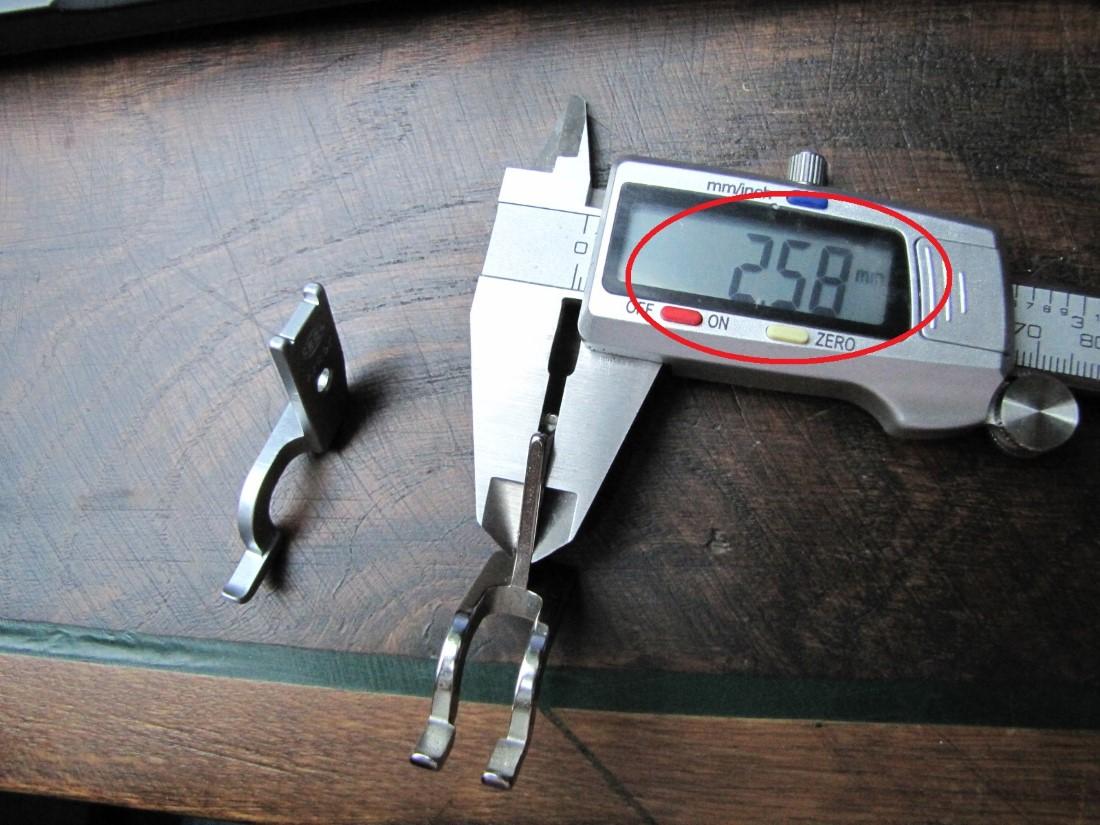
They have arrived! Took 10 days from China to Germany and no extra charge. I´m using them on my 111G156. First glance.... The "fork" foot set works fine and line well with my feed dog - no issues. The right toe foot is touching the thread guide but the one I have installed is not the "original" one I have one from a 211 so that is on me. The left toe foot does not fit into the foot bar. The end that goes into the foot bar fork is a bit thicker than on the other feet It also has a different finish, the other feet fit well. Maybe I´ll do some grinding but I´ll check with the seller first. The scissors are sharp a hell. I ordered them for just having a pair in my tool box. REALLY SHARP!!!
-

New Knife Sheaths
PastorBob replied to Dwight's topic in Gun Holsters, Rifle Slings and Knife Sheathes
Thanks for sharing! I have a pile on my table as well from a client who makes handmade knives. i really like the sheath design on the left. I think you have inspired me to try that design. Thanks. -
Mounting Indian Head nickle in a key fob
PastorBob replied to TerraKacher's topic in How Do I Do That?
Definitely use a hole punch if you can get one relatively inexpensively. I think you'll be forever trying to cut it with your laser and then you have the cleanup of the edges afterwards. -
Man, your son has the best dad. If I had received a gift like that as a child, I would have been the happiest kid in the world.
-
Personally I'd use a hole punch. Mainly cos have one that size. I'd also use one with can be used in a press, and I have one of those too. I think a good sharp punch can give a good clean cut
-
Nice job on the buckle fred. I used the silicone for casting lead jig heads for fishing, works well (you need platinum-cure silicone for this). Interestingly, I have some silicone molds I made for casting resin parts for Battlemechs and out of curiosity I tried pouring lead in them and it worked, even though the packaging said nothing about lead use.
-
I recently picked up four Indian Head nickles at an auction, got a good price for them. I was thinking about mounting them in a key fob blank. They measure about 7/8 of on inch in diameter. I was thinking of cutting a 3/4 inch hole in the center of two blanks. Then glue the two together with the nickle in the middle. Then stitch around it. I belong to a treasure hunting club and it would make a great gift or auction item. So my question is, what is the best way to cut the 3/4 inch hole? I've been searching on google, and there are plenty of cheap punch's. I do have a 5w laser engraver I could use. But I wanted to get your thoughts about this.
-
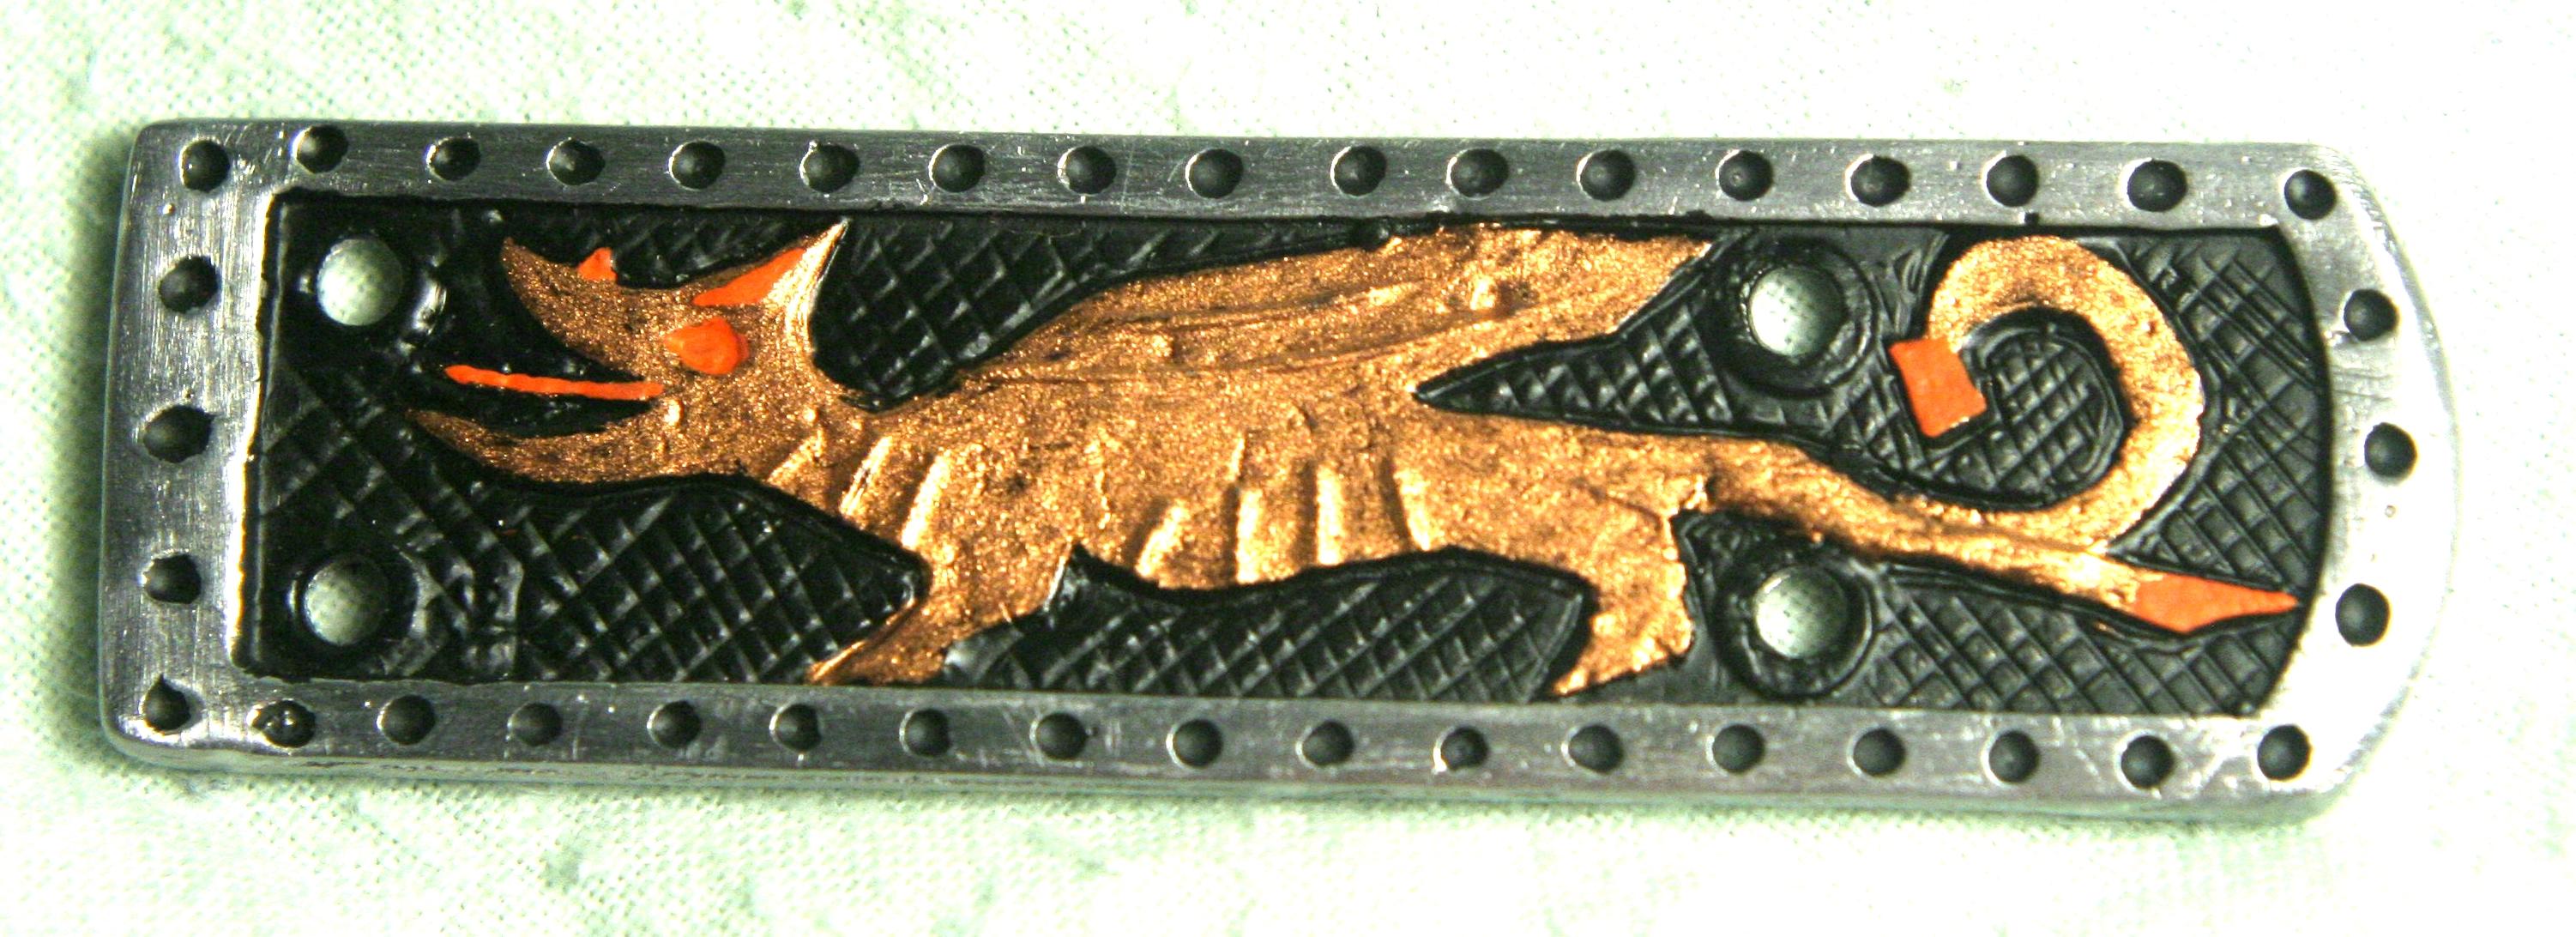
When tin and antimony is added to lead to make pewter it lowers the melting point temperature. For this mix I use a special heat proof silicone rubber to make the mould. The heat proof rubber is meant to be used with pewter casting Plaster is usually mainly used for a single one-off casting as the heat of the metal cracks the mould and it breaks apart when removing the casting This is a medieval style belt end I sand cast, then hand painted;
-

Seems I broke my Juki-LS-341, again... (Bobbin Shuttle)
AlZilla replied to Yoshi888's topic in Leather Sewing Machines
I'm not familiar with that particular machine but the basic process is to roll the machine over until the needle rises about a quarter inch or 3/8" back up from the bottom. Then find whatever you need to loosen the shuttle hook so you can rotate it. Set the point of the hook right above the eye of the needle, exactly in line with the needle.. The exact measurements will probably vary for your specific machine but should be close enough to stitch. The hook should all but touch the needle. There a spec and a way to adjust it if needed. Also, if the point of the hook doesn't align right above the eye of the needle, you may have a needle bar height adjustment to make. For me, the big thing is to remove things like needle plates and food dogs so I have a good, clear view. Do it a couple times and you can do it in your sleep. -
Just checked and the melting point of tin is considerably lower than lead so a silicone mold would be ideal for repeat castings. Won't work with silver though, temp is too high. I believe jewellers use plaster to make their molds but they would likely only be good for a couple of castings at most.
-
Good idea fred. kgg, yep, some use 3D printing to make their part and then use the "lost 3D" method to cast it.
-

Seems I broke my Juki-LS-341, again... (Bobbin Shuttle)
friquant replied to Yoshi888's topic in Leather Sewing Machines
Nice work finding the offending bushing! 💥 Here are a couple of excellent videos by Uwe on the general practice of setting timing: https://www.youtube.com/watch?v=1wNBPX8i524 - video by Uwe of Consew 225 https://www.youtube.com/watch?v=pL9WiZeKZAY - video by Uwe of Adler 67 Since these videos are conducted on a different machine, what you actually loosen and adjust will differ but the overall principle is the same. Your juki user manual will have factory specs for needle bar rise, needle bar height, and hook to needle distance. These will be adequate to get you sewing again. After you become a pro at timing by the book, you might also enjoy How to Stuff a Hook and New Way to Measure Timing. - Yesterday
-
I do some casting. I use 'model metal' which is a tin alloy and also pewter, which is a lead and tin alloy. For multiple castings I use a heat-proof silicon rubber mould and for one-offs. or two, I did the casting in oil sand For making conchos I'd use the rubber mould. Its good for about 100 to 150 castings. Less if you allow the metal to get too hot.
-
I already use LED lights by my spraying set up. I cover them in cling film and when that gets a bit grotty I take it off and put on fresh
-
Hum, that can't be right. I know casting, how can I make it easier. As a replacement to the lost wax method of casting maybe use 3D printed castings. kgg
-
 b-callahan joined the community
 -
I follow your you-tube channel so watched it the other day and I was impressed at the fine detail you got, not easy with sand-casting. For tin-casting you might be able to get away with making the mold from silicon, it would allow for repeat casting and give very fine detail. As an aside after watching your episode about the Vevor press I just had to buy one - I don't really need it (yet) but it's a solid bit of engineering!! Keep the vids coming, they're always good to watch.
-
 My order is on the way. I preferred to get complete sets, that's the way I roll, as I have needed to modify/finish pieces in the past.
-
Yep - much to my wife's dismay. Whenever she goes through her clean-up phase she says "is all that necessary?". I'm currently melting aluminium to make it useable in a lathe (casting cylindrical shapes and some square bar stock), next is brass and copper scrap. The foundry/furnace was built from scrounged material, as was the burner, the only thing I bought was the hi-temp lining. And not a 3D part to be seen! (Sorry kgg).
-
I think for photo's they maybe good but not so much for spraying as the LED's would probably get covered from overspray. Thank you. I think some of the fumes comes from the thinner being used. I use alcohol as the thinning agent. I think that would work really nicely. But remember no project is complete with 3D. You must have a bit of Newfoundlander in ya. It's always nice to scrounge materials. kgg