JLSleather
-
Posts
7,378 -
Joined
Content Type
Profiles
Forums
Events
Blogs
Gallery
Everything posted by JLSleather
-

Oblong Holster Holes
JLSleather replied to tardis86's topic in Gun Holsters, Rifle Slings and Knife Sheathes
You don't want it to slide through loosely. I wouldn't own a holster where the slots are wider than the belt. No, I'm not giving the long version of that.. just that I won't own one and i won't sell one. I don't put 1 3/4" slots for a 1 1/2" belt. -
Oblong Holster Holes
JLSleather replied to tardis86's topic in Gun Holsters, Rifle Slings and Knife Sheathes
1.5" from Weaver. Works pretty good, though I haven't had this one long enough to tell you how long it holds an edge. -
I have the cobra 4. I'm getting by, but honestly I couldn't' look a guy in the face and recommend it.
-
I been thinkin' bout wunna them cowboy 3200 things. I havent used one, but I'm sure it will do what you describe.
-
Sponge. On the back side of the leather.
-
Leather Burnishers - Poor Customer Service
JLSleather replied to Pounder's topic in Leatherwork Conversation
When I order something, I want a reasonable time frame for shipment / delivery. This type of thing happens so regularly any more that I simply can't be bothered to argue it. If you can't fill my order in the time stated, and you can't be bothered to let me know what's going on and when I should expect it, then just tell it to the credit card company when you're notified of the charge back. But that's just me. My personal opinion, there is NO tool worth a 3-month wait. -
Getting tougher and tougher to get a decent piece of cow these days. But, most of what I'm using at the moment is from W/C, holstered skirting leather. I'm getting some work done, but there's WAY too much waste in a hide any more. Personally, I'm thinking if a guy wants natural veg tanned cowhide for tooling and / or molding, go straight to H.O. The leather still isn't flawless, but then it hasn't been marked up along the way by retailers either.... The last I bought was that at Weaver. I paid $8.75/ft for one and $8.93 for the other. But I could have got "A" grade at H.O. for $8.03 (that's last year price, I haven't ordered there since the 1st), and would have been much nicer leather.
-
Shhoooot.. did I just get embarrassed? That's lookin' purdy good - but does that work okay with the bullets "backwards" ? Personal preference maybe -- Still, these designs are MEANT to be customized to suit you, so have at 'er
-
Yep, it's veg tanned (what I always referred to as) tooling leather. I tried a couple of sides, just to see what they were putting out. The ":holster" one has lines on the back, looks like it was from sort of feed mechanism (guessing).
-
I just got a couple sides from weaver, one "holster" and one not. I didn't return them, but I would say that if that's standard quality for them, I wouldn't order there with any regularity. The one side has "marks" on the flesh side", looks like may be from a pressure roller or similar. It's on the back, and the projects I'm making will get lined anyway -- otherwise I would have taken that less well. I use Fiebing's dyes, both the "alchohol" and the "oil" dyes. And you can dye before OR after you mold it.
-
Charter Arms Bulldog
JLSleather replied to Red Cent's topic in Gun Holsters, Rifle Slings and Knife Sheathes
http://duncansoutdoor.com/ They haven't put up an updated availability list for a good while (usually better update than currently). But I just call them anyway. -
I don't make 1/4" thick belts unless SPECIFICALLY ASKED, and I haven't been for a long time. My belts are generally right around 3/16" thick -- a 7/8 or 8/9 oz front lined with a 3/4 oz backing. I "could" use 2 5/6 oz, but i like to get the tooling depth. No problems with wrinkling. Just got an email from a cop with a new belt made of 7/8 + 3/4 oz- loves the way it carries a pistol, mags, cuffs, small flashlight... no worrries. Course, no "fancy" tooling on the duty stuff....
-
calfskin is fine --- it will hold up much better than the pig some 2 or 3 oz goat even better. and wrinkles are not mandatory.
-
Blue Gun Swappin'?
JLSleather replied to JLSleather's topic in Gun Holsters, Rifle Slings and Knife Sheathes
Hey, Brad - just saw this. I don't have the taurus, but you're the second person to mention that one since the new year, so maybe i should? Good to hear the patterns are working for you. There's a new one available for the S/W shield uploaded yesterday. That one's popular enough maybe I should get ANOTHER mold for that one? -
More stable -- less "wobbly" AND more strength.
-
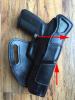
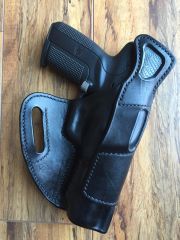
Don't sell yourself short .--- that glock was a NICE looking holster, too! In case "behind the gun" wasn't clear, I mean this....
-
First, though, that's a NICE lookin' rig - right down to the signature. I'd move that front slot (behind the gun) FORWARD a bit more - leave your belt loop wide as possible, and I might have blocked out those VERY SERIOUS rails, so the holster smoothly rides over them. Still, that looks GOOD Inlay is well done, colors blend well, stitchin' is tight... well done.
-
Woohoo... 1600 free Glock 19 / 23 holster pattern downloads! Got a picture, or a link to your picture? Let's see the finished goods

-
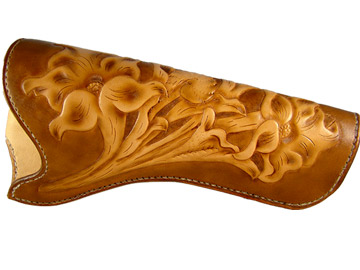
Avenger style with lizard inlay
JLSleather commented on tclaridge's gallery image in Gallery- Our Leatherwork
 Purdee
 -
Just ordered a set of the JW interchangeable head edgers. At that price, no reason to sharpen 'em... just pitch and replace!
-
This was worth repeating
-
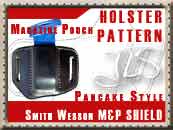
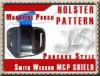
Welcome fellas - and thanks for the 'attaboy' Pattern up for the mag pouch to match the S/W shield. With or without sweat guard. Sold at half price for the weekend because... well... cuz i can https://www.etsy.com/listing/264070359
-
Will Ghormley El Dorado Rig Question
JLSleather replied to PAMuzzle's topic in Gun Holsters, Rifle Slings and Knife Sheathes
The loop goes on TOP the skirt, between teh skirt and the bucket. Mark your hole, move the holster, punch the hole in the second end of the strap, place and set the rivet, THEN slip the holster through the loop. -
The New Boberg Xr45-S
JLSleather replied to JLSleather's topic in Gun Holsters, Rifle Slings and Knife Sheathes
Thanks! If I had about $1500 laying around not earmarked for anything, I'd git ona them purdy pistols to stick in there and keep it! -
These do seem to come in spurts. Probably because not everybody can afford that pistol!