-
Posts
1,806 -
Joined
Content Type
Profiles
Forums
Events
Blogs
Gallery
Store
Everything posted by Matt S
-
Monday morning price drop to £625 or best offer.
-
The 45k is a classic heavy duty sewing machine. Capacity is up to about a half inch (12mm) of leather regards or fabric and can use some very heavy threads. Needles, bobbins and hooks are easily available but not other parts are like hens teeth. They are very simple, robust and reliable machines. All are drop-feed only, which is not a preferred feed arrangement these days as it can cause marks on the underside of the leather and does little to avoid later slippage. The 89 subclass has reverse (most do not) and a jumping foot, which is a half-arsed walking foot that reduces layer slippage a little. Layer slippage can be largely eliminated with glue. Dog-marks are also generally less of an issue than they are sometimes made out to be. Their depth and visibility varies depending on the sorts of leather you're using. They can be reduced or eliminated with judicious use of a hammer or bone folder. And frankly they often don't matter very much - I have several pieces of vintage leather that exhibit dog marks on the back or in gussets. The 45 used to be an absolute workhorse of the leather industry but it's been it of common widespread use for decades now. I love them (got two, keep trying to stop myself getting more) but they aren't everyone's cup of Darjeeling. There's several similar 45s on eBay under £500 and most of those have at around for months. £425 probably will be head only, or it'll have an old fashioned clutch motor which will need to be replaced.
-
Like I say I couldn't turn the opportunity down. It's not been a free ride -- I've probably put nearly 100 hours' work in over the past few months so if I were turning down paid work the price comes near to what dealers charge for a refurbished machine like this. However I've learned a lot about how this machine works and I've enjoyed myself hugely. The latest Camoga machines are half the weight and I suspect much quieter and more user friendly. They are, however, eye-wateringly expensive. Splitting with a skiver is certainly possible. Mine doesn't take new-style feet without more adjustment than I'd like and I want to keep the sharp corners on my roller foot because it gives excellent step skives. Re. the manuals I'll send you a PM.
-
Almost all the timing is fixed on a no6 so about the only thing to worry about is the needle assitant thing that's under the needle plate. If it doesn't get hit by the needle on the way down the machine is probably safe to use. Looks like a good machine. The little shelf is intact on yours, which mine has missing. Does your oil/wax pot have the wiper present?
-
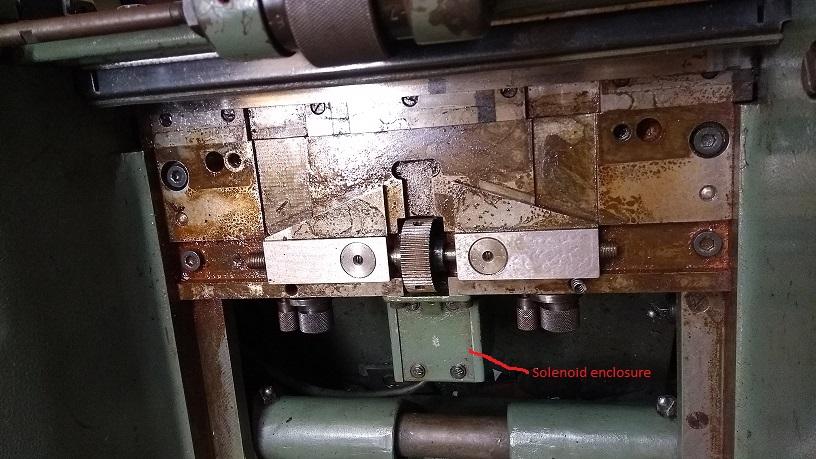
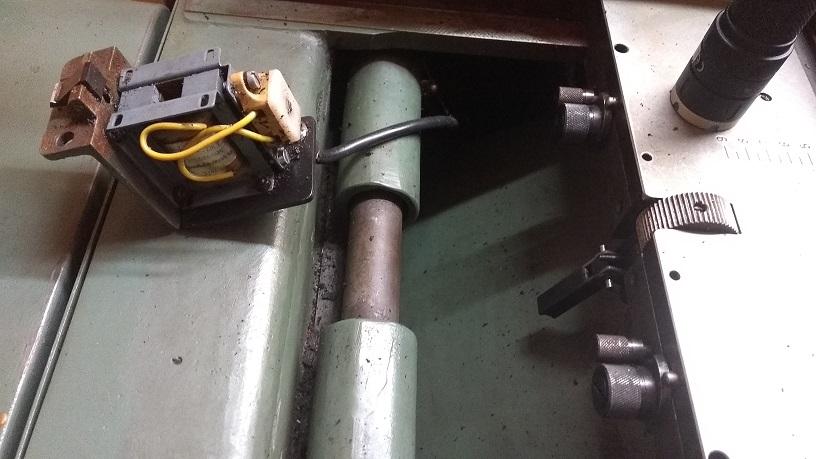
Tack, Danne I'm glad you're enjoying it. I'm sorry it's such a strung-out saga but I'm spending the odd hour on this machine whenever I can around my other commitments. Right now I don't have the time or resources to properly rebuild this machine (and I don't think it really needs it) so regrinding the the gibs is something I'm avoiding if at all possible and for now. Thanks fella. The top blade on mine is only held in place with two countersunk hex-socket screws. I tightened them according to the manual, which was pleasantly simple. No torque ratings, no fannying about, just tighten but not too much that the plate stops rocking on its springs. Then tighten the locking eccentrics so the guide stops rocking and then tighten their locking screws. Those are the sorts of instructions even I can follow. I checked and I can't get a piece of copy paper between the knife and either guide but can turn the knife over by hand. Excellent engineering. I've solved the mysteries of the auto sharpening feature. In case someone comes across this thread in the future is also trying to fathom it out, the timer appears to be an interval timer that sends out a ~0.5sec 220v pulse between each interval. I.e. if you set it at 10 minutes it'll close the contacts for half a second, then off for 10 minutes, close the contacts for 0.5sec again, ad infinitum. A simple thing to replicate using off-the-shelf parts if you're so inclined. The timer does not output to a clutch or an electronic control for the grinding motor as I suspected but to a solenoid directly behind the knife advance wheel. For each pulse it receives it advances the knife one notch. I presume that this brings the knife edge heavily into contact with the emery wheels and the edge is ground back by the same amount. I've hooked it up to a temporary toggle switch inside the electrical panel but I doubt I'll get into the habit of using it for all the reasons Rocky said. This was about the limit of my knowledge of band-knife machines too until I bought this one, though I don't have nearly your engineering skill. I was fortunate enough to be in the right place at the right time and had to jump on the chance, though I spent the money I had budgeted for some cutting dies I sorely needed (and still need). Apart from the labour (which was mostly days off and evenings) I've spent about 5-6% the cost of a new machine on this one. Bell-knife skivers are real handy machines. You can do some small splitting with one (and I do... or did...) but I've never got it setup so I'm happy with the finish if I have to do multiple passes. The largest roller-foot I have is 40mm and it has sharp edges so if the leather's any wider than that I end up with tram lines. The error is probably between the seat and the machine in my case, but that's my experience. I've got a few PDF manuals I can send along if you're curious but I don't think there's many/any exploded diagrams. Mostly line drawings of sub-assemblies if their function is not immediately clear.
-
That's about typical -- someone needs something, I overthink it, and overlook the most practical and appropriate solution!
-
That buckle is from Abbey England, a supplier of leather and associated products. They have their own foundry in the English Midlands, which is an unusual and laudable thing as it keeps skilled jobs in an area where employment has been patchy for decades, it keeps quality high, it keeps lead times low and it means that custom and bespoke work is a quick and easy thing to arrange. As far as I know they are the only suppliers of this pattern buckle. I've just logged into my account and these, in solid brass 1.5", are available at £8.40 (about US$10) in single units. I don't know about you but I think that's a pretty decent price for a relatively complex good quality piece of hardware. Abbey frequently fulfill overseas orders and there are several members of this forum who have ordered from them to the US.
-
@bikermutt07 You seem like a handy sorta guy -- if you only need a few why not make your own? Then you'll have total control over material, size and finish. Common tools should do it -- buy a strip of the cross-section and material you want. Cut to length with a pair of tinsnip shears, centre punch and step drill the holes, bend in the vice. Round and deburr the ends with whatever you got -- file, belt grinder, a lump of sandstone... IIRC you're a cabinetmaker, right? Perhaps you could snaffle some steel pallet banding from work if you want something free, or maybe a junked steel rule for a cool look.
-
No worries, glad to help. It'd be good to see pics of your grand old lady somewhen. The pressure required for a machine to penetrate leather from a standstill often surprises me. Even with a 1mm diameter brand new needle there's a fair bit of welly needed if you try to start with the needle in contact with the leather (the most difficult part of the entire cycle). Now consider that an average needle in a no6 is probably 2-3mm diameter! That's why the flywheel/balance wheel is so heavy -- it "saves" energy during the easier parts of the cycle and "expends" it during the more difficult parts. The energy stored in a wheel increases exponentially with the speed it's going (F=1/2*M*V*V) so it gets much easier with just a small increase in speed. With my no6 sometimes if I'm placing the needle very precisely for the first stitch I'll touch the needle to the leather, back the wheel off a little and slam it forwards, which is usually enough to push though even stiff bridle or tooling leather and get the ball rolling. (Got to be confident that the needle's going to survive to use this technique though -- the 331 needle is long and in small sizes has a tendency to explode. I got hold of a packet of no3 needles a few years ago and even on level leather and using the correct size needle steady each one died before the bobbin was empty.) There's also the chance that your needle is blunt or damaged. The manual recommends sharpening blunt needles with an oilstone. Even though they cost me £2-3 each damaged needles go straight in the bin. Glad you've got a selection of needles. I've never seen a 9 -- largest I've got are a few 8s but they used to make 10s! The number refers to the linen thread they recommended for that needle size -- 18/5 linen (what I think you guys call 5-cord), for instance, needs a no5 needle. There were also half-sizes. GB were the last company making the needles for these machines and the only commonly available ones this size of the pond are nm230, equivalent to the old no5 size. This chart does a pretty good job of translating the thread and needle sizes: https://www.tolindsewmach.com/thread-chart.html
-
Shuttle goes in the bed on the left. There's a sliding cover held by a little spring inside, which you have to unhook by sticking your finger in the LHS. At one point in its cycle (near the lowest point on the needle's stroke) the shuttle carrier, a large C of steel, becomes visible. The shuttle drops in here. The pointy end of the shuttle points towards the right and (what stumped me when I first got mine) the open face of the shuttle faces towards you. Hope that helps! If you need some photos I'll dig out my #6.
-
Quick question for anyone who's operated a splitter like this before: could you please describe the action of the grinder timer? Mine has never worked, it's beyond economical repair and I've decided just to replace it. The manual says to set it for 10-15 minutes depending on how tough is the work. But what it doesn't say is what the operation of the timer actually is. Is it, for instance, an interval timer where it switches on for 1 minute, off for 10 minutes then on again ad infinitum, or an on-delay timer where it's manually switched on but switches itself off after 10 minutes.
-
Thanks mate. My calipers wouldn't fit in the tiny groove but measuring with my mk1 thumbnail I reckon it's less than 1/2mm deep. Do you have some special arrangement for grinding them? The blade is pretty clean apart from a few minor rust spots. Yep the adjuster spring is present and pretty firm. What should I look for when snugging down the top plate? Blower's working okay but I've got it disconnected right now as it was running a little warmer than I thought right and I don't need it for the adjustments I'm making right now. Thanks Jimi, it's really coming together now. Despite a few maintenance issues it's not in bad nick for its age! Tea bag boxes ya mean Harry? Not so good for shimming steel-on-steel. (Actually I've shimmed steel-on-wood bearing surfaces with card before. Soak the card in linseed oil before snugging down and it polymerises to a hard, firm surface that can be peeled off with no damage if you need to. Works great on Lee Enfields where the wood has shrunk a little.)
-
A little more of the endless endlessness, you lucky people. With the blade in its proper place and the gibs moving smoothly it's time to adjust the tracking. This is a minute adjustment of the angle of the idler wheel, which changes the angle of the knife. Just like a bandsaw or belt sander. The idea is that the back of the knife bears evenly on both gibs, judged by comparing how warm each feels after running for a while. The previous owner of mine apparently had the knife running at an angle for long enough to wear a deeper groove in the right gib than the left so it can never run true. I didn't feel confident grinding the wear surfaces level with enough accuracy and couldn't find any for sale online. So I shimmed the right-hand gib. There's only one type of shim-stock I had handy, and it comes wrapped around beer. Much better.
-
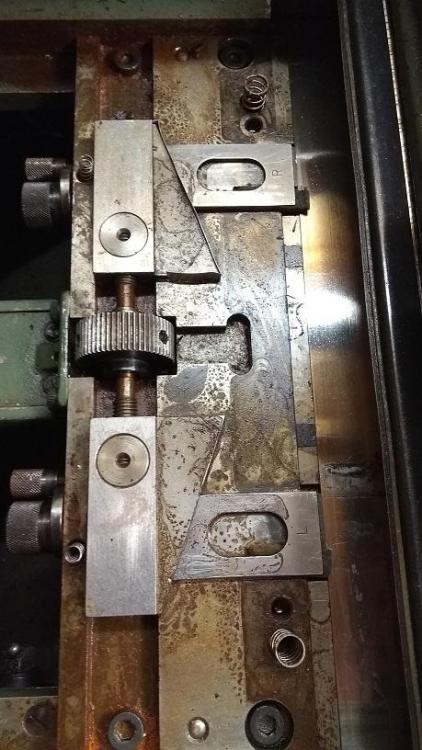
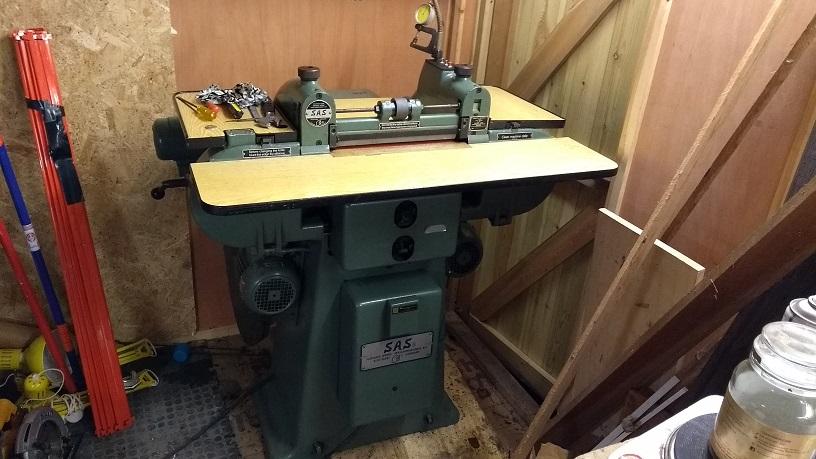
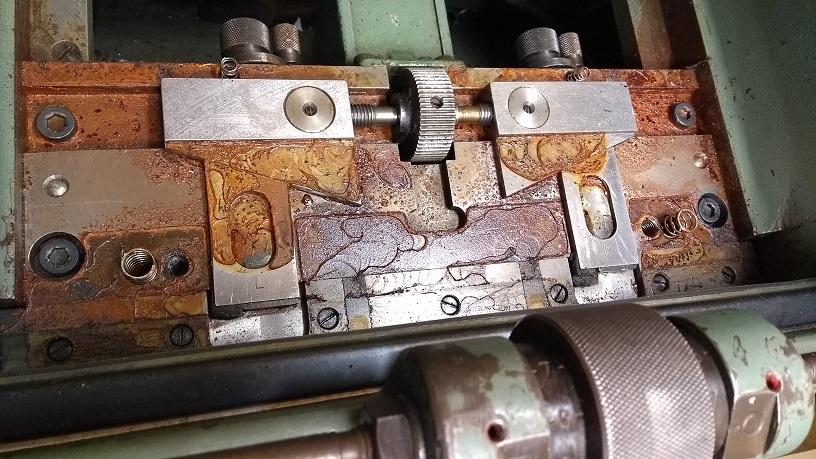
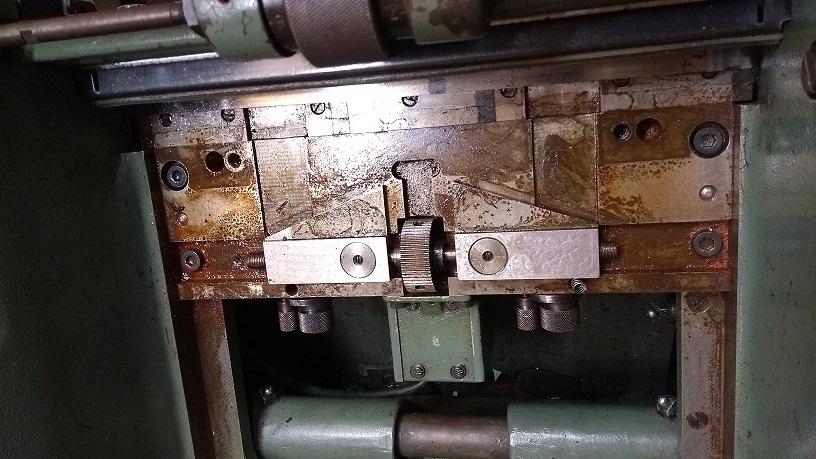
With the electrics mostly functional it's time to get the mechanical arrangements sorted. All the pieces went back together without too much trouble and I could revel in its yellow formica beauty. Then I had to put the blade in, which required me to remove the upper blade guide. And I was not pleased with what I found. First a little background. A basic/classic band-knife splitter like mine is not the most complicated machine in the world. Essentially it's a two-wheel bandsaw turned on its side with motorised feed, a motorised blade grinder/sharpener and a dust extractor. However what it is is incredibly accurate and rigid. It has to because we're talking about a machine intended for reliably splitting materials with a variance of a fraction of a millimetre. The blade, just 0.4mm thick, is kept dead flat during the 12" length of the cut by a pair of blade guides, very flat and smooth steel plates which sandwich it from above and below. There is also a pair of blocks which slide forward and back between the blade guides. These are the blade gibs and their job is to prevent the blade from moving backwards under pressure from the work being fed into it. They have to be adjustable because the blade gets a little narrower every time it's sharpened. As everyone who's operated a bell skiver understands, the position of the blade edge, relative to the feed wheel, is essential. Everything has to be very flat and smooth. And this is what I saw when I removed the top guide: Yep, that's rust. On precision ground surfaces. So, choking on the emulsifying oil I sprayed all over the machine and myself I set about with rags and a flat-head screwdriver scraping off what I could. (For reference we're looking down onto the top of the machine from the front. That big knurled wheel is the thickness adjuster. The knife runs in the groove just visible above the adjuster, and the gibs are the two narrow steel blocks immediately above the groove. Big improvement and probably as good as I'm going to get it without removing more mechanism than I wanted to, or getting in there with a dremel. This photo is taken backwards form the previous and was after I'd removed the gibs for polishing. The knife groove is a little more visible here, as indeed is the back edge of the knife, far too far forward for actual use.
-
I came to know of him through a friend who grew up near Ringwood, Jack's still a bit of a local legend down there. A good amount of his old vids on YouTube -- even if they were filmed in the neolithic
-
Thread diversion: I once saw a clip of Jack Hargreaves making something similar from leather offcuts, in the same way the local cobbler/cordwainer did in his childhood. A disc of leather maybe 3/4" with two small holes in it, and a short length of thong laced through the holes leaving a small loop, then another disc laced onto the thong, another gap, another disc, etc. A bit like a ladder. The loose ends were tied to the belt. Shoot something, put its legs through the loop and snug the disc down on top to keep it in place. Shoot another thing, put its legs through next gap, then snug the next disc down. The discs were cut with a wad punch, in his case the punch he used to cut the felt wads for his grandad's muzzle-loading gun... which he used for rough shooting.
-
@JJN that cleaned up well. I've had to pass on several clickers of similar vintage due to access problems. As @Constabulary would say, I'm glad to see people keeping vintage iron alive ;-)
-
I have no photos immediately available but anything that's longer than either plate I usually do in multiple hits. Press, lift the ram a few mm, slide the cutting board and press again. It's not so much a lack of power, it's just I'm ginger about pressing too hard, in case I bend the die or bury it in the board. My plates happen to be 10" square I think. I've cut 18" dog collars in 3 hits before, though it's a bit fiddly.
-
I use a similar 6-ton for small clicking and yes it works fine. Mine uses a bottle jack rather than a ram with separate pump. 10mm steel plate on top of the bars, cutting board on top of the plate. Leather goes on top of that, then the die and a second plate on top of the die to spread the pressure from the ram. Some people weld the spreader plate to their ram, but mine appears to have been welded together at 4.55 on a Friday afternoon so I've decided the spreader plate stays loose. The biggest limitation is the lack of space between the uprights.
-
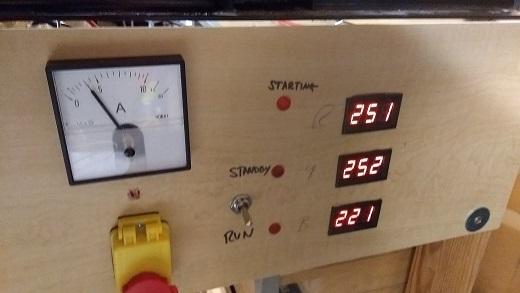
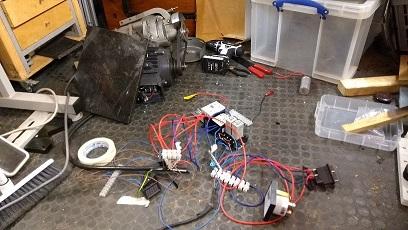
Long story short I went back to the KISS approach: a Steinmetz arrangement (static converter) on the largest motor on the machine. Cheap, simple, imperfect but adequate. What I should have done all along. She lives. VID-20190304-WA0008.mp4 A little fiddling with balancing capacitors later and I've got it about as sweet as it's going to get. The machine at idle consumes less power than my previous converter did alone. (Temporary control panel installed in spare space under my clicker press -- which means it'll be there permanently.) Time to tidy up the electrics and put he machine back together. I bloody hope this is going to be worth the trouble...
-
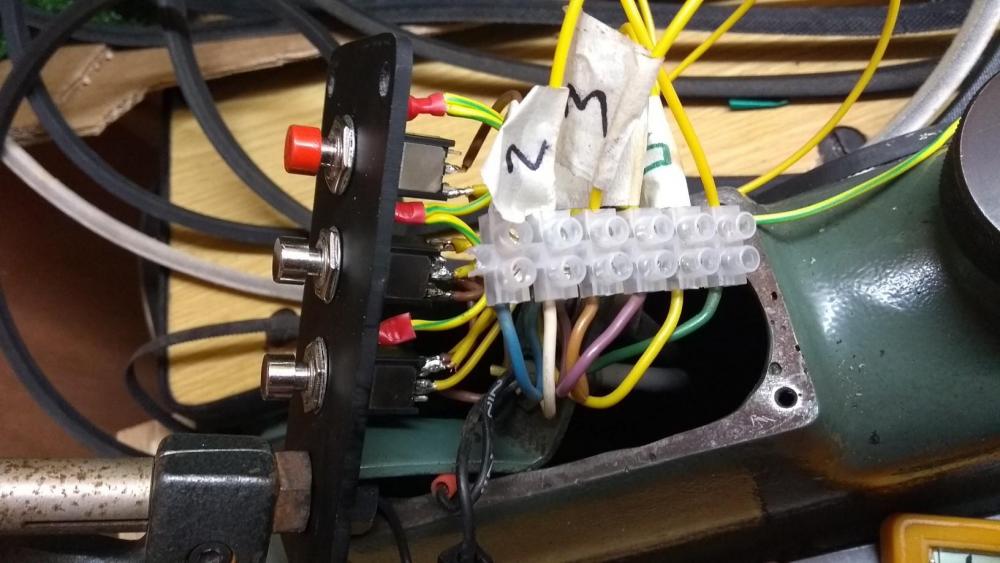
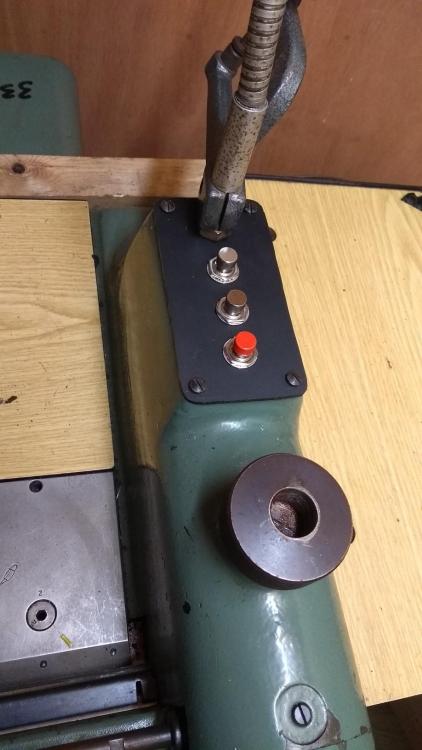
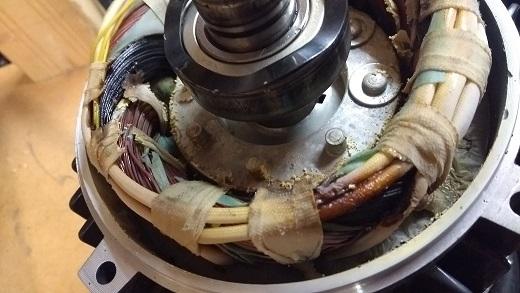
In this episode: Matt plays around with dangerous electrics. Best not to copy me if you're not familiar and comfortable with the risks. As noted earlier the control panel got damaged in the move. The 60 year old plastic had the structural strength of vintage cheddar so I built a replacement. Bit of an awkward setup but luckily there was plenty of space in the casting for a choc block to extend the original wires. This machine is built to run on 3-phase electricity. Same voltage and frequency of angry pixies as normally come out of the wall sockets in my country but each 120 degrees out of phase with the previous. This allows a smoother supply, especially for higher-consumption appliances. The splitter is only rated to consume 1100W so I presume that it's purely because 3-phase motors are simpler and more reliable than single-phase, and this machine was designed for use in a factory. What idiot would try to run one in a small workshop eh? Unfortunately I don't have 3-phase laid on so I had to make other arrangements. Upgrading to 3-phase supply would cost about as much as a brand new machine. Replacing the 4x motors with single-phase ones would cost £400, even if I could find cheap drop-in replacements. VFDs would require one per motor, connected directly, with the switchgear rebuilt -- not cheap and I wanted to keep the switchgear as original as I could. Cheap 3-phase petrol generators are minimum £350, noisy, and of questionable quality. So I needed some sort of phase converter. After some study on the subject I decided a rotary converter would be better. Prices were not attractive so I built one out of £150 of parts. Then I toasted the idler motor in my converter. Whoops.
-
I love my bell skiver, though I probably don't get all the use out of it that I could. A hugely versatile machine. As well as tapering and step skives it's really handy for splitting/thinning/levelling narrow pieces of leather -- your binding strips would be a great example. I read that people are able to thin wider pieces of leather 2" at a time but I've never got it as consistent as I'd like. The problem probably lies between the machine and the chair but this was my biggest disappointment with my machine. I've got the normal stone feed wheel fitted to mine, which does well on chrome tanned leathers under 3mm. I've used it on 4mm+ bridle leather but it didn't feed consistently. There is a toothed steel feed wheel that some users recommend for heavier veg-tanned leathers but I've never used one. Various rubber feed wheels are also around but I don't know what they're good for. One minor word of warning: these machines (or at least mine, a 50+ year old Fortuna) aren't plug-and-play with different feet. There's usually at least a few minutes of adjustment needed for each different job. They're a lot less complicated that they first look and I find that I can adjust for most jobs by tweaking the edge fence, foot height and foot angle. My most-used foot is a 40mm roller with fair sharp edges. Whether by luck or circumstance I can do 90% of my skiving operations using just this one foot. Also be aware that the built-in sharpening feature shoots small amounts of sparks, dust and iron filings out the left-hand side of the machine so don't put it next to where you hang your freshly laundered shirts. Checaflo on Youtube has a great couple of videos about bell skivers, I learned a lot of the basics from them. I've got mine set with the knife moving as fast and the feed as slow as possible, which I think gives a finer result.
-
Now asking £650. All offers and part-ex considered.
-
I've never wanted a e-stop mushroom on a sewing machine but I get frustrated with having to de-power the motor every time I want to stop it from sewing my fingers together. The second or two it takes to power on again is fine but the 10+ seconds the Jack servo takes to empty the power capacitors after I switch it off is too long for me to sit around waiting. An instant-safe switch would be rather handy, with a "live" light that's visible without looking under the table. And while we're at it I'd like a toggle switch for the needle positioner. And a one-touch backtack feature. And unbreakable needles. And an endless bobbin. And a pony, and a plastic rocket.
-

Best pre-finished leather for bike seats?
Matt S replied to Matt S's topic in Motorcycles and Biker Gear
Thanks JC. I still can't log into Abbey but as you say the Pittards won't be cheap!


