Bob Blea
-
Posts
1,771 -
Joined
-
Last visited
Content Type
Profiles
Forums
Events
Blogs
Gallery
Store
Everything posted by Bob Blea
-

My first western rig
Bob Blea replied to immiketoo's topic in Gun Holsters, Rifle Slings and Knife Sheathes
I love this especially because it relies on geometrics so much. That really makes it stand out. -
Chrome tan leathers are very hard or near impossible to get to burnish just by their nature. Usually people will roll the edges over so they can't be seen or use edge paint like robs456 was linking to. Oil tan leathers I'm not so sure about. I don't have any experience with them but I don't think they are very good at burnishing either.
-
Sheridan Leather Wyo Quik Slik? Anyone tried it?
Bob Blea replied to dfrensdorff's topic in Leatherwork Conversation
I use it too and it works great. Like Ray said it takes very little to get a good result. I use it with a wooden burnisher mounted in a drill press and get good results. -
Hello all, The class schedule for the Rocky Mountain Leather Trade show has been posted on the Leather Crafter's and Saddler's Journal website. The dates for the trade show are May 20th-21st-22nd, 2016, with the classes starting on May 16th. You can get class descriptions and other information by going to: www.leathercraftersjournal.com/sheridan2016.html
-
If it were me (and I'm not a holster maker so take this suggestion with that in mind) I would make a design similar to a Mexican loop holster and attach that holster by sewing it in along the same stitch lines as the carved ornamental piece. I don't like the idea of the gun being in the bag without it being secured to something. So I would take the part of the Mexican loop holster that attaches to the belt (I think the technical term for it is the skirt) and attach that to the bag. The holster part of the Mexican loop holster goes down into that and is secured by belts in the skirt. You could probably find a holster pattern and modify it to work inside this bag.
-
The rule of thumb I've often seen is to make the inner part of the wallet 1/8 inch shorter than the outside. Also, check out the Patterns and Templates section as I think there are several wallet designs listed there.
-
Those are all great guys and tools. I've collected many Bob Beard tools over the years and they are definitely worth the price. And I love Jerry Van Amburg. I've got some stingray I bought from him a couple of years ago that I'm going to use for something special someday....
-
You looked at Barry King's booth and got away with only spending $150.00? I admire your restraint!
-
I see what you mean about the color variations but I still think the finished product turned out pretty nice. I really like your interior too.
-
Excellent lettering Chief! It looks really good.
-
That looks great!
-
I know a saddle maker who used to teach at a saddle making school. He once told me that he would confiscate any pens he found on his students benches because it only took one pen mark to ruin a project, for just this reason.
-
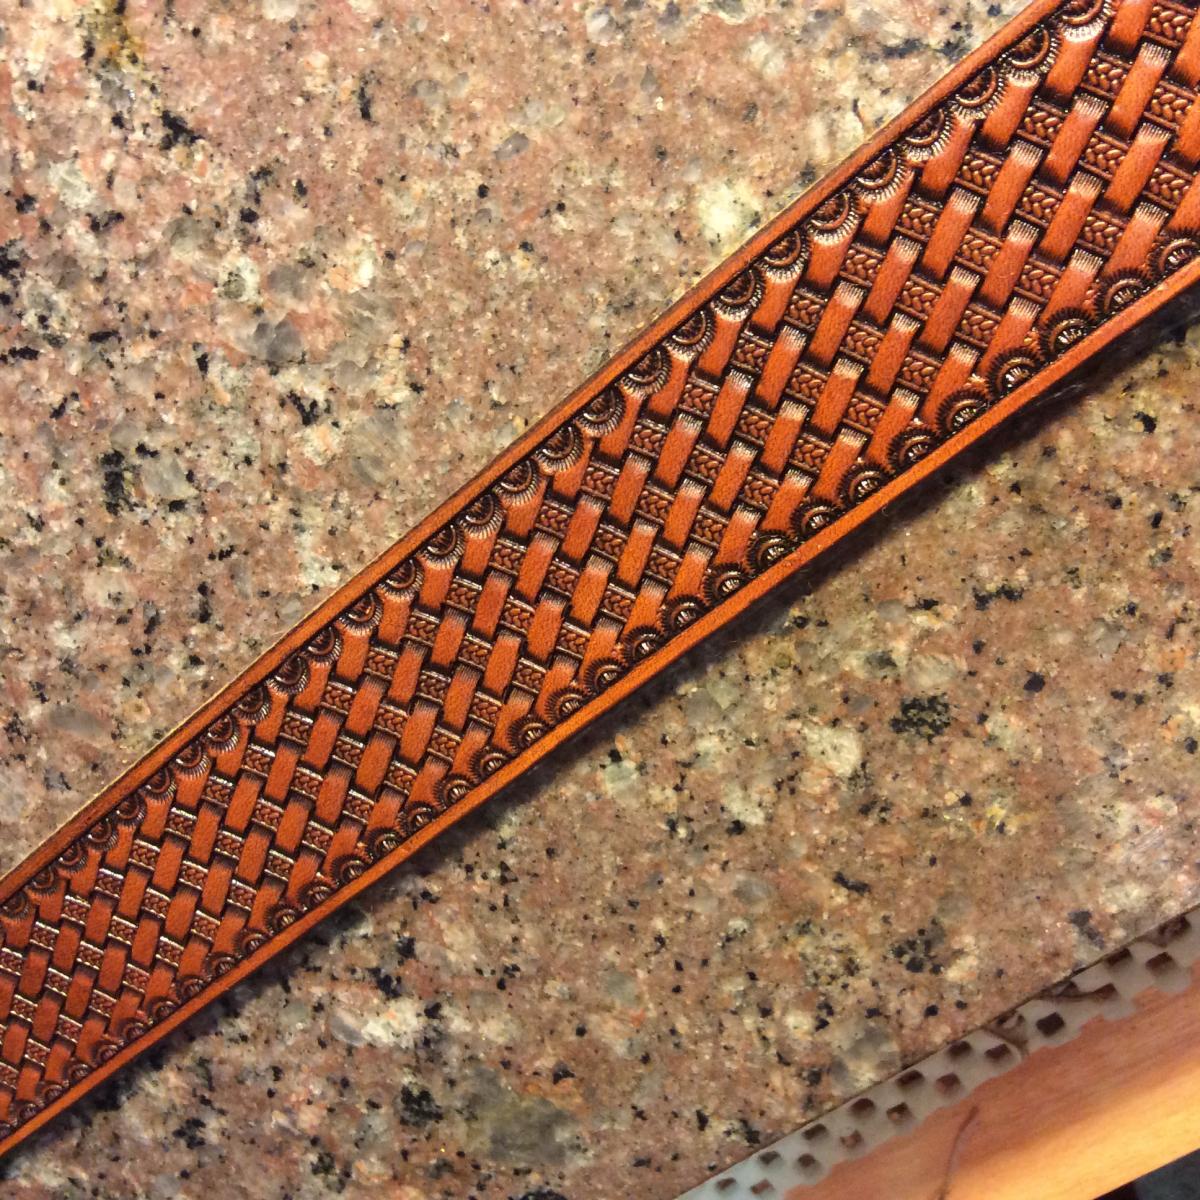
Here's a belt I did recently. The basket and the border are Barry King stamps.

-
You are correct, choose the resist based on what you've already applied to the leather. I will say that I prefer lacquer based resists just because I have more experience with them and they seem to work better for me. But plenty of people on this forum use acrylic based products with success. I would oil before I painted. The Acrylic will probably block the oil from penetrating since it seals the leather pretty well. I wouldn't say you absolutely need to oil an item. I know a well respected maker that has stopped applying oil to his projects unless it will see a lot of exposure to the elements. He wants to maintain the natural light color of the leather as much as possible so he's stopped using Neatsfoot oil on his works, and so far he hasn't heard bad feedback from any of his customers about it. I feel like you should use oil anytime you are dying leather because the solvents in the dyes tend to dry out the leather and make it more brittle.
-
And I should have also mentioned: Whatever product you find, TRY IT ON SCRAP FIRST! Make sure it doesn't mess up your paints on a scrap piece of leather before you try it on your project. You will also want to verify that it is thick enough to resist the antique before you apply that. Bob
-
Hello Katariina, I can't read the red label product but the wax probably isn't going to help any. Typically you would want either a lacquer based product or an acrylic based product for a resist. I'm assuming the painting on the leather is acrylic based, so I probably wouldn't use a lacquer based resist because I would be worried that the lacquer could dissolve my paints. I would choose to go the acrylic route, something like Resolene. If you don't have a leather supplier handy (I'm assuming you don't have a local store you can go to) there are other options. Art supply stores commonly carry a product called Acrylic Matte Medium, at least here in the US. Liquitex is a well know manufacturer here in the US. It can be used like Resolene over acrylic paints, though I would want to water it down 50/50 with water and apply it in several light coats. Hope this helps, Bob
-
There is always Oxalic acid, also known as Barkeeper's Friend at the hardware store. I've used it (diluted in water) to clean leather, especially when it had a bit of mold spots growing on it. Also, a really good way to remove metal discoloration on leather is lemon juice, full strength.
-
Funny/sad Story About Tandy Leather...
Bob Blea replied to Dougster's topic in Leatherwork Conversation
That by itself is a sign of hope for Tandy. -
Personally I don't think I would want to bring leather like that into my shop. BUT if I had to, I would probably try to clean it with Oxalic acid.
-
Introducing Me
Bob Blea replied to DiBentto's topic in Purses, Wallets, Belts and Miscellaneous Pocket Items
Welcome, you are off to a good start! One tip I would give you is to round your corners slightly. Pointed corners like you have will wear badly and bend back. They will round themselves with use. -
Congratulations, that is a great find!
-
First Post - Bible Cover & Portfolio
Bob Blea replied to KMMay's topic in Books, Journals and Photo Albums
Nice work, love the colors you are getting. -
Welcome, you are off to a good start! This site is definitely the best place to find answers and ways to improve, and there are lots of people here who are willing to help.
-
No trick of formula that I'm aware of. I just try and keep my radius of curvature much larger than the width of my stamp. If you bevel the line at the base of the border stamp it often hides any gaps between the base of the stamp and the line.
-
Good to hear from you again and welcome back! You were missed. Hope you are feeling better.