Beaverslayer
-
Posts
1,983 -
Joined
-
Last visited
Content Type
Profiles
Forums
Events
Blogs
Gallery
Store
Everything posted by Beaverslayer
-
Vegan leathers include: Vegetan: This is a microfibre material that is specifically designed and used as an animal-friendly leather substitute. Lorica: This material is made out of several different microfibers. Sidi, an Italian motorcycle company uses it a lot. Birko-Flor: This is what eco-icon Birkenstock uses. It’s made out of acrylic and polyamide felt fibres. There are two kinds — the kind you find on normal Birks and a kind that looks like pleather. Birkibuc: Another Birkenstock baby. It’s made out of the same stuff, but looks and feels like nubuck leather. PVC: Finally, a term you should be familiar with! Good for animals. Not so good for environment. Kydex: This is an acrylic-PVC alloy. It's produced by Kleerdex, a manufacturing company.
-
I am in total agreement with TwinOaks, unless you have actually sat down and created something from the side of a cow, along with a pig, snake, ostrich and kangaroo all in one piece, you will never understand what it is that we do so passionately. There are also things in leather crafting, that just cannot be done with a machine. Lacing for example. I have many times thought while lacing together a project for hours on end, that there would be no way to accomplish this, by using a machine, it's just not possible. Even if I did have a machine, and used it, then I could no longer market my products as "Hand Made". Every leather crafter I know, is filled with a desire to "Create" with their own two hands, it seems to be part of our DNA. I just could not imagine taking a cowhide, placing it in a machine, pushing a bunch of buttons and taking a finished product out the end slot. This is not in any way shape or form being an artisan or hand crafter. This is being a "Manufacturer", and I am not interested in being such. Do you think the Michelangelo's "David" would be such a great work of art, if he had used a CNC to make it? Or if the Sistine Chapel or Mona Lisa would be great works of art if they were done with a laser plotter? I think not. As TwinOaks stated, find a leather crafter near you, and explain to him why you want to hang around, watch them very closely, and you will see the passion in their eyes as they work. Then you may understand a bit more.
-
 Well 10mm on each side is a bit of a distance. Once you have your circle template drawn and cut out, lay it over the canteen and see how it lines up with the edges of the canteen. If there is any gap between the template and the sides of the canteen, then you will have to add to your template. Seeing as your canteen has this bowed out belly, then I would suggest that you do case the circle pieces of leather before assembly. It will then help to form it around this belly. when it comes time to tie it all together, tie each circle to the side piece about half way around, then slide your canteen into the "pocket". Once you have it in place you can continue to tie the rest of it together, then start to lace.
 -
shtoink, I know it sounds a bit hard to do, but once you get the hang of it, it's quite simple. Once you have traced the diameter of the canteen, all you do is take a ruler and every 1/4" to 1/2" you make a mark 6mm from the drawn circle. Once you have completely gone around the circle, you can then connect all the marks, giving you the desired template. Yes you could measure the radius, multiply by pi squared and all that, then take a compass and draw out the circle, but by the time you have taken the measurement, go to the computer room, Google radius conversion calculator, do all the math conversions on the calculator, go back to the work shop, find the compass (and hopefully it's an accurate one) adjust it to the right radius, then draw your circle, my process is done, and your ready to move on. To determine the circumference of your template, all you do is make a reference mark on the edge, then holding it like a wheel on it's edge place it so the reference point is at the beginning of a ruler, roll it along the ruler until the reference point comes around. This way you will get an exact mark on your ruler to use for your side measurement, rather than some number off a calculator or computer that is 13.364792". we know where the 13" mark is, but where in the heck is .364792 on my ruler? Once you have all the hole marks on the round template marked out, you can again roll the round template along side the straight one and mark those holes. It may sound fiddly and even a bit hoaky, but it works quite well.
-
What I found works real well for me, is transparent printable shipping labels. They come in a 8 1/2" X 11" sheet, and about 20 per package for $5.00 I think. You just print your design on the label, remove the self adhesive backing, and stick it right down to your cased leather....no slip or sliding around. Granted, it can only be used once, but in my case that's exactly what I need...one only.
-
What, your supposed to wear a mask??? No, just kidding....It all depends on the type of product you will be spraying. Home Depot sells a good respirator that should cover pretty much anything that a leather worker is going to use, get the one that has replaceable filters, so when they clog up, you can change them without having to buy the mask all over again. Those filmsy dust masks will work also, but only if your spraying for a very short time.
-
Marietje, To start with, I would use the kangaroo lace, as it's strength is far superior to the other option and you will not accidentally break it while lacing the sides together. Secondly, take some "poster board" and trace the circumference of your canteen onto it, then add 6mm to the circle for lacing seam. Now measure the new circumference. Once you have this done, then draw out the side panel piece on the poster board, using the "new" circumference of the circle as your length measurement. For the width of this piece, add 6mm to the width of what your canteens width is, again for lacing seam. You will have to make cutouts for the strap tabs on your side panel template as well as the fill/drinking spout. Personally, I would recommend using a round hole punch, not the slot chisel punches, as a round hole is less likely to "split open" if you pull to hard on your lace. Now, use a ruler and measure and mark along the side piece template 3mm apart, as you are getting close to where your start point is, measure between the start point and where your last mark is. If it does not divide evenly by 3mm, then just make a few adjustments to the last holes, such as one or two marks may be a bit over 3mm. Now, you can use this to mark your holes on the side piece. When doing something like this, I will always put marks as reference points on the template, and then as I'm marking the leather, I will transfer those reference points to it. You can then use them to align your pieces. Once you have all your templates marked for hole location, use your round punch and punch out all the holes. The you can lay the template down onto your leather, mark all the holes onto it and then punch them out. To assemble them together, you can use short pieces of kangaroo lace, align the reference points, and then slip a piece of lace through a hole on the front piece, as well as the side piece, and tie it up. Continue to do this about every 10 or so holes. Once you have the front tied, you can then do the same on the backside. Now you will have it all ready to lace. As you get to the little ties, just cut them out and continue lacing. Should you need a break from lacing, you can set it down for weeks if you like, and it will still be all lined up ready to go again. Hope I explained it well enough for you to understand. Oh yes, your holes should be just a tad smaller than 3mm so they don't show once the canteen is complete.
-
Bill, Glad to have you as our newest Ambassador. I myself have been away from this site for some time now, as a normal job had taken over my life. Now that I have my shop back up and running, I hope to be able to contribute such as I did in the past. I do have to let you know though, that the last words of wisdom you posted, is contrary to what you have been trying to say here all along. People may read that and say...."Hmmmm, I guess it is better if I remain silent" Ken (The Beav)
-
I myself have never tried it, I use a water based glue from LePages, it's non toxic and does hold nylon mesh to leather. I use it to glue nylon mesh to the inside of my hats as a liner before lacing them together. But, like contact cement, it can be a bit messy. I will use painters tape to mask off the area I want to apply glue to, so the mess is at a minimal. I wouldn't bet my next pay cheque on it, but I would think the sewing tape would work quite well. Can't hurt to try anyways, and there is no drying time involved.
-
Have you tried double sided sewing tape?
-
It really looks like a 2 strand button knot, but I have no idea as to how to do it.
-
wood, that is some fine looking work, the burnishing on the edges is extremely good....great job.
-
Can you explain to me and the others here on leatherworker.net that if as you say in your other post that you have fixed everything, and that your security certificate is good, why does your site keep showing this when I try to log onto it??????

-
New Site To Sell Your Work On! Craftstack.com!
Beaverslayer replied to craftstack's topic in Old/Sold
This Connection is Untrusted You have asked Firefox to connect securely to www.craftstack.com, but we can't confirm that your connection is secure. Normally, when you try to connect securely, sites will present trusted identification to prove that you are going to the right place. However, this site's identity can't be verified. What Should I Do? If you usually connect to this site without problems, this error could mean that someone is trying to impersonate the site, and you shouldn't continue. -
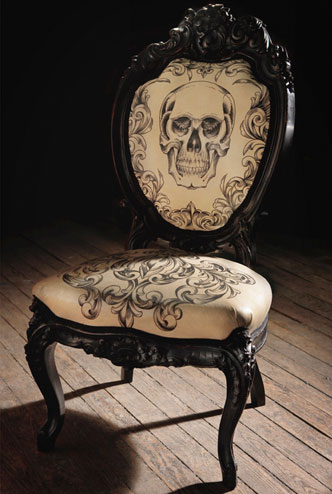
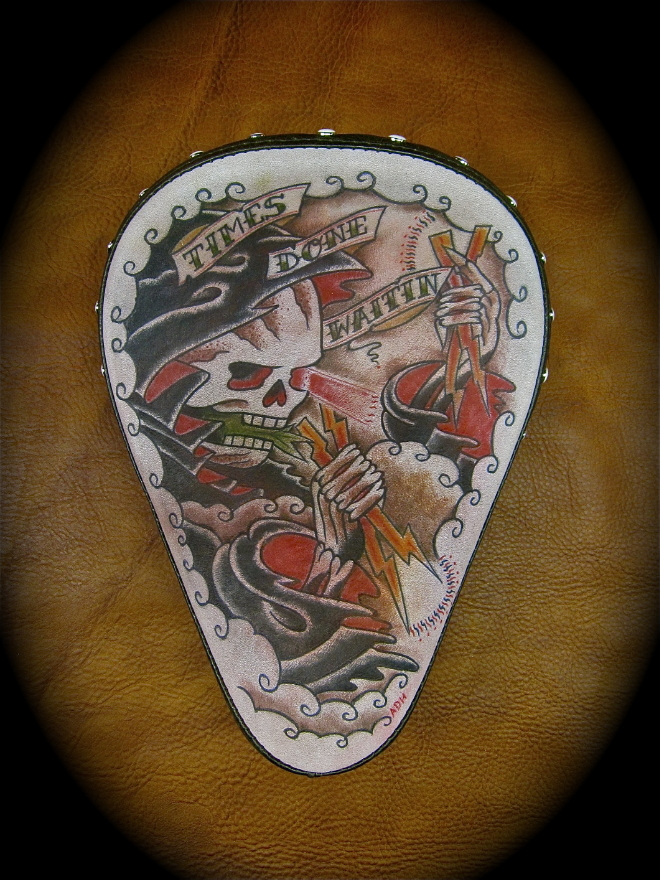
cem, Here's a few that are especially good work tattooing on leather. I know "Don't believe everything you see on the internet" but I'm pretty sure these are real. Undoubtedly artistic, this hand tattooed leather chair is made by the Mama Undoubtedly artistic, this hand tattooed leather chair is made by the Mama Tried studios, run by Scott Campbell, a very renowned tattoo artist. Here's a solo bike seat by Electric Solo. He states on his website that he spent 5 years developing the method to do this. Here's a picture of him tattooing a seat. Notice how all the bottles and stuff are all turned so the labels are not shown? The real nice thing about family in this case, is that family owns the tattoo shop and he wants to figure this out as much as I do.
-
renegadelizard, I know exactly how you feel. There was a time a ways back I wanted to get started on punching holes to lace together a vest I was making. I my haste, I didn't realize that the area I was punching holes into was laying on top of one of the front panels of the vest. I got about 100 holes punched into the front panel before I noticed. The only saving grace was the the front panel wasn't already laced to the rest of the vest, so I didn't have to take out lacing as well to replace it. I'd give TwinOaks idea a go, it should work depending on the type of glue you used.
-
cem, This is only the beginning. Ever since I posted the picture, it's been a constant brain drain about tattooing leather. The Ferrari has me just stumped. There is no way the artist sealed that entire car, then cased all that leather. Also, the leather on that Ferrari does not look like veg tan. My son and I (the tattooing son) were at Marks Work Warehouse this evening, and he had picked up a work boot that had the nicest suede type leather on it. He found me and asked my what kind of leather it was, so I told him I thought it was cowhide suede of a very good quality. He then asked me how would we tattoo this leather, because if we put that sealing stuff on it would wreck the leather. Well, this again started the old brain draining. So, its off to the leather supply store tomorrow to see if we can't find a bunch of scraps of a whole bunch of different kinds of leather, then back to the tattoo shop. I'm going to figure this out, one way or another....
-
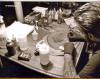
Well, regarding tattooing leather, we seem to have figured it out quite quickly. We tried pigskin....didn't work. We tried Chrome Tan Calfskin...didn't work We tried Garment Lambskin...didn't work So, we tried cased Veg Tanned...work, but the Vaseline kind of screwed it up. So, what I did was to take a piece of 2/3 oz Veg Tan, put 3 coats of Super Sheen on it. Once the Super Sheen had dried, I soaked the leather in hot water, until it worked its way all the way through. Had to do this by running hot water over the backside of the leather, as the water would not penetrate the Super Sheen. We let it sit for about 30 minutes, the proceeded to tattoo just like you would a human. The only step we didn't do, was to use Vaseline. After spending a bit of time adjusting the needle depth and power supply voltage, it worked quite well. The needle on the gun is adjusted for a very short stroke, but the power is cranked up to give a very "Heavy" hit. The needle we used was a single needle liner and regular tattoo ink. Depending on how good you are with a vibrating tattoo gun in your hand, and making it stop and start with a foot pedal, your results will most likely vary quite a bit. Myself, I don't like the vibrating gun in my hand, it tends to put my fingers asleep because of nerve damage in my arms and hands. I'm going to invest in a nice rotary tattoo gun, as these do not vibrate like a standard coiled gun does. Next I want to try tooling something, then tattooing it so it has finer highlights and faded coloring. This could open up a whole lot more options to our wonderful world of leather. Well below is a picture of what I tattooed, please remember I'm not a tattoo artist so it's not real fancy, but you get the general idea.
-
silverback, I'm not sure about using tattoo ink as a dye on leather, and I know for sure I wouldn't let anyone sink Chinese ink into my skin...Tattoo ink tends to be a bit thicker than most dyes, more like a hobby paint, it's longevity would depend on how it was sealed over afterwards.
-
What I will do in this case, is cut a piece of lining about 1/2" bigger than needed, apply glue to both pieces and attach together. I will "roll" the two pieces with a metal roller I have and allow to dry for a while. Once they are dry, I just use my scissors and cut off the excess. Works great and leaves a nice edge. I still and most likely always will recommend the Lepages Pres-Tite Green glue, it is so much easier and cleaner to use.
-
LaughingWolf, What I would do, is mark and punch holes along the perimeter of your top piece of leather...mark the holes at the corners and tips of the flame type cuts, then mark the ones between so it looks symmetrical. Once you have punched all the holes, then using painters tape or masking tape, tape the bracer to your arm where it feels comfortable. Now you can take the top piece and tape it to the bracer, making sure it's centre and such, might need an extra hand for this. Once it's all taped in place, you can then mark the holes with a Sharpie pen, unwrap the tape, then punch the holes. Once you have the one side with holes all punched, you can use this as a template to mark and punch holes on the other side. There will be no need to glue the two pieces together, as this will just cause problems with the two pieces not being able to move once you are wearing the bracer. Hope this helps.
-
here is some pictures of the Ferrari. The French artist name is Phillipe Pasqua.


-
silverback, Tattoo "ink" is more a "pigment" than paint, dye or "ink". It does dry out, if left out in the open like paints and dyes. I was up till 4:30 this morning surfing the web, trying to find as much information on this prior to testing at the tattoo shop. I found a very interesting site regarding a French artist, who covered a Ferrari with leather, then tattooed the leather. It hangs on a wall in his gallery....must be nice to have that kind of money. I've e-mailed him asking if he could share some knowledge on how he tattooed the leather and what kind of leather it is. My thoughts were, that him not using the process as an income source like the others I found on the net, is that he may be willing to move me in the right direction. The Ferrari looks like it is covered in some sort of soft leather, as it actually looks like it came out of the factory that way, so my thoughts are it's not a veg tan. I did find one person who tattooed veg tan quite successfully. What he did, was spray the leather with a shellac type product...he did not mention what type or brand...then he totally soaked the leather in warm water and tattooed it just like a human. It looked okay, but he wasn't a tattoo artist by any stretch of the imagination. There is a company called "Electric Solo" who does solo bike seats and tattoos them. He professes that he spent five years perfecting the process, and will not reveal any secrets. Quite a few of the seats he has done, are on "White" leather, so again this leads me to believe that it's not veg tan, as we all know just how hard it is to dye veg tan white. I also found another place that tattoos leather furniture, again white leather, and a leather that looks exactly like what is on the Ferrari. And I don't think furniture would be very comfy if it was made from veg tan. So, back to researching, and tomorrow we'll be at the tattoo shop and try a few things out....wish me luck....
-
Well all, I just stumbled upon this topic. I've been away from my leather work for a while now, but have recently decided to get going with it again. My oldest son owns his own tattoo parlor just a few blocks away from where I live, and he has graciously allowed me to set up my shop inside his tattoo shop. He keeps watching me do stuff with my leather, just the same as I watch him doing his tattoo work. Then he takes bits and pieces of scrap and asks me if I need this or that. He'll then come back a while later and show me what he's made. He's done a few things, they need a bit of finessing, but he has the idea down. The other day he asked me if anyone has tattooed leather, and I told him that there were people out there doing it, but they are very secretive about how it's done. So he took a piece of veg tan 2/3 oz and tried to tattoo it just like you would a human. Wiped the area with vaseline (by the way, the vaseline is used to lubricate the needles as they puncture your skin. If you tattoo without the vaseline, it tends to hurt real bad.) then proceded to tattoo. It seemed to work pretty good until I took a closer look at it. The lines he tattooed into the veg tan actually cut the leather a bit too much. He feels that the reason it did this, was because when you tattoo, you hold the gun on an angle so the needle goes in sideways so to speak. The ink did wipe off clean and no smearing occured. I'm thinking that the tattooed leather is not done with traditional tattoo ink also, possibly some sort of paint, but not spirit dyes as they would most likely stain as you wiped the excess away. I've seen quite a few pictures on the net of tattooed leather, and I'm thinking that none of it is veg tan. I'll get a few different types of leather together and I'll get him to have a go at it again. If we do come up with the proper leather, method and desired results, rest assured I will share it openly and maybe even make a tutorial on how to do it. For me and the type of leather work I do, this could greatly increase business, as well as my sons tattoo business, and seeing as some here have said they also tattoo, it would most likely help you out as well. The whole spirit of this site as long as I have been here, is to share out knowledge with whomever asks and to help others learn and increase their own knowledge base of leatherworking. So, hopefully over the next week or so, my son and I can figure this out, and it will be shared with all of you.
-
Hello strudell, Not sure where you are located, so not sure if this will help. I was at Micheals Craft store yesterday, and they had a woodburning kit there that had an attachment on it that was just like a pen tip. I was going to buy it, but then remembered that when you use it on leather, the smell is horrendous. Anyways, if you have a Micheals Craft store or a Hobby Lobby, they will most likely have this kit.