.jpg.e13e7809a690335a89b8a4ed2e876db1.jpg)
Northmount
-
Posts
6,535 -
Joined
-
Last visited
Content Type
Profiles
Forums
Events
Blogs
Gallery
Everything posted by Northmount
-
I have heard the comment a number of times that if something isn't selling, raise the price. Seems to hold true for crafts, arts, antiques ... Try it and see. CTG
-
Great videos. I would definitely like to see additional ones on Mexican Round Braid and Two-Tone. I've been thnink of doing both one of these days. I was surprised by the number of photos people have posted where the lace was twisted, uneven and no attempt made to close the start and finish. I would have thought that it was obvious to keep the lace from twisting and showing the backside of the lace. I do realize it is hard for the first couple projects to figure out how to close. It is good practice to always pull out the first 3 to 6 loops from the start so the angle of the lace is consistent at the join. It may be obvious to you and I that you should always start the lacing in an area where the ends can be buried between layers of leather (as you have done). If you do some edits, maybe add that comment. I have been using the perma-loc lacing needle for 50 years (same one, never replaced, just misplaced a few times). I have a nice slim one, curved. I use it for both 3/32 and 1/8 lace. I wouldn't buy the larger diameter needle. It's too big. The ones Tandy has now may need the pointed end filed down and reshaped a little. In your video, the contrast and brightness ratios make it hard to see the difference in color of the dark brown lace and the lighter brown of the leather. Often they both look black so you can't see what you are trying to show us. So take your desk lamp (or other lamp with a reflector that you can position) and set it above left so the camera peeks inbetween your shoulder and the lamp. The brighter light on the subject will improve the contrast and brightness, and the color rendition as well. Since we are not concerned with exact color, you don't have to worry about special daylight lights. Fluorescent or tungsten will work fine. The auto color balance on the camera will take care of some of the color shift anyhow. Again ... great job. It will help a lot of people improve their lacing skills and their project quality. CTG
-
I think the strap looks great. Don't try to fix it, just do some testing for future work so you can figure out what exactly happened. CTG
-
.thumb.jpg.6e903dd66163ad5672f00f144058c571.jpg)
Ipad Cover
Northmount replied to jana's topic in Purses, Wallets, Belts and Miscellaneous Pocket Items
The hype about magnets and computers is over stated and exaggerated. Floppy disks were supposed to be sensitive to magnets. I purposely tried to damage the data on floppy disks with magnets in various ways. No problems with reading data after. But electromagnets, especially powered by AC will destroy data on floppy disks and magnetic stripes. AC magnetic fields are used to bulk erase tapes and disks. Funny thing about floppy disks is that after a bulk erase, I couldn't reformat them. Memory chips in general are not affected by magnets. iPads and BlackBerry phones use magnets in the OEM covers and cases to turn the device screen off when the cover is closed or the phone is placed in the holster. Experiment with the covers and you will find out where the magnets are, and can then build that into your covers, just like the OEMs. Keep magnets away from the old CRT type monitors and TVs. Else you will have areas with poor color rendition, and have to have it degaussed to eliminate the residual magnetism around the screen. I have a BIG magnet out of an old hard drive. The drive was the size of a small automatic washing machine. I showed my kids how the magnet distorted the picture on our TV one day. Oops! The lower right quarter of the screen was now magenta colored. Had to rig up a degaussing coil to fix it. Kids learned a lot that day! CTG -
Great project. Love it. CTG
-
You need something (paint) that is not water based or water soluble, or a coat of something like a lacquer over top of it. Any color product that you use that lays on top the gum trag needs to be compatible with it. It needs to dry well between coats, so don't rush the steps. Water based paint is sensitive to the thinners in lacquers and alcohol based finishes, so the finish probably needs to be sprayed on so the color doesn't get spread around by any rubbing action for what ever applicator you use. Multiple light coats are better than single heavy coats. Heavy coats are likely to crack and check. Some one of the posts I read a couple months ago was about applying a hot melted finish on the edge. I think it was related to shoe repair. Anyhow, good luck with your search for a better solution. CTG
-
I think you are having problems because the dye can't penetrate the gum trag. Should dye first, then apply the gum trag if you are going to continue using it. Cova colors are water soluble, so any color sitting on top of the gum trag is going to get wet from perspiration a and transfer to clothes or skin. Search for Bob Park's method of burnishing edges. It's pinned at the top of on of the groups. CTG
-
Nice to see the problem resolved to your satisfaction. Many people will not publicly own up to embarrassing mistakes. Pat on the back for that. Resolution may help others to take a second look at their machine problems from a slightly different perspective. CTG
-
My youngest son worked with me from the time he was 12. Then he did a 2 year engineering technology diploma in a closely related field to the work we were doing. After graduation, he did some work for me for a couple months, then decided it was time to send out resumes. Sent out 3, had 3 offers. The company he went to work for gave him credit for 7 years industry experience (since he included his related work as a teenager on his resume) and started him off at a much higher pay grade than his peers. So any work you can set up for your teenagers, it is a great boost for their resume, getting their first full time job, and a much better pay rate due to their experience. Even volunteer work for local organizations can be a big help. Experience plus references from them helps. Same applies for unemployed while while job hunting. Shows you don't just sit on your backside waiting for a handout. CTG
-
If you have 2 full time jobs, you need to drop one, or cut it back while you have your health, sanity, and your family. Would be really nice to keep all three. CTG
-
I filled out their online application about a month ago. Then I saw posts about not being available in Canada, so figured I wouldn't get any trial subscription. Just picked up the mail, and guess what? There is a copy of Shop Talk. I had added a comment on their online form asking about being able to get the trial subscription in Canada, but hadn't heard back. Much appreciated to be able to see what it is like before purchasing a subscription. CTG
-
Logically, heel down AND needle down would release clutch (applying brake). Heel down would continue sewing until the above are both satisfied (logical AND). He also has a link to lift the presser foot. This is not difficult to do completely mechanically. Just using mechanical rods, levers, bellcrank and cam. Predates fancy electronic positioning. Chances are you could search and find the patent for the system.
-
This would not be too hard to do mechanically. Just need to have a feedback arm from the hand wheel or a cam that releases the clutch, applying the brake with the needle down. We tend to think nowadays that everything has to be electronic or microprocessor controlled. I used to work on mechanical accounting machines that we programmed mechanically to do things like multiply the mill rate by the assessed value to determine the tax, print it on the ledger card plus statement, plus total up the day's run. There are a lot of mechanical marvels from years gone by that we don't remember and give credit for. Even things like mileage counters used on covered wagons as people moved west 150 odd years ago. CTG
-
Some models of sewing machines have a needle positioning system on them. As you see in the video, his positioning system is set for needle down. He doesn't have to crank it by hand to stop where he wants it. Search for needle positioning here and in Google. One of the banner ads here advertises needle positioning for their machine. Very nice addition for a high volume production shop. CTG
-
Take a look at Will Ghormley
-
Application method makes a big difference too! If you are applying the finish, whether you use an applicator like sheep's wool, or your fingers, to rub the finish into the surface, you will dissolve and spread the dye. Even waterborne finishes can lift waterbourne dyes. Try spraying the finish on in very light coats. Light coats don't crack as easily either. There are many threads on dyeing and application of finishes. Do a search and you will be surprised at the number. Comments include buffing the dyed item 24 hours after applying the dye, so it is really dry, to remove any unabsorbed dye from the surface. Also what finishes to use and how to apply. CTG
-
There is a post somewhere here that has a number of photos and details where a person was experimenting with making their own rawhide maul. A 1" diameter bolt is expensive overkill. 3/8" should be plenty. Your handle and rawhide will make it plenty rigid. I think they used rawhide dog chews as the source for the rawhide. Since you have nice quiet evenings next to the campfire, I'll let you do the search! I'm lazy. Should be a fun project. I have thought about it too. Have to get a couple other projects done first. CTG
-
Like Chavez, put the granite on top a thick cushion to get a better working height when on your knees. Or at a table, add a good sturdy foam cushion about 2" thick between the table and the granite.
-
Thank you. Most appreciated Chancey. CTG
-
You only have about 10 minutes to edit a post. You will need to get a moderator or such to change it. Damage is likely done already, you are now on a list that gets sold over and over, and spreads worldwide. Get ready to set up a new email account and close the old. I went back to an old email address that I hadn't used for over 10 years. The next day I had some spam. So the list I was on had been circulating amongst the evil cyber spammers for 10 plus years. CTG
-
Also look at a couple other recent threads. Starting CTG
-
Are you using lubricated thread? If not, try it. Oil on the tension plates was probably lubricating your thread. Lubricated thread makes it easier for the needle to punch through, and helps with pulling the thread up. There are some other posts on LW about lubricated thread. CTG
-
Just a note about making sure the hinge sides of the 8 oz cover are perfect 90 degrees. If they aren't, then the hinges will be askew and the binder will not sit squarely when placed on edge, standing up. Also to reiterate, use a straight edge to keep the bottom edges all lined up and parts square during assembly and glue up. Enjoy. CTG So how many occupants are living in the doghouse tonight? CTG
-
I didn't skive that thin, just reduced the thickness to about half for the 3 oz and near a third in the 8 oz. I think you would have a hard time making a 'splice' like joint, and keeping everything lined up. Plus for sewing, I think you want to have enough 'land' on both sides of the stitch. If you skive too thin, there's no room for slips which usually happen to me. CTG
-
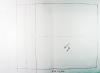
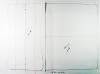
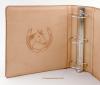
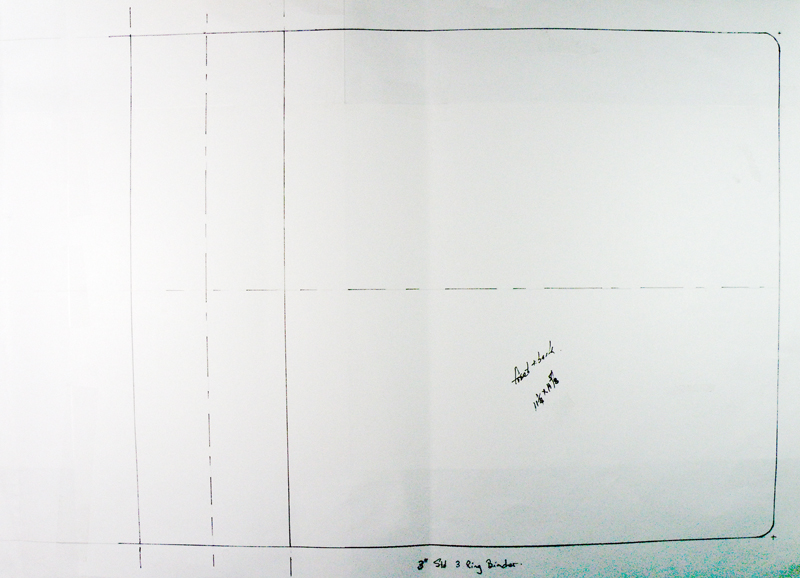
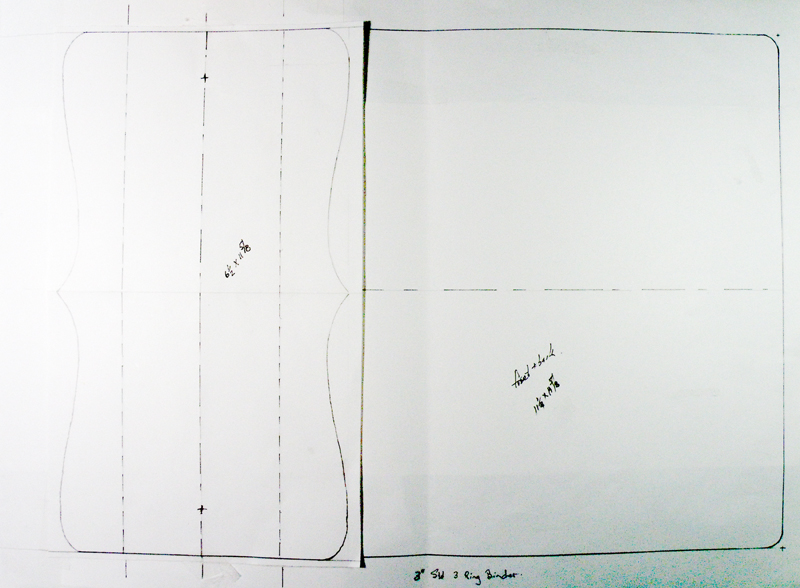
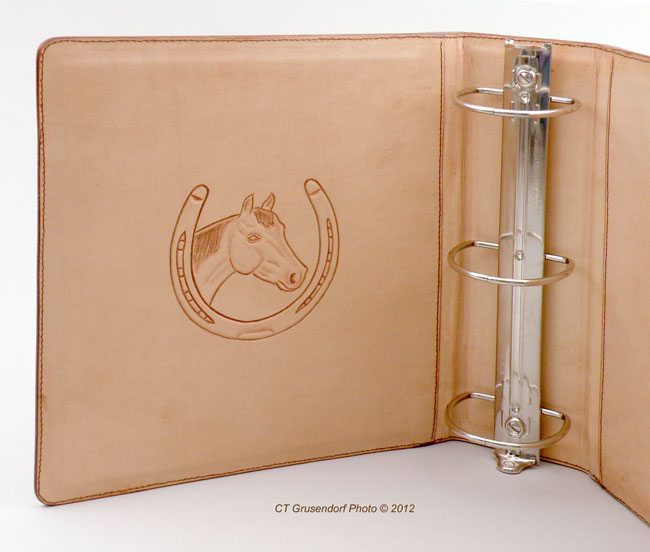
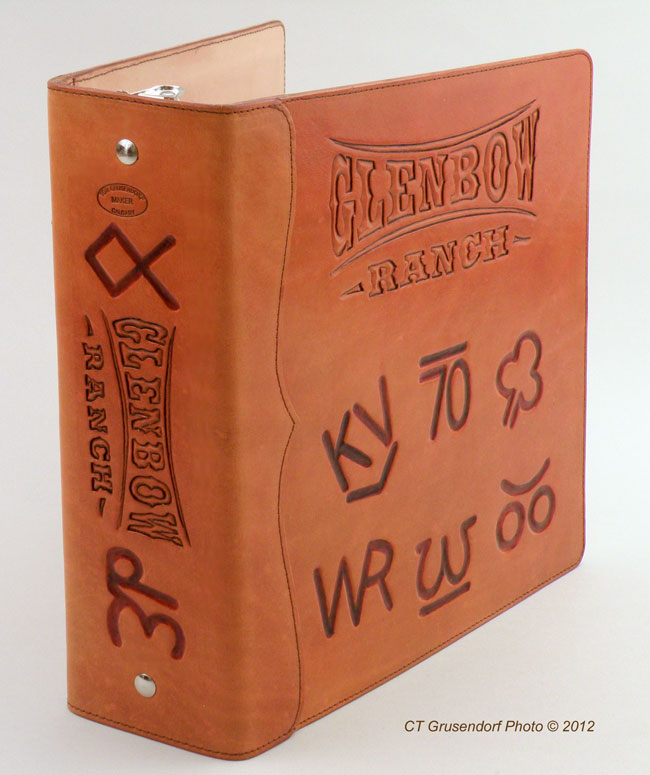
I lay out a full size pattern. First photo shows only one side and spine. I layout what I want for a spine to fit the space on the full layout as in photo 2. The front and back pieces go only to the 'hinge'. The spine overlaps onto the front and back covers. The cover and spine are 8 oz. The edges of all pieces are skived before any glueup and sewing in order to reduce the thickness. I also use a stiffener for the front, back and spine. It is cut to leave about 1/2" clearance from the cover stitching and hinge. The lining for the binder is cut to match the front and back. Lining for the spiine is rectangular only, does not extend to the scalloped edges. Cut everything about 1/4" or so oversize. After tooling the front, spine and back (and applying dye, antique, and at least a light coat of a finish to protect against little dabs of glue that happen), I trim the bottom edge perfectly straight as well as the bottom spine edge. Trim the hinge edges of the front and back to perfect 90 degree angle. I clamp a long straight edge to the bench, position the cover front, spine and back along the straight edge to make sure they fit, the spine is centered, etc. Skive the edges for all pieces, then glue all the 8 oz pieces together. Then I trim the top edge perfectly straight, mark out my stitch line for the spine to front and back covers and sew. Then I gouge out the hinge area to about 1/2 the leather thickness about 3/8" wide. Then glue the stiffener in place. You might want to skive the edges of the stiffeners first. I then layout the lining (3 oz) similarly to what I did with the 8 oz. Skive the edges, align with the straight edge, make sure it fits with the 8 oz cover. Make any small adjustments needed, glueup, then sew the liner front, spine and back together. Now you should have 2 full size covers, the 8 oz, and the 3oz liner. Hopefully you have left a little extra on the sides and top of the liner. Place the 8 oz cover face down along the straight edge. Begin gluing the liner in place starting at the spine. It may help to lightly dampen the hinge areas for both the cover and liner so they will bend and conform a little easier. As you work your way to the front and back covers (1 side at a time) work the liner into the gouged out hinge area. Bend the cover up at the hinge a little. So in effect, the liner will be slightly shorter than the cover, and tend to want to hold the binder closed a little. Finish gluing it all together. Trim the edges, burnish, etc. Mark you stitching lines and sew it together. You will get some wrinkles on the inside of the hinge. While the glue is still soft, you can work on the wrinkles to straighten them out so they look neater. You will not get rid of them. Add any additional finish coats, mark, punch and install the metal rings. I used 1/2 of a Chicago Screw, a nickle plated 8-32 oval screw and an upholstery type trim washer to attach the rings. Glue the screw threads so they don't unscrew over time. Because of the shape of the rings, I had to add a spacer under the rings so they could open fully otherwise they were limited by the spine. The last 2 photos are a finished product for the Glenbow Ranch Provincial Park visitors centre. The dimensions were limited by the display table, else it would be nice to add and extra 1/2" width to the front and back covers. So if you can read my measurements, add some width. The park is located on the west outskirts of Calgary, stretches about 15 miles along the river to Cochrane. It is a working ranch that includes the original townsite of Glenbow, several other buildings ruins, and includes several old ranches and homesteads. The binder will have the stories of the original settlers in the area. The brands on the front and spine were registered by the original ranches and settlers in the area. So the binder is supposed to look a little like the period the park represents. Hope this helps you and others, and that you may have found the previous paragraph interesting. CTG