


wizard of tragacanth
-
Posts
570 -
Joined
-
Last visited
Content Type
Profiles
Forums
Events
Blogs
Gallery
Store
Everything posted by wizard of tragacanth
-
 Welcome to the forum! Seems to me that you are already "doing it the right way". nick
 -
Oh, on the groover. The Tandy Pro Stitching Groover Set is good for $17. You can use a guide for grooving and it has a spoon for creasing. You can remove the guide for freehand use. It is a versatile setup. It is a little bit more fiddly than having two separate tools, if you are constantly changing back and forth between grooving and creasing. Two tools may be better in that case. nick
-
I use Tandy needles, not familiar with JJ needles but be sure, which ever you get, that they have rounded points, not sharp points! BTW, if you plan to use stitching chisels, you do not need an over-stitch wheel. If you plan to make smaller or more elegant projects than a holster, you may use 8, 9 or 10 spi. For holsters you can probably get by with 6 spi forever. 1mm thread size would be a good start and then you can decide if you want to go up or down from there. nick
-
Progression of a knife sheath
wizard of tragacanth replied to Rossr's topic in Gun Holsters, Rifle Slings and Knife Sheathes
Ross, thanks for this comparison. I enjoy seeing other's progress as much as seeing my own. This sheath and knife are top-notch! nick -
Beeswax for holster finish
wizard of tragacanth replied to bcraig's topic in Gun Holsters, Rifle Slings and Knife Sheathes
Thanks Lobo and Professor! Great information, much appreciated. Lobo, I just want to say thank you for the volumes of good advice that you have given over the years on this forum. When thinking about my beginnings in leather, your name always comes to my mind as a knowledgeable, gentle and wise guide. Maybe I told you this before, but it bears repeating. Thank you, Sir! nick -
Can I use a palm polisher to buff?
wizard of tragacanth replied to epiphanist1248's topic in Leather Tools
Really? This is a task for which I have never even considered using power tools. I actually enjoy hand buffing and watching the luster appear as I do it. However, I only make holsters, which would not easily be done with such a machine. That aside, this is a random orbit machine, which is a good thing and using a fleece would be a necessity. If you are doing large, relatively flat pieces, this might be helpful. Let us know how it works out! nick -
Is anybody on Leatherworker forum making these burnishers now? Or any other sources? nick Oh, never mind, I found it. http://proedgeburnishers.com/drill-burnishers.html
-
Can't wait to see it! nick
-
It is important to understand your competition. First, go to your local gun shop and look at the holsters that they sell. Try to find the closet thing to your product. Look it over for quality and construction compared to yours. Then look online at the best known manufacturers, Galco, DeSantis, Bianchi. Safariland. ec. Then look at the more "custom" type makers, e.g. Milt Sparks, Mitch Rosen, etc. Then charge whatever the hell you feel comfortable with. Seriously, google Sheridan style holster and look at what other people are getting for them. nick
-
Oh yeah, I really like the way that shows your work! nick
-
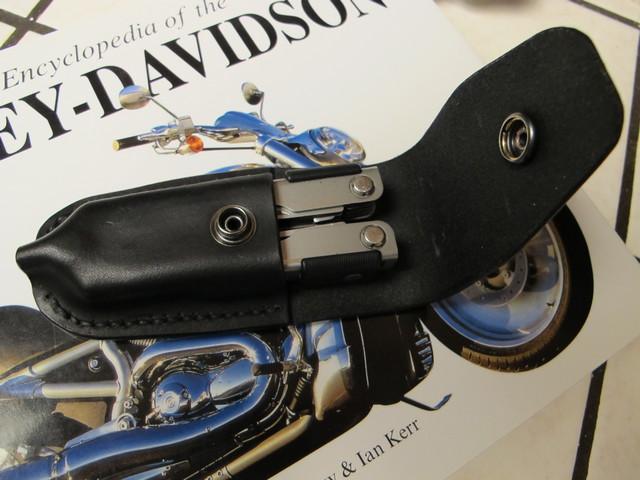
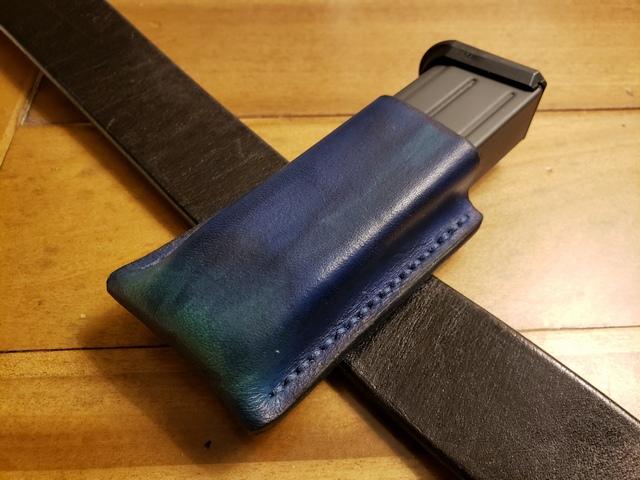
Yes, I really do like the color myself and will likely try to reproduce it... intentionally. I daubed some extra on my maker's mark but it did not turn green as I had hoped, just darker navy. Here is a Leatherman case that I made for a friend of mine, maybe 6 years ago. He had the pliers on one end of this tool and complained that they always ate through the bottom of his cases. So, I made one like a holster. Can't chew through that! If you look closely at the stitching, you will see where I ran my over-stitcher too high and left five or six marks above the stitch line. Oh well, it was a freebie. nick
-
4th holster
wizard of tragacanth replied to GnewVFL's topic in Gun Holsters, Rifle Slings and Knife Sheathes
Oh yeah! You're gettin' there. nick -
Nice work! I'm sure that black is most frequently used but a lighter color shows off you work much better. I think it would look great in Red but I don't know if that would be appropriate for this type of thing. nick
-
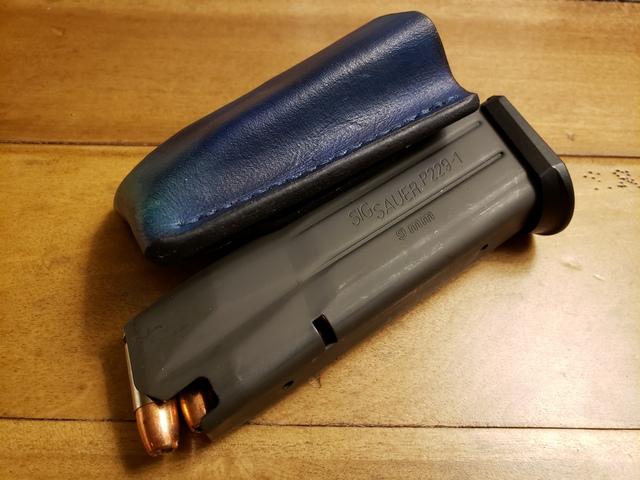
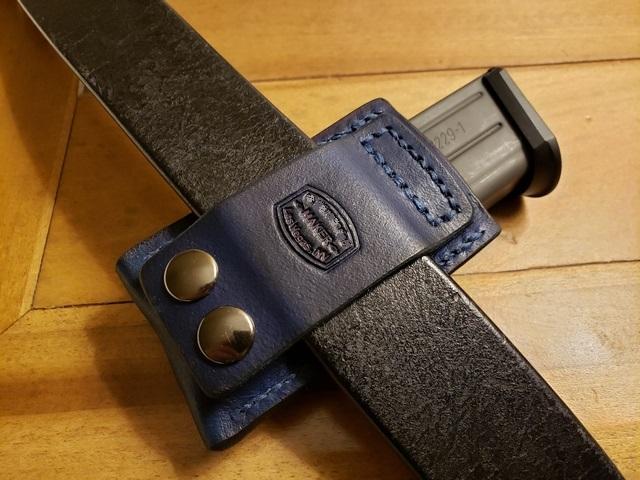
Been making holsters for some time but this is my first mag pouch. I got the idea a couple of weeks ago when someone was trying to figure out how to accomplish some particular task on their project. Sorry, I don’t remember who or what project it was. Anyway, I had suggested that they fold the leather under. Then, I decided to make a mag pouch using this method, just for fun. Here is the result. I had a little problem, I was distracted when I went to dye the inside of the pouch. I had a fully loaded dauber. Normally, I would squish half of it out, but this time, I didn't. This wild excess of dye, turned green. For me, it was a happy accident. I liked it! Reminds me of the Northern Lights. Critiques welcome. nick Leather: 2.15 mm Thread: Ritza 0.8 Navy Blue Dye: Fiebing’s Pro Navy Blue Edges: Tokonole Finish: Satin Shene Snaps: Tandy Line 20 Black Plate
-
Maybe you are talking about a Monkey's Fist. nick
-
Sig P365 pocket holster
wizard of tragacanth replied to chiefjason's topic in Gun Holsters, Rifle Slings and Knife Sheathes
Oh, wow! Pocketing a red dot? Maybe with cargo pants, I guess. nick -
Custom Bowie and Sheath
wizard of tragacanth replied to Rossr's topic in Gun Holsters, Rifle Slings and Knife Sheathes
Ross, what a nice Bowie. I have seen your antler/handle work before, which is of course, very nice. This time you stunned me with the overall shape, design and finish of the blade and hand-guard. Wow! Love that hand-guard. I have never seen anything like that "sling" attachment. Quite unusual, and cool. Is that your own design? nick -
Every once in a while, someone brings up the idea of using wood products on leather. I think the consensus is that they can work, but that they are not optimized for leather. You could use leather dye to stain wood, but the results may not be as good as they would be with wood stain. I specifically remember someone saying that floor stain does not have UV blockers but leather stain does, to prevent fading. Anyway, use what you want, it worked... at least temporarily! I really appreciate your spirit of experimentation.
-
Now that you bring it up, your maker's mark is one good looking piece of art. One of the best that I have ever seen. And your work on the belt lives up to it! nick
-
I have seen a video on this somewhere -- can't remember. They used an appropriately sized, foot long piece of twine, glued it to a board, applied jeweler's rouge and stropped it. nick
-
Who is your favorite hardware supplier at the moment?
wizard of tragacanth replied to fighttobreathe's topic in Suppliers
fighttobreathe... I see where you're coming from. There can be some hidden gems out there. nick -
Edge Kote rubbing off....solution?
wizard of tragacanth replied to HondoMan's topic in How Do I Do That?
Mop & Glo is just an acrylic floor polish. Fiebing's Resolene is essentially the same thing. Many people dilute it 50/50. But Mop & Glo is a cheaper alternative here in the U.S. Just look for any acrylic floor polish that you have locally. nick -
Who is your favorite hardware supplier at the moment?
wizard of tragacanth replied to fighttobreathe's topic in Suppliers
I don't really have an answer for you. I mostly use Tandy. However, I am curious as to what you are looking for and I think that it would help others, help you, if you were more specific. Are you looking for more variety, better quality... what? nick -
Well, it would help to see a pic of this in order to make a proper recommendation but off-hand, I would say -- stitch a line around the flashlight. That's how we would do it on a gun holster. nick
-
Third holster
wizard of tragacanth replied to GnewVFL's topic in Gun Holsters, Rifle Slings and Knife Sheathes
I am not normally a fan of floral but dang, that is very good looking. I like the red too! nick