bruce johnson
-
Posts
4,401 -
Joined
-
Last visited
Content Type
Profiles
Forums
Events
Blogs
Gallery
Store
Everything posted by bruce johnson
-

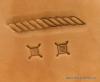
What is it?! Geo. Barnsley tool.
bruce johnson replied to mynholme's topic in Leatherwork Conversation
Shoe guys use them to drive nails. -
Victor, Great to see your work again. That is some kind of cool.
-
What frustrates you most in your "shop"?
bruce johnson replied to wildrose's topic in Leatherwork Conversation
After a few different layouts, it is still a work in progress but overall - pretty happy. Just enough space to heat and air condition easily. The lighting is good. Tons of electric outlets. The move around space is good. With this layout and storage it is a lot neater than it used to be. Tools are organized and put back. Good amount of storage for scraps and sides. Stall mats on the floor - easier on me and and dropped tools. Minor frustration factors- 1. I recently moved the tooling bench out of the cubby hole and into the center. Now to build a bench so the rock is inlaid. Design so it will be stable, no bounce, I can get my legs in under it and not be too high? How big? New rock or square up mine? 2. I need to close in the ceiling. 3. I know my music and poetry CDs better than the folks doing it. I ought to get a CD player with "shuffle". -
I keep looking at the picture you posted of the tip. Granted it is out of focus on the tip, but it looks to me like someone just laid it down and ground the front of that leg flat. No way it will work like that. I use that groover a fair amount, and it works pretty well. I would get a new blade and try that first.
-
Lining those monel stirrups - what nails to use?
bruce johnson replied to Go2Tex's topic in Saddle Trade Resources
I use clipped off lino or escutcheons too. -
A few things I see. The seat profile looks very good, it ought to ride well. the lines look pretty good and pretty flowing. There are a few little construction things sticking out to me. It looks like there is a gap at the right cantle ear cut. Also I would rub down the marks where the awl barked the bottom piece of the horn cover. Some spit on a thumb ought to correct that. On the tooling design The flowers look pretty good. I would work on taking out any straight lines in the stemwork. I would carry my swivel knife cuts further down and into the stemwork also, and then set a few muletrack stamps deeper and then fading at the major stem separations.
-
Frank, The ones being referred to by Pete and Celtic are made by another company than the one you probably have. They are made kind of locally here from hardwood and I never really have heard anyone with a complaint about them. There are some being sold not made by them, and may not be hardwood. I bought a few of them on sale thinking I could just leave them set to specific widths. I had a couple that the blade was not parallel with the handle and they tracked in or out. From your description, I suspect that is what you have. I haven't used the metal version other than to try it at the TLF store. Here is a link I found to the company that makes the original - The Original Strap Cutter. There is phone number and if they can't sell direct they can probably tell who carries them.
-
Russ, I like the colors. The drop shadow look on the leg shields is pretty cool. The hardware looks like it may have come from my fellow townfolks here?
-
Another way that metal loop irons are used is for fixed loops. One way to put them in is to sew down one side of the strap with the loop open. The other end of the loop is then sandwiched between the lining and top of the bridle parts. The loop iron is put into the loop and can be like an anvil. You can staple or clinch against it.
-
Can someone explain this type of dual rigging to me?
bruce johnson replied to Curbstrap2's topic in Saddle Construction
This is a dual rigging plate. This type of plate gives the rider some latitude in where the cinch hangs. The latigo can be strung on the front slot and run back through that to make it a "full double rigging". If you hang it on the back slot and then run everything through there, it may be a 3/4 rigging position. To add another twist - string it on the front, run it through the cinch and then back to the rear slot to hang the cinch between the two positions - making it a 7/8 position. Some folks like the split position because it makes a smaller lump under the leg. -
Darcy, I tried to buy a "third hand" a few years ago on one of his sales. I did the whole checkout thing and it went through. My card was never charged and after a couple weeks with not receiving it, I called. The item had been sold previously, but their software at the time didn't remove the item or mark it sold. They said then they were looking at software that would do that. Maybe not. I would give a phone call to verify that you got them.
-
I have been checking every so often and the annual Proleptic.net tool sale is up and going. Here's the link - Proleptic tool sale link. There are 1475 items. Some are pretty tedious to look through, but there are some pretty neat ones too. A few creasers, some splitters, and some draw gauges are pretty cool. Take a peek at what $1000 can buy you in the way of a draw gauge. Nice old handtools, and some of the classic old names look to be some bargains. If you spend a couple hours, don't say you weren't warned. If you spend a couple hundred bucks, you are on your own.
-
RMR, It sounds like a blade edge problem to me, and a few things can cause it. One is the edge may not be sharp enough to get a bite into the leather. We've all done it and especially on a new blade. You sharpen and strop, and thing everything is good. My problem with some is that I never quite got to the edge. I had a microscopic square or rounded front to the blade, and all my sharpening was above that. Once I have finished sharpening a splitter blade I test the edge on some scrap leather. It basically should fall through some firm leather held on edge. I make a few random slices. Then I stick it part way through a piece of scrap and draw and slice the rest of the way with the blade to feel for any dragging areas that indicate not as sharp along the width of the blade. I do it a few times. Wire edges can get you sometimes too. I have also had some blades I got so thin on the edge they chipped out. Putting a secondary microbevel helps with that. The other big thing I have seen on some of the used splitters I have gotten is a bit of bevel on the flat side of the blade. Even a very small microbevel can make it so some firm leather will ride down that bevel and the edge won't get a bite into the leather to start.
-
New blade for Snell-Atherton heelshave?
bruce johnson replied to JAM's topic in Saddle Supplies, Tools & Trees
Julia, Bob Douglas would be the guy to call. Like Andy, I use the skivers and Bob told me in July to at least try the heel shaves and see how I liked them. I asked him about blades for the heel shaves then, and he said somebody was going to start making them. I think he said Bob Dozier, but not 100% on that. -
Shirley, The only used sale reference I can find for a Nippy is from Big Horn saddlery's auction. The Nippy sold for $325 and the SAS sold for $700 to give a relative value comparison.
-
The reason a lot of these tools look rough is because they are. It really seems like a lot of these old Osbornes especially and some of the Gomphs are estate finds. These date back to when tools were used to make a living and not as a hobby, so a lot of those tools have sat for 50 years or better. Grandad retired and the shop closed, so the tools came home to the basement or garage. The hollow handled cast draw gauges take it hard because they have corroded from inside and out. The gibs are lost. Seems like the bars usually are in decent shape. The brass frame ones do alright unless the wood has shrunk up. Somebody buys the whole lot at an auction and finds out that time spent to clean them up isn't worth it. They might not know what they have and how they are used, but they know they are all "vintage". There are a few guys who restore old tools and have started off with good old tools to begin with. They pretty much sell good ones that are usuable right off the bat when you get them. Bob Douglas in Sheridan WY and Keith Pommer from Worthing SD are a couple I have dealt and would recommend without hesitation. They charge more, but they have done the legwork to get them and clean and restore them. Most of my other really good usable tools ready to go have come from old guys slowing down and have been in use right up to passing the mantle to me. Once in a while a home run in an antique store. A few from trading around duplicates to other guys using the tools. I have made some pretty alright ebay deals, and some of the sellers are pretty knowledgable. I have got a few hand tools that were good, but I knew what they were and had a good idea of condition. Most of my ebay bargains have been bench tools - rein rounders, splitters, crank skivers. Seems like they will scare some people off, but there is better chance the bench tools have more care than hand tools thrown into a coffee can or box in the basement.
-
The tree has been glassed. It is not that old or this saddle that neat. The skirts over the bars are a nice touch. The stirrup leathers under the bars and the evident lump even better. I have had some horses I have not liked all that well, but never one I disliked enough to strap this saddle-in-name-only on. The stirrup leathers locked into that slot in the skirts would be sort of limiting. One jump you are holding their ears, the next one you aren't. I'd let this one go by too.
-
Funniest thing in read in a while. Another to add: 9/16 WRENCH: The size wrench used on arena panel connectors, gate hinges, and stirrup bolt nuts. The one that immediately goes AWOL from every organized open end wrench and socket set I own. Then we could get into chain saws and handyman jacks.
-
CWR, If that is the way it came, I would leave it alone. That sounds right - a liner under the strainer, nail the strainer to the bars, cantle, and lower fork. Then come the build-up(s) glued onto the top of the strainer. The riser pieces underneath create the clearance for the stirrup leathers and help to define their range of motion. The number size and shape of the build ups all affect how the saddle sits. They are the base for the seat. If you go to changing the geometry of the groundseat, you may have hell trying to get the seat to fit back. Some of the two piece seats will split right out at that seam when you spike them back down over a higher buildup or have bubbles in the gaps. If they have ridden it this long, chances are it may not be an issue to them as is. If it is a problem and they want a different groundseat shape, be prepared to make another seat too. Sometimes you can do some little tweaking, soak the seat, and draw it in alright though. A lot of these performance and event saddles don't have much buildup. Some is for a better performance for that event, and other times that seat is "because that is how it has been done for some time". I have worked on some saddles that a few hundred thousand probably have been won out of, and they may have one pattern skived buildup. I have one in right now where there is just the fiberglass strainer. No build ups under the chap leather seat, and the foam is long gone. It is a 2 piece seat so the seat overlay is the only thing over the strainer. I googled her, and she has won a lot in a different part of the country.
-
Here we go again
bruce johnson replied to Curbstrap2's topic in Saddle Identification, Restoration & Repair
Again, there are some design issues with this one. They are not measuring the gullet width correctly. The seller is telling you the horn cover is loose, but not showing you the picture. They are telling you the fleece is all there and good, but the screws for the corner plates show - again, no picture. They are telling you the leather is dry. It looks like the cantle binding has been off and restitched at some point. It weighs 25#. Back when it was made, one of the marks of a quality saddle was what it weighed. No returns accepted. I think David hit the nail when he said at the price point you are looking at here, it is going to be hard to do much better. I don't know where you live, but here's the deal out here. This kind of saddle sits on the used consignment rack at the feedstore for about $150-200. Some sell, some don't. These saddles sell at the twice a month horse auctions for $100-150. Not many private shops are going to deal with them because there is no incentive. The margins aren't much and the liability is. The better market for some of these a while back was for interior designers. They'd buy them and nail them to the wall of the steakhouses and bars. -
Here we go again
bruce johnson replied to Curbstrap2's topic in Saddle Identification, Restoration & Repair
My two cents opinion. Just because a saddle is an oldie, doesn't mean it is a goodie. The Wyeth - Those quilted seats like that got to me pretty quick when I had to ride one. I don't like the exposed rigging plates like that much either. They catch leathers and eat them after a while. The front rigging is about where I like them. The back ring sits about 1-1/2" or 2" forward of where I like them, especially on this kind of saddle. The Little saddle looks like a better choice between the two. Nice seat looks like. There is a lump in the seat where the stirrup leathers come over the bars. That might be an issue. My only real criticism would be the rigging position. This front ring sits pretty far forward. Seeing where it is in relation tot he low point of the front bar pads would tell me more. The basck dee looks a little forward to me on this one also. I like the front edge of my back dees to sit at the point of the cantle as a forward reference, and some I like them back a little off that depending on the tree and purpose of the saddle. -
TAKE A GUESS
bruce johnson replied to Curbstrap2's topic in Saddle Identification, Restoration & Repair
Curbstrap, I have to suspect that rigging plate is riveted through the rigging piece and hopefully the skirt and plug underneath. That is a big assumption sometimes right there. The stitching all the way around (probably machine sewn) has perforated those layers of leather. With the age of this saddle, strength might be an issue to start with. Factor in a nice line of perforatins from the needle and it could unzip at a really bad time. Not to debate the whole geometry of riggings, but this looks like a good example of a bad example to me. It looks like that part angling up and forward is what is probably attached to the topside of the bars, right there in front of the pivot point. There is not much or any sort of obvious attachment behind that. Cinch it up and the forces will pull the front of the bar points down. Perforated and pulling the fronts down. Not a good combination for rider safety or caballo comfort. I am not a packer, but that whole idea of seats like this in any saddle and the whole rigging issue would send me looking elsewhere. That seat looks flat side to side, and then just drops straight down. It would have the comfort of stradding a crate all day. Factor in that ramped horn to cantle seat profile and it is formula for riding in and hiking out. As one of my senior pals said about one similar,"I'd rather ride any breed that starts with "A" than that kind of rig". He was quite colorful and direct. -
TAKE A GUESS
bruce johnson replied to Curbstrap2's topic in Saddle Identification, Restoration & Repair
Not to sound like a smart a--, but I don't think those pin adjusters ever were in fashion. Are you looking at this saddle to buy? From the pics there are some real design issues that make me think it was a bottom ender to start with. It starts with the stitching around the rigging plate perforate it, and ends with the latigo being strung through the slots on the rear jockeys to either carry the tail or some used that tails as a back billet to hang the rear cinch off. The strings laying over the sheepskin is not quite what most us would do and the seat shape is pure factory. I would maybe agree on the age, and probably the guess on general region it was made. -
I would trim back the ends where the old AlRay buckles were to get into some fresh leather and then just use copper rivets to attach the new leathers with.
-
Difference between Craftools and "more expensive" tools
bruce johnson replied to Sal's topic in Leather Tools
Sal, This is the difference -