
ReneeCanady
-
Posts
528 -
Joined
-
Last visited
Content Type
Profiles
Forums
Events
Blogs
Gallery
Store
Everything posted by ReneeCanady
-

Newest Fire Suspenders
ReneeCanady replied to Fd3615's topic in Purses, Wallets, Belts and Miscellaneous Pocket Items
Very nice! What tool did you use to get such a smooth impression on the fireman and flag behind the stars? -
Finally ordered my makers stamp

- Show previous comments 14 more
-
Yes, it came, but it was not as expected. The stamp is nice. I ordered it via email with him vs checking out on Etsy because I wanted it to be a stamp AND be able to be used with a heat embosser. I didn't expect it to be flat on the back side. I either need a press now or need to fix it to the heat embosser permanently. The seller told me to use heat resistant glue for the heat embosser but it just falls off. I'll figure something out. My fault, I just assumed it would have a place on...
-
i need a press also. Found some on Ebay for less than £30 so its not a big problem. Quality of the stamp itself is excellent. So nice in fact it prompted me to buy a new web domain so i can start getting my stuff out on the web...i'm gonna be BarkingRooster.co.uk !
-
awesome!
-
Feibings White ?'s
ReneeCanady replied to RandyJ's topic in Dyes, Antiques, Stains, Glues, Waxes, Finishes and Conditioners.
Sorry about that Site was acting funny and uploaded it twice. -
Feibings White ?'s
ReneeCanady replied to RandyJ's topic in Dyes, Antiques, Stains, Glues, Waxes, Finishes and Conditioners.
This project was made with the white acrylic dye and yes it is pretty thick stuff. It looks to me as if it is just regular acrylic paint. I was able to thin it enough to go through my airbrush with about a 25/75 ratio and required many many coats to get this good of coverage. As far as peeling goes, it might lol, I don't know it's only been sitting around for about a month untouched. I must admit that after using my airbrush for this project my airbrush hasn't worked very well since lol. I still need to get around to taking it apart -
LaPera Modified Bare Bone Motorcycle seat
ReneeCanady commented on chancey77's gallery image in Our Leatherwork Galleries
 Bad ass!
 -
I have no idea what lap skiving means, but I can tell you that my skiver and I do not get along very well lol. It seems to be getting better the more I use it. I often wondered if a splitter would work for what I do or not.
-
I have seen this in progress via Facebook and loved watching it in the making. I think it came out very pretty! I am sure the baby will also love it when she is older. Well done!
-
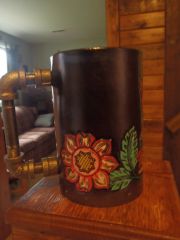
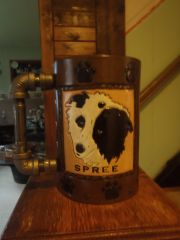
From the album: Leather mug tankard
These mugs are personally hand made and designed by me. Each mug is made from 8-9 oz veg tanned leather, hand dyed, has resin that can hold hot and cold liquids, a wooden bottom, antique style nails, and an amazing pipe handle. The mugs are 6" tall and about 4" wide. -
From the album: Leather mug tankard
These mugs are personally hand made and designed by me. Each mug is made from 8-9 oz veg tanned leather, hand dyed, has resin that can hold hot and cold liquids, a wooden bottom, antique style nails, and an amazing pipe handle. The mugs are 6" tall and about 4" wide. This mug was made for a US Navy HT's wife.© Alteredleather@yahoo.com
-
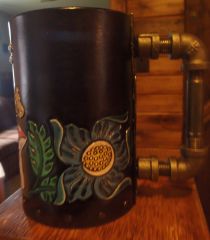
From the album: Leather mug tankard
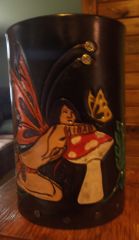
These mugs are personally hand made and designed by me. Each mug is made from 8-9 oz veg tanned leather, hand dyed, has resin that can hold hot and cold liquids, a wooden bottom, antique style nails, and an amazing pipe handle. The mugs are 6" tall and about 4" wide. Girls can have mugs too! -
From the album: Leather mug tankard
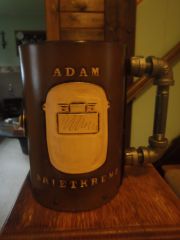
These mugs are personally hand made and designed by me. Each mug is made from 8-9 oz veg tanned leather, hand dyed, has resin that can hold hot and cold liquids, a wooden bottom, antique style nails, and an amazing pipe handle. The mugs are 6" tall and about 4" wide. The perfect drinking vessel! This mug was made for a HT3 on a US NAVY SHIP.© Alteredleather@yahoo.com
-
Glad I went into my settings and found that I can "follow" posts I have made and be notified when others comment. Yeah, I am a day late and a dollar short. This is my way of saying sorry if I have never responded to a question you asked me LOL. I always thought it was such a bad layout because I would go back to each and every thread to see who commented. Which means after so long I stopped looking at it.
-
I haven't tried it yet, but this was a question I had a while back as well. I got this response, sounds good Renee, if you go to a local hardware store, take your beveler. Find the bin where they sell wooden dowels, and try your beveler on the smaller ones (around 1/8th of an inch) until you find the one that matches the curve in your beveler. You then need to go to a auto parts store, tell them you want a very small jar of VERY FINE valve grinding compound. Mount about 14 to 18 inches of the dowel rod to a 1 x 3 board, . . . apply the grinding compound to the top of the dowel, and pull backwards on the handle of the bevler, . . . the opposite way of beveling leather. The first time you do this, . . . you will be matching the dowel diameter to the beveler, . . . and it may take 20 or thirty minutes, your arm get tired, and you may say phooey on it. Stay with it, . . . about every ten strokes, . . . try your beveler on a piece of scrap leather. Once you see it is starting to cut a lot better, . . . take about 15 or 20 more sharpening strokes. Then use your beveler to bevel the edges of a piece of 9, 10, 12 or so oz leather, . . . about 14 to 18 inches long. Get it wet and allow it to dry so it hardens up, . . . rub jeweler's rouge on that rounded leather edge, . . . and from now on, . . . THAT is the strop you use for your beveler.
-
This is probably not the best pic to use for showing the resist on the lettering but I think you can see how dark it is in the lower part of the lettering. I use resist on the raised part of the letters. I use about 2-3 coats of resolene to get this turn out. I have a habbit of using Med Brown Antique Gel from Tandy as a dye itself because I LOVE the shade of brown. So I used the resolene on all the lighter areas on the entire mug, make sure it is completely dry (atleast 24 hours), I use a wool pad to apply the gel over the entire mug, and then a moist paper towel to wipe off areas I have resisted. Infact I use the paper towl over the entire area just to slightly lighten/even out the gel completely. LoL my point that I forgot was.....You can resist the entire project to keep it lighter in color as are my gears and lettering and then use the med brown antique gel over the entire project. The gel will seep into any tooling/deeper spots on the leather like in my gears shown above. Most important thing is to be patient enough to let all your coats of resist dry.
-
Just ordered 2 more hair on calfskins from Tandy. I don't need them right now, but when I do they are never less than $100 and they are on sale this week for $59!
-

Great score!!
-
Now if I could only find the 1/4 block style number stamps that pop out and not sink in
I found ONE set like that on ebay for $53 from the UK lol. Hate when they know they have something unusual. I have the letters. I have been using the numbers and letters that sink in for most of my navy orders, but I would rather the other. I just think they look nicer. PS: I know Cyber ROFL! I could carve them, but honestly that is too small for me -
couldnt you get a set of stamps made for that money? This link (UK again - but probably similar in US) http://www.leprevo.co.uk/embossing.htm
Theres plenty of room to get a custom alphabet + numbers. The material is soft enough to cut up and mount on wood blocks to use individually. Theres a video here showing how its done
-
-
Raven Sword Scabbard
ReneeCanady replied to Destrier's topic in Gun Holsters, Rifle Slings and Knife Sheathes
As it seems to be my newest line to you......DAMN WOMAN! LOL That is awesome! I love the color blend as well. -
Purse "snow Leopard"
ReneeCanady replied to Tanya's topic in Purses, Wallets, Belts and Miscellaneous Pocket Items
Nice! Even managed to capture the cuteness in the eyes -
Chrome Tan Leather For A Tool Roll?
ReneeCanady replied to HelluvaEngineer's topic in How Do I Do That?
I really don't know much about chromed tanned leather, but I do recognize that tool roll as the one that Tandy just put on their site. I haven't had a chance to watch the video though. What leather do they recommend? -
Sunflower Photo Album
ReneeCanady replied to Double U Leather's topic in Books, Journals and Photo Albums
Same to you Double U!! Not long ago we moved my Mother in for age/lonely issues so she is in one spare bedroom, and the other spare is my leather working room (I need a leather working house with all the stuff that's in there lol) anyway, my sister and her kids are here for Easter and we just put a big blow up air bed in that room for them. Needless to say I feel completely grounded like a 2 year old. I can't get to my toys!!! I am also anxious to get stuff done. Be sure to post pics of the second item, I would love to see! -
Sunflower Photo Album
ReneeCanady replied to Double U Leather's topic in Books, Journals and Photo Albums
Awesome! That came out really nice! -
I am clueless as to why it won't work. Are you planning on sewing it? If you plan to use just the glue I am of no help really. I know that if you are sewing it later you should be able to stretch the leather and make it come together nicely. I make round mugs that a seam has to meet, but I skive both edges and bring them together. Even that is not completely flush.
-
I think you did a great job! Normally I wouldn't have liked that color because I am a neutral kind of girl, but for some reason since you chose the white thread it makes it really cute, almost trendy yet primitive. It looks very functional also.
-
Medieval/renaissance/fantasy Pattern Pack
ReneeCanady replied to mrdabeetle's topic in Patterns and Templates
Jumping up and down like a little kid! Awesome thanks!