


immiketoo
-
Posts
2,372 -
Joined
-
Last visited
Content Type
Profiles
Forums
Events
Blogs
Gallery
Store
Everything posted by immiketoo
-

Custom armguard for injury.
immiketoo replied to immiketoo's topic in Collars, Cuffs, Leashes and Leads
I hear ya there. Funny how mood makes such a difference on artistic things. If you're just banging out the same old holster, I'm sure its not as bad, but creativity definitely comes in waves! Can't force it for sure! -
Laser engraved Spirit Bag
immiketoo replied to LatigoAmigo's topic in Purses, Wallets, Belts and Miscellaneous Pocket Items
That is a fine piece of leather work. I love everything about it. -
How do you edge veg tan with suede lining?
immiketoo replied to OnePivot's topic in How Do I Do That?
I have rolled the edge of the suede which was a pain, skived the suede to a feather edge, which was a super pain, I’ve cut the suede just short of the edge and burnish only the veg tan and I’ve used edge paint. Rolled edges are classy, the other two are gambles and edge paint is the easiest and most consistent. -
To take this one step further, figure out which way you’re twisting on each side and build an untwist motion into each stitch. Took a while to figure it out, but I have changed how I grab each needle and give them an opposite twist every few stitches.
-
Custom armguard for injury.
immiketoo replied to immiketoo's topic in Collars, Cuffs, Leashes and Leads
Well, I'm retired, and this is what I do for a living -
Thanks! Nah, post it up!
-
 This is 100% veg tan.
 -
Thanks, man. I like how it came out
-
Tooled Wallet
immiketoo replied to Tim Schroeder's topic in Purses, Wallets, Belts and Miscellaneous Pocket Items
Now HERE"s a man who understands deco cuts! Nice work, Tim! -
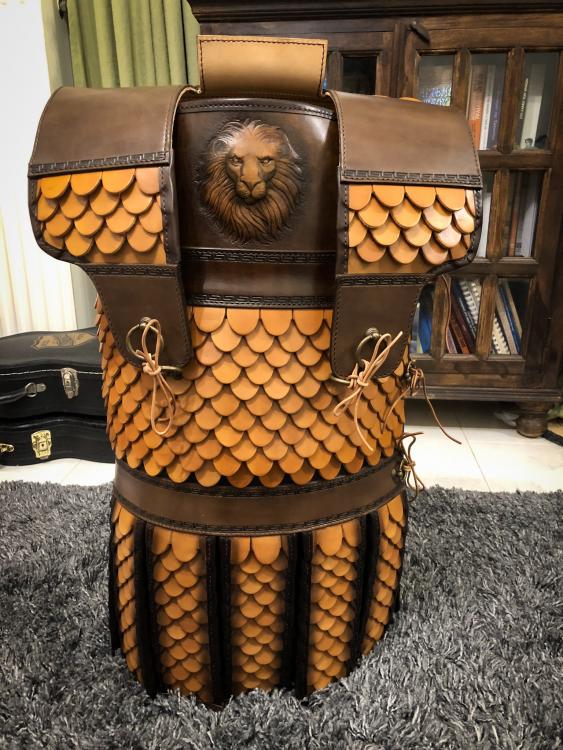
Just thick hide. This is meant for reenactment, not actual battle. Plus, there is no historical reference to boiled hide from this time period. It could have been done, but we can't prove it. There is historical reference to thermatothorax (Leather thorax) armor, but nothing on actual construction methods. We have an archeologist who consulted on this project. Thanks, everyone! It was a fun project to make. Sure is heavy though.
-
Thanks, everyone! HW, glad I could bring you out of the wings
-
Yes. No way I was cutting those by hand! Thanks, everyone!
-
-
My knees or leaning on a chair. I'd need a stitching mammoth to hold this thing!
-
I hate it, but its a matter of cost. Too much time to do them all.
-
Thanks, everyone. Learned a lot for the next set.
-
Sorry, sides, not hides. It weighs 10 kg roughly.
-
-
-
-

-
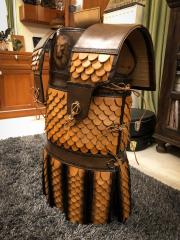
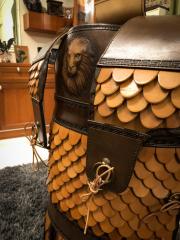
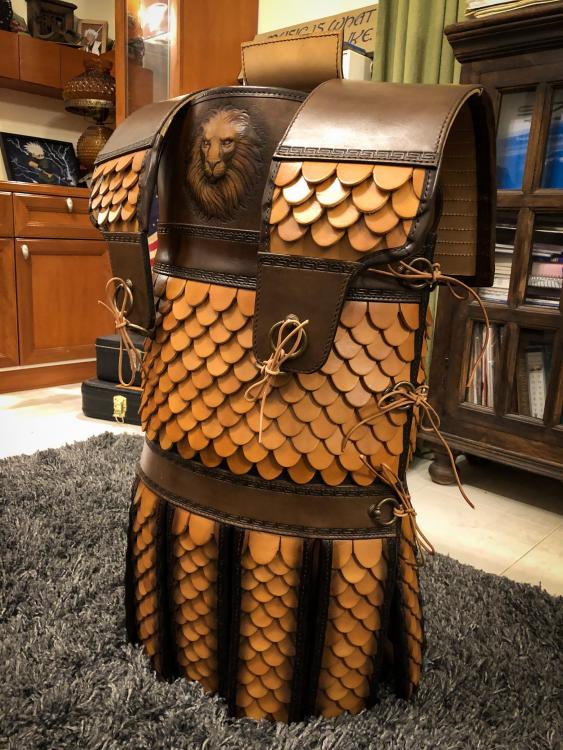
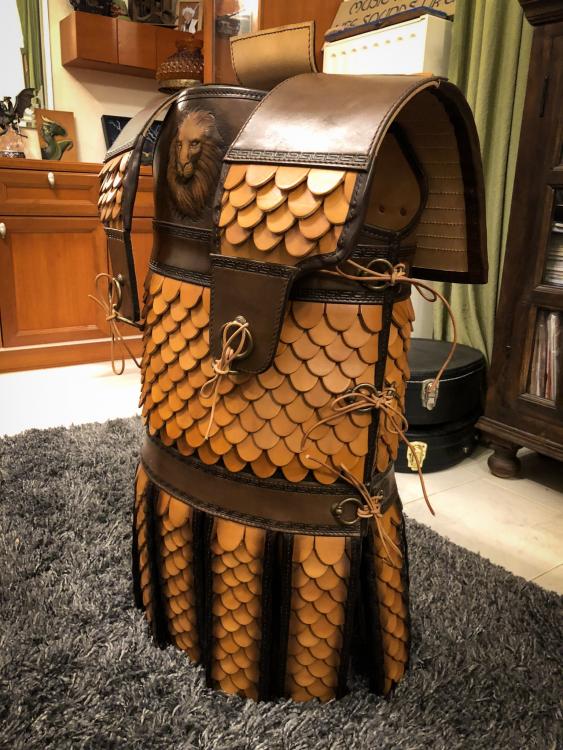
While some folks are content making the same thing again and again, Natalie and I like to stretch the boundaries of what we can do. And I’ll tell you, this stretched ALL of them. 3.5 full sides, hand stitched except the scales, embossed lion and bronze fittings and three months of our lives. Made to a historical pattern with the help of a local experimental archeologist, this piece will be used for re-enactments and historical displays, among other things. I hope you enjoy it. It’s time for a drink or three and to let my fingers heal!

-
Genius. Like always.
-
Looking good, Andrey!
-
 Makers mark by our very own Sergey Noskrimny


