-
Posts
941 -
Joined
-
Last visited
Content Type
Profiles
Forums
Events
Blogs
Gallery
Store
Everything posted by Boriqua
-
I confirmed the tandy Pro water stains dont run. I did try the Turquoise and the three other colors I have and then ran water over them and absolutly no color runs off so since it doesnt rub you can use less sealant which should help keep things flexible. Keplerts .. your right about the Turquoise being a bit weird. It seems to have little pigment so I had to shake it up good before I could get some nice coverage and I found I had to apply it let it dry and then reapply but I liked the final color. Only problem was it turned ugly fast when I sprayed it with 50/50 water/resolene. I have no idea why it happened. That particular piece of leather has been sitting on my shelf for over a year and I didnt pre dampen the leather so ..?? The piece I ran water over got darker but still a decent color for turquoise leather dye. The goat skin took the dye nicest. Didnt have any issues like that with the red, brown or black. Resolene didnt affect them. Here are some pix. In the group shot going clockwise from top left Piece that had been outdoors for a while in the sun and wind next was goat, then a piece of nasty 6 oz I have that hates dye, then a nice piece of absorbent 8/9 oz and finally the little keychain thing that I sprayed with resolene. The other pieces are how it looks after dye but before wetting
-
I think its so awesome that you fabricated the cam!! Nice work. I used poplar on mine but I didnt care for the pony that sat under your lap so I made mine a floor model. I have since bought one of the cams from amazon and replaced the knob. Been using this for sometime now almost daily and its perfect for me. Were I to do it again I might use oak since there is a little more flex than I would like out of the polar at that length.
-
Shield 'n' stuff
Boriqua replied to JLSleather's topic in Gun Holsters, Rifle Slings and Knife Sheathes
Those avengers are SWEET! I just did 2 of them and I thought they were nice but .... not nice enough evidently. Did you dye those or just use oil? -
I have only used it with a dauber or rag. Sorry if i confused things with mentioning dipping but i was refering to dipping in water in order to mold. If the dye was going to run i would have seen it then as i dyed the inside before i glued stitched and wetmold. I have never dip dyed with any dyes.
-
I cant speak to all the colors having only used about 4 different ones but just this past week I used the Pro Waterstain black to dye the inside of a holster and 3 mag pouches. They all get dunked in a pan of clean water and stuck in a bag and there was absolutely no run off. I wish my Solvent based red and oxblood were that color fast when dunked. When I dunk holsters that I used fiebings red or oxblood on the water turns red but like I said that Waterstain black .. completely stable. I have some turquoise and another color out in the shed I havent tried yet. I will dye up some scrap and check its fastness. I usually treat items with a light coat of resolene anyway so they do get extra protection but I will give those colors a wet test and report back.
-
On certain items where I dont want to bury the item in Resolene I have used the Tandy Waterstain. It dries quickly and even with no sealer top coat it absolutely doesnt rub off. I have rubbed it to death with a white cloth and nothing ever comes up. I then do a thin top coat of 50/50 resolene but I have also done the neatsfoot/beeswax finish but what rubbed was the wax. No color but the rubbing of the wax on the persons clothing caused a dark spot
-

Holster / sheath makers Careful with Seiwa Chisels
Boriqua replied to Boriqua's topic in Leather Tools
I Finally received my chisels from China. They are the flat ones which I actually prefer very much more than the round ones for alignment. I have completed a holster and a few mag pouches since receiving them. I received a 1,2,4 and 6 prong for it turns out a little less than $7.00 for the entire set. What is nice compared to the black tandy chisels is each chisel makes the same sized hole. With my Tandy black chisels the 6 prong made one size of holes the 4 another and the 2 and 1 made a huge hole. Really ruins the look of your stitching when the holes arent the same size. I got impatient and ordered a set of 4mm and 5mm/6spi and 5spi from Amazon distributed by Crazy Eve. They were a little more expensive and their 4 pc sets cost a little under $15.00 each. Still I got 2 complete sets for $30.00 which is a huge cost savings over some of the other brands out there. In truth .. I am sure the ones I got direct from china and the ones from amazon are very similar in how and where they are manufactured. I find the ones I got direct to be finished a touch nicer but it could have been from a Wednesday batch and nothing more. The crazy eve as well made consistent sized and spaced holes through all 4 chisels. I have to use them more to give them a full on seal of approval but so far .. I am digging them and the extra bit of money I got to keep in my pocket. Perfect angle on the stitches and uniformity! The 4mm makes a hole that is about 2.2mm. Works well with my Small Vergez awl blade but a bit to narrow for the thread I usually use. Since I am following up with an awl its not that important to me but if your not that could be useful info. The 5mm makes about a 2.6mm hole and my awl sings through it and it works just fine with heavier thread. -
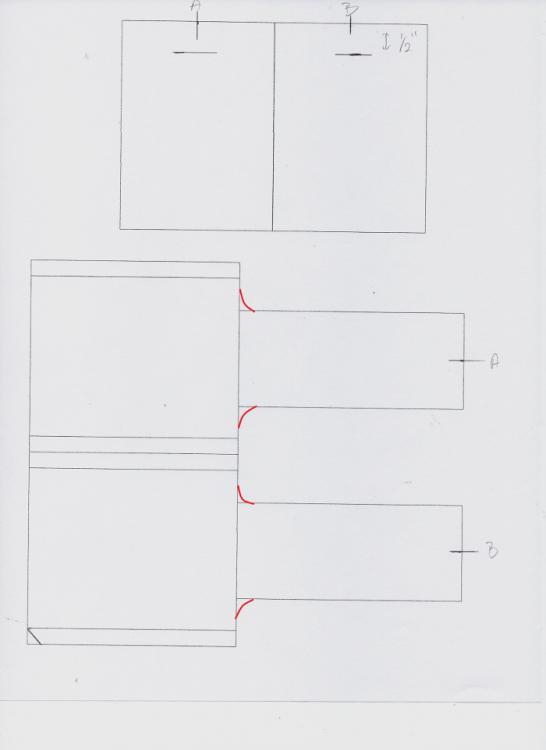
Found a more recent version... Well my freaking cat decided to play in my enormous pile of patterns so I guess she found it!! anyway the only change was I curved the cuts where it met the strap and it did look a little cleaner on the finished project and was easier to burnish. See red detail
-
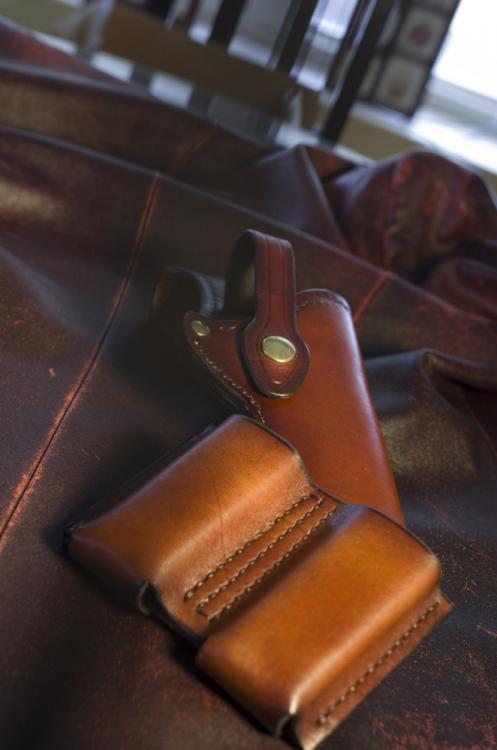
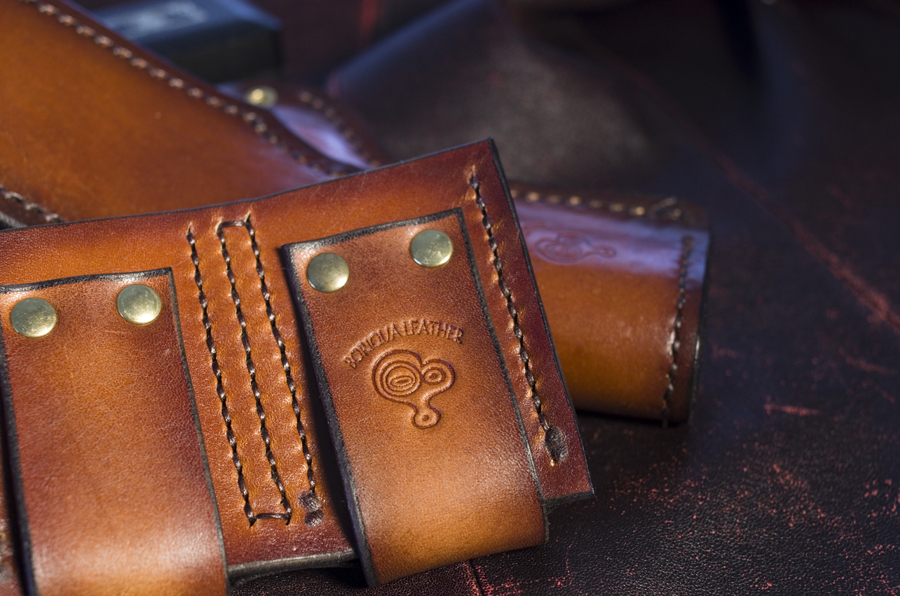
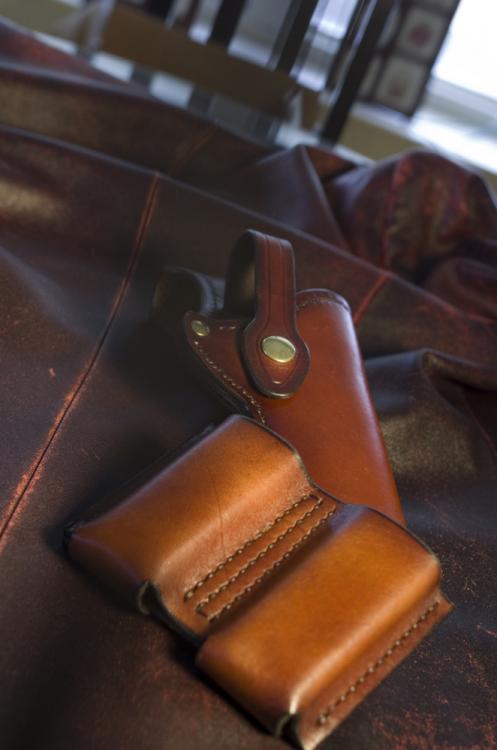
Billy Hell asked about a double mag pouch pattern in another thread so I figured I would post it here for anyone interested and not crap in Jeff's wonderful thread. This is really easy to make and you can easily convert it to a single. The back is one piece and I usually go a little heavier leather on the back than the front. Dye the back piece Line up the lines and come down about 1/2 inch and sew or rivet the straps to the back. Sew down center line Go 1/4 out to each side of center line and sew Pull in ends and match them up to back. Glue .. if you are careful here it will save you a bunch of sanding later. You can dampen the center of what will become each pouch to make the ends line up easier. Sew down the two outsides Now take a sponge and wet only the front piece from the top all the way out to the ends and just around the bottom. its not necessary to wet the strap at the back and you shouldnt wet the back piece at all. Because you didnt wet the back and the back piece is slightly heavier than the front but gave a fair wetting to the front and bottom when you force your mag in it will form nicely but leave a mostly flat back. You can do a little extra boning to the front if you like .. I just form with my fingers but I think I would crisp it up some with some boning when I do this one again. Dye what hasnt been dyed and seal Here is the file. http://boriqualeather.com/stuff/Double Mag Pouch.jpg
-
Cool I will pull it out and add some minor details and scan it for you. If you have a machine its a breeze to make a bunch of these. Its only a hand drawing but its full size.
-
Hey Billy I dont have one like that because I didnt want to have to mold all the fronts but I do have a pattern with loops on the back. I dont make many of these anymore but I did clean up the pattern since these pix were taken and its super easy to make and I know for a fact there are a few that have been in use daily for at least the last 5 years and going strong. One picture shows rivets but I have gone to stitching since then. I have to find the pattern in my stack of unorganized drawings but if you would like let me know and I wil dig it out. Its built for a 1911 mags but its an easy adjustment for anything else. Man o man has my work improved since these!
-
I came to a similar pattern to yours jeff when I started getting asked for double mag pouches. My belt slots are a touch lower because I wanted to get the mags up some but everyone who has gotten these from me has loved the space in the middle. Its only about 1/2 inch but it lets the mag pouch form to the curve of the body a little nicer than if they are butt up against each other. I dont wear one but what I have been told is that its more comfortable for all day wear and that since I precurve it it hides out under a loose shirt nicer than if it were a square block. That was my intention when I made it. Here in AZ we mostly conceal out of courtesy so its just a loose button up thrown over the gun and mags so anything not to print toooo much. I designed it with the rounded corners because lets face it .. Americans have gotten FAT. so I figured one less corner to find the soft spots although you cant do much about the mags stick'in you. I think that pattern you have with the gap is a winner. Its a great looking Mag pouch. Here is mine .. and here are some in different colors but plain so its easier to see the outline. There is even an IWB there which I would never wear but wsas a special request. http://www.boriqualeather.com/Gallery/index.php/Leather-Holsters/Latest-Double-Mag-pouch-designs
-
I still have a handful of the studs that took a brass washer on the back and needed a special setter. I dont even see those offered anywhere anymore but if you set it right that sucker aint never going anywhere. Its a lot easier to just thread a screw but if it came down to "I never want this thing to come out" those that use the washer are the ultimate. Dont know what I am saving them for but I still have the setter.
-
Finished a few projects now with the Angelus Jet Black dye and thought I would comment on its pluses and minuses. I had been using Fiebings black pro dye for as long as I can remember. Tried Tandy's black water stain, tried USMC black but by and large .. Fiebings pro black since about '91. Put in an order for some different colors of Angelus with Angelus direct and I included a qt of "Jet Black" The good It is HEAVILY pigmented. It can easily withstand a 50% cut and still be BLACK It is so heavily pigmented that the finished products even before resolene look like the Police gear I remember from back in the day and a bunch of the old military gear I get asked to repair from time to time. I mean ... its BLACK! I often wondered how some of that older gear got so black and assumed it was some type of acrylic spray finish and it may be but .. this is that kind of BLACK. I have given items multiple passes with Fiebings and I never got that really deep heavy satisfying black. Always a little gray for me which looked better after resolene or some other top coat but the Angelus is really that much more solid black even with one pass. The first time I tried it I did what I do with Fiebings ..I used it straight from the bottle, I sprayed my item, then I went in with a dauber and finished with a light spray. It was WAY to much dye. It was a waste of money. You just dont need that much dye to get superior results. I just finished 2 items this morning and all I did was spray once and the items are wonderfully black. The down side Because it is so heavily pigmented it is actually difficult to clean out of my airbrush. I keep a bottle of Denatured in a squirt condiment bottle at my work table and with fiebings I squirt some in the brush when I am done with a color, swirl it around and spray it out. One more pass with denatured and its completely clean. Not so with the Angelus. I squirt in Denatured and swirl it around and the black just sticks to the sides of the bowl. When I first used the angelus straight from the bottle I had to pull the brush apart. You need to cut this dye. Even then .. clean up is not as easy as with fiebings. Cool thing is its like getting 2 qts for the price of one? Secondly because it is so heavily pigmented .. you will be buffing. Huffing and buffing because while you can buff it until your rag comes clean, unlike USMC, it requires effort and time. Many times when using fiebings even if I laid on heavy coats of dye, when it dried a couple of minutes of buffing and my rags were clean. Not so with the angelus. You will work. Could be my imagination but I think the Angelus reducer works better than denatured at cutting but ?? My conclusion ... It is by far a superior looking end product using the Angelus. It really looks like what I always imagined black leather goods looking like, the kind of things i grew up seeing but was unable to achieve in my own work and I have been at this a good long time. I am a hobbyist who sells a few things so I am not mass producing and not in a giant rush. I get joy at improving what I offer and making cool looking stuff so the extra time needed to make this work is fine with me. It really is that much more beautiful. I cant imagine what it would look like on some of the upgraded leather some of you are using. It is comparably priced on Ebay to a similar size of Fiebings. Not knocking fiebings .. been a great dye but if you happen to be on ebay and can spare about $7.50 pick up a small bottle of the Angelus jet black to experiment with. Try it straight and cut. Its BLACK!
-
Ah you wet formed first. I was wondering what happened because I have made a few using Jeff's pattern or his stitch lines and I know that gun should have been set down in that holster about another 1/2 inch. The bottom of the trigger guard should be right up on the stitch line and if you use Jeff's pattern as is the muzzle come right up on the end of the holster and the swoop by the mag catch is close to right up under the mag catch. Almost like the man knows what he is doing! Basically you got the pattern and stitching in the right spot you just needed to shove it down more. DId you already put finish .. maybe you can rewet it?
-

S&W 686 Three Evils Holster
Boriqua replied to Boriqua's topic in Gun Holsters, Rifle Slings and Knife Sheathes
I do not groove the stitch line. I tried it once and two things occurred to me .. I was cutting through the hardest part of the leather and then sewing in the soft flesh which seemed counter intuitive and I really found it took the character out of the stitching. The stitches in my mind just didn't look as nice. I will on occasion use a creaser and moisten the leather and make a deep crease that I will sew in but I never cut a groove. I understand the concept is to put the stitching below the surface to protect the stitches but I have stuff I made and abused for over 20 yrs and the stitching being worn through and compromising the item never happened. Thank you all for your kind comments! -
SHWEEEET! I play a good deal with wood as well as leather and that handle finish came out superb. So who does she cut leather?
-
Worse yet is if you dont poke with Consistent depth with a tapered awl you are creating different sized holes. That results in a nasty stitch line with different length stitches. Its one of the reason I lean heavily on my Seiwa. Its one less thing I have to worry about. With straight sides I just poke and go. No matter how deep or shallow I always have the same size hole.
-

S&W 686 Three Evils Holster
Boriqua replied to Boriqua's topic in Gun Holsters, Rifle Slings and Knife Sheathes
Lol ... I put these up so people can come up with different ways of thinking and then adding their own personal touches. I cant make cool patterns like Jeff and I have learned so much here its my little way of hoping to contribute. Just remember .. the tools you bought are just a suggestion and there is no right or wrong way to use them. Your piece is finished when you think it is. I have always had a wierd habit of not filling in all the space. here are some old quick and dirty sketches that "may" seem incomplete. Just the way my stupid brain works I guess. -
If I am not going to be able to access them because I am burying the screw between layers then I put a fair helping of crazy glue on the threads before I put it together. I guess red thread locker would work as well but I wouldnt trust the blue for a forever hold.
-
what an awesome idea!!!
-
Quick and dirty pix while it dries but maybe it will inspire someone. Still one more step to completion. More pix here if you like http://www.boriqualeather.com/Gallery/index.php/day-of-the-dead-686-progress/uploaded-10_11
-
You can create an antique effect with an airbrush with varying levels of success. In the saddle bags here I started with a cherry base then darkened with more cherry in places and then I thought about where things might get rubbed dark in actual usage and misted those areas with Mahogany and Dark brown varying how much was applied and being sure to bleed out the spray so there were no hard edges. Came out ok .. not great but ok Taking the pix in direct sun bled out some of the effect. It was a little more pronounced then it appears. By misting with my airbrush pulled way back I was able to pick up the grain. There are more pix at my site I chose to do that for this project because Saddle bags get ROUGH usage. The acrylic antiques and in particular the Fiebings is pretty tough but it is a surface prep and will get scratched. Antique like Fiebings antique acrylics or even the paste is applied to the entire surface and then systematically wiped off. You get no benefit at all from spraying it. Cover your piece and and if you want one area lighter than another simply wipe more of it off with a very lightly dampened sponge. I then follow up with a folded paper towel and buff hard because it helps to blend the edges from an area you may have removed more material from to an area where you left it really dark. I tend to do both on things I know wont see terrible hard usage. I start with a mottled airbrush treatment that may involve several different colors and as a final step use the antique to pick up the grain and blend the edges some. Its a bit of work but people who buy my stuff seem to really like it. You can see kind of the progression here. The final upload pix are with the antique overlay. http://www.boriqualeather.com/Gallery/index.php/templar-progress Hope that helps .. probably to much information for such a simple question but
-
I also prepunch but not all my holes. I am quite capable of using 2 needles and awl in hand but find I just get a little nicer result if I poke about 7 holes set my awl down, stitch, punch 7 holes stitch and so on. Might take a little more time but I definitely think the finished product just looks a touch nicer and hell ... I'm not in a rush .. my goal is to try and make as nice looking a product as I can. If speed were my primary concern I would buy a machine. Doing it this way I can focus on making sure my angles are as consistent and the awl is held as straight as I can make it. My primary awls are Siewa which are straight sided so I don't run into the problem Bikermutt mentioned but I do from time to time use a tapered awl and then you do have to focus on consistent depth as well.


