


Boriqua
-
Posts
941 -
Joined
-
Last visited
Content Type
Profiles
Forums
Events
Blogs
Gallery
Store
Everything posted by Boriqua
-
ugh even thinking about moving is painful. Then there is the year with stuff still some where in a box. I hope I will pass quietly into the night right where i am because I have moved a bunch and it gets harder every time. Doesnt MN get to like 30 below !?!?!? Gets to 50 above around here and I start to whine.
-
 Has anyone ever tried applying resolene on top of supersheen? Is it destined to crack? I am working on a holster and it is a fade from dark blue through purple and to oxblood. With most of these types of things I give a good spray of resolene, wait a day and apply stain if the design calls for stain. As most of you know supersheen resists stain and keeps the original cover better than does resolene. You can then use that knowledge for effect but .... Since this is a fade I was thinking of painitng out some of the blue with supersheen with a small paint brush and allowing it to dry. Then spraying the whole design area with resolene and allowing that to dry and then applying my acrylic stain. This should keep some of the blue area very blue and allow the rest to fade and be affected by the overlay colors. But .... I have already spent a fair amount of time on the piece and am afraid that I may not get good adhesion between the supersheen and the resolene on top of it. Any thoughts or experiences most welcome. Alex
 -
With solvent based be sure to buff well before you go to seal. Your rag should come up clean before you add sealer. I air brush my resolene but I to start with about a 50/50 or 60 water to 40 resolene on my first pass. You can watch it absorb into the leather at this concentration. Your first pass will look almost as if you hadnt applied anything. Then depending on the project I will just keep applying until it is built up to my liking or make a small batch of a higher concentration to apply over my initial watered down application. I no longer have issues with transfer and I have used this method on IWB holsters in Arizona.. You are right about the waterstain .. In places I dont want a big build up of resolene I sometimes use the black or brown Tandy pro waterstain and it is damn near transfer proof. Its a little steep in price but I like the stuff.
-
I havent used the acrylics but have several colors in their solvent dyes. The colors are JUICY. I have been moving away from fiebings in my recent orders and have used fiebings for a couple of decades. Only caveat I can add with my experience is that the Jet Black from Angelus while indeed the blackest black I have ever used requires a fair bit of buffing after drying. Cut it in half to use it and it is still BLACK BLACK but you will be buffing heavy before sealer. I don't have that issue with any of the other 5 colors I have and continue to use.
-
Actually ... thanks alot fellas .. you helped to reinforce where I was in my thinking. Not knowing everything leather I thought I should ask before saying no but my gut said it was a money/time eating disaster waiting to happen. Love this place!
-
I am doing some work for a LEO and one of the things he asked me to do is cover his safariland holster with basket weaved leather. I saw pix of it before he sent it but didnt realize how very many contours there are in this particular holster. I have covered kydex holsters before but never anything with quite so many divots and contours. So I cant use 4/5 oz which was my original intention because of all the bends. I have some 2/3 oz which is mostly 3 oz but its goat and has a pretty heavy texture and doesnt take a very deep stamp since its so thin. I would really like to help him out since he seems so excited about it but I am about 2 seconds from telling him I have to pass. I am worried if I ruin it I have to pay for a new one! So ... I am here to see if anyone has any advice for making this happen. I tried small piece of leather glued to the fabric wrap and it glues up firm so I don't have to remove the wrap. When I pulled it off it actually separated the fibers and didn't come undone. I don't think I can use a camouflage tool so I was just going to stamp an oversized piece with basketweave and trim to size. I posted a few pix at the link and one with red dots shows all the contours on just the one side. Any suggestions or advice or admonishments and warnings would be appreciated. He just wants this holster covered in black basketweave. http://www.boriqualeather.com/safariland/
-
Shweet!
-
Cutting Leather - Getting nice round corners
Boriqua replied to Sheilajeanne's topic in How Do I Do That?
I got something like this on ebay .. I admittedly went cheap and had to clean up the set some but they really upped my game and made all my corners inside and out look great since getting them and have saved a ton of time. I will never go back to cutting them out with a razor or knife. I have now been using the set for about 2 years and am very satisfied. http://www.ebay.com/sch/sis.html?_nkw=Leather+Craft+Belt+Strap+Wallet+Bag+End+Arc-shaped+Punch+Leather+Handwork+5+Size&_id=121171114229&&_trksid=p2057872.m2749.l2658 I think I paid about 10 bucks for mine and am not sure you get a better polish on ones costing more. If you get them I would assume you will have to spend some time polishing. they are not pretty but mine work great and I use them several times a week. -
Questions about awls and thread. Looking for guidance.
Boriqua replied to JenGranger's topic in Leatherwork Conversation
If you choose to use the scratch awl ... which I dont recommend if you already have a diamond awl then you should still make sure that on every stitch if you put the needle in from the back/ front first then do it the same every stitch and to make sure if you place the first thread in the lower part of the hole then be sure to always place the second thread on the top. Consistency is the absolute key to a good look stitch. So long as you do every stitch the same you will be ahead. .. but if you already have the osborne ... that is the way to go. Tandy has a contact cement that is supposed to me non stinky but weldwood works great and is available almost everywhere locally for a good price. It is available in wee little bottles at hobby stores if you dont want to buy a quart. I only use the scratch awl "round hole" on hard right turns otherwise its the diamond awl. -
Wow! That came out great. That is probably the best piece I have seen you post up here. Not saying the others weren't nice but this is another step in my opinion. Very nice! Alex
-
I back stitch and then cut my thread ends about 1/6 in from the work. I then take a lighter and heat up the ends until they start to melt then squash them with my thumb so they form a little mushroom cap. If the stitch is on an inside I will never be able to get to again should anything happen I do all the above and then put a drop of crazy glue.
-
Questions about awls and thread. Looking for guidance.
Boriqua replied to JenGranger's topic in Leatherwork Conversation
There are more than one right answer but I will offer a little guidance. You mentioned you are on a tight budget so I will approach it from there. Your awl that is 3mm is tapered so a section of that will be narrower. I would hang on to that awl now that you bought it and perhaps if you sell a few things or squirrel away a few bucks from your income you can get another. The projects you are talking about doing will probably not exceed 6-8 oz total. When using the awl be sure to have your head right above the work so you can see that you are sending the awl in at a good right angle to the piece and only insert to say 1/3 of the length. Mark the depth on the awl in your mind and be sure that every hole after that you sink the awl to the same depth. If you sink the awl to different depths you will get an ugly stitch. I used that method for years and still do on some smaller inlay pieces. What is nice about this method is you now have a awl that will work over a broad range of work. You can test the depth on a scrap to determine the size hole it will make. The next method were I certain I wouldn't work on anything other than a smaller narrower range is to take the awl carefully to sharpening stones and basically shrink the width. It requires a steady hand and some skill but not very hard to do. Lastly .. Siewa awls are interesting because they are straight sided and come in specific sizes. I think they are about $20 and a number 1 is about 2.2mm I have some of the Chinese thread from ebay ... It is thinner than advertised and is more like .08. For the projects you referenced it will be fine dont sweat it. I use the Chinese thread for my more delicate stitching jobs. I havent seen a negative leaning toward chisels here but regardless... I love chisels. I have been through many ways of marking and stitching and I use a chisel awl combo. I have three sets of Chinese stitching chisels and they work great and are much better than the Seiwa and Tandy chisels I had previously at 1/4 the cost. For the projects you mention I think you can be well served with a 4mm which is easier to find. 3mm looks great on some of the smaller projects but again, thinking about wanting to keep initial cost low, the 4mm will get you from the projects you mentioned and give a little room to go up to some larger items. The 4mm will give you about 6spi and is a nice medium stitch that covers a broad range. You didnt mention the nature of your disability but if it impacts hand strength then use the chisel to give a good started hole. It can be kind of a pain to remove the chisel even if treated with wax if you punch it all the way through heavy material. I tend to tap it hard enough to go through the top layer of my project and mark all my holes to about that depth then get my work in a pony and with awl in hand stitch my piece. I am sure you will get other good suggestions but I hope I gave you at least a start. Enjoy your new hobby Alex -
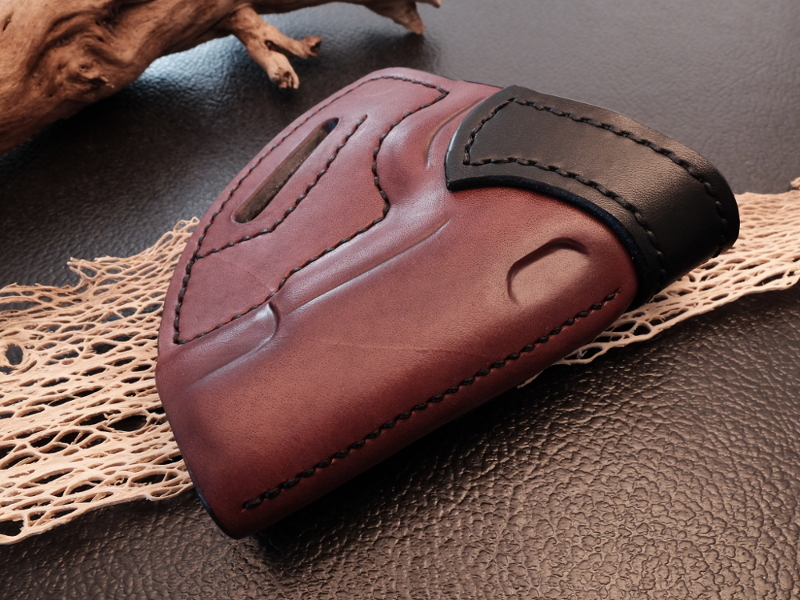
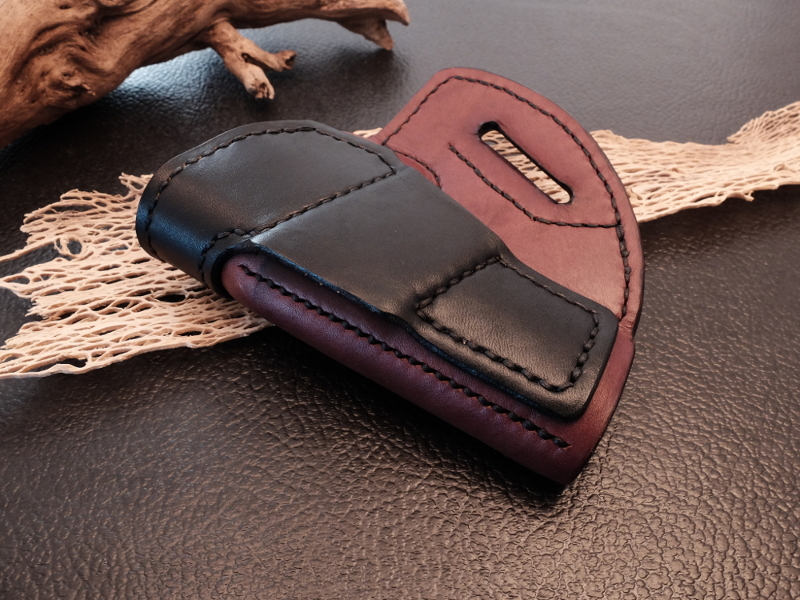
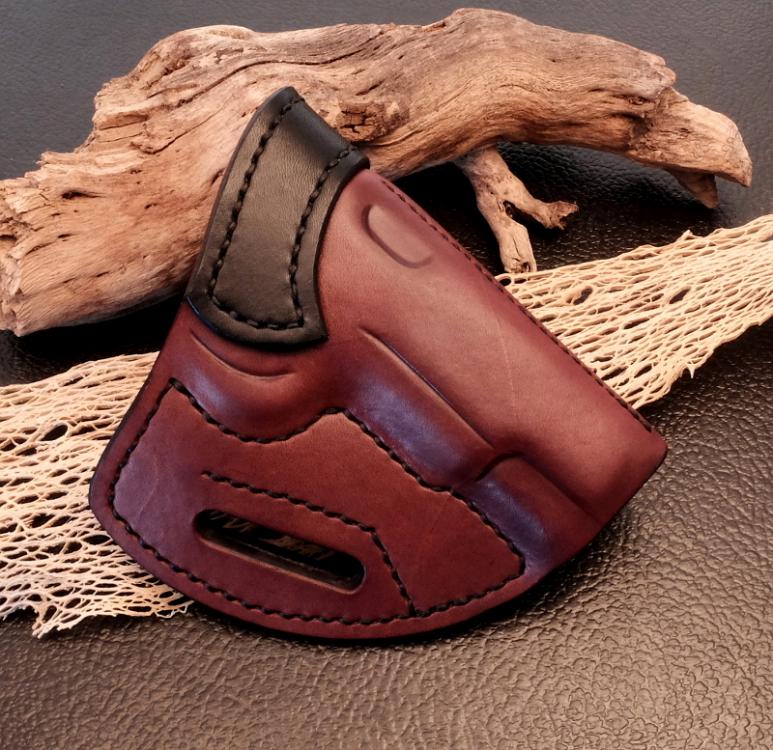
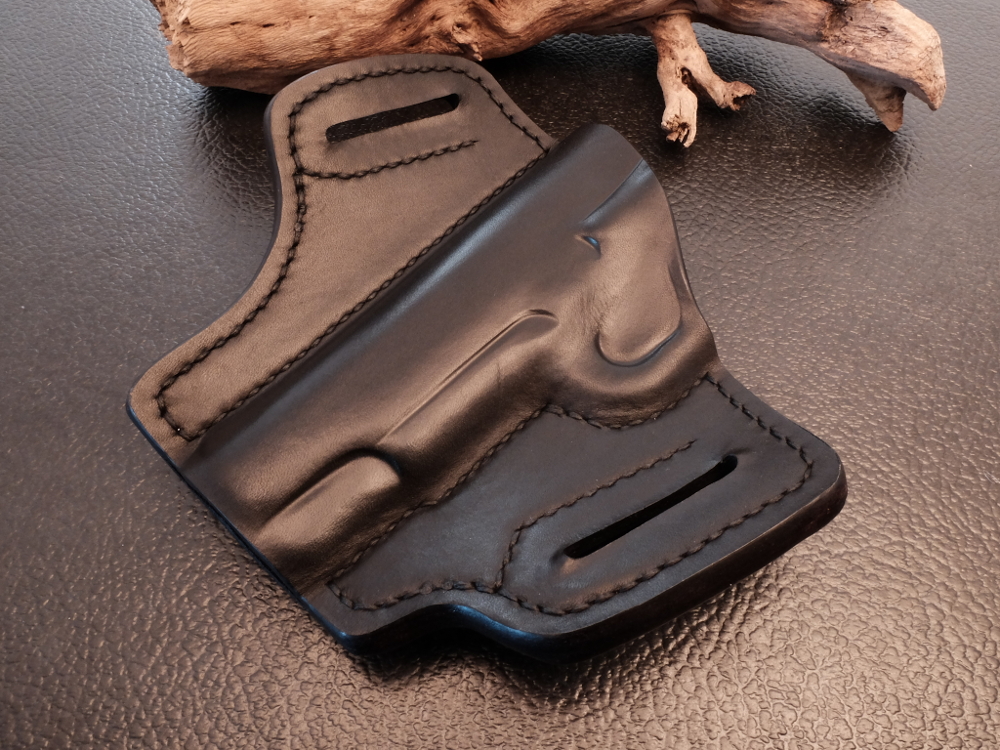
Dont know if Jeff is going to want to take credit for this one but ... Based on his 1911 avenger pattern. I use a sewn in Sight channel so I didnt want to use the large wrap around piece but just a throat support. Jeff's Pattern has both. I beefed it up some and I made the back a little wider. It serves to really stiffen the holster. I have used the same throat/belt strap setup on a few other avenger style holsters and it works really well. Absolutely no bounce and little stretch. As always Jeff's patterns are mechanically economical in leather usage and his stitch lines would take me 80 tries to get as close as his. THANKS JEFF!!! First time trying this pattern so I didnt invest the time in the dye I usually do.

-
This is how I address Dwights concern about completely blocking in the trigger guard and the potential danger with strikers. I bone deeply the bottom and side of the inside of the trigger guard. but dont block in the whole thing. It helps to give a little POP to my holsters when the gun is inserted but cant activate the trigger.
-
I dont know if galco is using horse or cowhide but I have handled many and the leather is fairly thin. The thickness of the leather is going to make a great deal of difference in your being able to get a really tight mold like that. I have done some smaller guns using 6/7 oz and get really nice detail but I dont get the same detail from 8/9 oz. You just cant .. It wont make the same bends. 5 seconds in water sounds like it is way to long. I usually just take a roasting pan filled with water and dip and then turn over and dip. Then I stick it in a sealed plastic bag for some 30 minutes and I can bring up good tight detail using just my thumbs and a bone folder.
-
were I playing with that I would want to first mark up the leather. You being from AZ I know there is gravel somewhere near by. I have had wonderful success (sorry no photos) taking a cased piece of leather and putting it face down on the ubiquitous gravel that surrounds my home. Then I take a board .. I have a piece of 12 inch by 2' board in the shed and I put it on the rough side and I stand on it and rock back and forth some. Lift board .. pull up leather and its got some cool very varied indentations. Next ... water that green down about 3/4 water. I just did a bunch of that same green and it had more pigment than I thought it might. 1/2 will still be pretty dark and you cant come back from dark. I like Tob's idea of using a sprayer because it will come out all spit like and be less uniform than an airbrush. Now ... I see a fair bit of warmth coming from that horn. In the simplest form adding some red to your green will dull out the green nicely and warm it some. You wont need much red to dull the green so after the initial light green was applied I would use the same sprayer to apply some of the red/ green and maybe 50% water and apply here and there. The dents in your leather will pick up more of the darker dull color and really kick it up some.
-
Alright now it has been about 3 more months and I am still in love with this edger. I am not kind to edgers meaning I dont specially case the leather or anything else. I edge the stuff dry, sometimes it has resolene already sprayed on and maybe some acrylic antique. I strop it about 20 times every couple of projects and its good to go. I havent sharpened it up since I bought it just strop. The short legs let me get into really tight curves and I really like the steel. Dont know if they already deleted my business account because I want one more and was hoping to get it at the reseller price but even at full price its a great tool.
-
Its really to bad what has become of tandy Tools. I have a couple of awl blades that are favorites of mine that I got maybe 15/20 years ago from tandy and gets used 3-4 times a week and they are just wonderful. I bought some awl blades from them a couple of months ago just to have some as back up and they were awful. I brought them back and I am not one for going back to a store for a few bucks. Nothing I have gotten from them that was supposed to have an edge has one. I am usually unsatisfied with a factory edge on most things regardless of manufacturer so I am OK with sharpening and sharpen everything I get before using it but it has to be a good enough quality steel to make it worth the effort. Having said that ... You would do yourself a service by checking out this vid by leathertoolz. I posted it once before because the reprofile of the tip he demonstrates and the sharpening technique really really made my awls a pleasure to use. Now I just strop them before each use and haven't reshaprened them in ages and I use it on two layers of glued 8/9 oz leather consistently. Below is part 1 of 2. You can just fast forward to the meaty parts. I now have only one Vergez Blanchard with a pointy tip for delicate work and use almost exclusively my old re profiled tandy. Holds an edge like no ones business. I like the Seiwa awl blades too but I find they need touch up more often. were my two old tandy awls burn in a fire I would probably get another Blanchard and reprofile the tip. They are a good hard steel
-
That is looking beautiful !! are you using calf or kangaroo?
-
1911 White Lizard Holster
Boriqua replied to Boriqua's topic in Gun Holsters, Rifle Slings and Knife Sheathes
Yea .. Im still working on a wallet for myself... Its only been 2 yrs!! -
I paid 5.35 a square. Their site is pretty basic. Im cool with that. Think shipping was around 14 bucks here to AZ for one double shoulder. Its dark in the pic. Its not that dark in person. My camera freaks with fluorescent light and I just took that real quick on my bench when I finished it weeks ago just to post here at some point.
-
That is from the double shoulder I ordered. Not bad right?! I was pretty shocked. I am sure it can be better but I was pretty happy and what I liked was it was pretty even as well. I know that it has to do mostly with how I apply the stamps but I think it has something to do with how the hide accepts the water too. At least its a theory. My only fear now is that they wanted to make me a new customer and someone went out and hand selected that piece and my next purchases will be less than ideal. Which ... would be a bummer!
-
1911 White Lizard Holster
Boriqua replied to Boriqua's topic in Gun Holsters, Rifle Slings and Knife Sheathes
Man you haven't made it yet!? I think I turned you on to suppliers months ago. of course not everyone is a leather bum like I am and has nothing to do but make things ... -
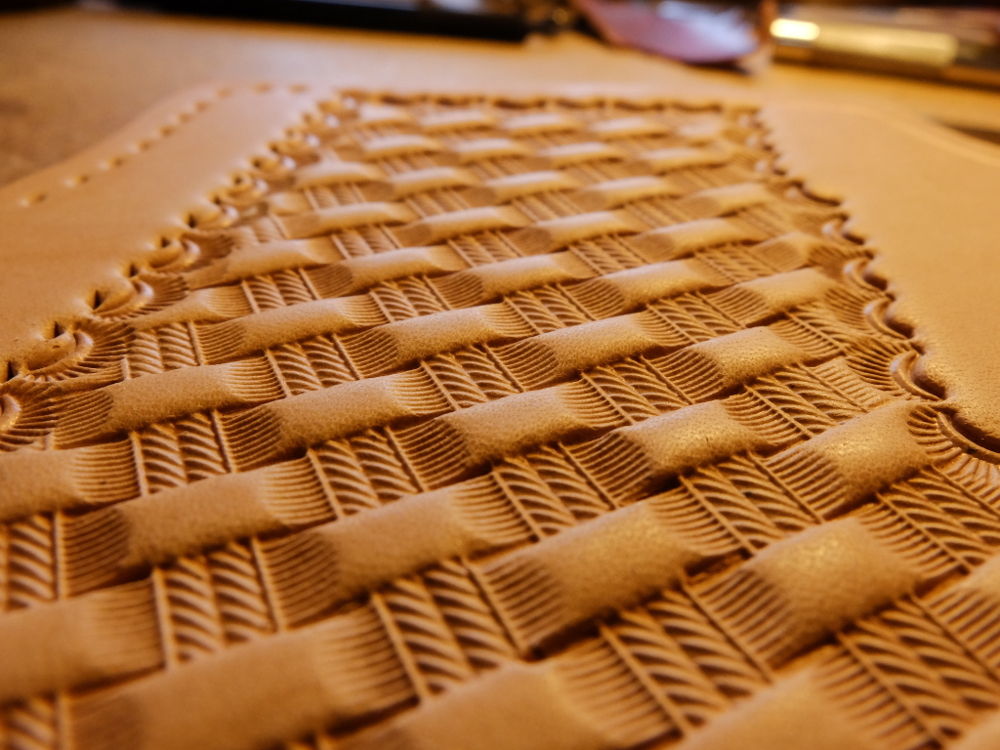
I wanted to use more of the leather that I got from American Leather Direct and ... I was swamped with orders to get done in time for Christmas so I couldnt come out and play. But now that its done here is what I think so far. I dont know if because it was my first order it was a honeymoon piece and not indicative of what I will continue to get. Having said that ... I have really come to love the leather I got from them and am ready to put in another order. I ordered 7-8 double should grade 1. Price was very reasonable. most of the hide measured heavy which is fine. I would say it ran 8 and a touch heavier. It was a nice white color when I got it and felt very dense. When you work with it and when you take it out of the box it feels like the hand may be a little soft but I think its because I am used to getting stiffer dryer leather. Hard to explain so I will leave it at that. It absorbs water like a sponge. I mean maybe that is what it was always supposed to be like but it just wicks up the water. It tools deep and solid with minimum effort. I LOVED the way it took stamps and it cut with my swivel knife like butter. I had to adjust my cut and the wait time before cutting and after wetting because it cuts that easily. Here is the part that really surprised me ... how it takes dye! I use a fair amount of red and ox blood as undercoats for other colors. On certain pieces I dye before wetmolding and when I did the water would go red and my dyed piece would turn kind of pink and I would have to reapply after the piece dried. I cursed Fiebings and their crappy oxblood but figured it was just something to work around. Sometimes black would come off some in the water ... Not anymore. This leather sucks that dye up. I got a tiny bit of color run on my last holster set on the red but the piece didnt change color and it was a miniscule amount. Other colors that I have used that ran no longer run at all. It does seem to need more dye to get a nice deep color but at least it is holding on to it. I bone .. with a bone and not a vacuum or press and I have always been "ok" with how it turned out. Didnt hate it but didnt love it. This leather bones beautifully and easily. You can easily pull up most of the detail by just pressing with your thumbs and rubbing before you go in with the bone or other tool. So far ... Im loving this leather. I will report back after the next two hides. below is a pick of my first attempt at Basketweave on the new leather. I do a fair amount of basketweave in different patterns so I could tell the difference in detail and ease of use.
-
Some rules are just toooo damn funny. Here in AZ we can pretty much carry any damn weapon we want. Want a gun .. sure no problem and you dont even need a Carry permit to carry concealed and you dont have to carry concealed if you dont feel like it. Double edge knives, bowies you name it no problem go ahead and carry them openly and dangling from your hip if you like but .. nunchucks ... yea the broom stick handles that bruce lee swung around in a bad 70's karate movie ... strictly prohibited! Im pretty sure we are cool with catapults but if you tie two sections of broom handle together with a leather cord ... you are going to visit the man! On to the original question... I tried to put water in with an oversized bottle and it is no longer like oatmeal but .. like you said .. it doesnt stick very well. Sigh .. to the garbage and I brought my dyes inside the house. I dont remember it hitting freezing around here in a couple of years but it might have over night at some point.
