


Boriqua
-
Posts
941 -
Joined
-
Last visited
Content Type
Profiles
Forums
Events
Blogs
Gallery
Store
Everything posted by Boriqua
-
Sheaths, studs and frogs ?
Boriqua replied to Boriqua's topic in Gun Holsters, Rifle Slings and Knife Sheathes
thank you!! that is what I thought but your pix made it perfectly clear. Beautiful work. I have never seen it done with the notch but it makes perfect sense. Alex -
First airbrush attempt
Boriqua replied to alpha2's topic in Gun Holsters, Rifle Slings and Knife Sheathes
When you air brush some colors atop another they deceive you. I have found that if I do a halo with the dark brown or mahogany that it can look great and then when I wet mold ... the cool effect is a little less dramatic than I would like. What I do now to ensure the final is close to what was in my head is after I spray my halo on whatever base color .. I let it dry an hour or so and then buff it well. Then spray it again. This is speculation since I am not studying it at a microscopic level but it seems that when I spray the halo on to dyed dry leather I dont get the same penetration so alot of the pigment that is in the suspension sits on top. When you look at it you beam with pride at how cool it looks but once you wet it that surface pigment kind of comes off and you are left with what actually penetrated. Since I started doing it the way I describe above my end product is pretty close to what I intended. I don't mind happy accidents but as craftsman we should strive to make repeatable techniques so that we are in control of the final product. The holster looks great though and Grey is right it will get more dramatic with a little use especially since you used wax. -
I have been looking at knife sheaths for a couple of days. I am making one for myself and since I never make anything for myself I would like to finally take the time and do something nice. I have come across many sheaths with the stud and love the simplicity and learned that sheaths with this feature are called belt or sash sheaths but that they can also be used with various frogs. Here is where i got a little stuck. So the frog is an attachment device that is made to fit fairly tightly around the sheath but is simply slide up the sheath and then retained by the stud or are people attaching the frog to the stud via a button hole. Thank you for any guidance. I have made a couple of dozen knife sheaths but nothing with this style and ... hell I can play some when its my own stuff for me. Alex
-
After all these years I have never used or tried tan kote so know very little about it. I am contemplating taking a job that would require me to remove the finish. The maker said he used tan kote as a sealer. I have Fiebings finish remover and have used it on Lacquer and resolene with great success but can I use it to remove tan kote or is there a better product.
-
You could achieve that look with a touch of practice with an airbrush. Try going with at least three shades of the dye you will be using and then a light coat of oil.
-
Acrylic resoloene is just the ticket. It imparts a mellow sheen but only very very slightly affects the color. I prefer to use it cut with water by at least 50%. I get nice penetration into the leather and since I spray it on I can build it up to the amount of sheen I want. Works great with natural undyed leather.
-
I really like the dye job!! Nice work.
-
Hey Bob .. Dont they have any Tandy's in Tucson!! Tempe seems like a bit of a trip! I am joking of course. Tempe is where I get all things Tandy and they are always polite and helpful. I get leather elsewhere but there is still a bunch of stuff I get from tandy.
-
It is a tandy backgrounder I have had for years E294-03. There are several sizes but that is the large one and should get you on your hunt.
-
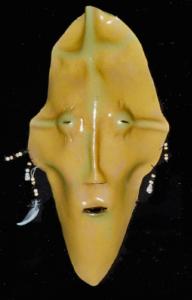
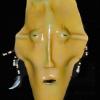
 I think it is awesome! I love it and it instantly put a smile on my face. It has a great playful quality
 -
Thank you everyone for your kind comments and I hope the pix and the others I post help jostle your imagination!
-
Spanish Landscape design Holster Set
Boriqua replied to Boriqua's topic in Gun Holsters, Rifle Slings and Knife Sheathes
Hey Clintlock I am sorry but that color is a combination of colors and techniques I use so you wont find it from a bottle but I have found that if I use Mahogany and then mist it over with burgundy that I get a very similar shade. The color on the throut support is that same mahogany and burgundy. The black is air brushed and there is a very subtle fade from cordovan at the edge. Hard to pick up in the photos but I try most times to have a transition color so its not so hard edged. Most people who get my stuff probably dont even notice but ... I do and think it makes it just a little nicer. I use an airbrush from most anything that isnt going to be a solid color. I will make quick work with a dauber if its going to just be brown or black and such. -
Here is another one I am posting just because it might help others look harder at things and come up with cool new stuff. Design ideas for leather are all around us so dont feel obligated to do what has been done.I have done this design on pancake style holsters but was working with someone and we came to an Avenger style holster (my favorite) with the same design. I am posting a link to more pix and you can see where the crazy leg stamp is kind of representing the grey organic tile in one of the landscape images. I dyed it based on the shadows that you see cast from the sun on those same organic grey tiles. But ... the other images have hard lines and one landscape image has a very defined floral edge against hardscape. I took all of this and mushed it into this design. More pix here http://www.boriqualeather.com/Gallery/index.php/Leather-Holsters/Spanish-Avenger-set
-
I use a hair dryer and it works fine. I have a hair dryer just for this kind of stuff and what I did was make a funnel out of some light cardboard and taped it to the end of the hair dryer to concentrate the heat a bit more and works like a charm
-
handcuff case questions
Boriqua replied to Boriqua's topic in Gun Holsters, Rifle Slings and Knife Sheathes
perfect! Thank you! -
I am making a handcuff case for the first time. I have made other molded cases mostly for knives but never a handcuff case. I have made a wooden form to form the top but have a couple of questions. It will be basketweaved. My 6/7 will certainly mold around that small a shape better than my 7/8 but this is for a working PO and it needs to hold up. If you have made one what leather weight did you chose? Send question is how did you chose to handle the back. It has to fit a duty belt 2.25". I was thinking simply sewing a flat strap across the back wouldn't be aesthetically pleasing although no one should ever see it but .. I will know what I did there and I dont want to cheese it out. If you happen to have a pic of how you handled belt attachment that would be AWESOME. I dont wan tot do a loop because these guys belts are like batman belts with all the stuff they carry so I know it should sit tight to the body and not booble. Any heads up or advice would be appreciated. I like the guy and have made a bunch of stuff for him so I want to do something nice.
-
If you are asking about the engraved floral design I think it is a resist before a stain. If you are asking about the basketweave I believe it was block dyed with black or a dark brown (looks like it could be Cordovan which is what I would have chosen instead of a stark black). Were I to do this I would dye the "reddish" color then take a piece of tee shirt and wrap it tightly around a small wooden block. Put some dye in a little flat receptacle like the lid of a Chinese food container and gently load the tee shirt up with some dye. have a clean rag of paper towel near by and just blot off some dye so the rag is not to wet or it will get everywhere. Now gently rub on the surface of the basketweave and Wala .. you will have that effect.
-
will you be hard waxing or boiling the armor plates?
-
Dye questions?
Boriqua replied to dtgilljr's topic in Dyes, Antiques, Stains, Glues, Waxes, Finishes and Conditioners.
I cant imagine they get a commission on selling Tandy branded products but maybe. I think you just got a bad salesman. I almost immediately wince whenever any salesperson of any good or service starts his speech with negativity about something else. Having said all that .. most products have their place and use for me. I have done more than a thousand projects with Fiebings over the course of 26 years and never had a problem. I have literally used GALLONS upon gallons of it. I think it was and probably still is the go to dye for many once they graduated from the little bottles of solvent dye tandy used to sell. I have been using more Angelus because I like the brightness of some of their colors over the fiebings and I love ecoflo for painterly things I may do on leather such as flowers or vines. I like the way it blends and most things I am going to do painterly designs on aren't destined for real hard use. So his admonishment about fiebings is unfounded and you should feel comfortable with using it. -
Thread color with burgandy latigo help...
Boriqua replied to CraigJhnsn's topic in How Do I Do That?
I have used a variety of colors on the burgandy dyed. I really like the Havana Cigar (light brown), white is awesome and Black works nicely too especially if its a heavier thread. Maine thread has a color called ECRU that is killer on burgandy and you may want to get their free sample card. My bigger issue would be the latigo. I have gotten some that is somewhat dry and almost colorfast but also have gotten some really oily stuff that bleeds like a pig. Latigo is Rub-y. If you are sewing by hand and chose a lighter color thread be sure to buff your stitch area some and be very sure to leave a good foot or more of lead thread so it will act as a cleaner for the stitched thread. -
I find there is a sweet spot. My setter often gets stuck to but I can usually get it out with a tiny bit of work. If I set it to hard in a soft material it happens. I have learned kind of where the sweet spot is as far as pounding it in. You don't have to mash it to get a good tight fit with those. At least for me .. Segma was just a practice thing. Still after having set 100 .. I still get em stuck now and again
-
I am usually the first person that says "if I can make it or fix it by myself I will" but .. I have several logo stamps from Studio N who is a member here and the price was so cheap it would have cost me three times as much in time to cobble something together that works half as well. I believe they were under $30 and he was great to work with. http://www.lasered-stamps.com/ His are made to be struck using a hefty handle or pressed in a press. I thought they were a bargain Halitech is right though .. this will only work well on Veg tan. Anything else and I would look at brands and yea .. I want one but they are pricey.
-
Small festival belt bags
Boriqua replied to stormcrow's topic in Purses, Wallets, Belts and Miscellaneous Pocket Items
Those are really nice but that yellow mottled one .... Oh yea!!! I even like the shape of the keeper. Stunning. -
My first attempts
Boriqua replied to Jamespio's topic in Purses, Wallets, Belts and Miscellaneous Pocket Items
very cool. I especially like the bag. I would like to offer one suggestion though. The thin leather of your hand straps is quickly going to stretch and pull out of that single rivet. Just so you are not left scouring the ground for your possessions I would at very least take out the rivet and fold the strap there so you can get the rivet through 2 pieces of material or leave it and just run a stitch in a square around the rivet. say 3/4 x 3/4 or so -
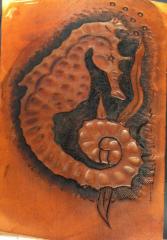
Just a couple I thought might inspire some new ideas. While I enjoy using my stamps as intended I dont feel married to the idea of using them as such. They are just stamps and I am always experimenting with stamping with objects in my shed, electrical caps and so on make great impressions, but I also like to see what else I can do with some of my traditional stamps. The first is a basketweave ... kinda wanted it to feel like the old plaster walls with brick showing through that you find in old NYC buildings. The second is supposed to represent dragon Flesh. The stamp is pretty awesome when used as a traditional pattern but I had this idea of an old dragon who had been in many a scrap and portions of his scales were hacked away leaving his gnarly flesh exposed. He died while feasting on knight and I acquired his flesh.