


Murf
-
Posts
49 -
Joined
-
Last visited
Content Type
Profiles
Forums
Events
Blogs
Gallery
Store
Everything posted by Murf
-
Feibings pro oil is the best black i have ever used, I used Eco flo before that and it coats well but i have spent days rubbing that dye and it seems like i always get something off when i rub. I actually made a belt recently and ran out of the Eco flo black half way across and finished the other half with Fiebings pro oil black, so ill have to make a thread about that somewhere down the road after i end up on some motorcycle rides where it rains alot. Eco flo antiques on the other hand i have had great luck with. I apply my dyes with a cheap kwill paint brush and my antiques with wool daubers. i used to rush alot and that was a downfall, give your dye some time to set. I then rub with 3oz squares of cotton duck, then I then rub with 3oz squares of cotton duck, then I then rub with 3oz squares of cotton duck, then... you get the point. When you find a method that works for you write down the steps you did it in and pin it to the wall above the place you dye your work. Rule #1 should always be "Don't spill the dye!". As far as the order in which you dye your work in the construction process, do what works best for you. I have heard alot of people say that you dye after construction. Not every projects that same, a recent project i went in with that mentality and messed up some high dollar cloth on the inside of a wallet (i guess being careful has something to do with it too) and had to back up and redo the interior.
-

What Kind Of Material Do You Use For Templates?
Murf replied to cantankerously's topic in How Do I Do That?
My prototypes for small items (wallets, coin holders, and such.) are all originally cut from canvas paper. I buy books of it in the painting section of an art supply store, its thick durable, and the scratch awl takes well to the edge of it. its also cheap and easy to store and comes in several different sizes, the only thing i havent used it for is painting. When i buy a book of it i grid it out with a pinstripers grid 1"x1" squares and anytime i come up with an idea i can jump right into templates with a pen. -
Same here. Had a Tandy from the Lucky 7 kit and struggled for a few projects then i ordered a medium sized barry king. After seeing the difference i bought 2 more from BK. I was reading up on something in one of my basics books the other day and it mentioned stropping your beveler. Not really sure what the point of this would be other then to remove micro layers of tanning residue that may build up on the beveler but i dont really slide mine its more of a small scale hopping jackhammering.
-
I graduated college with a degree as a paramedic specialist, after the 3 years of college and some time in the job I had to get out. Through my teens and college years i managed several small pizza shops so thats where i went when i left healthcare. I moved back to my home town with my fiance and got a job working with my dad (fabricator), my uncle (Machinist) and my best friend (skill-less laborer, lol) in a pet food factory. I make great money but being that my grandfather retired from the same factory and so will my dad I am doing everything in my power to not carry on this tradition. My goal is to do custom fabrication for motorcycles and hotrods, I am currently awaiting a local custom car upholsterer to give me the green light to start learning his trade with him, along with my new found love of leather work, pinstriping and lifelong experience in metal fabrication I hope to build something that can be carried on by my family. My fiance and I are getting married next may/june and after that its full on business plan development.
-
Recently picked up a chunk from Foam for you, Great price, quick delivery. I went with the 2" high density (it says Punching bags or something in the header for this foam) for my shop stool and 2 harley seats im doing, a cheap 10$ electric carving knife works like a charm on it =)
-
I watched this video a few weeks back (thanks for opening me up to Explosions in the sky). I was thinking about that adhesive thing at work today. It looks like your leather has an adhesive made onto it and you just pealed it of and pressed it to your liner. either way, love your wallets, and the fact that they can take a bullet. Keep up the good work! -Murf
-
Im not familiar with the method mentioned, even though im looking for a new method i look at it like this, Drawing = 1st draft, I then light box my drawing and go over it with a sharpie fine point = revision 1, Then the transfer = revision 2, and then the knife = revision 3. this gives me alot of experience with the image and it give me a chance to space things and think about the carving and tooling each time i go over it. "will that bevel crash with another", or "ill gap this out more so the back grounding has more area". Question @ cyberthrasher- You mentioned backing your images with packing tape then using a stylus. How wet is you leather when you do this? im reinventing how i transfer and im struggling with the image not enduring the carving session.
-
http://www.specialtyleather.com/ This is a place about 40 miles from me in boone iowa run by Jerry Bogart and his wife (met them at a deer hunting show). They come across some pretty strange stuff. If they dont have it they can get you in touch with who does have it. Recently they set my co-worker up with a good side of hippo and a few square ft of gator and got him contacts to a man that deals in elephant hides (from what he told me it came straight from africa). My co-worker had a gunslinger rig made out of the hippo, gator, and elephant and from what i have seen its amazing and durable.
-
No problem =).Ya Springfield does have alot better materials, but tandy was the first place i found and its only an hour away. They ship fast and i can stop in to check out the material, when my gold is up at tandy ill most likely get one at Springfield . Im making seast for me and my dads harleys and all the materials for those are coming from Springfield. I dont have a pc in my currently leather working shop (aka the basement) so the printed copys of burnett's works were required (also i have a book obsession) . Ive seen your site cyberthrasher (really like your work) and i was wondering if you use regular quality tooling side or do you spring for like grade A Herman Oak?
-
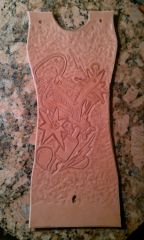
There is probably already a thread on this but i had no luck searching it. Currently i am transferring my images onto the leather with a modeling stylus the image on top, then Grey/white transfer paper (Depending on the dye or antique) onto cased leather rubbed with a glass burnisher. as you can guess i have had issues with the white not showing up well (in some cases its clear as day) and issues with the gray getting embedded into the leather then i have to dye or antique to cover it up. I was hoping to get a collective on how the rest of you transfer your carving image. I know really experienced toolers freehand with their swivel knife but personally im just not that confident in my skills at this point. Thanks, Murf
-
I started recently as well, I got a gold membership at tandy leather (35$) and just picked up dirt cheap oak leaf shoulder splits. with the gold membership you usually save about a dollar or so per square foot. I also bought Paul Burnett's realistic leather carving and Victorian carving volumes (all together around 90$, his wife mails them printed pages with sleeves). When i get the leather in the mail i cut them into 6x6 squares and each day i went through the lessons and carved a few squares a day. Ive been tooling for only 3 months and have already become one of the best leather carvers in my area.The cost of the lessons may shock you at first but the information is worth its weight in gold. Shortly into the first volume i realized i was making major mistakes that were making the tooling part much harder. Always try to challenge yourself at least once a week and find some crazy image off the net and try to carve it. other days just sit and fill every open space of the squares with varying depth lines and spirals. Just a little advise from someone who just started as well hope it helps and if you have the money, buy nice tools. a good knife and a few nice bevelers go a very long way. Nothing beats a 4 hour session of carving/tooling that leaves you staring and grinning at the awesome work you did for another hour (please tell me im not the only one that does that).
-
Two birds with one stone, clicked on this for the same question and hopefully answered my airbrushing issue at the same time. recent attempt mostly rubbed of when i put a duck cloth to it. thanks again cyberthrasher!
-
What tool did you use on the background around the dragon? i see this done alot, and i cant seem to figure out what tool that is.
-
Ive been looking all over for prices and order information on weavers website for the little wonder but i cant find it anywhere. can someone post a link or do i have to call them?
-
I just picked up a dremel press and with a small fabricated metal disc i could put my speedy into it. Gonna have to try this out.
-
i picked up this one off amazon, used it for sunburst dying today for the first time, i get a good steady airflow but i think my dye/alcohol mix is to thick. its a good price and comes with 1 single action and 2 dual action. i used the .35mm brush and up close it lays down about a 1/4" line i think with alittle airbrush experience it would be prefect for the whole process. http://www.amazon.com/Dual-action-Airbrush-Professional-Compressor-Airbrushes/dp/B004PJU8A4/ref=sr_1_10?ie=UTF8&qid=1370285374&sr=8-10&keywords=airbrush+kit
-
Ive always been in the understanding that poly cutting boards are horrible for your blades, a few examples: We used poly boards one summer we were knocking the heck out of catfish and wondering why we were sharpening and honing fillet knives everyday, it was because of the board. The other example: i work in a factory and we can our product and use a ton of poly to protect the cans from the rails, well when we cut the poly we have to find the oldest band saw blades to cut it because it'll clear the teeth right off of them. This is my experience with poly boards, i personally use an old bamboo kitchen cutting board and it does not break my thin blades nor dull my head knives rapidly.
-
 I noticed alot of your work has the same type of texture in the background to fill the void of just having flat leather, what tool do you use to do that. Love your work by the way you have great shading and depth. Also you use a a modeling tool for those internal bevels or a stamping tool?
 -
Love that knife, I just got an SK-3 and its awesome, so picking up the round knife anytime soon will result in a smack in the back of the head from my fiance. (Working with headphones on and leaving invoices laying around equals surprise attacks)
-
I love that large logo. kinda new here, but what materials are your mauls constructed of? Edit: lol you have a link to your site and i visited it
-
I just recently started tooling leather. I purchased a couple tools from Tandy and there seemed to be a quality lacking in them, and thats how i ended up on this forum. Searching for a tool maker that does leatherwork himself. I was pointed to Hidestoart.com and from there I found Barry King tools. The tools themselves are alittle spendy at about 25 usd each but the quaility of my work improved. My most used tools curently are smooth bevelers (Sizes 2,0, and 00 for the small corners) and a narrow thumbprint tool (Shader). He also sells curved bevelers, stops, seeders, and lifters wich i will be purchasing for leaf work and sheridan styles. The biggest reason i like these tools and his selection is that they are tools i couldnt find anywhere else. To deal with the cost i purchase about 3-4 tools at a time every few months. Also find a good swivel knife, its worth its weight in gold. I finally broke down and bought a new SK-3 from leather wranglers. The black rubbered Ergo swivel knife from tandy with a hollow ground blade is what i used for a long time and i like this knife alot as well and that set up is only about 33 usd compared to the 150 usd of the SK-3 from leather wranglers
-
Ok thanks for pointing me in the right direction, Also thanks for some of your post in the past about dye. Really helped me out.
-
I am getting ready to tool a seat for my dad's custom Harley and i have all the concepts down for the seat except the lacing. The seat will be a slight rolled pan with foam, then the tooled top section that will be laid onto the bottom section that covers the whole bottom with holes for the seat mounts.So basically he wants the seat pan sandwiched between 2 sections of leather then braid laced around the edge covering the edges of the leather. Ive seen several seats done this way but i dont know what kind of lace to use (round or flat). Also im not sure if i should use a thronging chisel or dremel out small holes, should i cement the sections together around the edges with the seat pan in it then lace it?. any ideas are welcome and any links to laces from tandy with sizes. thanks, Murf