


garypl
-
Posts
1,642 -
Joined
-
Last visited
Content Type
Profiles
Forums
Events
Blogs
Gallery
Posts posted by garypl
-
-
21 minutes ago, Rossr said:
 I got this picture from google I have no affiliation with this company. This is how these dies are. Its a thin piece of steel set in a board. the steel is sharpened to a point. The board holds the metal in place. Hope that makes sense. For what its worth I think the all steel ones are better and would hold up longer but that is just my opinion from having some of those around too
Ross
Ross - that makes sense now - what confused me was the holes cut into the wood boards - I guess they are just to make it easier to grab the dies.
Thanks for the explanation!
Gary
-
14 minutes ago, DarkGoku said:
I am having a hard time getting them smooth. Thank you, I will work harder on a better method

Don't feel lonesome! Edge finishing is often a frustrating effort for me too!
-
24 minutes ago, Rossr said:
Gary they are a type of die set. steel rule die set in a board you put the leather down then the die set and press the clicker press. Then you have that shape cut out. I dont know much about die sets but I know there are all different types
Ross
I guess I'm not certain what the wood is used for - I always thought clicker dies were just metal that you put on top of the leather. Does the wood allow for more even pressure underneath the press?
Gary
-
5 minutes ago, CaptQuirk said:
@garypl- The tip of the knife goes in at a downward angle, through a tunnel that is between the 2 sets of rivets. Once the blade is in the tunnel, as you push the handle into the case, the leverage folds the blade back. It does not close all the way, because the front set of rivets.
So you unlock the knife, carefully insert the tip and it automatically contacts the two rivets which guide the blade back up. Seems like it would require more space inside the sheath to do this, but it works, so must be something you need to try to really see how it works!
-
4 minutes ago, Rossr said:
Ok so I figured it was only fair I snap a shot of the clicker and its dies....so ....this really is the only other leather parts of my shop..
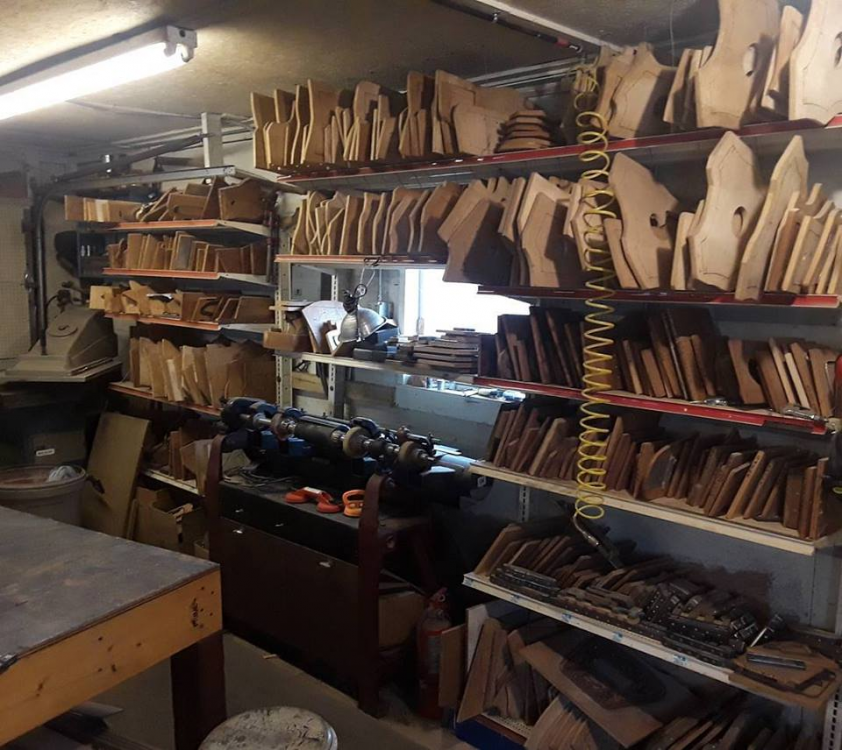
Hey Ross - how are all the wooden forms used?
Gary
-
Hi Chris - I saw this when you originally posted it in 2016, but I still cannot figure out how you reinsert the knife into the sheath so the tip if the blade catches the upper rivet! What is the sequence to properly resheath the knife? Nice design!
Gary
-
That's a great looking wallet! Stamping looks very good. The only comment I have is that the edges look like they could have been sanded/finished a bit more. Nice work!
Gary
-
When you buy leather you normally select the thickness you want. If you request a thinner piece, let's say from Wickett & Craig, and you have to have it split down from a thicker piece - you pay the same price as you would buying the hide unsplit. At least that's been my experience.
Gary
-
2 hours ago, 9tpi said:
Here is my space.
Its small but the layout works for me and the kind of work i do.

My workbench / shop has never ever looked so neat!
-
5 minutes ago, Brooks125 said:
Right now I'm using a vacuum sealer to do the rough molding. It works OK but makes for a lot of cleanup from the wrinkles it puts in. I'm wanting to move up to a shop press and high-density rubber soon. I recently have been able to use HO leather, exclusively. Weaver Leather is about a 45 minute drive, and I can go there and hand select my sides, which is really nice. I was using Tandy imports prior to that, but now that I'm working for strangers, more and more, the better leather is a must. Thanks, by the way.
I sometimes use a vacuum press for small items - I use my seal a meal vacuum and as long as the item fits in the small bags it does a good job! I put a smooth piece of thin wood under the leather to prevent the diamond pattern from the back side of the bag from imprinting on the leather.
Those shop presses I think are only recommended when you are using blue guns - am I correct? I don't think I would be comfortable putting a real gun under that much pressure.
Gary
-
2 hours ago, Firewalker said:
Hi there Gary, Thank you very much. Honestly I have only made a handful of holsters and this is the first one of this type. This one is open toe but I needed just a little more squeeze to keep the "smokewagon" (Ha, love that term) from settling down too deep in the holster. It has adjustable rear sights and I didn't want the pressure of the holster to effect how they are set because of the spring. I will take another pic of the toe to show you what I mean.
Now that I took a closer look I do see that the stitching doesn't go all the way around the toe! Good point about the rear sight - you could also mold the leather a bit around the cylinder to keep the revolver from going too deep in the holster. That's what I like about leather working - so many different ways to do things and I am always learning!
Gary
-
Beautiful holster! I really like the contrasting colors.
Gary
-
Brooks, that is some very tight molding! Did you vacuum form it or do it by hand? I am always curious to learn what type leather, finish, thread is used to give me a better idea what works best. Nice job!
Gary
-
Scott, that’s a cool looking holster! Do you always use a closed toe design or do you switch between open and closed?
I prefer the open design, but I have made them both ways.
Gary
-
11 minutes ago, Rossr said:
I have to give credit to Paul Long. I bought two of his sheath tutorials and that is where I learned the arrow head pattern. Its actually a basket weave stamp. you basically draw a line up the center and then you angle the basket weave stamp and then the one leg of the stamp overlaps the other and the other leg hits the line. Then you run the opposite to make the arrow shape coming back down and reverse it going across. Not sure that makes sense?? IF you look close you can see it. The arrow head it self is what is left from stamping the basket weave left and right of it. This might also be why they seem a bit off. I dont have the technique down perfect just yet.
Weight lets see the back is 6-7 ounce and the front is 8-9 ounce range. The front came out of the scrap bin I had a hunk large enough. Hence the different weights. Normally I would have used the same. The Step is for a inner lining. It is deer skin, Hard to tell but its a dark green color. It got stitched to the outside so you cant see the stitch and then i glued it and flipped it over the back. Again I have to credit Paul Long and his video for trying that. Seems to give a nice fit for the knife with the deer skin in it and adds a bit of flair in my opinion.
Ross, my brain can’t process that stamp design! I kind of see what you are referring to, but I don’t think I could do it!
That deerskins lining must make for a nice snug fit. Is it glued to the back side of the front panel?
Again, nice job!
Gary
-
Thanks Ross - wish the carving was a little more visible on the darker case - light has to be shining right on it to see it well.
-
Thanks Kiwi - My wife just wrapped them up - we are exchanging Christmas gifts late this year due to a death in the family. I will take a picture on Saturday when they are opened!
-
Hey Ross - nice job on the sheath. What weight leather did you use?
Also curious about the step between the hilt and the carved front of the sheath - what is the purpose of this?
That’s a nice looking stamp design, how did you stamp it? First column up the middle and stamp to the right and left or did you start on one side and make your way over to the opposite side? Only critique is that the center arrowhead stamps are cut off a bit just before they reach the retaining strap.
Gary
-
I like it! Nice job on the cover design.
Gary
-
Thanks Mutt! I am sure there are folks who prefer your design over mine. I appreciate your comment but I think you would be able to sell a lot more using your design because it is more suitable for production!
Gary
-
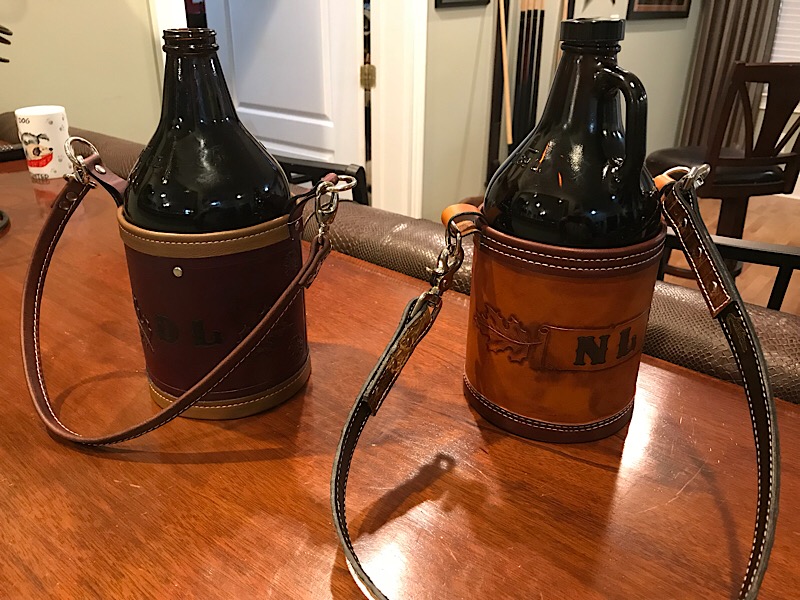
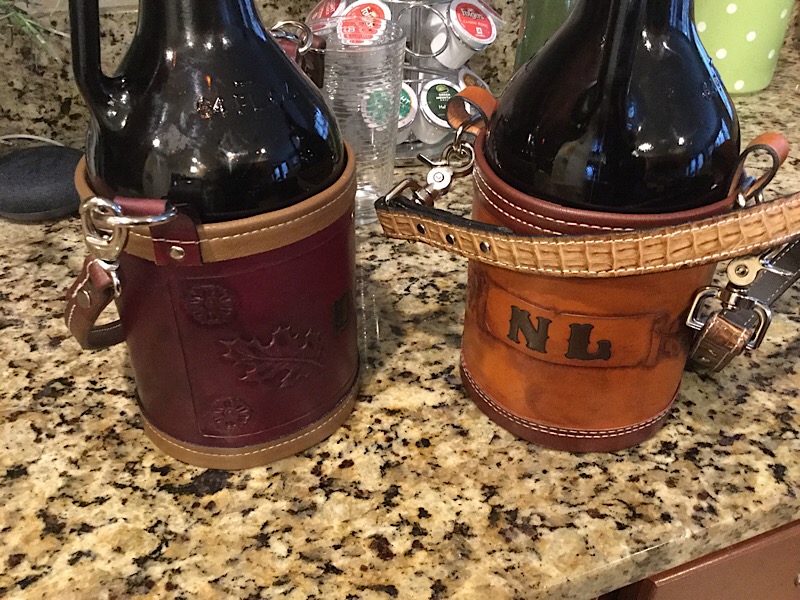
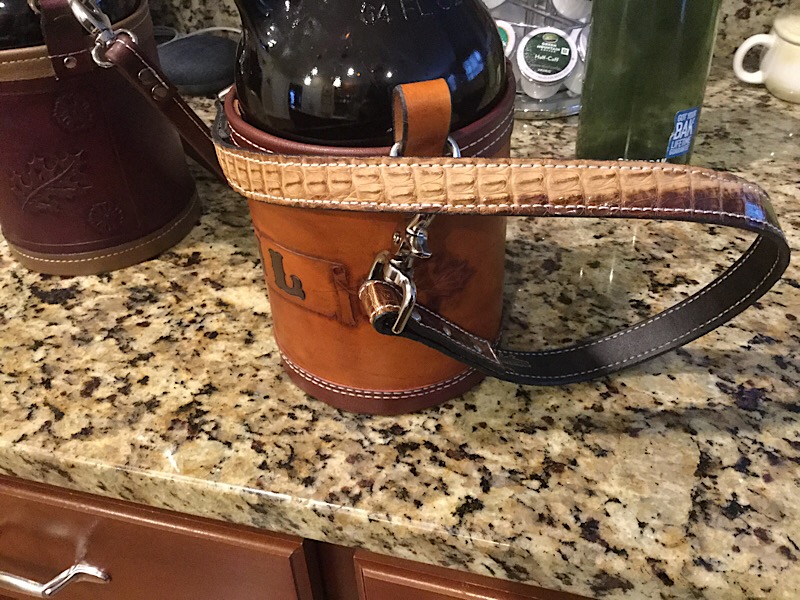
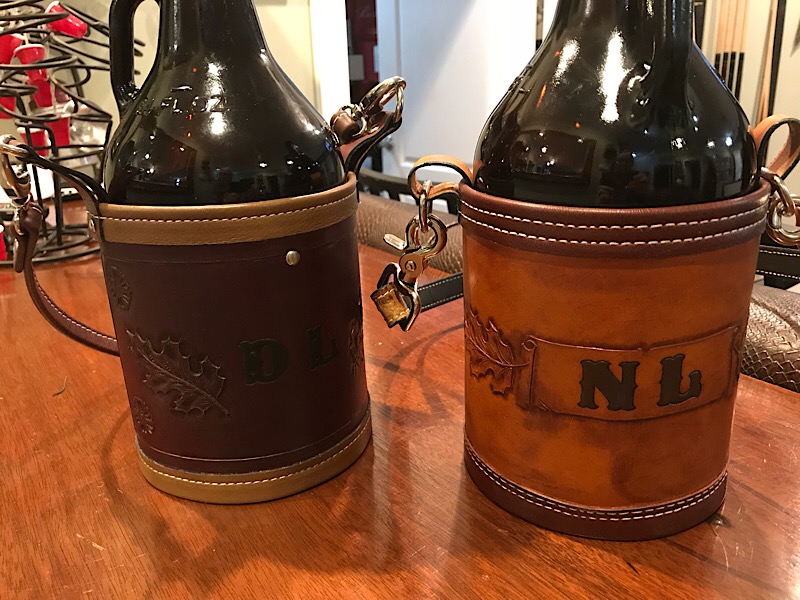
Finally finished a set of beer growlers for my sons. Made of 4-5 oz veg tan and trim is upholster leather. One handle is made from a crocodile belt I bought 30 years ago - it must have shrunk because it is too small for me now! Bottle is supported by two straps that criss cross and go up the sides of the main body. Finished inside and out with my homemade leather balm made of beeswax, carnuba wax, NFO and lanolin. Outside was also given a coat of Atom Wax.
Gary
-
1 hour ago, fredk said:
I don't stamp letters too often. but here goes;
Recently I made a couple of adjustable frames like this one sold by Tandy;
https://www.tandyleather.eu/en/product/leather-stamp-guide
Mostly I just clamp a thick piece of wood across the leather. It needs to be thicker [deeper] than the letter stamp and very wide so as not to leave an impression on the leather. I use this as my base line. I leave the letter just stamped in place and put the next letter stamp against it. Make sure the edges of the letter stamps are smooth and even and free of casting flash. Many I have have little nubs sticking out on the edges which can throw the alignment off. A few strokes of a metal file quickly removes them. Work slowly and carefully, make sure your letter is the right way up, hold tight to alignment board and to the leather and make a positive strike. if you need to strike more than once try not to have a bounce as that will cause the letter to mis-align slightly
I use a similar process, but I use an arbor press to push the stamps into the leather. Works great and you don’t ever have to double hit the stamps, eliminating risk of a blurred image.
Gary
-
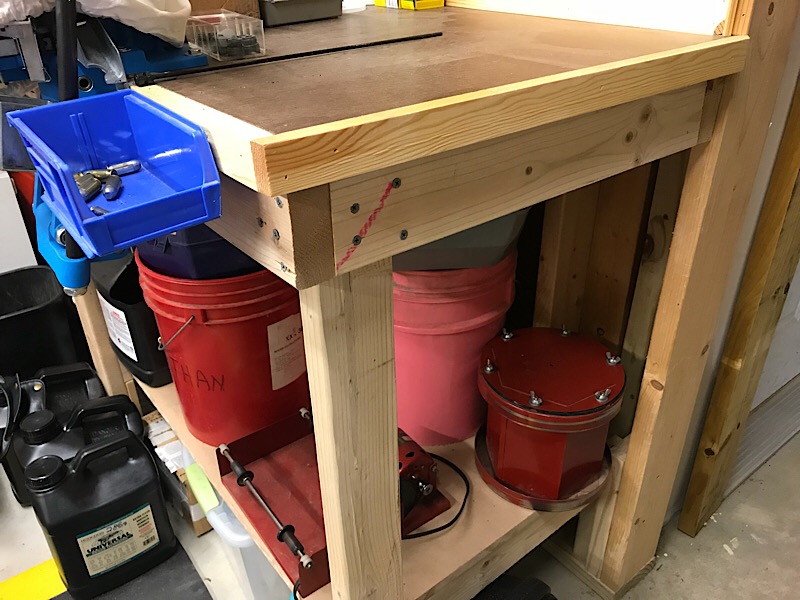
17 hours ago, garypl said:
Susan,
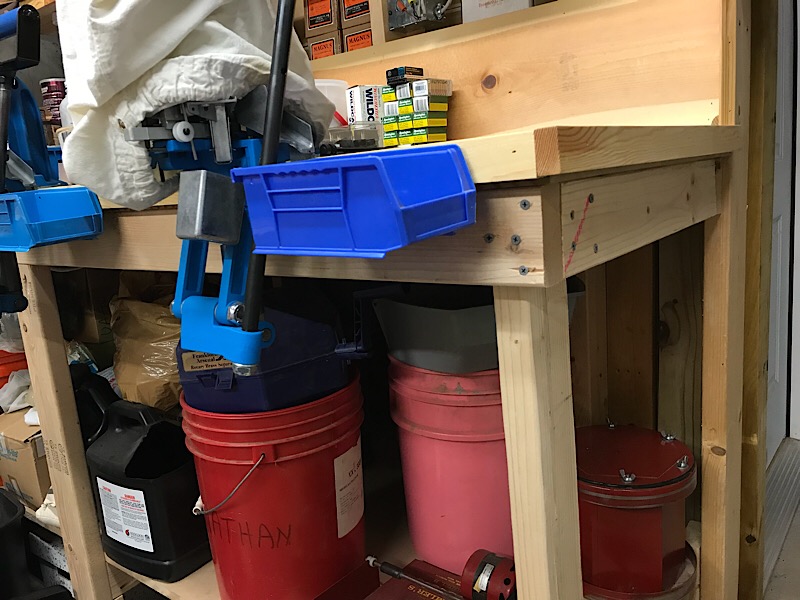
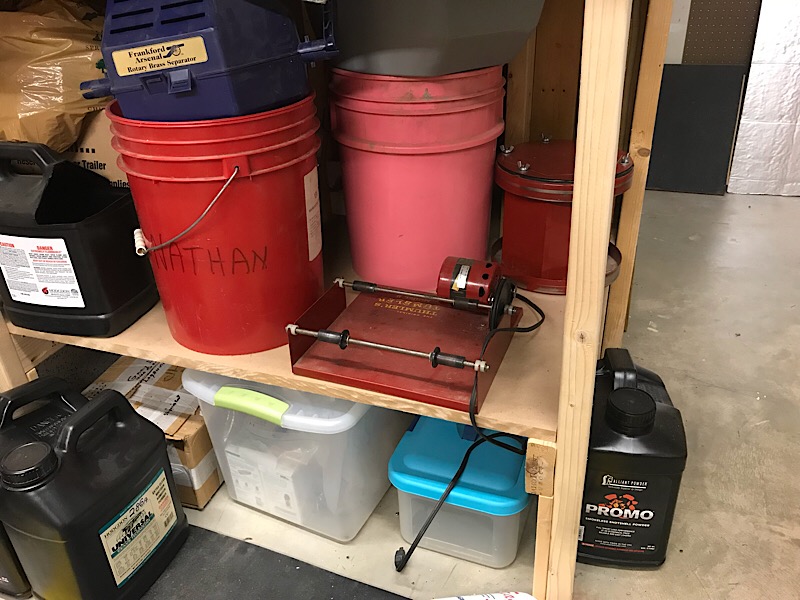
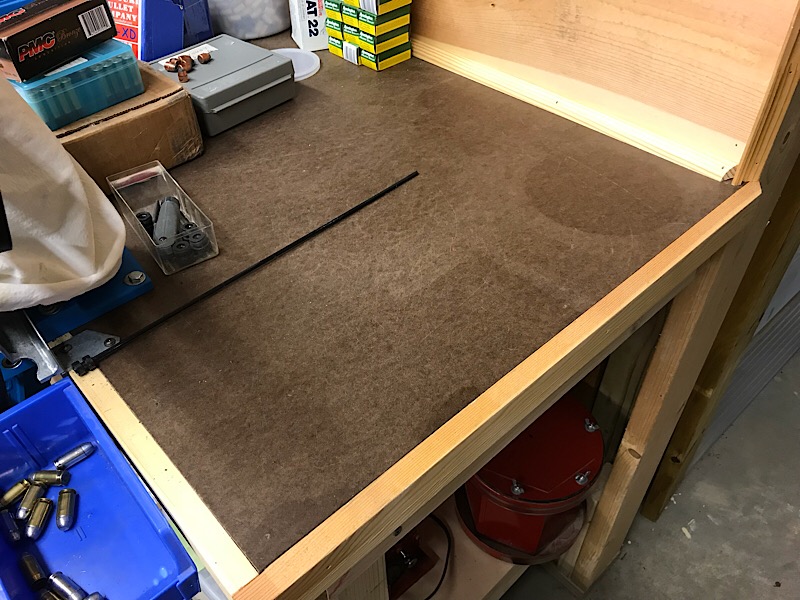
If you have a space on a wall, you can build a very sturdy workbench by screwing a horizontal beam to the wall (2x4" by however long you wish to make the table). Screw the beam to the wall at the height you want, then make a table top frame out of 2x4" lumber and top it with plywood or whatever material you wish to use. Just make certain the top is at least 1.5" thick. Working on the floor, make a couple of support legs from 4x4" lumber and lag bolt them to the underside of the table top in the two corners. Cut the legs so they are the proper height that when the top is set onto the wall beam, the legs will support the underside of the top. Now have someone help you flip the table right side up and set the rear edge on top of the wall beam, bolt the top to the beam, build a shelf underneath the table to strengthen it and provide storage space.
This sounds more complicated than it is to build and I will post a few pictures tonight when I return home. It makes an extremely sturdy bench top and the cost is minimal. Only caveat is you must have some blank wall space to attach the bench/table top.
Gary
Here are some photos - I use this bench for reloading, but it is solid as a rock and would also work well for leatherworking.
-
That's a fine looking bag!

No idea what I'm doing, but happy to be here!
in Member Gallery
Posted
That is a very cool bag front! Can't wait to see it finished and painted!
Concerning the finish, I recommend you take some scraps of this leather and experiment with different waxes/finishes to see how they wlil affect the color. Then you can apply to your project.
Gary