-
Posts
961 -
Joined
-
Last visited
Content Type
Profiles
Forums
Events
Blogs
Gallery
Store
Everything posted by BDAZ
-

Stitching issues on a 3200 with 5-6 oz veg tan
BDAZ replied to BDAZ's topic in Leather Sewing Machines
Speaking of check springs, I took off the front cover this morning and reduced the check spring tension spring tension (whew, that's a mouth full) by 50%-60%. Now I can reduce the top tension to the point where I can almost get knots on the bottom (never happened before) and I get full travel on the check spring with every stitch. Feels like I just bought a new machine!! Single layer 5-6 oz stitches with 138 and a 23 needle are perfect! No stitching trough the thread, all is good!! Thanks again to everyone who contributed to solving this problem. Last question would there be any advantage to cutting a couple of felt discs for the upper top tensioner? I have not fine tuned the upper tension yet, this is the first shot with the adjusted catch spring. The leather is exactly 2mm / 5oz. I just notice I need to back off the foot tension which I increased when the cover was off... Bob -

Stitching issues on a 3200 with 5-6 oz veg tan
BDAZ replied to BDAZ's topic in Leather Sewing Machines
I use the front of the foot as a guide for following sharp curves. If anything, I'd cut an index mark dead center. Bob -

Stitching issues on a 3200 with 5-6 oz veg tan
BDAZ replied to BDAZ's topic in Leather Sewing Machines
I did watch this very useful video put the check spring tension spring was properly engages as was the check spring on the hook. Thanks! Bob -

Stitching issues on a 3200 with 5-6 oz veg tan
BDAZ replied to BDAZ's topic in Leather Sewing Machines
What is happening is that the check spring tension seems to be too tight and the thread simply slides through. If I crank top tension down I may get some movement of the check spring but not full travel unless the top is set realy tight, then I end up with knots on the top of the single 5oz. -

Stitching issues on a 3200 with 5-6 oz veg tan
BDAZ replied to BDAZ's topic in Leather Sewing Machines
The Main tensioner consists of a wheel with two friction discs on either side. It is designed to spin and I read that some 441 clones include felt washers between the discs and wheel. -

Stitching issues on a 3200 with 5-6 oz veg tan
BDAZ replied to BDAZ's topic in Leather Sewing Machines
Thanks Rocky! I do have a feeling the check spring is a bit rough. I don't get much movement in the spring and sometimes none if the tension is a bit slack. I did pull the check sprin gand check for rubbing and also lubed the check spring tension spring, but I agree it needs attention. Am I supposed to get full travel of the check spring with every stitch? This is the latest test which is pretty close to acceptable. -

Stitching issues on a 3200 with 5-6 oz veg tan
BDAZ replied to BDAZ's topic in Leather Sewing Machines
Thanks! I have done that in the past, using a lighter black bobbin thread but it wouldn't work for this application. Also, I have used 207 with a 24 for these tests but switched back to 138 with a 23.I am still not sure I have the check spring operating properly. It certainly doesn't seem to keep the tension on the thread as the needle is piercing the leather. I'll shoot a video tomorrow.. Bob -

Stitching issues on a 3200 with 5-6 oz veg tan
BDAZ replied to BDAZ's topic in Leather Sewing Machines
I want to thank you all for the input. It seems there was no one issue but a combination of tuning the catch spring stop, changing back to a 23 needle with 138 thread, reworking the bobbin tension seems to have corrected the problem. I will give it some more attention tomorrow but as of tonight I am a happy camper and will be able to complete my order with confidence. Thanks again!! Bob -

Stitching issues on a 3200 with 5-6 oz veg tan
BDAZ replied to BDAZ's topic in Leather Sewing Machines
Did this and it's the first improvement I've had. Not perfect but better than the above pic. Thanks! BTW I picked up an EUB a year or so ago..FUN! -

Stitching issues on a 3200 with 5-6 oz veg tan
BDAZ replied to BDAZ's topic in Leather Sewing Machines
I was waiting for someone to post this! I remember this vaguely when I got started. Plan A is to move to a heavier leather. Plan B is to keep painting the knots black with a Sharpie, looks great if you don't get too close. My latest batch of drum dyed purchased for this production run is noticeably thinner than usual. I was hoping I could make some changes in setup that would help. This is the main headache, again only on 5-6 oz. -

Stitching issues on a 3200 with 5-6 oz veg tan
BDAZ replied to BDAZ's topic in Leather Sewing Machines
The first two microscope photos are a new spool that was supposed to be bonded but the subsequent photos are from my old stock purchased from Bob Kovar and are bonded. BTW I occasionally used to be the club champion at the Christmas Common Sporting Clay Club when I lived in Berks. Not fun when the temp is 45C and no bacon butty sandwiches to be had! Also lectured in photography at what was Surrey College of Art and Design and also Trent and Derby.. Bob -

Stitching issues on a 3200 with 5-6 oz veg tan
BDAZ replied to BDAZ's topic in Leather Sewing Machines
No, it's an illusion. It is exactly the way Ryan demonstrates in the video and the way I have been doing it from Day 1. I get a perfect stitch when stitching 2 pieces of 5oz but having trouble with the single. Bob -

Stitching issues on a 3200 with 5-6 oz veg tan
BDAZ replied to BDAZ's topic in Leather Sewing Machines
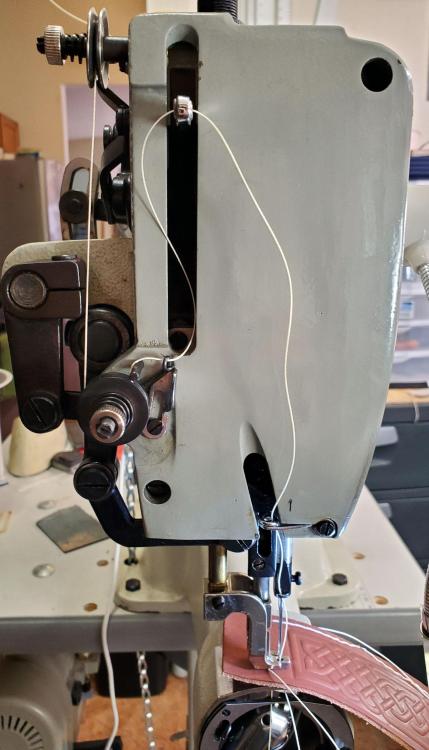
I did move the check spring stop back to the middle position and vertical and now the thread runs straight across from the post through the opening in the check spring but it made absolutely no difference. The current tension is the maximum tension I can use and not present knots on the top. The bobbin is set to almost maximum. -

Stitching issues on a 3200 with 5-6 oz veg tan
BDAZ replied to BDAZ's topic in Leather Sewing Machines
I watched Alexanders video on removing and resetting the check spring. I did pull it apart and all seems normal did make sure the neck of the check spring was engaged in the hook of the check spring tension spring but it made absolutely no difference. I checking Ryan's video of threading the 3200, he demonstrates the action of the check spring but on my setup, upper tension is not enough to move the check spring at all. Bob -

Stitching issues on a 3200 with 5-6 oz veg tan
BDAZ replied to BDAZ's topic in Leather Sewing Machines
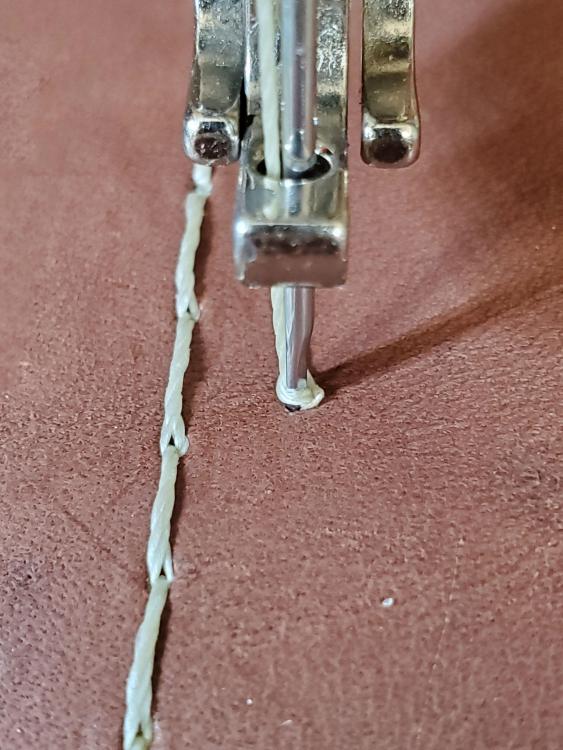
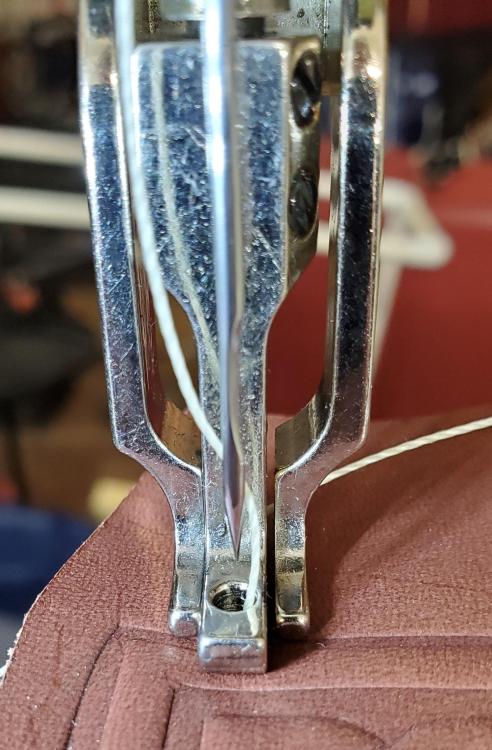
Thanks both for your help! I have been working on the check spring tension and position of the stop. Bobby from Toledo suggested to move the stop so the hole in the spring is even with the post on the lower tension. Didn't seem to help.This is what happens during a stitch when tension is low enough to move the knot below the surface of a single layer of 5-6 oz. Bob -

Stitching issues on a 3200 with 5-6 oz veg tan
BDAZ replied to BDAZ's topic in Leather Sewing Machines
-
One of my product lines, a pouch, uses 5-6oz drum dyed leather. I use either 138 bonded nylon with a 23 needle or 207 with a 24. (Pictures are 207/24) I purchased a spool of white bonded nylon for this job as all my tread inventory is either black or natural. I get perfect stitches when stitching two 5-6 oz pieces but when I reach the flap I end up with knots on the top or if I loosen the top tension the knots move below the surface but the thread appears to bunch on the down stroke and the needle punches through the tread as shown in the pics. Both look like crap! Any suggestions will be most welcome! I am backed up and I need to solve this issue, whether by changing thread/needles or adjusting the tension or possibly working with the catch spring ASAP. Thanks! Bob
-
We refer to accordions as "boxes" For those who don't know, perfect pitch is when you toss a banjo into a dumpster (tip) and it lands on an accordion!. BTW my avatar was laboriusly traced from a 1909 pearl engraving from a Faibanks banjo, and every 5 string banjo I own has one. Bob
-
Nice! What box? Salterelles are becoming quite popular here. Have my hands full with instrument cases! The strap market was more interesting when I lived in Boston.. Bob
-
The client doesn't want a plastic sheath, one came with the knife. He also wants a form fitting sheath so a cuff style case is also out. The epoxy impregnated welt appears to be a solution or possibly to create one from carbon fiber. I am going to play with laying down a single layer of carbon on top of an epoxied welt on the bottom. I won't have the knife too tight and will wet form using a Maquette think enough to give it room. The client wants it horizontal on his belt and it will be worn daily for work. Thanks! Bob
-
Cut through the threads and the glued seam. Kydex would be too bulky, I have used it for straight edges but to get a curve would be a problem. With the spacer I will trace the outside of the case on some 5-6 oz then cut the inside 1/4" smaller and should be able to lay the spacer right over one shell. It's the curve that's the issue.
-
I tried a test using a 1/4" spacer strip between top and bottom saturated in epoxy then stitched when try. I was unable to slice the edge of the 5-5 oz spacer after repeated tries and the knife glides smoothly across the edge. It will be a bear to apply this to the case without ruining the piece. I am thinking about lining with carbon fiber at the same time. Bob
-
Beautiful Work! Don't think I have seen a nicer one! What sort of music do you play? For a while I was playing guitar for a Morris side in Uxbridge and will be playing tenor banjo in Clare in a couple of weeks. I have occasionally been asked to make custom straps for button boxes but declined due to the distance involved. I'd want to be able to fit and measure and the 5,000 mile commute would be a problem. Bob
-
I have a commission to make a sheath for a karambit. This is a working knife and retrieval has to be quick and easy and reinsertion, at least simple and not fiddly. Unlike all of the Karambits detailed here, this has an extreme curve, is not for show and will be used for self defense. It is extremely sharp and immediately sliced open the seam of test sheath I constructed. I am not sure simply adding an extra layer of leather around the perimeter of the blade would work. The worst area is along the outer edge towards the tip. Suggestions or ideas are most welcome. Thanks! Bob
-
Sounds time consuming and not very economic, unless it's for hobby work. Bob
- 48 replies


