BDAZ
-
Posts
961 -
Joined
-
Last visited
Content Type
Profiles
Forums
Events
Blogs
Gallery
Store
Everything posted by BDAZ
-
I want to make a 1"x18" leather stropping belt for a Work Sharp Ken Onion knife sharpener. I am trying to figure out how to join the two ends to avoid either a hump or snapping the belt. Clearly will skyve the leather to 50% at the joint and possibly glue some light weight fabric as a reinforcement on the back, but otherwise have no idea how to do it. Thanks! Bob
-
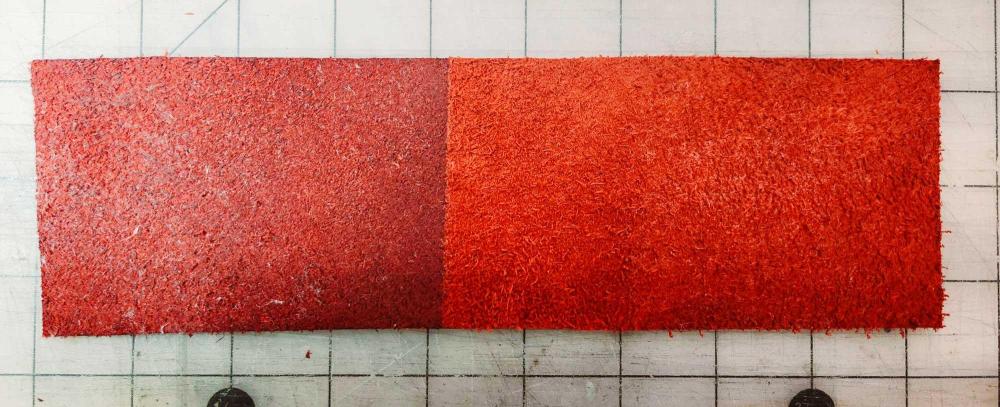
Thanks Tom, The problem is to maintain the qualities (soft padding and non slip) of the flesh side without turning the musicians shirts orange... The Resolene did the trick as far as sealing the dye but killed all the supple padding qualities of the flesh side but sounds like an interesting product for other projects. Best regards, Bob
-
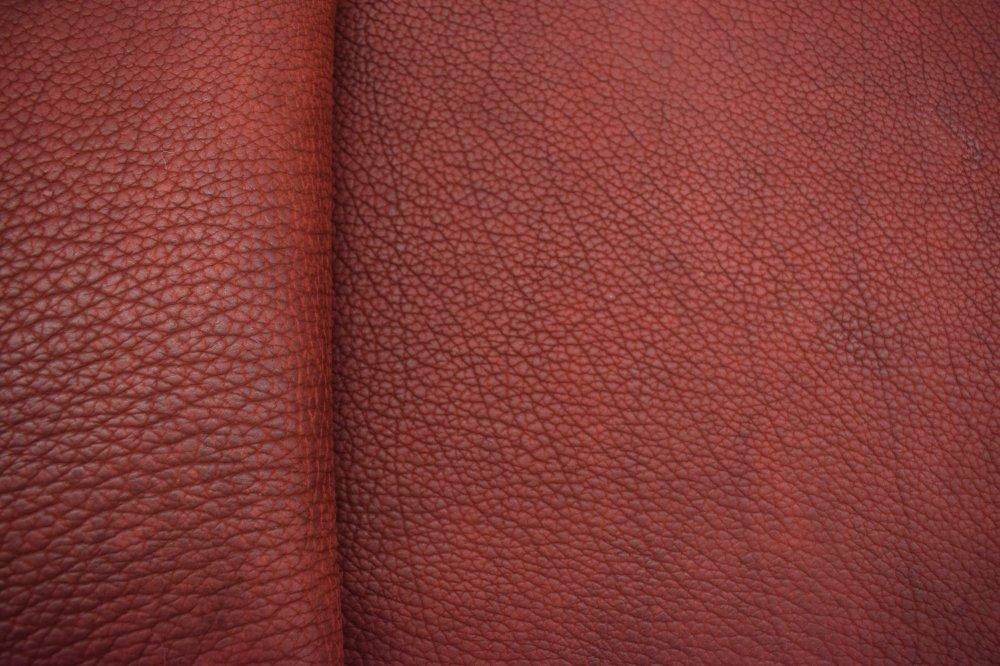
UPDATE: I was contacted by the owner Doug, and it looks like he is going to resolve the situation. He seemed alarmed that any of his employees would hang up on a customer and surprised at what I was told. I have been purchasing Bison hides of various shades for the past few years, primarily for the production of guitar straps. I have purchased numerous sides from Tandy and lately The Hide House in California and most recently Montana leather Company. I am able to make the straps quickly and because there is virtually no finishing required I am able to offer them at a reasonable price. I also have a wholesale contract with a guitar manufacturer to produce branded bison straps The bison is great for straps because the flesh side is soft, comfortable on the shoulder and also essentially padded. I sometimes purchase 10-12 oz and then skive the strap to 6-7 oz but leaving the middle like a built in shoulder pad. In addition I make a range of instrument cases using drum dyed leather in various shades from Wicket and Craig. I also use their dyed leather for musical instrument straps for guitars, banjos and mandolins. So over the past 15 years or so I have been through many dyed hides with no issues. I purchased two Bison sides from Montana Leather Company a few weeks ago, one was brown and the other had a reddish tint. I though the red tint would be great for folks with red electric instruments. Opened the package a few days ago and last night I started trimming the sides, first the brown and then the red. When I started cutting the red hide, I notice my hands were turning orange! The red dye was bleeding from the flesh side and of course, it would have been a disaster to make a strap from that side. I called the company and spoke to Brandon. I explained the problem and assumed I had a defective dye job. I was the passed on the the manager, who I believe was Patrick, the owners son. I explained that the hide was defective, it was unusable for my application and what could they do to help me. He then told me "It's normal for all dyed leather to bleed" "I have sold thousands of hides and they all bleed" I explained that in my experience of purchasing commercially dyed hides, for many years, that they don't bleed, and neither does the other hide I purchased from them. He told me that all his customers seal the flesh side of the leather he sells them. "That's Normal" . I asked him what they use and he mentioned Resolene. I replied that I have a gallon of it but I doubt it will leave the flesh side as I required, in a soft comfortable condition but I agreed to try. I asked what they can do if it doesn't work and he basically told me to suck rocks and hung up. I called back and explained that if they refuse to accept responsibility, I will contest the transaction with my credit card company. He then stated it doesn't work like that, clearly having had this issue before. This was the worst customer experience I have had in recent times with ANY vendor and I caution against doing business with this "bleeding" company. The below images show the bison swatch from their web site and the flesh side and the effect of Resolene on the left side. The Resolene effect would be fine for a bison bag, wallet or similar but a guitar strap..not so much. Also if they had posted the bright orange flesh side on their web site I never would have purchased it. Any comments, or suggestions much appreciated. Bob
-
I have a special project which requires a heavier leather than I carry in inventory. Unfortunately the leather I required was not available in the weight and I was bit optimistic and ordered a heavier grade than I require and figured I could just skive the leather to the required thickness as needed. BIG MISTAKE. The straps I have to produce are 3" x 6'. After a test with a sample strip of the heavy leather on my 6" manual Tandy skiver I realized this was a pipe dream. Anyone know of a skiving service that could handle a 25 ft2 side of Vegtan or possibly 6" strips? Thanks! Bob
-
 I was curious where it was just cost saving, expedience or some tradition. I suspect the former. This was used on stress bearing components, obviously to utilize the scraps of leather left over from the main parts. Probably easier to use garment machines on cardboard than solid leathers. Thanks, Bob
 -
Try the Hide House in Napa. Ask for Shanée Somogyi. www.hidehouse.com Bob
-
As you can see they did use 2 layers of thin leather. I was thinking that they had one type of leather available and everything needed to match ..but surely cardboard? I believe this bag was well over $1000. I thought it may have been typical of haute couture leatherwork...Gucci, etc. I rarely use cardboard in holsters heh heh.
-
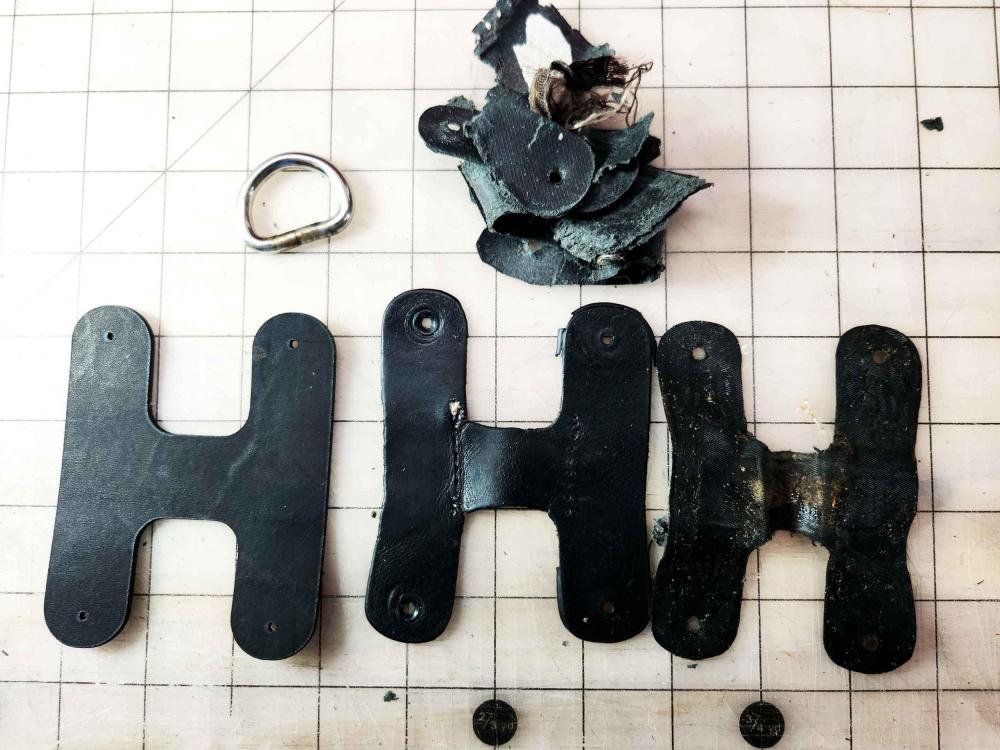
I occasionally get calls for repairs or odd projects generated by my web site but I have done some work on a Dooney and Burke purse where I replaced the canvas strap with an exact match leather one and most recently a call from a local surgeon who has a bag very expensive from Verapelle, purchased in Italy many years ago and big enough to easily carry a 17" laptop, note books, etc. The strap loops and attachment fixtures were disintegrating. The strap is nylon webbing and the bag is heavy duty and well made. When I removed the rivets and the leather pieces holding the strap ring to the bag and the other piece attached to the webbing, I discovered they were actually a sandwich of cardboard, some fabric and thin leather holding it all together. The actual leather was so fragile, it tore in my hand. I created exact duplicates of the pieces on my laser cutter and used 5-6 oz Wicket and Craig drum dyed and laminated to replace the cardboard sandwich. The owner is thrilled and the new attachments will outlast the bag. My question is why the sandwich using cardboard and fabric instead of a heavier leather that will stand up to the stresses of a large and heavy bag? Or is this just an Italian thing? The attached shows the part that attaches the D ring to the corner of the bag. Original on the right and laser cut dupe on left and the dog's breakfast filler on top. Thanks, Bob
-
I thought about that but there are no tanneries in Arizona so pretty unlikely. I was thinking about the sides to get skived somewhere but by the time I pay freight it breaks the budget. I think I found the solution.. https://www.amazon.com/Cargo-Tie-Downs-Roll-up-Trailers-Warehouses/dp/B01MT0WAGO There are lots of these out there and a few that are designed to be bolted on to a truck. The price is attractive! Bob
-
Laser cutting and engraving Chrome Tan..What Respirator UPDATE
BDAZ replied to BDAZ's topic in 3D Printers and Lasers
Thanks, never heard of it..I play guitar and banjo for traditional Irish and Appalachian and even did a stint in Uxbridge playing for Morris Dancers...different end of the spectrum, though Morris Dancers may have been the Goths of their day.. Bob -
I have a project coming up that will require skiving hide length 4" strips of relatively soft leather. Pricing hand cranked skivers, seems like they are way over my budget for this project. I have an Osborne 6" skiver which does a great job but will certainly get devious. akin to hauilg sails by hand... I was thinking if I could find or build a 6" wide roller with a handle and a ratchet and month the two on a work bench, I could make short work of the skiving while getting consistent results as the skived side will be visible on the finished products. Has any one seen anything like this anywhere? I suppose I could build one but time is money.. Suggestions? Bob
-
On this last job the laser only ct 5/8 through the leather and I had to follow the cut with a knife. This resulted in lots of small bits of char all over the bench and once it gets embedded in the unfinished grain side... Try using the burnisher BEFORE you remove any of the char. It seems to turn it into a shiny glossy edge that won't rub off. Thanks! Bob
-
U usually have no issues as most of my leathers are drum dyed vegtan and usually black or brown, but I am working on a project with some particularly tough natural veg tan that is particularly firm and seems to be tougher than plywood in terms of cutting. I'm using a 20 watt diode laser. The problem is that the char is really messy and the natural leather seems to be a charcoal magnet. I've tried packing tape, blue tack and crepe with some limited success. Any tips? One surprising aspect is that when I throw it on the cocobolo burnisher, I end up with a finish edge that looks like glass...I'm thinking maybe finish first but not a great idea because most of my products are wet formed. Thanks! Bob
-
Laser cutting and engraving Chrome Tan..What Respirator UPDATE
BDAZ replied to BDAZ's topic in 3D Printers and Lasers
In further discussions with Bruce it would seem that Chrome 6 has been all but phased out in most western and European tanneries and replaced with Chrome 3. I would be suspect of any third world countries that don't export to the EU or the US. Almost all of my leather is veg tanned and my leather is US sourced with an occasional veg tanned hide from Mexico. I am starting a project which MAY use chrome tanned hides from US tanneries. YMMV. What is EBM Music? I used to compete in the clay shooting at the Essex County Fair when I lived in the UK..Lovely part of the world! Bob -
I am hoping someone responds who actually knows the answer rather than guessing. I have a large wholesale order coming up which will require extensive cutting and engraving utilizing my 22 watt diode open bed laser. I have been using lasers, and 3D printing in my leather business for the past few years and it's a real time saver, especially for production volumes. I have been primarily cutting vegtan and Birch ply and have a reasonable exhaust. My workshop adjoins my residence and the exhaust system is effective enough for non lethal smoke and fumes. Because of the size of of laser bed, an encloser is not practical, however I will be installing more powerful exhaust fans in the adjoining window but I want to make sure that I do inadvertently inhale any chrometan vapors. Does anyone have knowledge of the type of respirator that will protect against heavy metals found in leathers and aniline dyes, or suggest a resource.One of my closest friends worked in the shoe industry in Europe, and was transferred to Dungguan, China where he lived for 5 years. On his return to Germany he was diagnosed with terminal lung cancer and never got to drive that Mercedes SL he had stashed for his retirement. His doctors ascribe the cancer to the air pollution in Dongguan which is heavy in chromium particulate. He was also one of the best bluegrass banjo players I have ever played with... I'd dearly like to not suffer the same fate. After researching the topic this, IMHO, lays the subject of the dangers of laser cutting/engraving chrome tanned leather to rest. All the fearmongering idiots are wrong..listen to the science!
-
I am from South Africa and used to deal with the folks years ago: https://www.africangameskin.co.za/ Importing from South Africa is no big deal.. Bob
-
I have a need for leather sourced here in Arizona. I have found a source for local hides but my usual supplier (one of the big ones) will only tan hides they source. Final product needs to be veg tanned and skived to +- 8oz Thanks, Bob

-
Great information. I'll check it out!! Bob
-
I know, I have a few sets. Thanks, Bob
-
-
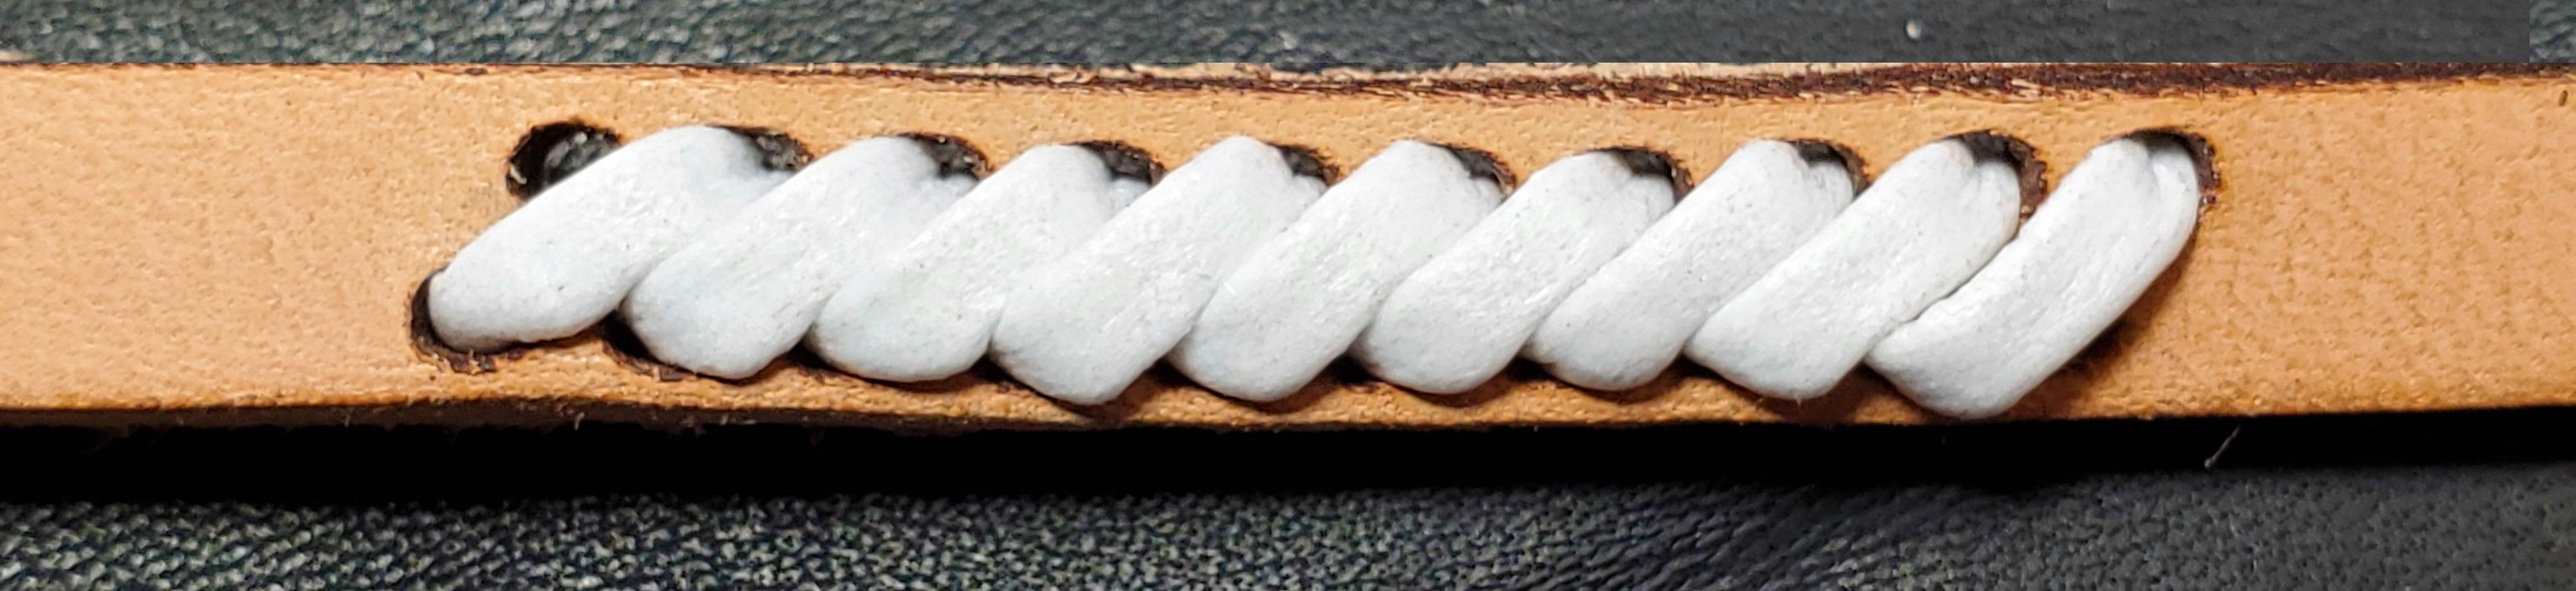
This is the same laser cut holes with a different lacing pattern and I think it does the trick though the 2mm punches sound like a good option if I can find them. Thanks! Bob
-
Brilliant! I'll give it a go... Bob I looked on Amazon, didn't check Ebay. Thanks! Bob
-
Thanks! That's what I would use for an edge but it has to be a single stitch..
-
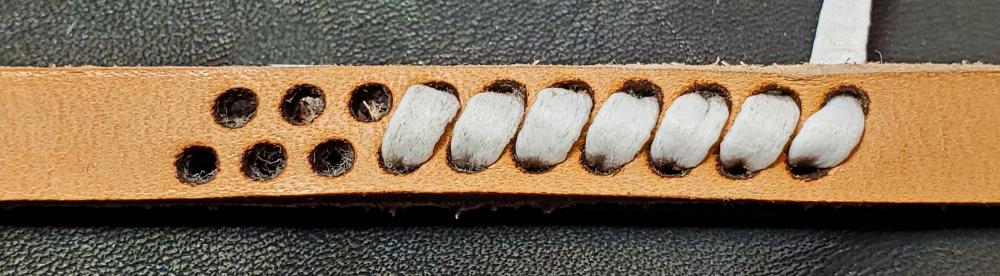
Not sure if a wider lace is an option but good suggestion and I'll check. Update: I checked and it has to be 1/8th" lace. Thanks! Another Update: Searched for 2mm punches but none available. I was able to laser cut these 2mm holes spaced at 2mmin 3.3mm veg tan. For the actual project I'll may have to clean the char out before lacing but it will be the final stage and the project will already be sealed with resolene. In addition, I'm going to make the holes 2mm x 1.5 or even rectangular slots of that dimension and spaced 1.75mm. A punch would be an easier solution but this is Plan A if no one has a better suggestion.
-
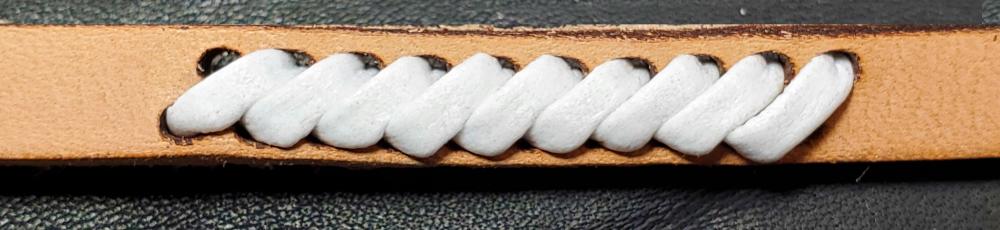
I have to produce a decorative line of lacing on a project which will be around 60 inches and needs to have a tight "wrap" as shown below. All my lacing chisels leave gaps between stitches. Are there any punches for 1/8" lace that could produce these results. I suppose I could hand punch but that would be really time consuming and not in the budget. I have the possibility of either marking punch holes or even cutting them with my laser, which I will use to "trace" the pattern on the leather but again, a lot of extra work when it seems the right punch may do the trick? Thanks! Bob