


BDAZ
-
Posts
961 -
Joined
-
Last visited
Content Type
Profiles
Forums
Events
Blogs
Gallery
Store
Everything posted by BDAZ
-
What I notice is that the flesh side will pick up an texture that may exist on the cutting surface and of course you are pushing the grain into the cutting surface as opposed to pushing it towards the flesh. Bob
-
I also have a 12 ton and use it exclusively for large embossing plates and cutting dies. It is too slow and impractical for stamping. The 2 ton arbor is ideal, plenty of work space and quick to use for alphabets, 3d stamps and makers mark. I had mine made with a back like a 3D stamp. I have added a bottle jack that enables me to keep pressure on the handle as long as necessary for stamping. I have a zero failures with the Gold Star and I know it is used in production work by garment makers. Bob
-
You may have missed that this is production work and I find using tape saves me lots of assembly time and eliminates drips and ruined pieces. The parts have quite a bit of work already invest in decoration prior to belong assembled. I only use glue for touch ups. I was thinking of making a paste with glue and a black filler but I am not sure how well glue will take edge paint. So far all my tests have failed. Bob
-
Another experiment, I punched a hole at the edge of an old credit card producing a semicircle the diameter of the width of the leather. I applied a bead of caulk to the edge of the leather and "squeegeed" the bead forming a perfect semicircular bead the exact width of the edge. It dried perfectly. I am going to obtain some black caulk which could be an alternative to edging, burnishing and painting. The white looks perfect! It would be easy to make a jig that would be a slot with a rounded top the exact width of the project, and one would simply draw the leather through and form a perfect bead on the edge in one step. Bob
-
Is that a commercial product or do you make it? Bob
-
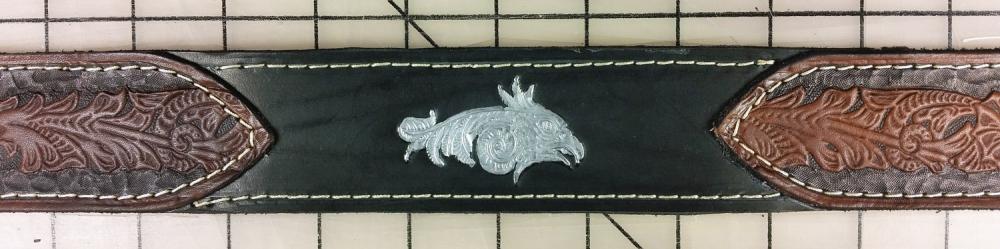
I use undiluted acrylic to highlight stamps and letters. This is a quickie strap I made from scraps for a new banjo I acquired a few years ago. The acrylic still looks freshly painted. Bob
-
I have seen these at leather shows and they are much quieter than a manual hammer. I also recommend a 2 ton arbor press for all 3D stamps and lettering, etc and a rivet press for snaps, rivets etc. Last resort: That should keep the complaints to a minimum
-
I assume that if you can dilute the black, you may be able to evaporate some water and thicken the paint a bit as well, though I see little difference in viscosity between the Edgekote and paint when applied to the edge with a tool. Bob
-
Edgekote is basically the same formulation as Acrylic paint but thicker, less water or more pigment. The plastic wood is just for filling separation cracks where the glue or tape has failed. 16 oz bottle is $4.99. 4 oz. of Edgekote is $8.99. https://www.hobbylobby.com/Crafts-Hobbies/Stencils-Craft-Paints/Acrylic-Craft-Paints/Black-Anita's-Acrylic-Craft-Paint---16-Ounces/p/80753748 Bob
-
That's probably close to plastic wood but I want to avoid the mess of mixing and applying glues. I did additional tests on PW and it seems to work well, no drips, easy to apply and remove excess, and once dry it does not separate. It takes Edgekote well and provides an invisible fill once painted. I also tested standard acrylic paints from the Hobby store as an alternative to Edgekote. I could not tell the difference between the two when applied and when dry. The $1.49 satin acrylic paint was less expensive. Bob
-
A second test with the caulk failed. After a single application of Edgekote, the area that had the caulk showed up as a break in the Edgekote. I believe that the latex repelled the Edgekote and left a visible gap, though not through to the leather. Going back to the plastic wood for more testing. Bob
-
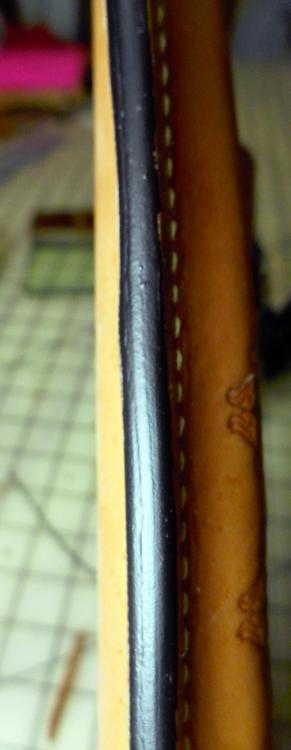
No, an extra step with the possibility of a screw up, leather is rock hard and no longer flat. Sanding sometimes helps but the problem is a gap. I did some moe tests and it does appear that the caulk may be the answer. I used the suggested drying time and it didn't work, however using a longer drying time seems to be the answer. I tested it as an adhesive (flesh to flesh) and it works as well as any other glue once dried. The advantage is that i is very thick, can be applied to the edge and slicked off with a scraper or credit card and it remains in the crack. The photograph attached was a reject piece with 4 layers, 2 x 6 oz leather and 2 x pigskin lining. There was a large gap where the lining had separated at the edge. I did give it a couple of hours to dry then burnished with gum trag and painted with a single coat of Edgecote. While not perfect, it is certainly more than acceptable, especially once waxed and buffed. Bob
-
I saw that post but not sure if it is tough enough to be able to hold a crack together. The caulk and plastic wood doesn't seem to handle the burnisher and separates. Maybe a blend of white glue and pigment. . Bob
-
Thanks! Checked out the video and ordered their sample kit. Looks promising, though more of an over coat and less of a filler. It will require two edge paints which I am trying to avoid. I am in the processing and acrylic caulk, which looks promising and plastic wood which looks less so.I will post some pics once finished. Bob
-
To messy and risky. I'm heading for Home Depot and The Wood Store to look for something that may work. Good news that all my edges are black
-
This is production work so I am not looking for perfection, just good quality. I don't want to bill my time at $5 an hour heh heh. I am making cases for flutes. I cut top and bottom pieces from Wickett & Craig drum dyed veg tan, decorate then dry, tape my seams (faster than glue and no chance of smearing, etc), trim the edges straight and even if needed, then stitch. Next I wet the leather and insert specific forms and wet form. If the form is very tight, it will put stress on the edges and may cause the very edge to separate slightly as it dries. In typical AZ sun, a couple of hours later I have a rock hard case ready for edging and final finishing. (It rained today, first time this year!). Sometimes the edge dressing fills the cracks and sometimes not. It would be simpler to have the right compound, fill in the cracks and then when dry, throw it on the belt sander, burnish with home made Trag, paint and ship it! Bob
-
What happens is that the glue may separate at the edge during the wet forming process due to the stress on the leather from the form. The result is essentially a thin crack that is to wide in places, to be filled by single application of edge paint. Edge paint is one of those operations that has the potential to ruin a piece, and when I am rushing to complete a batch order, the fewer potential disaster steps, the better. A non drip paste which will not stain and is easily applied would be ideal. Bob
-
Most of my production items are glued, stitched and then wet formed with dozens of different forms. I make a number standardized products customized with the particular form required. Sometimes there is a very tight fit and the edges tend to separate slightly. I generally don't use an edger, just edgepaint and burnish but it hasn't been a critical part of the process. I would like to improve the quality of the edges , especially where there is a small separation along the edge. I would prefer to have some type of filler I can apply and then use a single coat of edge paint rather then multiple coats. After researching I have seen a few possibilities but I am wondering if anyone has a personal favorite that would work as a filler, sand, burnish and then take Edgecote. Thanks! Bob
-
Occasionally when I screw up the tension, I use a fine point marker, the same color as the thread and touch the upper loops and presto! They disappear! Details will help diagnose the problem,, which could be a tension issue if the leather is a bit thin for the machine. Slainte! Bob
-
-
 I had a belt to dye this morning with Feibings USMC. It is a woman's belt at 38" total. The first part was dry by the time I was finished with the other end. At 10am the belt was around 130F in the sun while drying. 50%-60% seems to be the ideal humidity for wood instruments. The leather is along for the ride! When I lived in Florida, everything in the garage turned green! Bob
 -
Just received a post from musician friends at an outdoor session in Liscannor Sunday. All wearing Sunglasses! I didn't know they sold them in Ireland! I have had black leather wet molded items reach 71C while drying in the sun. As for mold, the spores have to be in the air before they can germinate on the leather, and here in Arizona, they don't survive unless there is a constantly damp area, like a leaking toilet. many of the homes here don't have A/C but instead use a swamp cooler, essentially a large fan blowing through a wet pad and then into the house. The evaporation cools the air 25F when it is hot an dry and is much cheaper than A/C. However, later in the year, when the monsoons move up from Mexico, they are less effective as the temperature drops and humidity climbs to 30-40%. Bob
-
Alligator print belt
BDAZ replied to mike6642's topic in Purses, Wallets, Belts and Miscellaneous Pocket Items
Au contraire! I have been using the stuff for years. After spraying both sides, allowing to get tacky and then picking of large pieces of sticky lining and trying to line it up on the sticky leather making sure it doesn't fold over on itself or get misaligned, or the item touches some of the over spray. Then when the wind is blowing.... If you are going to use glue, industrial spray adhesive IS the way to go, but I can tell you, I have cut production times by 50% and spoilage to 0%. Bob -
Alligator print belt
BDAZ replied to mike6642's topic in Purses, Wallets, Belts and Miscellaneous Pocket Items
Nice belt! How does the alligator print hold up over time? When I still used glue for linings I used a number of industrial spray adhesives, especially the stuff used for headliners. I found handling long strips of sticky leather challenging! I now use HeatnBond. No mess, takes 30 seconds to apply lining to the belt and doesn't fail. I am currently working on a commission for a belt line with suede. Bob -
Early summer in Arizona. 107 outside and 7% and inside cooler and dryer. I have converted a bathroom and shower to a humidor with a humidifier made from a 5 gallon pail, fountain pump, computer fan, hooked up to the shower head which keeps the bathroom at exactly 60% where I store leather and musical instruments. Generally wet molded items are bone dry and rock hard in an hour. Of course casing and carving requires lots of ongoing moisture. Bob

