.jpg.d60258221c476480a6e073a8805645bb.jpg)


Hidemechanic
-
Posts
334 -
Joined
-
Last visited
Content Type
Profiles
Forums
Events
Blogs
Gallery
Store
Everything posted by Hidemechanic
-
replacing saddle parts
Hidemechanic replied to jetech's topic in Saddle Identification, Restoration & Repair
I would suggest you do some research on saddle making process. It will give you a better idea of what is involved in fitting pieces to the tree. It's not a simple a cutting copies of what is on the saddle now and applying the new parts. Read up , you'll understand better. Good luck. GH -
JRedding, you have any pics?GH
-
I frankly, build the seat the same as a full seat, I just have less to carve. Think about where most of your weight is, it's not in the front half of the seat so comfort shouldn't be an issue. As to tricks and hints, I plan for the swell cover to come way back of where it does on a later models. In kind I do the same with the seat cover, so what happens is you get enough leather to cover the bars where they would normally be exposed. I feather them down and over lap and glue in place and have the 'seam' under the stirrup leather. It takes carfull planning where to make your cut when the seat leather turns under the the front edge of the half seat( which I pink with a 1/2" half round punch and use e-pings or brass screws to attatch under the seat edge) and around the bars. When my new camera comes in I'll try to get pics of what I mean. Also on the Sam Stagg rigg, I plan each strap so as to be able to use my draw down to pull them into their prosective places while on the dry. This aviods gaps later and helps them lay tight against the swell. Another cool thing I think I saw on a saddle Dick Shearer did a piece on in the LCSJ, is shape the rear jockey(kind of an ear in front) so as to lay under the seat leather as it comes down to wrap around the bar. Just another way to tie up lose ends. I'm sure it would be a pain if it had to be worked on later but I think it is a neat look. I'm sure we'll get to hear some more suggestions. GH
-
How much sway or belly is right???
Hidemechanic replied to Doug Mclean's topic in Choosing the Right Saddle for the horse(s)
I think for me at least, in all of these saddle tree and saddle fit topics we are trying to articulate things that normally don't get addressed much outside the custom saddle world. We are trying to make these issues more understandable for those less knowlegable of trees and fit problems. Three makers I have worked with are aware of what is typically being ridden in particular areas as well as being able to recognise the oddballs in any region. BruceJ has just started another post to find out what each tree maker does to be sure the customer is getting what he needs. That is going to get as close to 'base line' as I think we can get at this point. Cheers ,GH -
I almost hate to post on this one. I still do it the traditional way. I have a couple sizes and sometimes adjust the shape. Line with tight weave canvas and stuff with horse hair and stitch a nice flower on them. I haven't yet gotten into exotics but they look great in many applications. I look forward to seeing and hearing more about the foam filled JWs.GH
-
Fantastic job Don, I want to see a close up of that seat tooling. I think you made me jelous that I didn't think of a design like that. I love that way down south west stuff. Way to go! GH
-
ArtS, I agree with DavidG about a few things here. 1. everyone wants to get their gimmic on the maket to apeal to another target group. In the case of 'self adjusting trees' I have found that they work or they don't. You love em or you hate em. How do you know where you fit? No one can tell. Do you want to spend the money to for something that may not work? That's the question I pose to those who ask. Then they say that their best riding buddy has one and loves it. My responce is, do you know that it works because it truley fits the horse? 9Read some more of Rod/Denise's posts if you haven't it some clarity about fit) Or as David said,is it dumb luck that all things are working together to not cause problems for that horse. Another point about gimmic equiment and improper equipment is how much of the appearant success is actually from a good natured horse putting up with it and things just haven't been pushed to the point of that horse letting you know there is a problem. Of course too, some horses do try to let the rider know but it is inturpreted as bad behaivior and not the equipment. Referring to DavidG's statement about the guys riding style in the Tucker add,and you recall the responce about the nightlatch, there is a lot that can be solved with horse and rider's problems if we improve our abilities as a rider. There are a lot of mis-conceptions that many horse people have that usually lead them away from their solution. I know folks in the past who have tried Tuckers and others for their seat comfort rather than fit. In general I try to get people to learn to ride correctly and that padded seats usually will become a problem rather than fix it over a long run. My philosophy is that a properly carved seat will improve a rider's comfort and riding ability and that will be passed on to the horse's improved ability to move while carrying the rider and both last longer on a ride. Can you get that from a generic commercial saddle? My 47 cents worth, Best wishes to you and your friend, GH
-
How much sway or belly is right???
Hidemechanic replied to Doug Mclean's topic in Choosing the Right Saddle for the horse(s)
This conversation actually stirs up a few of issues that have plegued saddle and treemakers. 1. what is a standard of measurement(width, rock, twist, lenth,end flare) 2. Micro-fit or not to micro-fit. 3.Rider education, that is, teaching riders how to use(recognize propper fit) a propper fitting saddle as opposed to going to extremes to make an ill fitting saddle work. As for #1.It's all educated guessing at this point because there is no standard for breeds in this country(USA). In other countries there has been a tradition of breed standards. If a horse's conformation is not up to standards that horse is put down. In America we have a history of mixing breeds to achieve a specific conformation which in and of itself is a method of improving a breed's usefullness for a specific purpose. But there was little control over who can breed what, and we have become a nation of 'back yard' breeders and are losing the standards within many breeds.(not to mention the sentiment that "we can't kill a poor horse just because it's shaped a little funny, it's part of the family!!" That makes it more difficult nowadays for tree makers to set a standard of measurements. As to micro fitting, I worn people ahead of time that if they bring me a horse that is not 'standard' and wants a tree to fit it's special confirmation, they need to no that when that horse is no longer rideable they will have as much trouble finding another horse to fit their custom fitted saddle as they had finding a saddle to fit their special needs horse. If that is not an issue for them, we move on. I know that your previous conversations on 'micro-fit' (I missed) probably addressed more precise fitting of a horse which brings up other questions, to that I will just restate what I've mentioned in another post, that we are trying to fit a stiff slab of wood to a fluid surface and hoping to hit a happy medium between the different shapes a horse's back goes through when in action, and have the horse still be comfortable doing so with 250+# of top heavy weight on it's back. #3. I agree that there are different riding stayles within the western disciplines, I have though, seen many riders that think that because they haven't fallen off their horse much that they are great riders. But they are surprized when they come to me with a problem that they think is related to their saddle and I tell them that it is their riding style that is causing their problem. I agree that a riders style can directly effect the horse's performance abilities, but that the ride's position in the seat has nothing to do with soring a horse. In many cases if we could get riders to position their pelvis properly use their stirrups differntly and built up their upper leg muscles and use them all together as a finely balanced suspention mechanism, they become suprized at how their horse's performance improves. Back to the tree fitting issue I agree with Rod/Den that for the most part the bare tree fit on the back is the best way to judge the contoures between the two. Adding hide, fleese and padding when done correctly will not change or obscure those contoures, they follow them. As for DougM's situation, I don't want to presume what you have or haven't tried as to padding( not that that has anything to do with your white spots at the stirrup slots) I have found with packers and working cowboys (hours on the range) that a 1" felt pad between a folded quality wool blanket has had great success in most cases. The combiation together gives good padding without over padding as well as heat and moisture wicking, and cleaning the pad and blanket is easier too. We wind up having to become inventive and imaginetive when trying to communicate with our tree makers to achieve a satisfactory end for each situation, but like with what I think you were getting at with the micro-fitting I think sometimes we get caught up over anylizing that we miss the simple solutions. Good topic. GH -
We are a 4-h community and our household is quite involved in animal programs. One of our neighbors has been frustrated with their leader(leathercraft) as he seems to be too controling about how he thinks they should be doing. They are trying to talk me into doing a group. I think my trepadation is just what you mentioned , the different skill levels and interests. I know this is an open ended question but what are some suggestions for getting started and maybe ways to avoid potential headaches? I presume I need to assess skill levels and interest,and who has what tools. Do you suggest ordering basic 7 and move on from there? How do you deal with the money issues in ordering materials? I personally would not want to do a 'kids craft corner' and would rather work with kids that truley want to make something funtional or art beyond 'finger painting' if you know what I mean. As I am typing this I am setting my peramiters but I would still like to hear experiences, suggestions, and projects that will work well for kids that want to eventually show their projects at fair. Thanks GH
-
Is anyone or has anyone taught 4-H leathercraft? GH
-
Selecting a saddle tree
Hidemechanic replied to Hidemechanic's topic in Saddle Supplies, Tools & Trees
I have tree catalogs that have pages and pages of different styles and configurations of trees.I think there were so many because many of the big time rodeoers and anyone winning something out of a saddle got a tree put in the cataloge under his name as a tree type. Customers would say I want Buster Welch, Olin Young, Crosby, as well as other styles that I don't know how they got their names. As time went by in the past 20yrs. the selections appearing in a tree makers cataloge has dropped significantly. I spent my first couple years as a saddlemaker pouring over those old cats to find that there were really only a few basic styles and everyone wanted a little something different that they thought would improve the usefullenss of their saddle. When you look at a tree cataloge you will see 4 basic elements of the tree, The bars the cantle, the swell and the horn. If you are new and starting out this all seems confusing and you don't know where to start but maybe the best thing is to get a picture of a saddle you like and get with a tree maker and discuss basics. If he can see what you are shooting for he will help you come up with something that will suit your intrests. If you are or are not building this saddle for a specific horse the tree maker will help you with that part of selection as well. Most of this has been referred to by Rod and Denise and others, as for maybe a more specific responce to Don 101, in a simplified sence, a tree maker will take a chunk of wood and whittle it to the shape you are looking for. So the answer to your question is yes a tree maker can make a tree to fit the style of saddle you want as your finished product. I don't know too many that aren't willing to help you do that.GH -
Yeh, rigging hobbles here too, I have seen the stirrup leather worn also where there was ware on the rigging leather and no hobble. I would say that the only place there is 'stabilizing' between the front and rear D is if you use a cut back ring rig for a ring placement behind the swell center. Not too common now.GH
-
Just a quick note about knives. 1.Learn to sharpen them correctly. 2.When using them keep your free hand behind the blade. I was taught(as a right hander) to keep me fingers curled on my left hand while holding the leather while cutting This puts the tops of my finger nails down on the leather and makes less of a 'target' for the knife. If you use put your free hand down with your finger tips on the leather they are more exposed. Sometimes you forget but you will quckly learn the nicking knuckles is less damaging than nicking finger tips. Be safe-have fun. GH
-
OUTRAGIOUS MAN!! Can't wait to see that one finished. GH
-
Wolv, I luv ya man but yer givin me a head ache. I really think you can do this the same way you did your other pad that you had the mis-calculation trouble with(that one must have you thinking too much). I don't see why you can't cut your pieces, tool them, dye them and lace them then slide it over the foam and start snugging and riviting(stapling). I agree with Beez that you can leave extra on your side panel and trim after tacking under. Your lace line is your common line to measure from for the placement of your tooling. If you need to, mark some referrence points to help keep things lined up or you could punch your top holes then start your side panel from where you want to lace it(where the ends come together). Punch a few holes while it is in place. Tie the first hole to the top at that point, press the panel sngly where it needs to go and attatch a few more spots near or at the first turn keep it up to the next turn then the next until you are back at the beginning. This should give you the best referrence for where your tooling should go on the panel and top. If you are concerned that the side wont be the right fit then you can still leave the 'wild' end where it the two meet and snug it to fit (and lace it)at the last minute before you fininsh tacking to the back. I just think you are adding too many steps. It's not that what you are explaining wont work. I just don't like to work too much if I can avoid it. The reason I think this will work is because you are going to make the top piece an particular size that fits the foam shape, then the side panel kind of takes care of itself when you tuck it under to tack it down. that seems like it should work if your top is semetrical as it appears in the pics. Maybe I'm all wet, but this looks like and easier job than the other one you did.Whatever makes you feel better about it we're behind you. Go for it. GH
-
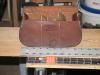
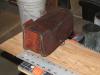
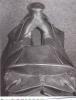
Jordan, it's a blast isn't it? Funny thing is I just had an old buckskin buddy get hold of me yesterday, said he picked up one of my bags off a prize blanket years ago and his neighbor saw it and had to have one, so I have to dig through my pats and hides and make one for him. Since I don't get to post much of my work I'll add a couple shots he sent me. This one is worn on the belt usually by trade gunners. It has three compartments for cards and wads. Makes it easier for loading on the trail. We need a happy face av with a coon skin cap. but drinkin buds will do. GH
-
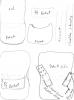
Yeh, there are a few things you can do, depends on what you have in mind. In fact what I will suggest will take you a little past simple because if you are shotting you will want it functional. The simplest is to start with a square the size you want to work with. I would radious the bottom corners to what ever suits you. Some people like square corners but I think you get things out of the bottom corners easier when they are rounded. Now for the sake of patern making, I would use a card stock of some sort, file folders has been a favorite. In fact lets use that as an example, it will help with clarity here. Using a file folder and the center fold as our fold for the lid of the bag (laying horizontal in front of you) draw your basic shape on the bottom portion to the size and shape you like. We are going to make the back and lid together. The simplest thing to do here is to fold the top down and copy your bottom shape. Fold the top back out of the way and copy the bottom shape to another piece of file folder for the front part of the bag. At this point you have two pieces, the back and lid are one piece and the front is another. On the front piece you want to measure in from the top corners each about 3/4"-1". Mark a line paralel about 1"-2" below the top edge of the front. Cut out this radiused line to lower your top edge of the front which will give you easy access into your bag. Now you need to choose, you can stitch the front and bottom together as they are or you can opt for more room in your bag and add a gusset 1 1/2"-2" would give you ample room for all your goodies. If you are a trade gunner you will have more goodies than most and may want to add an inside pocket as an option as well. If you want this inside pocket, attatch it before attatching the front and bottom. Measure a piece the width of the bag and about 4" wide. Say your bag is 8" wide, this pocket piece will be 8"x4". When it is applied to the inside of the back you can bring in the edges of the pocket about 1/2" on each side and stitch the two outside edges of the pocket. This will give you some puckers to deal with as you stitch the bottom of the pocket to the back. This is just a simple way to have some room in the pocket to make it usefull for smaller items that may get lost in the big part of the bag. You may also want to run a stitch down the center of the pocket if you want to devide it. Now you need to cut your shoulder straps, you decide the width, 2" is average but it demends on your leather and how it feels on your sholder.Decide where you want the bag to hang and cut your straps accordingly. I say straps because you will want some adjustment so you will want a short one and a long one tha makes up the aproximate length you need. They will overlap and lace together to make the loop.Each end of the shoulder strap will attatch to the outside, back of the bottomjust below the where the lid folds. This may need to be done before the inner pocket is stitched in. Depends on which will interfere with the other depending on their placement, so lay it out before you stitch. Lay the front piece on the back piece and mark the top corners for a reference for a attatching the front or gusset later. For a nicer look when attatching the front to the bottom, I would put the face side of the front against the outside of the back(yes it's backwards) stitch them together then turn the bottom and front inside out which will expose the outsides of the front and bottom and turn the stitched edge to the inside giving a nicer look. If using a gusset, measure the distance around the edge of the front piece, one corner to the other. Add a couple inches and trim after it is stitched in place. The short version 1. Determine the size and cut out your patern pieces. bottom and lid one piece, front one piece, srtap two pieces, inner pocket one pice optional, and gusset one piece optional. Gusset can be more than one piece if you need to stitch pieces together to get the length you need. 3.Lay out pats on hide for the best use of the hide.Mark and cut leather. 4. lay pieces together and check alignment. 5. stitch on strap and inner pocket as they allow. 6. Stitch bottom to back, or if using gusset, stitch gusset to the front piece starting at one corner working around to the other corner. Place the corner that is even with the corner on the matching mark that you made earlier on the back piece and stitch to the back as with the front. For the nicer look you can doe this inside out, that is, before stitching the gusset to the back, turn the gusset and front inside out and so the you have outside facing outside.Stitch the gusset to the back, then turn right sides out. If you are using tooling or strap hide you will need to the leather fairly wet to turn inside out and work the corners smooth. Most chap hides will turn dry. I will post or PM you some drawings later (gotta go to work). Any clarification needed, just ask. Have fun.GH
-
Hidden loop holsters
Hidemechanic replied to BOOMSTICKHolsters's topic in Gun Holsters, Rifle Slings and Knife Sheathes
What's to critique man, you got it. Nice concept with the hiddle loop. Seriously nice mold work. Is that all by hand with tools(rub stick type?) or did you do a vacuum or air bag to do your molding? I haven't mentioned it with others cause it's kind of a personal preference thing but I'd like to see more deaper or detailed molding as you have done. Of course a guy has to make sure he can still get his pistol out, don't want too much molding in the wrong place that it locks the piece in the holster. If you want to see more holsters go to the gun and holster section after the saddle section before the motorcycles there's more there. Thanks for sharing. GH -
Also helps in removing oils and smudges you've left on leather from you hands. GH
-
Saddle treemakers-sub topic
Hidemechanic replied to Hidemechanic's topic in Saddle Supplies, Tools & Trees
JonW, you have any pics of your trees?GH -
Thoughts on fiberglass trees.
Hidemechanic replied to Hidemechanic's topic in Saddle Supplies, Tools & Trees
"JUST IN!! THE BIGGEST THING IN EQUINE SAFETY! THE NEW BUCKAROO HELMET, FOR ALL YOU SAFTY CONSCIOUS COWBOYS. WHAT WE LACK IN WESTERN FASION WE MAKE UP IN INSURENCE PREMIUMS. OSHA APPROVED, RHINESONE COWBOY TESTED. GET YOURS TODAY!! Western theme stickers not encluded All rights reserved, no animals were killed or injured in the testing of this product,,,, except for that one." All seriousness aside, I did mean to mention earlier that I think this issue of enginereing strength into trees that we need to take into consideration how the saddle is going to be used. As Dave and Bruce and others have said, arena work and real buckaroo work is way more demanding on a tree then most pleasure riders. So I agree that myself anyway, I do over think the crud out of some issues hoping to find a middle ground. And you notice how most things of this nature usually keep coming back to what has been successful in the past? Good coments all. GH -
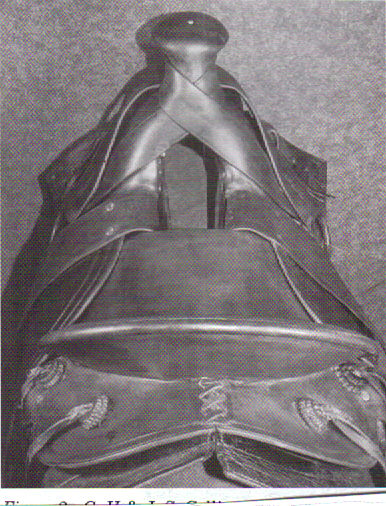
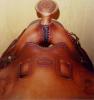
Depending on your level of experience, my philo is do some research. I have seen several articles in the LCSJournal most by Dick Shearer(and other sources) which always gives good examples of early saddles. Then I sit back and look at the saddle and visuallize what I would like to do with the seat(in this case). When you say a loop seat, are you referring to a full covered seat with the stirrup loop exposed? As opposed to a half seat where the front half of the seat area is exposed. The whole idea back in the day was to use small amounts of leather (because of lack of supply) And the later it got in the 19thC they went to covering more of the tree. That is, they looked for ways to apply the leather so as to protect the tree from weather. That being said, I'll reserve my coments about the half seat, but with the loop seat as you can see in the one pic,(after measuring where I want to cut for the stirrup leather opening) I pinked the top and bottom(for looks)line of each slot.[if I don't pink, I like to use a small unch at the end of each slot(punch first) and cut between the punch holes, the rounded part of the puncheched hole gives relief to the leather and heplps keep it from cracking when you stretch the leather later] The piece between the pinked lines I skive down to where they are moldable. When skiving I may leave the middle heavier and feather out to the edges as they lay on the bars. I reset the seat on the tree and work the skived piece into the stirrup pocket on the tree, on the dry. When the seat is ready to go on permenantly I will glue down and tack the piece I molded into the stirrup pocket. I may even put stirrup leathers in place and draw them down and leave set till dry. This will also be the time that I stretch the set jockies in place and let them all dry set together. Of course there are steps of seat fitting that were left out but this is the part that applies to the loop seat as I have done them. Hope it makes sense. GH
-
Maybe it was made by an employee on the night shift that had time on his hands.GH
-
Saddle treemakers-sub topic
Hidemechanic replied to Hidemechanic's topic in Saddle Supplies, Tools & Trees
LaPorte is a new name to me as of late, but Ralide has been making injection molded trees for many years. Does LaPorte use a differnt compound than Ralide? I am behind the curve a bit in the last few years. I'd like to know more about LaPorte. As for the earlier injction molded trees, they were one that was advertized that you could run over them with a truck, but in my experience repairing them, they seem to get brittle with age. I've seen the bar ends shatter and seem especially to follow lines between nail and screw holes. I've also seen bars break and forks on endurence trees that have less material in that area. Just my thoughts on injction molded trees in the past.GH -
Thoughts on fiberglass trees.
Hidemechanic replied to Hidemechanic's topic in Saddle Supplies, Tools & Trees
Jon, I get the concept of the vacuum infusion, prepreg, and cloth to resin ratios(not as you do) which is what has been missing from the whole equation until late. (I agree you can't just take a wood tree and slap some cloth and resin on it and expect it to be superior to rawhide.) I'd like to see the results of such a product if it can be produced within a reasonable price range. As to Bruces referrences, I've been out of things for a few years(old info) but the last time I delt with H&F, their fiberglass tree was more of a shell. The top half of the tree was layed up into a form (upside down) wood blocks were placed in the typical nailing areas and then the bottom which had been layed up in the same manner is applied to the top. Now I missed any other details as to whether those were the tripple dips or whatever, but I held the trees in my hand and they seemed quite solid to me but I also as Bruce mentioned had an issue with skirt blocking. Bruce, my reasoning on the flex issue(not unchangeable) is especially after talking with Pete Gorel and his reasoning for going to a flexable strainer plate. You may recall his story of a saddle with a flex strainer that he tore down after a short time of use and it was obvious that there was a good amount of flex evident and this was built on a high quaity tree. ( I wecome responces) In this case the subject of flex may have hit me at a time when I was dealing with resolving a lot of soring issues customers were having, so in my mind at the time it made sence that if the tree didn't flex it could lend to the soring issue.(Let's presume all the other saddle fit issues were taken into consideration). It may sound like a senseable idea, that trees should have some flex to accomodate the movment of the horse and though we are talking about minimal movemnet of the tree, maybe not enough to detect on a finished saddle (as you would test for a broken tree), But I have to ask myself, we are still dealing with a couple slabs of wood (with little give) intended to carry waight on a surface that is fluid. Are we looking at an 'every little bit helps' point of view, or a 'there's only so much you can expect to do' way of thinking? I guess when it comes down to it and I think about the saddle fit issues I have delt with, the fit issue has usually come down to two major factors. One, the conformation of the horse was such that you would have to take extra measures to build a tree to fit(such a tree then would not likely fit another horse). Two, the owner had it stuck in there head that this or that brand name was the only saddle for their horse and their fit problem must be able to be solved with a different high tech pad, and had nothing to with them using the breast collar to hold the saddle forward where they though it had to be, and the horse gets to suffer. I personally don't have a problem with new ideas and materials after they have proved themselves. GH