Timbo
-
Posts
361 -
Joined
-
Last visited
Content Type
Profiles
Forums
Events
Blogs
Gallery
Store
Everything posted by Timbo
-
 That is also what I use for large pieces and they work really well. Most auto parts stores also carry them. They spray very even and you will be surprised at how little dye you actually use. I cut the feed tube down on mine and stick it right on top of a small bottle of dye. It doesn't screw on perfect but if you tape it on it will not fall off. The dye also comes out very uniform and even compared to daubers and wool scraps. It also takes less time for it to dry and see the light spots you need to hit again, which is really easy to fix since you can feather it in. Down side........after you do this go blow your nose........you'll understand. Tim
 -
It all looks great Bruce!!! How do you attach the leather to the rope can?? Thanks, Tim
-
ARGH!!! That be lookin mighty sweet matey!! (sorry couldn't resist) Excellent execution of an excellent design!!!! If this is the first can't wait to see the second!!! Good job!!!! Tim
-
Can somebody post of pic of the blade that is being refered to as convex and removing 3/4'' off the shoulder. I have a head knife and have yet to use it to cut anything other than straight lines. But I do need to learn how to sharpen it or shape the edge to hold an edge. Please post some pics if you got 'em. Tim
-
Maybe its a cold camel scrotum and if you warm it up it will get bigger!!!! Tim
-
That is a sweet little round knife!!!! The depot is still in the same place.........they still store there but now it is also a disposal plant for out of date munitions and other fun chemical stuff the military has had stockpiled for years. Tim
-
Mink Oil?
Timbo replied to Schno's topic in Dyes, Antiques, Stains, Glues, Waxes, Finishes and Conditioners.
I would recommend anything but mink oil..........also known as stink oil. Depending upon what kind of leather it is made from I have used extra virgin olive oil on alot of stuff. Sparingly. But that's just me. Tim -
High cost of cantle/horn pliers got you down???
Timbo replied to Timbo's topic in Saddle Supplies, Tools & Trees
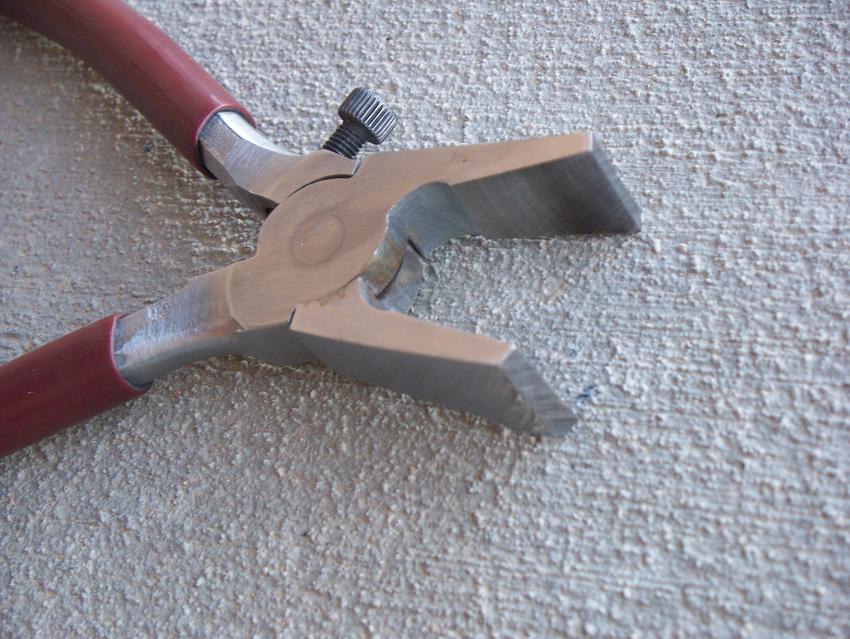
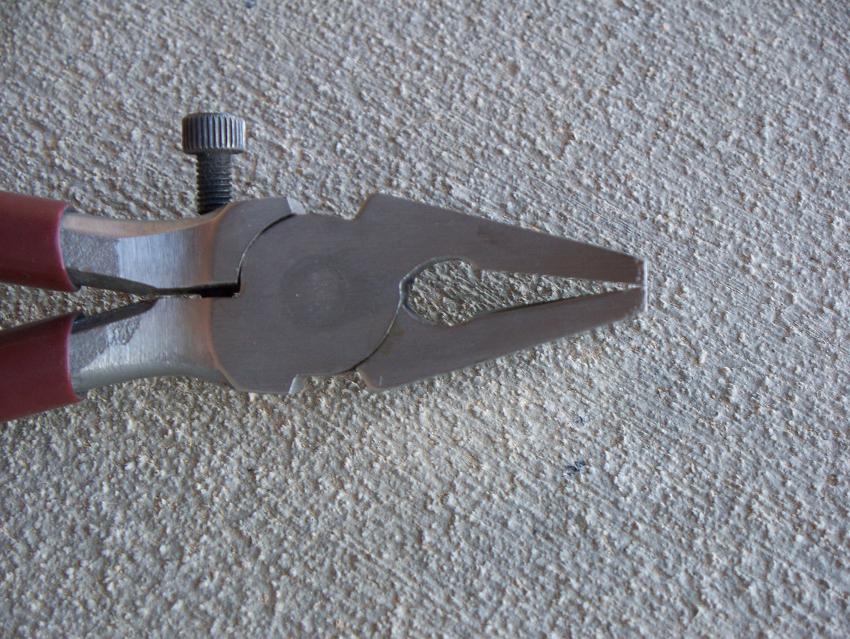
I've actually buffed the edges off pretty smooth........but I might buff them a little bit rounder. Good idea covering them with leather though. Might give that a try. I saw an article in LCSJ about Dusty Johnson modifying some RoboGrips from Craftsman for this purpose. He welded some steel plates on the jaws. The good thing is you don't have to adjust them the way you do vise grips. I think these will work for now. Soon as I get my tree I can get started and see how they do. Tim -
How short to you cut the shank above the bur?? Then what do you do?? Flatten it out with a hammer then dome the shank?? Tim
-
That is seriously bigger than the cabin I lived in for a lot of this summer!!!!!!! ........and its a tree house. Looks great. .....and I really like LITFA..........I shall use that often. thanks for posting. Tim
-
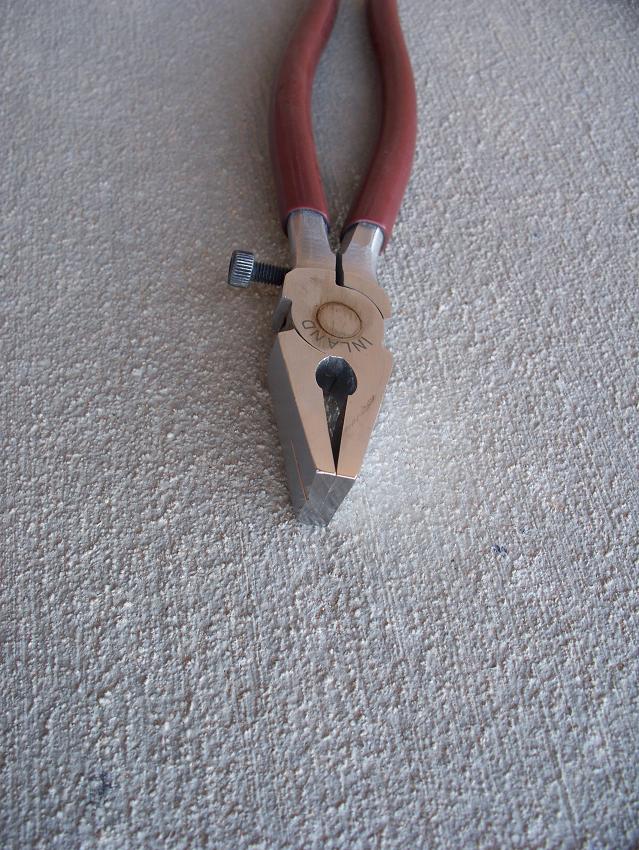
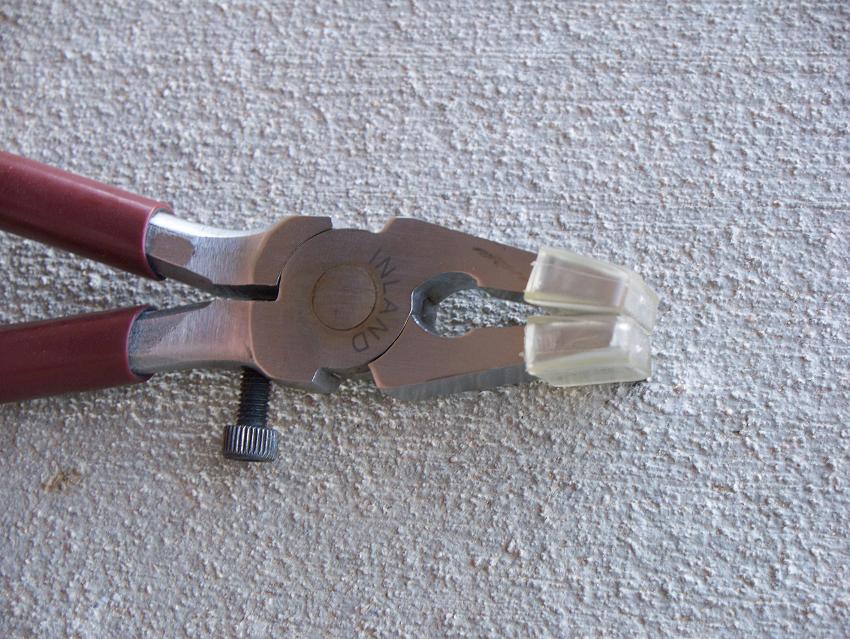
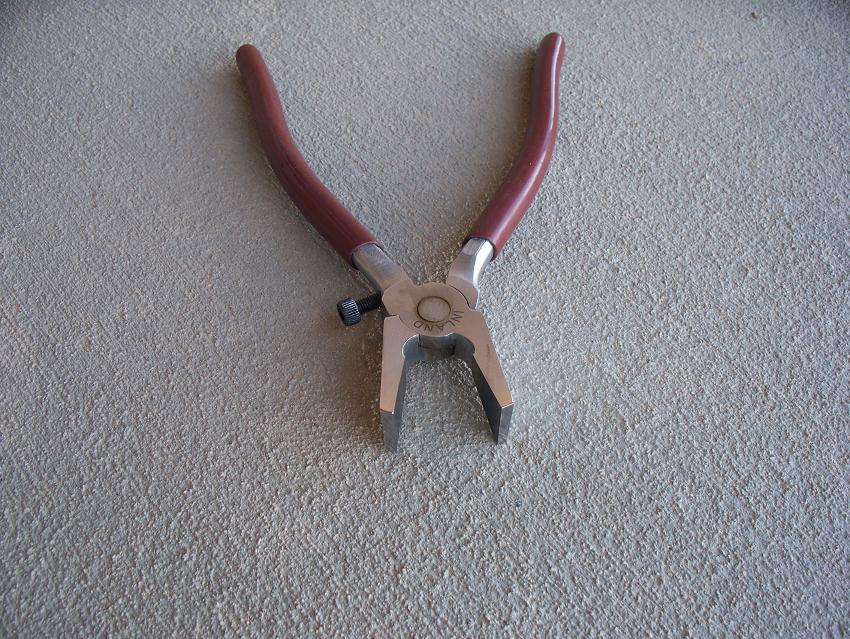
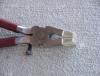
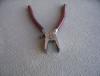
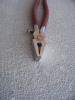
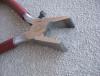
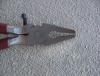
Well, it did me and I am soon to start building a saddle, so I am amassing tools and supplies to that end. The one thing I was dreading was spending $50-100 bucks on one or more sets of pliers. I need cantle pliers and horn pliers, but thought I could probably get by with just one of either. I am also a notorious skin flint. Long story short I used to dabble in stained glass and remembered using running pliers. I didn't have mine anymore so I ordered a pair off of ebay. One thing I did forget was that running pliers jaws are weird, they have one convex and one concave jaw. You line the mark on the jaws up over the score line and squeeze and it breaks the glass. So I ordered a pair off of ebay and took my grinder and buffing wheel to them. Got the jaws a little blue but that won't make any difference. The other bonus is they came with some soft tips that will help in not leaving marks.They are 8" long overall and the jaws are 3/4" wide at the tip and 1 and 1/4" deep.Grand total...................$13.00 with shipping!!!!! Here's how they turned out: So what tools have you modified????


-
Rifle scabbard......finally finished!!!!
Timbo replied to Timbo's topic in Gun Holsters, Rifle Slings and Knife Sheathes
Thanks alot!! Now that is a great idea, cane scabbard for a bike!!!! Tim -
I would assume if you are building the saddle you would just sew it right to the leather on the back of the cantle. But if you were building one to put on an already built saddle you would just about have to sew a backer on to it. I could see doing this as you could just screw it on to the back of the cantle. For the top you could actually put the screws inside the pocket and just leave one little tab on the bottom center to put a screw thru. Or just leave tabs on all four corners to put screws or screw conchos thru. Hope that helps, Tim
-
So when did you move to the States Tom?????????????? (just a little "our economy sucks" humor there!!) It looks great!!! ....and you should wear it in your hat. I think I'll have to do one for my hat too. The one thing I have never understood is why do some call them ravens and others crows???? I've never called them ravens in my life......always crows. I think its a geographic/regional thing more than anything. 'Cause I'm pretty sure its the same bird!!! Good Job TOM!!!!!!!! Tim
-
I've also heard good things about this: http://www.leathertherapy.com/index.php?ma...products_id=190 Tim
-
Well, it did me and I am soon to start building a saddle, so I am amassing tools and supplies to that end. The one thing I was dreading was spending $50-100 bucks on one or more sets of pliers. I need cantle pliers and horn pliers, but thought I could probably get by with just one of either. I am also a notorious skin flint. Long story short I used to dabble in stained glass and remembered using running pliers. I didn't have mine anymore so I ordered a pair off of ebay. One thing I did forget was that running pliers jaws are weird, they have one convex and one concave jaw. You line the mark on the jaws up over the score line and squeeze and it breaks the glass. So I ordered a pair off of ebay and took my grinder and buffing wheel to them. Got the jaws a little blue but that won't make any difference. The other bonus is they came with some soft tips that will help in not leaving marks.They are 8" long overall and the jaws are 3/4" wide at the tip and 1 and 1/4" deep.Grand total...................$13.00 with shipping!!!!! Here's how they turned out:

-
Rifle sling I made for a friend
Timbo replied to Timbo's topic in Gun Holsters, Rifle Slings and Knife Sheathes
It is Eco-Flo Gel Antique in Dark Brown with EVOO as a finish. I was happy with the way it turned out. Pretty close to what I had planned for it. (with the new Eco-Flo you can never be quite sure, but the more I use them the better idea I have of what the outcome will be) ((Unless you are doing a piece for Halloween stay away from the same stuff in saddle tan, it comes out orange and black)) Tim -
Rifle scabbard......finally finished!!!!
Timbo replied to Timbo's topic in Gun Holsters, Rifle Slings and Knife Sheathes
Thanks Art....it was an ongoing project that I am thankful is done......shipping it to him today!!!! Tim -
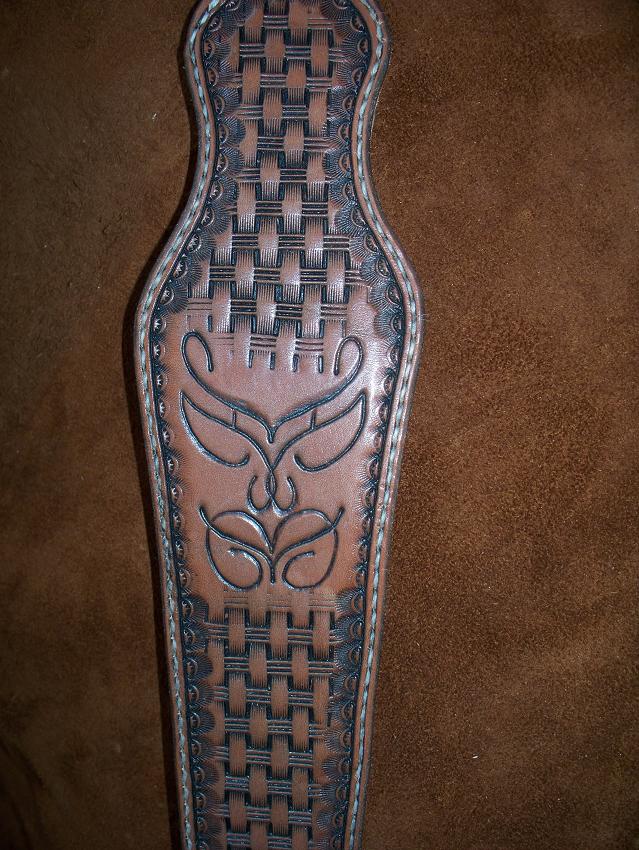
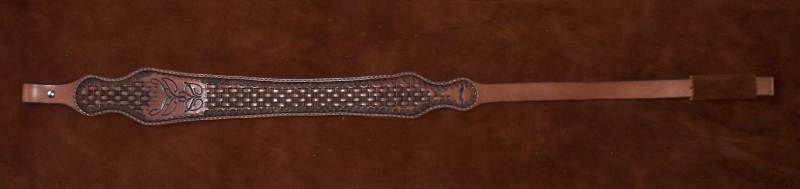
Here's a couple pics of a rifle sling I made for a friend..............he'd been on me to make him one for 3-4 years. Finally found the time. I made my own pattern/shape. It is lined with some moose I got from Siegels years ago. The grain side of the moose is kind of funky but the flesh side is like velvet...........actually better than velvet. It is the flesh side of this moose that you see as the background in the pics. I know it looks like a weird little face that I tooled into it.......but it is more than that. If you'll tilt your head to the left when looking at the first pic you will see his initials DH......and a mirror image of them. It was pretty cool that this particular font and his initials made a cool looking face. BIG THANKS TO TOM SWEDE FOR THE HELP AND INSPIRATION FOR THE INITIALS AND HOW TO DO IT!!!!!!!!!!!!! Tim
-
I use the setting block from a Tandy spot setting set. Slip the rivet down into an old drive punch that I dulled the end of an drive it down into the biggest dimple of the block. Then just buff them on the cotton wheel I have on my grinder. Tim
-
Ok, I can dome and polish the head of the rivet but for the life of me cannot finish the other end to look like anything other than crap. Once I get the bur on and cut the rivet off it goes downhill really quick. Can anybody help me out or make a tutorial on this??? I am really looking for some help on this as I have always used rapid rivets or some other one whack wonders. I am desperate to learn how to make these look good. thanks, Tim
-
Rifle scabbard......finally finished!!!!
Timbo replied to Timbo's topic in Gun Holsters, Rifle Slings and Knife Sheathes
Thank you to everyone for all the kind words. They are very much appreciated. Tim -
tried a watchband
Timbo replied to Locknut's topic in Purses, Wallets, Belts and Miscellaneous Pocket Items
I think it looks great!! Sometimes simple is better. I am very guilty of overkill. I tend to dress things up too much, when sometimes less is more......... ........and we are our own worst critics as leather craftsmen. I would be proud to wear your watch band. I have made a few and none have looked as good as yours. This forum has also done wonders in building up my self confidence when it comes to my work. Again...........looks great!!!! Tim -
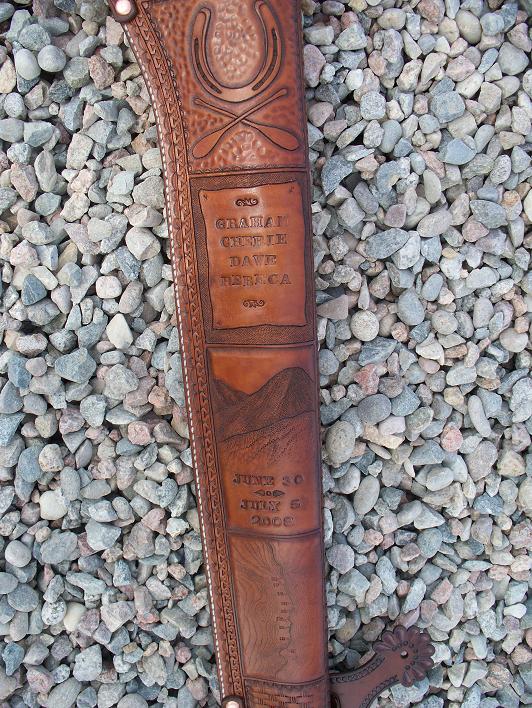
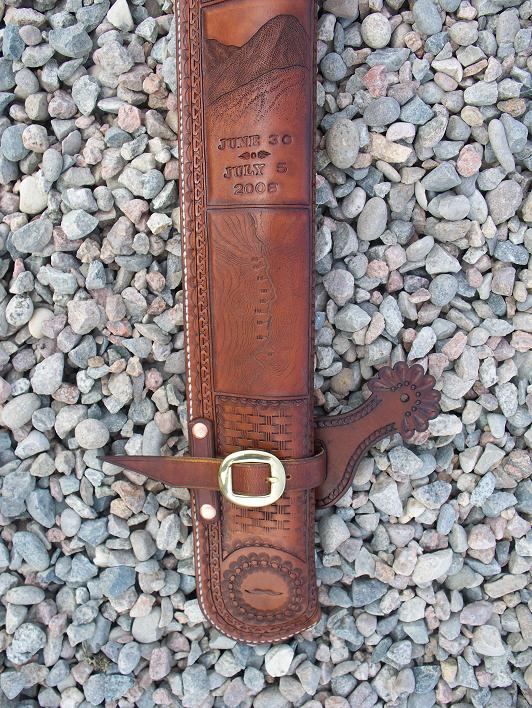
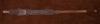
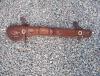
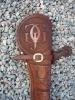
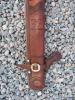
Here are some pics of a rifle scabbard I made for one of my trail ride clients from this past summer. It is to commemorate his trip to the mountains in which they camped and trail rode in the mountains for 3 days and then white water rafted for 2 days. The top of the scabbard are his brand: Initials GJG The next panel is the horse shoe and crossed padels Then next are the names of himself his wife and 2 friends that were on the trip Next panel is a mountain scene with the dates of the trip Next is a map of the Arkansas River as it flows thru Browns Canyon......one of the stretches they rafted. The very bottom is my signature. It was a very long drawn out process........but I think it came out very well. ........and boy am I glad it is done!!!!!!! One other thing is..........this will never be used on a horse or saddle.........it is made to hang on the wall, hence the hangers on the straps. He is going to use it to display his 1873 Winchester long rifle. Tim

-
You title says "felt saddle pad"......if you need felt here is a good source for it: http://aetnafelt.thomasnet.com/viewitems/f...?&forward=1 hope that helps Tim