TwinOaks
-
Posts
4,513 -
Joined
-
Last visited
Content Type
Profiles
Forums
Events
Blogs
Gallery
Store
Everything posted by TwinOaks
-
Burnish Marks From Wet Molding
TwinOaks replied to SooperJake's topic in Gun Holsters, Rifle Slings and Knife Sheathes
Well, we're talking about two different things- So in fairness, molding is done 'wetter' than tooling....because you want to be able to move the leather around. Tooling is done 'cased' so that you get the burnishing effect in the tool impressions. The detail lines (boning) on ANY type of wet molding is actually done after the molding is complete...which means the moisture has had a little time to evenly distribute through the leather...resulting in slightly damper than 'cased' leather. By the time you get the lines boned in, you are effectively working with cased leather. In simpler terms, if the leather is taking and holding the impressions/lines, then you're doing fine. If it squishes around a bit, (lines are not distinct) it's too wet. If you need a lot of force to get clean lines, it's too dry. -
Newbie Questions
TwinOaks replied to TXJhawk's topic in Gun Holsters, Rifle Slings and Knife Sheathes
For that last question...For belts, yes, it's worth the extra money to get the better leather. For holsters, at least for the first 50 or so, you won't recognize much profit if you're using the more expensive leather. There is a learning curve while you learn how to work WITH the leather, and small errors can (and often do) result in lots of things in the scrap bin....i.e. If you measure the stitch line totally wrong and can't even get the leather to stretch enough. I'm not saying get the cheapest stuff you can find, though. While you're working through the 'trial and error' stage, order, use, and experiment with 'good' quality leather. Once you've got your patterns worked out, THEN start making product with the HO. -
Burnish Marks From Wet Molding
TwinOaks replied to SooperJake's topic in Gun Holsters, Rifle Slings and Knife Sheathes
http://leatherworker.net/forum/index.php?showtopic=19121 If you haven't done it yet, spend some time reading Bob's posts. He's one of the true masters of this craft, and he's graciously shared a LOT of information with us. -
Double Compartment Laptop Bag
TwinOaks replied to AndyL1's topic in Purses, Wallets, Belts and Miscellaneous Pocket Items
Spinner (Chris) did some testing of the pro water stains and posted the results. IIRC, he was using it for tank bibs on scooters. -
Just a reminder here, but look at the date of the thread. This one is over two years old, so the OP may not reply.
-
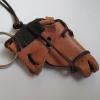
I think it would look a lot better if it was antiqued. Also, due to the lack of any discernible burnishing in your beveling, it appears you may have tooled this while it was still too wet. Overall fit looks to be about right; how does it attach?
-
Check into Dura-edge.
-
Perhaps the easiest and fastest way to check if it's vinyl or leather is to put flame to it for a few moments. If it curls, peels, or melts, it isn't leather that you want. If it bursts into flames....blame the seller.
-
Burnish Marks From Wet Molding
TwinOaks replied to SooperJake's topic in Gun Holsters, Rifle Slings and Knife Sheathes
Correct on the cause...friction. There's a couple of solutions, one of which is to press with the molding tool, but don't rub (or slide). I like my way, which is faster, and has almost zero unwanted burnishing. First, do the secret chant five times, then hop on the left foot while turning in a circle......... Yes, you can use a home vacuum sealer to pull the leather down to shape. However, some caution must be used because on the inside of the bag (on at least one side) are small grooves in the plastic which act as air channels. They will most certainly leave marks in the leather. You have to block them from the leather somehow....I use a sheet of paper. Cut the bag well over sized so you can re-use it multiple times. You're going for compression, not long term storage, so as long as the bag will take a vacuum you can use it. Now, once you've pulled the vacuum, you'll have the shape of the item you're trying to mold to. You will NOT have the detail boning lines you're after. To get those, get out the antler or what ever you want to use, and chase the lines through the plastic. The plastic (being sucked down in the shape of your object) will provide a smooth surface for you to rub on without imparting any friction to the leather. Chase everything you want, but DO NOT over mold the item. You don't need every little detail to be seen, and trying to do so may make the holster so tight that you can't remove it. Mlapaglia (member) did that on an accessory rail and it acted like zipper teeth - very difficult to remove the gun from the holster. If you mold too deeply in the trigger guard, you could even set yourself up for a ND (depending on make, of course). Open the bag and remove the holster and carefully remove the gun, taking care not to flex the leather too much. Alright, you've got your molding done....but you're not finished yet. You need to set the leather in its current shape/molding, and address another minor issue. Leather has a tendency to shrink just a bit as it dries, so if you've molded exactly to a shape, you'll end up just a tiny bit too tight when it's dry. If you're air drying, you can skip this first step. Set the oven to 125 (or as low as you can) and place the cased holster in it. You're looking to get the leather up to the 125-135 F range. My oven takes about 20 minutes from a cold start. No, you can not use the microwave. Once the leather hits that range, the collagen in the leather has been 'activated'. Now, you've got to work quickly. Place the gun in a ziploc (type) bag of appropriate size and pull it as tight around the gun as you can. Now, reholster and let the whole thing cool down to room temperature. When you remove the bagged gun, you'll find that there is a few thousandths of an inch extra room which allows for a reasonably fast presentation, yet holds securely and doesn't hang up on the draw. If you're going to add anything that requires lots of rubbing (wax based) or heat, wait until the item is dry* then reheat it just enough to aid the leather in absorption of the finish. * If I'm using vinegaroon, I apply my conditioner as soon as I'm able to handle the leather. The vinegaroon process tends to push waxes in the leather to the surface and may be difficult to get conditioners back INTO the leather once it's dry. That should get you headed in the right direction, but remember to experiment on some scrap to get your oven temp/time right. ETA : If you're not using a vacuum sealer, you can do the whole boning bit inside of a regular (ziploc) bag....just be sure you properly case the leather. Mike -
Stirrup Purse
TwinOaks replied to rscow's topic in Purses, Wallets, Belts and Miscellaneous Pocket Items
Well, the only things that look 'off' to me are as follows: The handles are REALLY thick - to the point that it looks a little off. If that was the intent, then by all means disregard my comment. The other thing is the spacing of the lace from the edge. Most of the time, lacing is done closer to the edge so that the 'legs' blend into the edge work. Others may have a different preference, but I like to stay at a maximum of 1.5 x the width of the lace away from the edge. There's a lot of info already posted here on lacing, so I'll forego retyping it and ask that you spend some time reading in the appropriate forums. -
How Are You Sealing Your Air Brushed Work ?
TwinOaks replied to Anacott Steel's topic in Leatherwork Conversation
I wear a Leatherman pouch I made several years ago on a daily basis. It's subjected to bangs and knocks on all kinds of things, as well as weather, and fairly frequent rubbing on the inside of the aerial bucket (fiberglass) on my work truck. The snap is scuffed, tarnished, and rescuffed to the point I probably should replace it. I've had to restitch the belt loop three times now. The resolene finish is still holding up, and except where the bucket has REALLY scuffed it, it looks almost as good as when I made it. It's not 100% waterPROOF, but any water that has been on it has not damaged it in any way. -
I recently had a pool cue maker turn a piece for me out of Ipe. He turned a couple of coves for me (at my direction), and sure enough, the first project I tried to use it on I needed a slightly larger size. I chucked it up an used a half round file to add the next size 'cove'....which needed to be pretty large for 3 layers of 8oz. And like Chris said, most things of that thickness (or more) won't be completely rounded.
-
Stirrup Purse
TwinOaks replied to rscow's topic in Purses, Wallets, Belts and Miscellaneous Pocket Items
It looks good. You did a very nice job on back grounding the bear paws (inverse carving). I see a few minor things you can work on for the next one if you're interested. -
Nice work on the DIY solution!
-
If You Could Only Have One "blue Gun"
TwinOaks replied to Phatdaddy's topic in Leatherwork Conversation
I agree with the glock 17/22 suggestion. You can always use measurements off the website to shorten a holster, but the grip/trigger area is so close on most glocks that you should be able to use one to mold for another. -
Welcome to Leatherworker.net, your online support group for your new addiction! Generally, we're happy to help you figure out how to do things and help you improve as you go. Feel free to ask questions, and we'll do our best to help you.
-
cotton balls wouldn't be a good choice as they tend to shed fibers easily. While that may not be an issue with dye, it WILL be an issue with finishes. The Wool daubers also have that problem, but not quite as bad. For my two cents worth, I suggest looking into an inexpensive spray rig. Airbrushes provide a very even coat, and you can vary the hue intensity with little or no waste.
-
Leatherwork Courses - Improving The Learner's Experience
TwinOaks replied to UKRay's topic in Leatherwork Conversation
Ray, take look in "spec. events, contests, and classes" and look at the current run of monthly challenges, and also at the previous iterations (hosted by Bert and Ernie...er...Clay and Clay). See if there's any topic or structure that you can use in them. -
Sewing On A Holster Clip...
TwinOaks replied to Sixer's topic in Gun Holsters, Rifle Slings and Knife Sheathes
Sew the 'pocket' for the clip, then install the clip. You use needle nose pliers to place the rivet, and can slide something like a putty knife behind the clip to act as the anvil while you set the rivet. -
It's an inconvenience, but not really too much of a problem.....and it has a pretty easy fix. It sounds like you're saturating the leather with the alcohol you're using to dilute the oil dye. That saturation is driving out all the natural oils and tallow that keep the leather pliable. The solution is to not apply so much solvent (alcohol), and to condition the leather well. If you can, look into spraying the dye onto the leather. Several of us have found that an airbrush is just fantastic for this because you can vary the intensity of the hue without having to dilute the dye very much. Or, conversely, you can really soak it in with little additional work. If spraying isn't an option, also look at 'dip dyeing', which should also give you an even and consistent coverage.
-
Hi everyone! First off, I apologize for the tardiness of this challenge. Things got pretty interesting IRL, with the day job. I've got to get my June piece posted and turn out this one too. Since pretty much half the month is gone, I'm going to roll July's and August's challenges together. They are somewhat similar, so it works well. Here it is: Make a 3D still life using EMBOSSING, and APPLIQUE techniques. Embossing is the process of molding the leather so that the surface is raised....not just appears to be raised as is the case with most tooling. We'll not only be pushing the background "Back", but bringing the elements further forward than normal. This is most easily done by casing the leather and pushing it 'forward' from the back (flesh side). Cheryl has already been doing this with her pendants, and many others have done this to some extent making holsters, bags, etc., in the form of wet molding. This differs only in the extent that the design in the leather will be raised from a flat back ground, instead of having a 3D piece molded around an object. Applique' is simply adding a separate piece to the surface of the leather. This additional piece can be a solid shape, a filigreed shape....heck just about anything. No real limits on the tools; if you've been working along with us, then you've learned to explore each tool to it's fullest potential. Therefore, there's no reason to limit you to further point out that each tool can be used for many things. However, please keep in mind that if you tool before embossing, some of the tooling will probably be stretched out with the leather. If you tool over the embossing, you run the risk of mashing your careful stretching of the leather.......it's a catch 22 isn't it? Give it a try first and we'll cover the neat little trick behind it in a little while. Who knows, somebody might find a better way to do it!! Please also consider adding color to your piece. Do this well, and you'll end up with a pretty nice piece of art for your wall, or to give as a gift. I'll have my piece up in a day or two with some explanation of how I did each section.
-
Hold your horse hides, I've been tied up with the job that pays for all the leather. Check the new topics.
-
One way to test 'sharpness' is to get a page from a magazine - nice glossy paper - and bend it in half. Not fold, just bend....so it has a nice roundness to it. A very sharp knife will bite into the paper and slice it. If it doesn't....back to the strop. If we're talking about things other than cutting blades, my usual comment for an awl is "it should get half way through your finger before you feel it."
-
Can you be a little more specific with 'shoe glue'? There's a product called 'shoe-goo' which is not suitable for what we do. Instead of 'Barge', I get Dap contact cement from Lowe's. Spread t h i n on both pieces, and let it dry to almost no tackiness to the touch, Carefully position and stick together....no mess.