


Bolt Vanderhuge
-
Posts
250 -
Joined
-
Last visited
Content Type
Profiles
Forums
Events
Blogs
Gallery
Store
Everything posted by Bolt Vanderhuge
-
I was going to post the same thing. ☺
-
For dying edges I use these foam applicators from Walmart. You get 36 for less that $2.
-
I had one made by Nick (Studio-N) as well. I have to concur that Nick is a pleasure to work with and produces very nice work. I actually need to get a couple more stamps from him.
-
Well I do not use enough leather to buy 10-20 hides so I will pay the extra to get quantities that are better suited for my needs.
-
Can an average joe buy from them and is there a minimum purchase requirement?
-
IWB holster fitment issue
Bolt Vanderhuge replied to badluckleather's topic in Gun Holsters, Rifle Slings and Knife Sheathes
I have made 30* canted IWB holsters that do not have that issue. It should not be the cant that is the problem. If the leather is too dry and hard once finished it can cause this issue. -
I have had better results by getting the leather wet and then dip dyeing. As for the getting hard I am guessing that you cut it with an alcohol type reducer. This will strip the oil from the leather.
-
Having my doubts about Springfield Leather
Bolt Vanderhuge replied to CaptQuirk's topic in Leatherwork Conversation
I just ordered from them two weeks ago. Order came correct. Shipping wasn't flat rate any more but was not too bad. Went back last week to order a gallon of dye and a gallon of finish and they wanted $42 in shipping. I found the same two gallons from a seller on eBay for $35 less shipped. I will continue to get my HO leather from them but I will price shop everything else. Even with their shipping though, I can get stuff cheaper thru them than the Tandy's down the way. -
Magazine Holder
Bolt Vanderhuge replied to SLP's topic in Gun Holsters, Rifle Slings and Knife Sheathes
Looks really good. -
Thank you both.
-
IWB holster fitment issue
Bolt Vanderhuge replied to badluckleather's topic in Gun Holsters, Rifle Slings and Knife Sheathes
You can see that in your pic the bending of the wing starts at the sweat shield. So along with moving the stitch line, trim the sweat shield to the base of the rear sight. Let the sight hang out free from the leather. It still won't touch you. This will let it start bending right after the gun. Also pre bend it during forming. -
Grommets and Snaps with longer depth or posts
Bolt Vanderhuge replied to Anubis78's topic in Hardware and Accessories
Sorry to hear this. I have only ordered from them once. I received my order very promptly. Perhaps I was the lucky one. -
Prefered Holster for 1911
Bolt Vanderhuge replied to Dorado's topic in Gun Holsters, Rifle Slings and Knife Sheathes
It looks like a nice clean usable holster and mag pouch set. Your stitch lines are nice and even around the holster and the lines around the gun pocket are smooth flowing and straight. Lack of these traits can make an otherwise nice pattern look not as good. So good job with that. The mag pouch is the same for 99% of it. There is a tiny spot where the line got crazy at the bottom. It is a very small section so it doesn't stand out. I prefer finished edges myself. You are actually half way there. If you ever do want to try finishing edges I think you will have no problem getting really nice edges just continuing down the path you are already heading. Again good job. -
You can use furniture type tee nuts as well. With their spike tabs they do not need material removed to get them to not turn, But this comes at a price. They are wider then what I used and in tight areas they may not fit between stitch lines. They both have the possibility of being over tightened and loosing their ability to stay in one place. This is another place where thru-hole has an advantage. A thru-hole setup can be cranked down without fear. You then have to decide open or closed back. The closed back does not offer a flathead or allen wrench method of holding it in position while you tighten or loosen the front side.
-
That looks awesome. Great job.
-
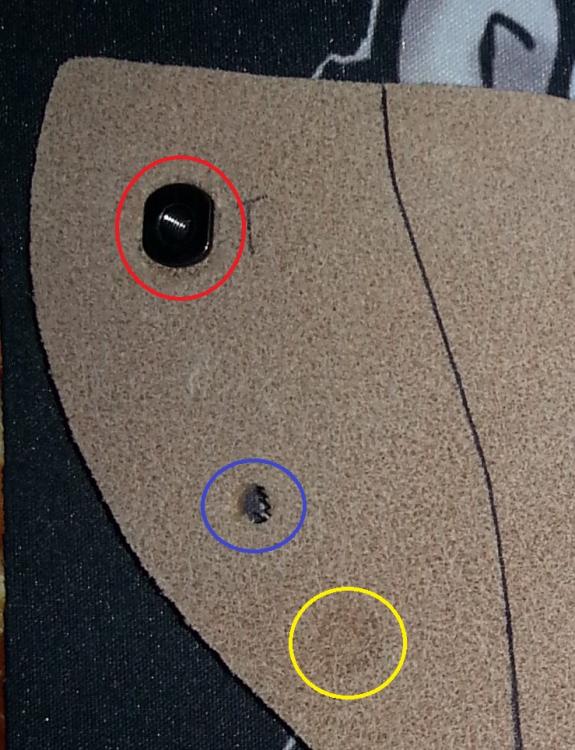
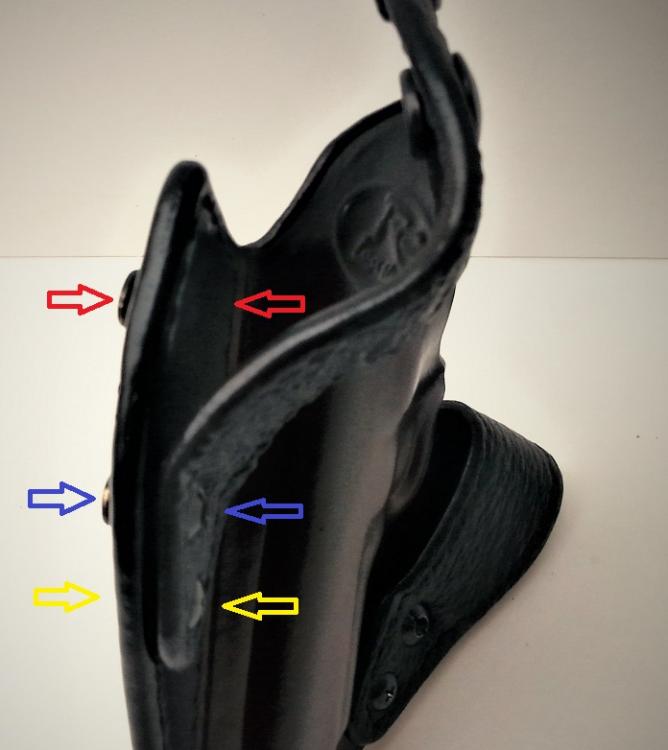
While the t-nut locations are secure they are no where near as strong as the thru-hole location in the middle. So for longevity sake of the holster, having thru hole mounting is for the best. But that does not need to be used for each location. At least that is my story and I am sticking to it . Honestly, I did think about hiding everything but the snaps themselves like what you are suggesting. But the thru-hole has strengths that the t-nut cannot match and chose to use it to it's full potential for defining the belt tunnel and holding things together with the most strength possible. Also the lower belt strap screw is not shared with either snap and the upper snap is located at roughly the middle of the belt so the lower strap screw still would have to go thru either the front of the holster or the strap itself like it does currently. For any one wondering, here are descriptions with pics to show the snap and mounting locations. The upper snap is up near the top of the holster and the belt runs directly behind it (see the red locations in pics). The lower snap goes thru the holster and the belt strap to define the bottom of the belt tunnel (see the blue locations in pics). The lower belt strap mounting screw is below that point on the holster (see the yellow locations in pics).

-
Here they are. It was starting to rain almost immediately when I set up outside so I had to use my phone again and get whatever I could get. You can see a few rain sprinkles in a couple of the pics. I wanted to get a couple pics that show that the lower backside screw does not go thru to the front of the holster and the upper front snap also does not go thru to the back of the holster. I used T-nuts that I got from Holsterkits.com. I made channels for them on the inside between the two layers of leather to keep them from turning so that all hardware can be removed if needed.
-
Still trying to figure this site out I was using my phone and once I typed the Haha I could not move the cursor back to change what I was typing so I closed the browser yet it still posted it. HMMMMMMMMMMM. I was wanting to respond though. The laughing was intended. But I wanted to insert a smiley instead . I also wanted to say add that I used to get the leather saturated with water by either dipping or moving under the running faucet. But I never had the patience to wait for the leather to get to the proper state of casing before working it. This just caused a lot of extra work in both mistakes and lack of satisfaction with the level of detail. This spray technique has worked well for the last few holsters and is allowing me to get the practice I have needed in correctly working leather to the shape and level of detail that I have been looking for. I have a few new pics but I have to run off to work for an quick meeting. I will post them up shortly
-
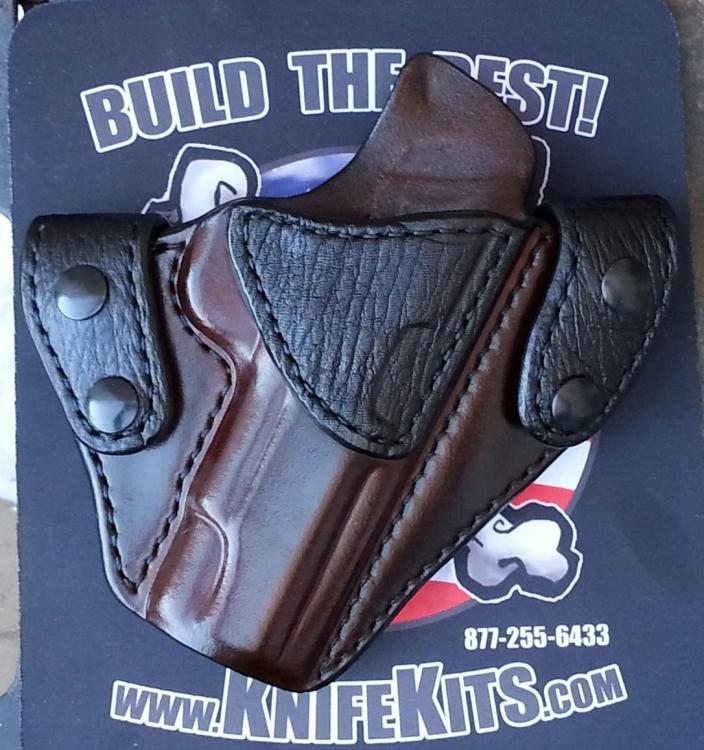
Both the front and the back are 8/9 Herman Oak. The accent is 2/3 HO with roughly 2/3 shark on top of it. Straps were thinned 8/9 and then the same 2/3 shark. Not sure how thin I got the straps down to but I did not take much off. Probably only about the same as 2/3. All molding is by hand. Starting from dry I just use a spray bottle to evenly spry the front, back and then the inside. Let it sit for 5-10 minutes and insert the gun. From there it was easy to use my thumbs to get the rough detail and then my detail crease tool for the fine detail lines. Took about 40 minutes from dry to the start of letting it dry out. Both sides are actually detailed. I am gonna try to take some better pics of it tomorrow and add them here.
-
Thank you all.
-
I just finished this holster and thought I would share. I have been working to get this boning thing down and I think I finally got it. Still working thru some dye learning curves but that seems to change from one color to the next. The holster is a snap on pancake with 25* cant for Commander size 1911s. Yes it is a clone of the MS Axiom and TT Gunleather DDOO. The shark trim was chocolate brown before being sealed but now looks black. It works for me though so not a big deal. I used 8/9 leather for this. The seal coat is Tandy's Pro clear gloss. Hand stitched. Sorry double post.
-
I just finished this holster and thought I would share. I have been working to get this boning thing down and I think I finally got it. Still working thru some dye learning curves but that seems to change from one color to the next. The holster is a snap on pancake with 25* cant for Commander size 1911s. Yes it is a clone of the MS Axiom and TT Gunleather DDOO. The shark trim was chocolate brown before being sealed but now looks black. It works for me though so not a big deal. I used 8/9 leather for this. The seal coat is Tandy's Pro clear gloss. Hand stitched.
-
I have this one too. It was sharp out of the box. I do wish the wider ones were not so expensive though. Sometimes I like to make holsters with full exotic outsides. These are always wider than 4".
-
Grommets and Snaps with longer depth or posts
Bolt Vanderhuge replied to Anubis78's topic in Hardware and Accessories
Other than that same place, I do not have a suggestion. Sorry.


