Uwe
-
Posts
2,221 -
Joined
-
Last visited
Content Type
Profiles
Forums
Events
Blogs
Gallery
Everything posted by Uwe
-
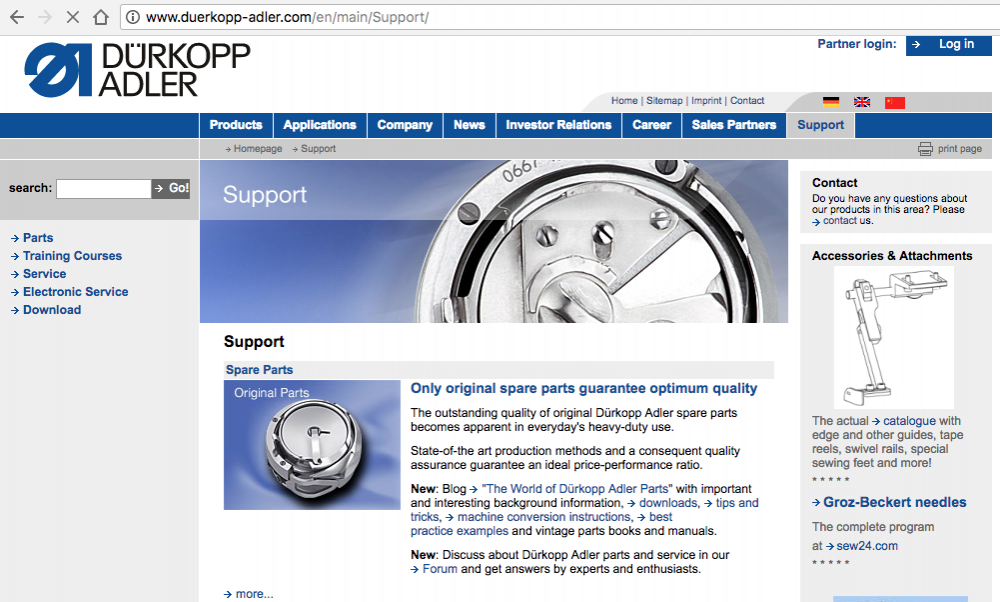
Your best bet is service department at Durkopp Adler headquarters in Bielefeld, Germany: http://www.duerkopp-adler.com/en/main/Support/ If they don't have it, nobody else will either.
-
My Kwok Hing feet are mostly hard to find feet for Pfaff 335/1245, Durkopp Adler 67/167/267, or Juki 441 class machines. The 227R takes standard Singer 111W style feet, which are cheap and readily available from dozens of vendors.
-
The default go-to oil for sewing machines here in the U.S. is the "Lily White" sewing machine oil made by AlbaChem , which has a ISO viscosity of 22. Any oil that has a color to it will likely cause stains on white fabric, so a truly colorless oil is preferred by many. Trying to get oil stains out of a newly sewn garment is not fun. Some leathers soak up the oil like a sponge and never let it go again. Some leathers have so much oil to begin with, a little extra oil from the machine makes no difference. Recommended viscosity variations may depend on the oil delivery system the machine was designed for. Manual drip-on-the-parts-that-need-it is different than a pump-driven systems, which in turn are different from systems where wicks deliver the oil throughout the machine. In all cases, one important factor is what the oil leaves behind when the volatile elements evaporate and the oil dries up. Some natural oils dry to a hard varnish that acts like glue and can lock up a machine in storage. Other oils dry with very little residue, others yet leave behind tiny flecks of Teflon that act as a lubricant even after the oil has dried (e.g. Tri-Flow, but with scary SDS info). Once you find an oil you like, stick with it and sing its praises online.

-
I've decided to clear out my inventory of Kwok Hing items. You'll get 40% off any Kwok Hing item in my online store at https://uwe.store/collections/clearance-40-off Use discount code "KH40" during checking to get 40% off any items made by Kwok Hing. While supplies last, not returns on clearance items. I won't be ordering any more items from Kwok Hing. They make great products, but it's not worth maintaining an inventory these days. Regards, Uwe Grosse
-
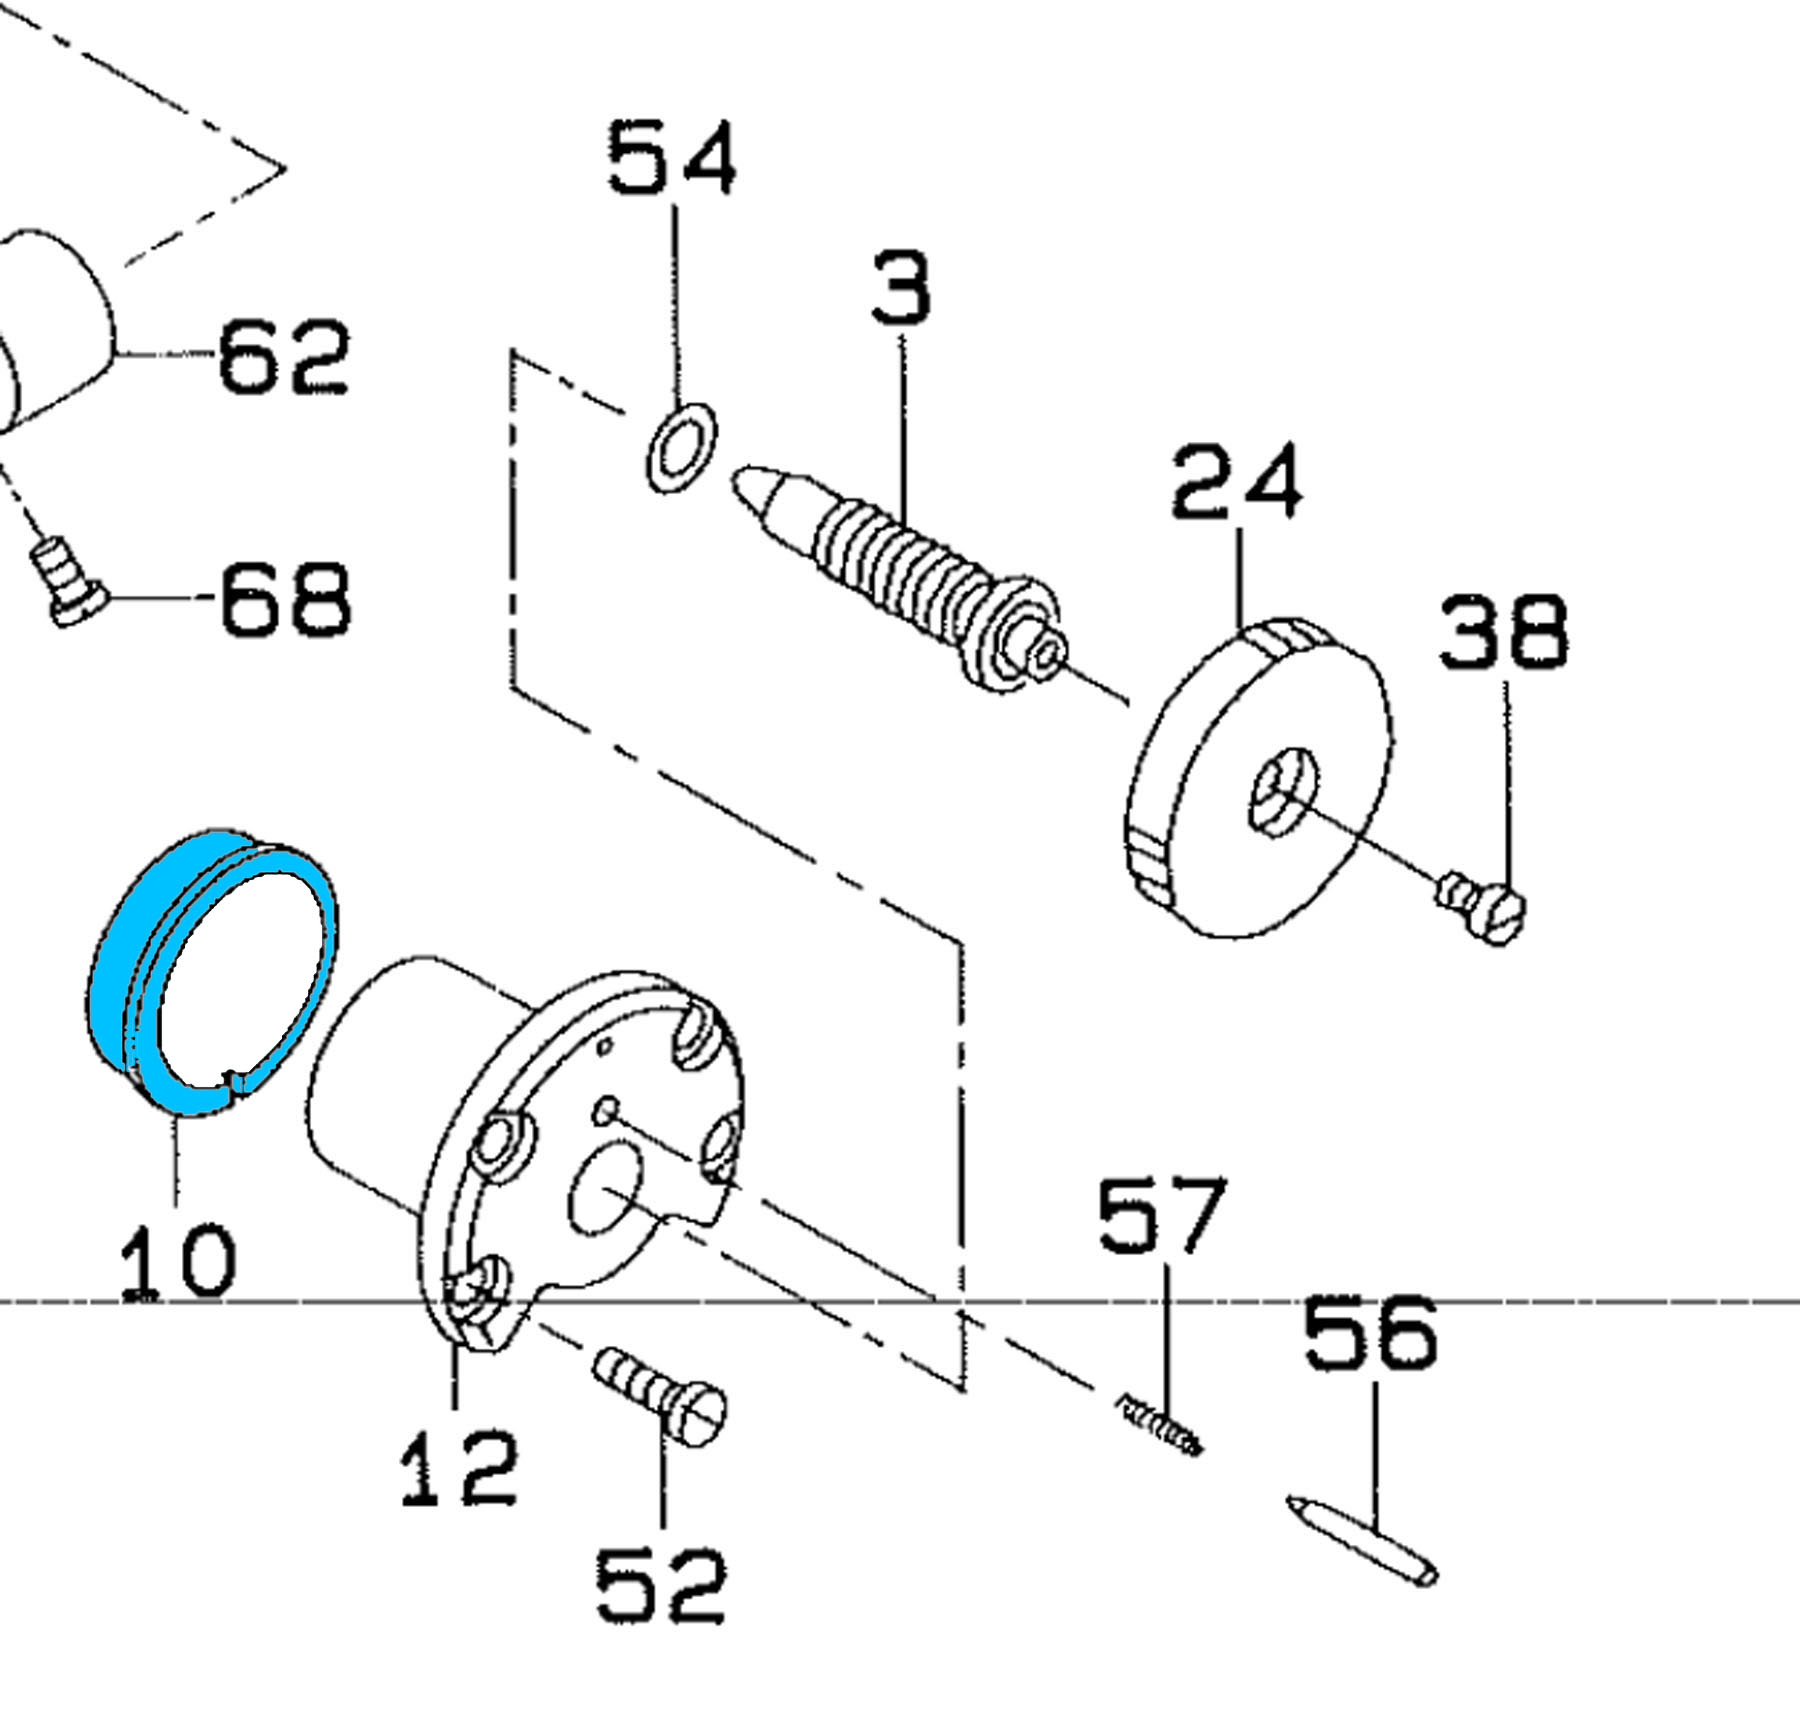
I just got done spending some quality time with my Rex 11-155R. It may not be any consolation, but my Rex also has larger forward stitches (8mm) than in reverse (5.5mm). And there's apparently nothing I can do about it - that's just the way the machine was designed. This machine is not designed to be adjustable to balance forward and reverse stitches. The shape of the butterfly part determines where it hits the stitch length dial stop pin. One could theoretically alter the shape of the butterfly part somehow, but it's not worth bothering in my book. Later designs by Juki have a nearly identical stitch length mechanism, but they added an eccentric bushing that allows moving the stitch length adjustment pin up and down. This allows adjusting the relative forward and reverse stitch lengths. Here's a snippet of the relevant part (blue No. 10 "Eccentric Bushing") in the Juki DU-141NH parts diagram: We actually had a similar discussion a little over a year ago: So, in summary, I think your options are: 1. Live with it 2. Start shopping for a machine with a more sophisticated stitch length mechanism.

-
I hope so. I suspected one of those looks-like-a-screw-but-isn't heads is really an eccentric adjustment bolt with a set screw. I'll have to take a closer look at my Rex. Which manual is that image from? I have nothing for my Rex yet.
-
Your machine appears to be a close relative of a Rex 11-155R and they may both be re-badge jobs of some other machine made by a contract manufacturer. My machine has a plate that says it was "Made exclusively for Rex by Nakajima." Many factors contribute to the real-world forward and reverse stitch length. The actual stitch length and reverse mechanism is one of them, but feed dog movements and walking foot linkage are also factors. I made a video some to ago about the stitch length and reverse mechanism on my Rex 11-155R. That "butterfly" part plays a central role in both stitch length and reverse functionality. One easy check is to see if the butterfly part is properly centered. Set the stitch length dial to "0" and verify that A: that the pin really does sit in the valley of the butterfly wings (reverse level has minimal or no movement at all) and B: that there really is no front-to-back- movement of the feed dog or walking foot when you turn the hand wheel. If A or B is off, then your forward and reverse will not match for sure. Other easy visual checks are: 1. The feed dog needs to move all the way to the front before it comes up and all the way to the back before it goes down (and obviously the opposite for reverse.) 2. Descending needle, descending walking foot and rising feed dog should all meet at the throat plate level at the same time. Check those things and report back. In general it's better to upload pictures directly here on LW. It's a bit of a pain, but worth it in the long run. Those external picture hosting services have a tendency to turn nasty or greedy.
-
It's quite unlikely that the foot driving eccentric cam slips out of position. It's much more likely that the driving arm clamps on either end of the foot driving shaft slip out of position. Perhaps the clamp on the other end of the driving shaft was not quite tight. If either end slips, the walking foot motion will go out of synch. I'd try rotating the hand wheel to bring the needle tip to be level with the throat plate, then loosen either driving shaft arm clamp to bring both feet down to also be level with the throat plate. Then tighten clamping screws on BOTH ends of the driving shaft well. The concept of the walking foot mechanism for many machines is nearly identical. The main difference is that on some machines the slotted arm for adjusting walking height points up, and on other machines that arm points down.The foot driving eccentric will be offset 180˚ depending on which way that arm points. Normally the foot driving eccentric cam is at one extreme (e.g. all the way out) when the needle is at the very bottom (BDC) and at the other extreme (e.g. all the way in) when the needle is at the very top (TDC.) That's easy to verify visually. I recently made a video of that walking foot concept on a Pfaff where the slotted arm points down. I have a strong feeling the 441 is exactly the opposite because the arm points up. I don't have access to a 441 right now to verify. Here's the Pfaff walking foot adjustment video, just for reference:
-
I have a feeling you disassembled more parts than necessary. The whole side cover plate assembly should come off after removing just two screws (shown from 0:24-0:35 in my 441 adjustment video - please don't do anything else shown in that video.) I'd contribute pictures but I'm nowhere near my machines. You'll have to post some more pictures of the rear of your Cobra and also the parts you removed, so that we can perhaps mark up the pictures with numbers and arrows to communicate what needs to go where and in what sequence. If that L-shaped part with the fork ("thread tension release arm" sounds good to me) was not installed correctly to begin with, it may well have caused a bind when lifting the feet. The upper end of the thread tension release arm needs to go BETWEEN the thread tension discs when you lift the feet. If it went behind or in front of the discs, it may have caused a bind. I also have a strong feeling that you're unclear about what certain other parts do. For example, that foot pressure adjustment screw on top of the machine does NOT change the height of the presser foot as you implied earlier. You said that you had that screw all the way down for working with your thin fabric materials. That screw really adjusts the spring pressure that pushes down on the feet as they walk. In general, the foot pressure should be as light as possible while still holding the material in place. Sewing machine maintenance beyond basic oiling may not be your thing. After we (hopefully) get this current issue resolved, try to connect with a different local mechanic who's familiar with the 441 design. Your previous mechanic was not up to the task.
-
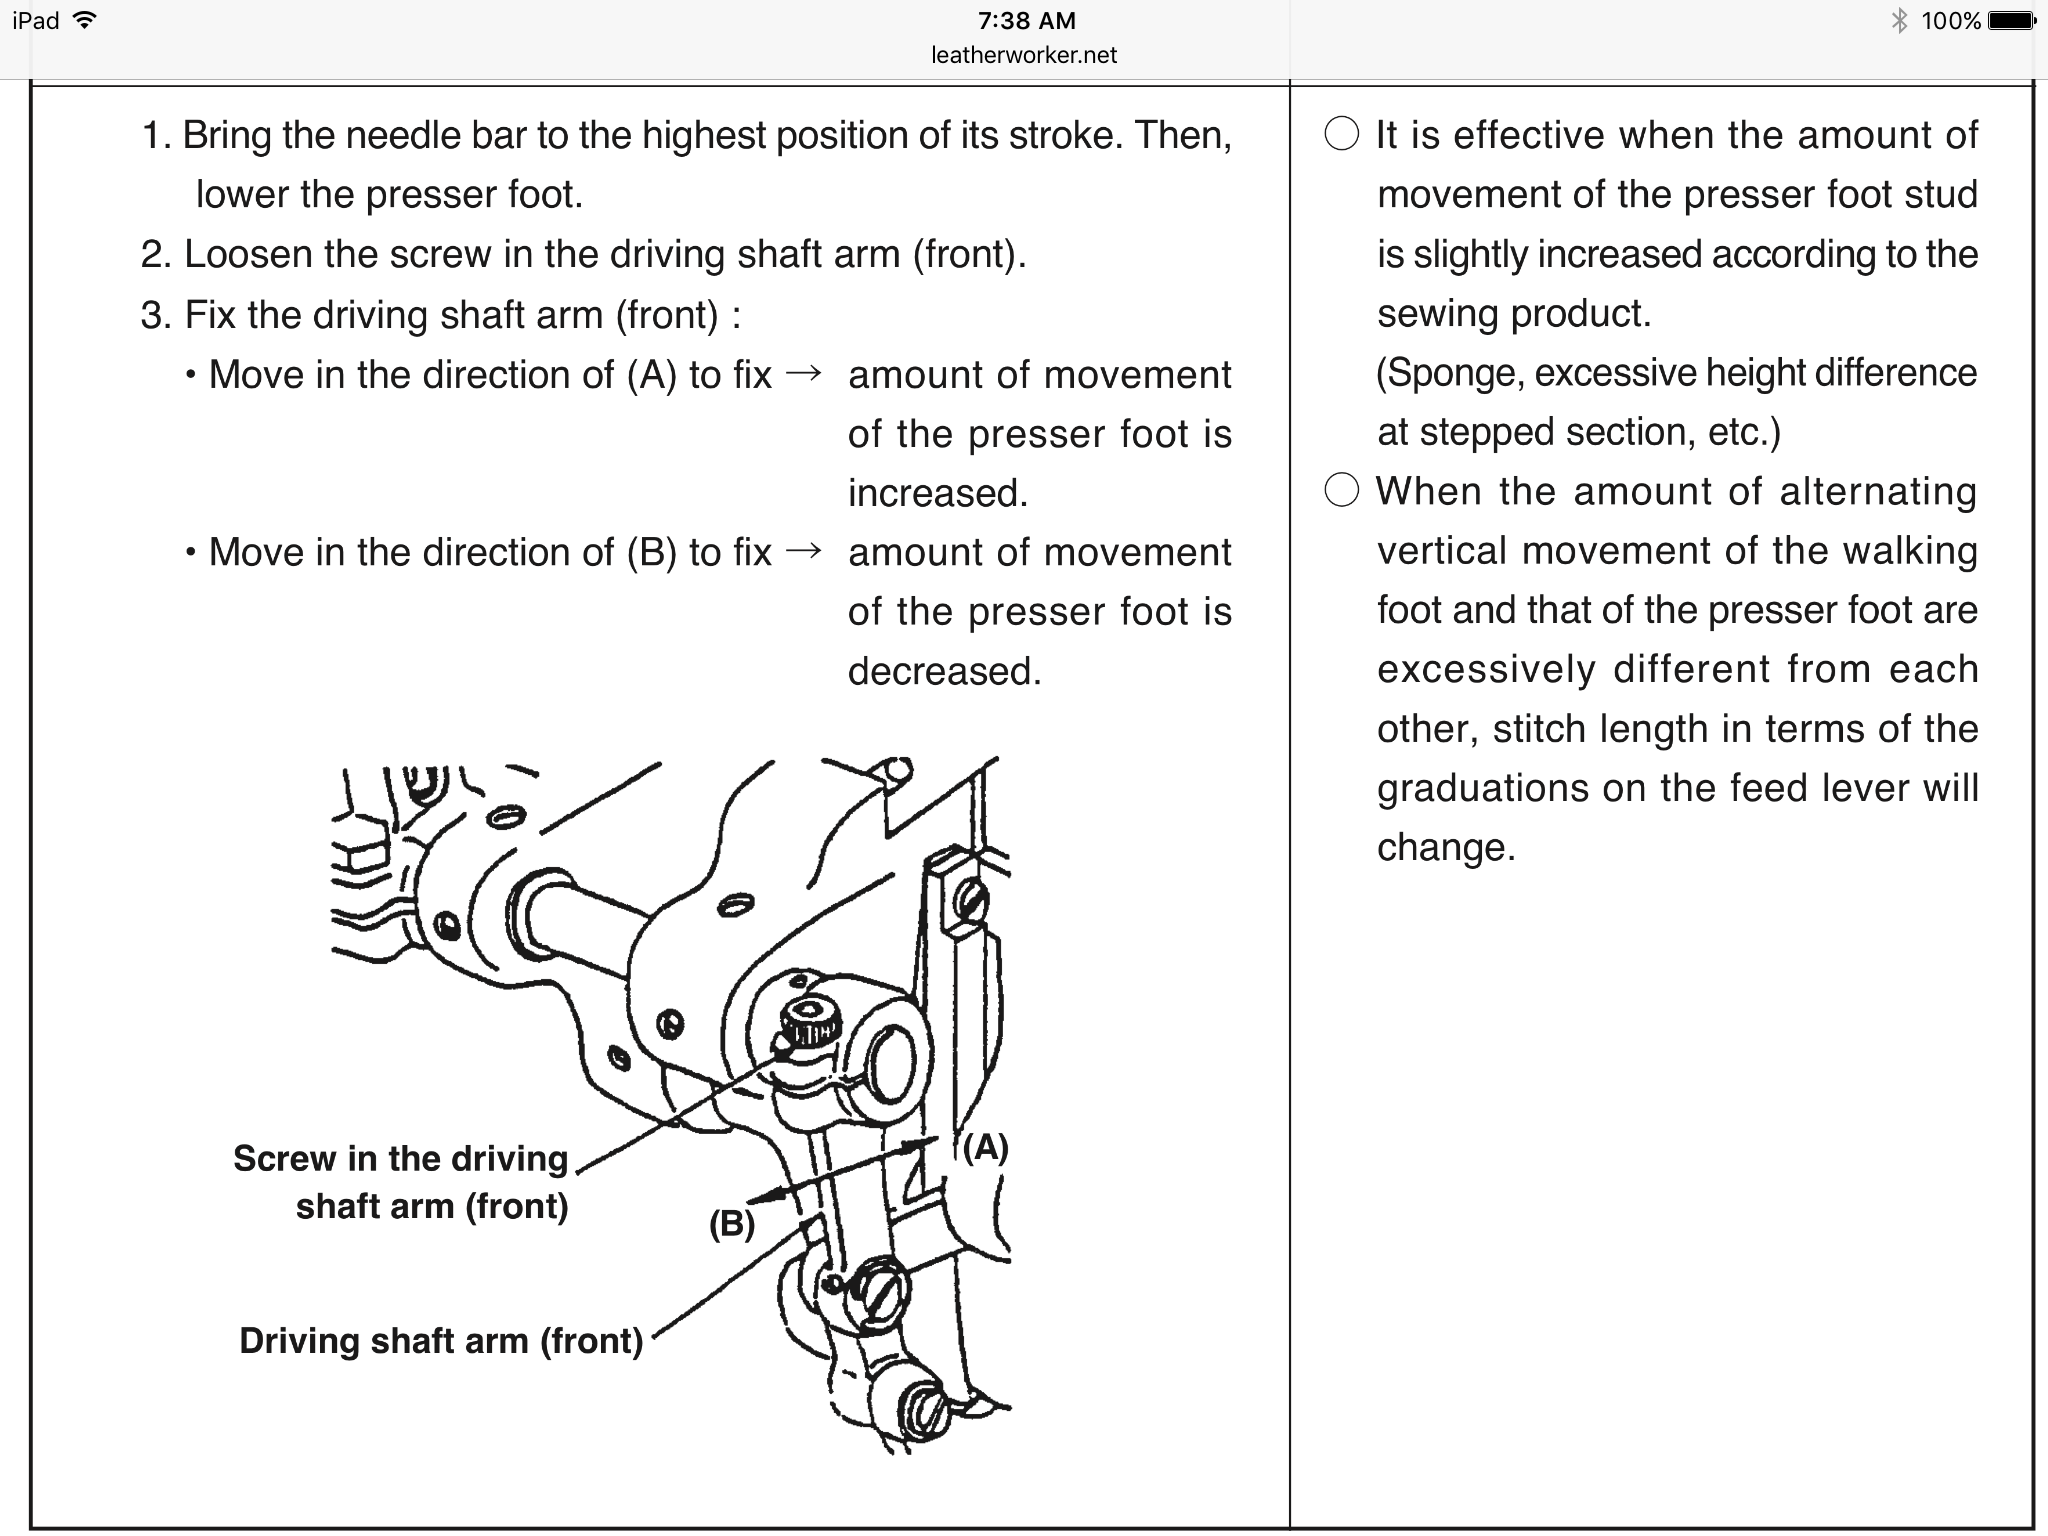
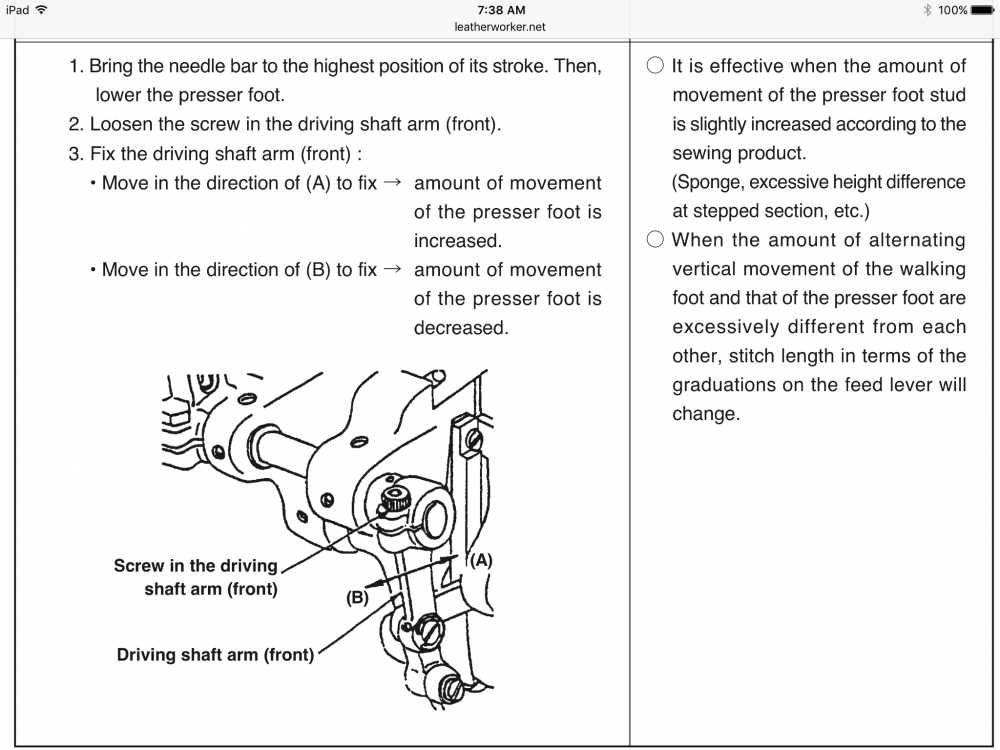
Section (9) 2. of that manual describes how to adjust alternating presser foot walking height. It looks like a straightforward adjustment. Make sure you view that PDF manual as two-page spreads to make sense of it. In single page view the adjustment rule and adjustment procedure appear out of sequence. This is the part that shows how to adjust relative walking foot height to get rid of the "limp."
-
If the mechanic sitting in front of the machine couldn't figure it out, it'll be a real challenge for us to do it remotely and blind-folded. As for oiling, remove the side cover and oil everything that moves when you lift the feet. Anywhere metal touches metal and moves needs to be oiled. I'd recommend a few simple process-of-elimination steps to see if you can narrow down the source of the foot lift bind. Loosen the foot pressure screw all the way and remove the screw. If foot lift bind goes away, then that screw is where to investigate further. If it still binds with the pressure screw removed, then the problems lies elsewhere. Closely inspect everything that moves as you lift the feet and look for visible rub marks, scratches, etc. Sometimes the problem hides in plain sight.
-

Several Replacement Part Questions - Nakajima TDU-N62
Uwe replied to dandspach's topic in Leather Sewing Machines
This is the only Nakajima->Juki cross reference I know of. Unfortunately the TDU-N62 is not on this list .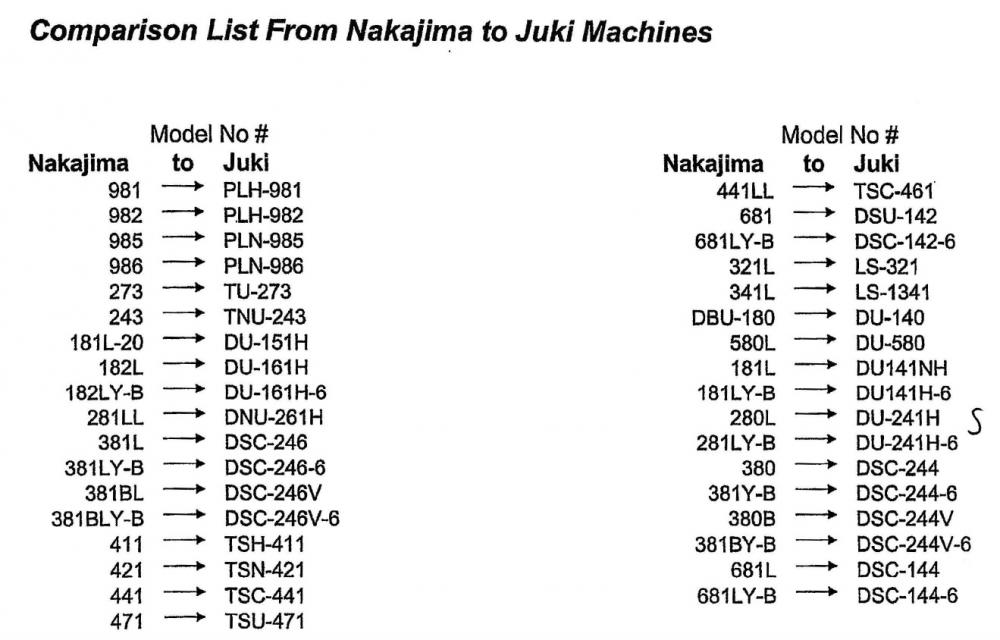
-
You'll have to be a little more forthcoming with information if you want meaningful answers. Otherwise it's just a wild guessing game. Not sure why the brand is a secret. Is it sticking with manual foot lift lever, pedal foot lift chain, or both? How high does the foot lift when it sticks? What exactly was that recommended thing you did that did't work? Did you buy the machine new? Has the foot lift ever worked properly?
-
Perhaps the bushing (outer sleeve) that the needle bar runs inside is eccentric. If it is, then rotating the bushing may allow slight adjustment of the needle position.
-
Make sure you use the correct type of needle ( System 328 ) with this machine, otherwise things may not align properly. Here's an Adler 166 User Manual: I'm guessing you want to adjust needle position front-to-back so that the needle is centered in the curved slot in the throat plate. First make sure you have the correct needle system installed. The System 328 needle may have a thicker shank than your current needle, which would move the needle toward the center of the slot. Once you are certain the correct needle is installed, we can look at possible adjustments.
-
Several Replacement Part Questions - Nakajima TDU-N62
Uwe replied to dandspach's topic in Leather Sewing Machines
Some parts are easier to make than to buy, especially for orphaned vintage machines. That thread guide is essentially a paper clip combined with some quality time with a pair of needle nose pliers. If you want to get fancy, get a thin stainless steel welding rod at you local welding supply store instead of a paper clip. The screw that goes with it is harder make and find. Hope it is a metric or common sewing machine screw, otherwise you may be, well, out of luck.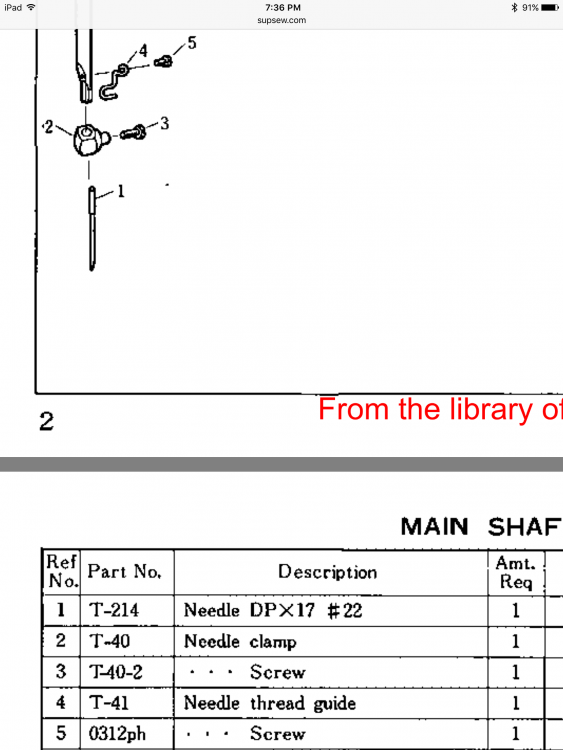
-
Several Replacement Part Questions - Nakajima TDU-N62
Uwe replied to dandspach's topic in Leather Sewing Machines
Part numbers often work best when looking for replacement parts. Check the Nakajima TDU-N62 parts manual for the part numbers. Then you can contact Superior Sewing to see if they have the part, google the part numbers or try eBay for research. Available parts sources vary greatly depending on where on this planet you are located. -
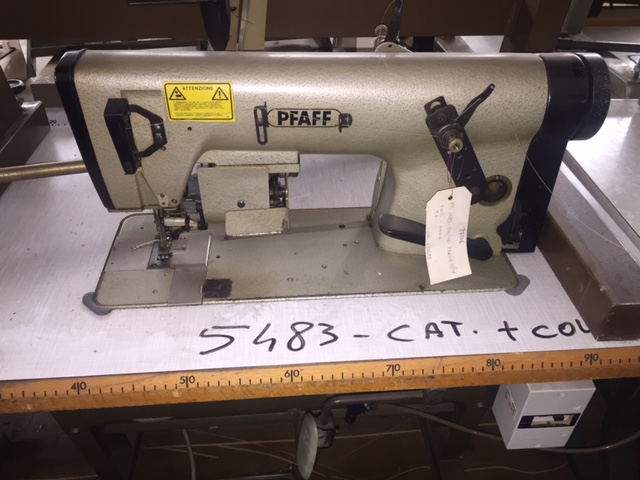
Yup, looks like a chain stitch machine to me. Perhaps a Pfaff 5483? https://www.manualslib.com/products/Pfaff-5483-3645237.html
-
How much movement the feed dog and needle bar rocker frame make when using the reverse lever depends your stitch length and also on their starting position when you use the reverse lever. If your Juki LS-341 didn't move when pressing down on the reverse lever, it's because you either had stitch length "0" selected, or the feed mechanism happened to be perfectly centered front-to-back by chance (e.g. needle at the very top, or needle at the very bottom.) Select maximum stitch length and turn the hand wheel until the feed dog is at the very front, then use the reverse lever. That's when the reverse movement is most pronounced. Your Juki LS-341 works exactly the same way.
-
Did't I answer this very same question in one of your other topics?
-
Yes, moving the reverse lever will move the feed dog and needle bar rocker frame. When the feed dog is at the very front, actuating the reverse lever should move it all the way back. This is true for all "normal" sewing machines, not just the Pfaff 145.
-
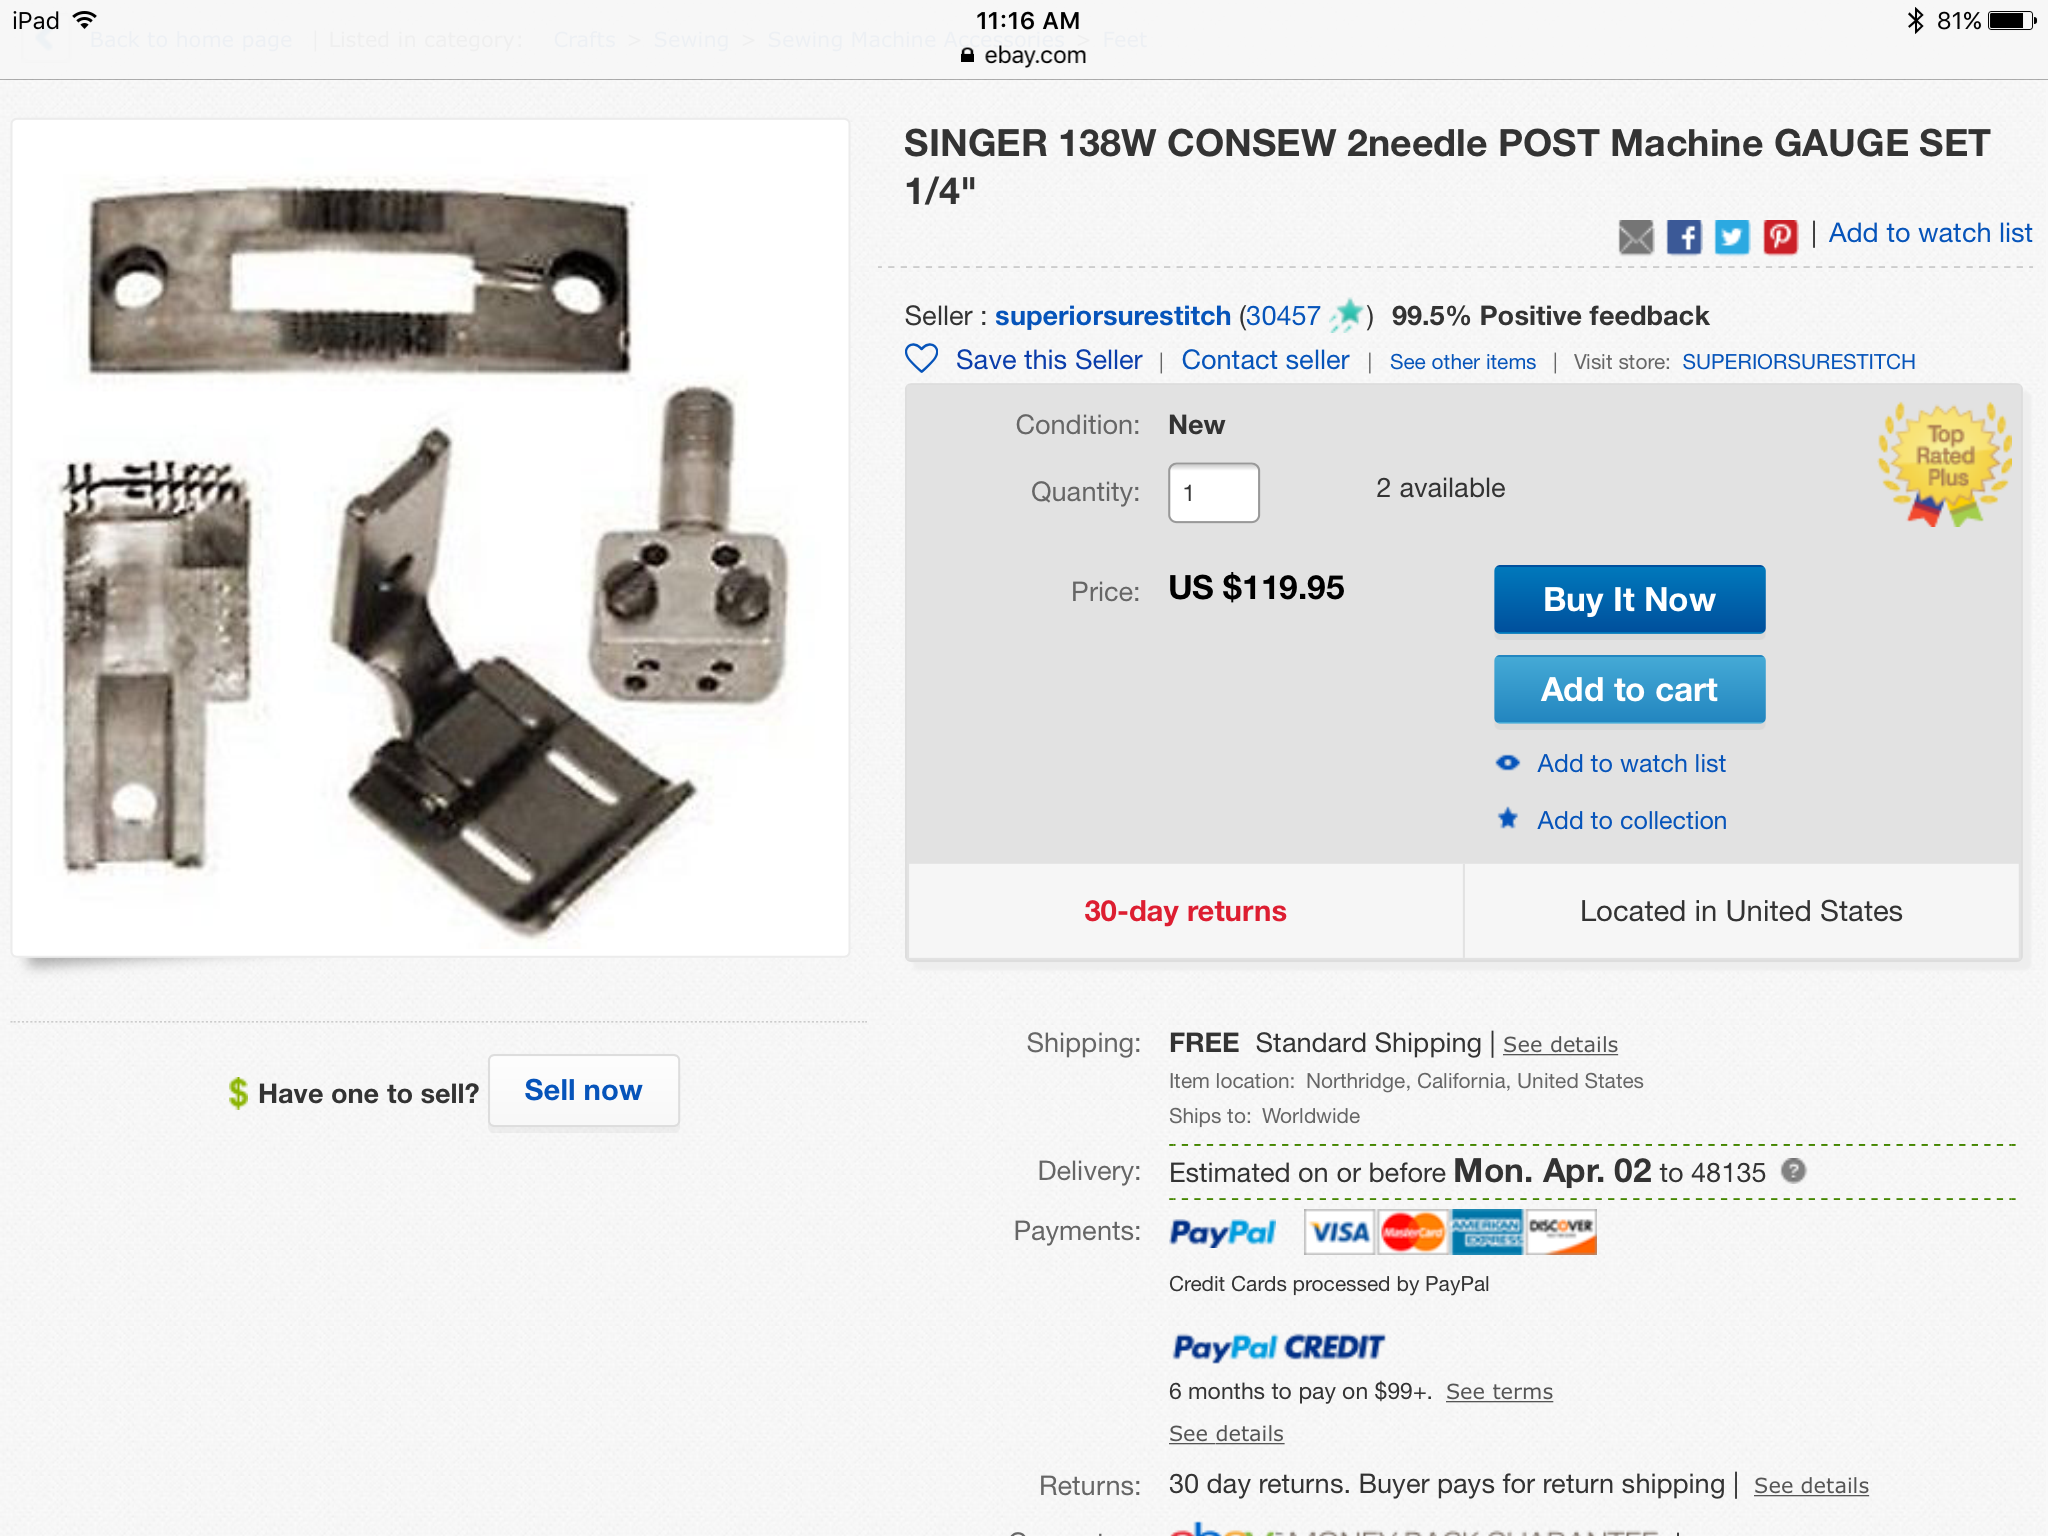
Here's a 1/4" gauge set on Ebay:

-
Needle bar hitting outside foot on Adler 67
Uwe replied to HardenGoods's topic in Leather Sewing Machines
Make sure you don't change the height of the needle bar as you rotate it and that you're not creating a new interference elsewhere (e.g. needle screw towards the back.) It's tight quarters and every millimeter counts. Also re-align the needle itself again to make the needle's scarf point to the right. -
Needle bar hitting outside foot on Adler 67
Uwe replied to HardenGoods's topic in Leather Sewing Machines
It looks to me like you could rotate the needle bar a little more to move the thread guide hole closer to the 7 o'clock position and still have access to the needle clamp screw, too. I know that several people have made this Q-feet work on Adler 67 machines without requiring modification of the foot. Sometimes these interference issues crop up when the machine is timed using a shorter needle than the specs call for. Double check your needle system. -
Changing gauges is a non-trivial affair on a flatbed machine and usually also requires a matching needle bar. You also have to move both hook saddles - that's the part may be next to impossible on a post-bed machine.