Uwe
-
Posts
2,221 -
Joined
-
Last visited
Content Type
Profiles
Forums
Events
Blogs
Gallery
Store
Everything posted by Uwe
-
And since he asked for "best", here's the reigning champion, the Durkopp Adler H-Type 967-100 (if you have to ask, you can't afford it):
-
I'd say the Singer 144W design is one of the most capable for sewing heavy canvas and wrangling tarp size work pieces. Used Singer 144W heads can be had for under $1k, modern equivalents like Consew 744RB30 run close to $10K new. Singer 144W: Consew 744RB30:
-
Thanks for that dose of comic relief on a Saturday morning, Bob! One more cup of coffee should do it. That feed eccentric mechanism is indeed a confounding, yet brilliant, piece of engineering. I've been procrastinating making a video about it because the task is daunting. I do have a Singer 111W155 on the workbench with a stuck feed eccentric. Maybe I'll get the camera rolling as I work on it this weekend.
-
Yes, the quilting machine in the video below is what I was thinking of. Mounting the Chandler on a frame would give essentially the same effect, minus the computer wizardry.
-
Indeed, quilting is very similar to darning - the main difference is what moves and what is fixed. On quilting machines you freely move the whole machine around and the material is fixed. On darning machines the machine is fixed and you move the material around freely.
-
So it appears the check spring then really performs two distinct functions on machines with a thread regulator: 1. Keep thread taught while the needle is above the material to prevent the needle from accidentally piercing the thread on the way down 2. Apply very slight tension to the thread as it wraps around the farthest part of the hook The thread regulator device allows you to make sure the second function is indeed happening. Normally, you adjust the check spring resting ledge so that the check spring hits that ledge just as the needle enters the material. Then you can use the thread regulator to make sure the check spring just barely lifts off that ledge as the threads wraps around the farthest part of the hook. You learn something new every day. I'll have to check that out on a real machine when I get a chance.
-

Adler 67-372-thoughts on quality and capability
Uwe replied to koreric75's topic in Leather Sewing Machines
The Adler machines of that vintage and design are very good machines in general. Whether or not this particular subclass suits your needs depends, well, on your needs. The machine is not designed for holsters and heavy belts, but it may be perfect for wallets. Here's a PDF of the original Adler 67-372 Brochure (Adler 67-372-373 Brochure.pdf) with specifications and other relevant details. The Adler 67-372 is a light/medium duty version designed for needle sizes ranging from 90-120 Nm (Singer size 14-19, indicating a max thread size of T90), and a max stitch length of 4.5mm (about 5.5 SPI) -
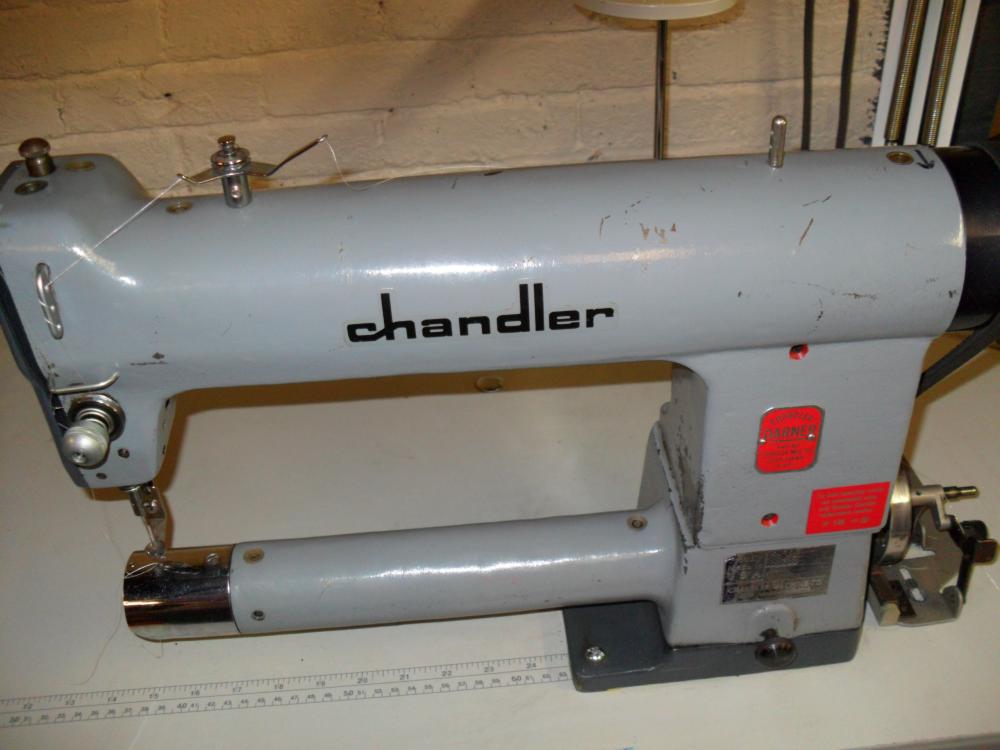
Chandler sold some re-badged machines made by other manufacturers. They may have contracted a few machine to be sold solely under the Chandler label. They produce some machines themselves, too. I'd say this is an original Chandler since the plate clearly states "MFD by CHANDLER MFG Co. Aver, Mass. U.S.A." You can always ask them directly since they still exist: http://www.chandlermachineco.com/ In any case, you probably know it's a darning machine, others may not. No feed mechanism at all. You move the material by hand. Below's a video of how to use one of these machines. Great for repairing jeans, not so great for sewing leather.
-
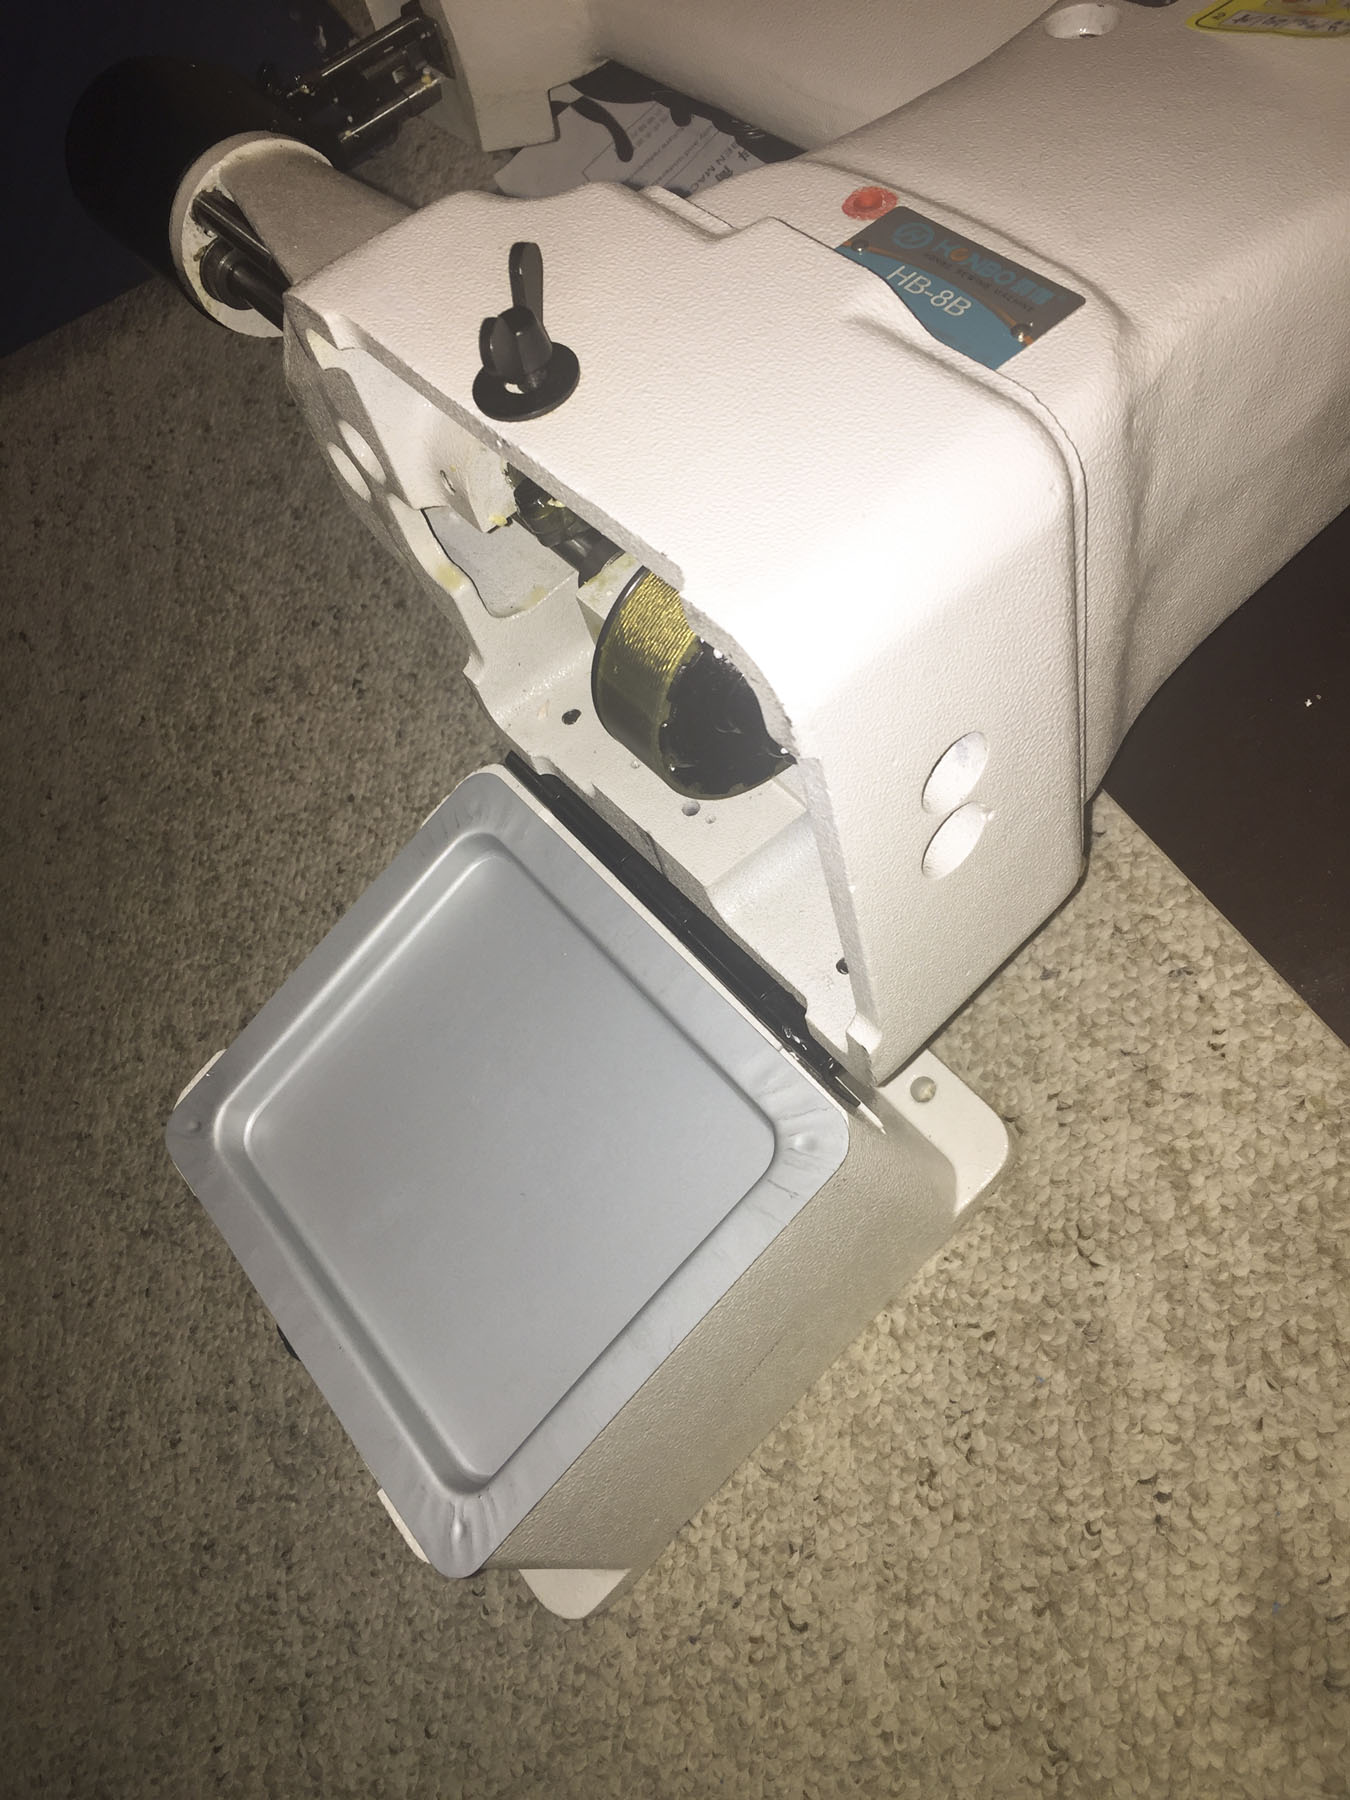
I have a new, old-stock Juki LS-341 and it took me nearly two days to figure out the root cause for a bind when I first got it. It turned out the machine had - for some unknown reason - a set screw on one of the hook driving cone gears that was a tiny bit too long.The set screw was touching other cone gear teeth nearby - not a good thing. With a proper, shorter set screw installed the machine is the buttery smoothness you expect from Juki. I mention this because even the tiniest part can turn a perfectly good machine into grinding, thumping mess. I'm glad I found the screw before I ran the machine under motor power. On the sub-topic of oil drip pans, I ordered an inexpensive Honbo HB-8B (copy of Seiko CW-8B/Consew 227R) to develop a table attachment for this machine class - eventually. It was a gamble but it turned out to be a surprisingly nice and well made machine. It even came with a metal oil drip pan insert - yay!

-
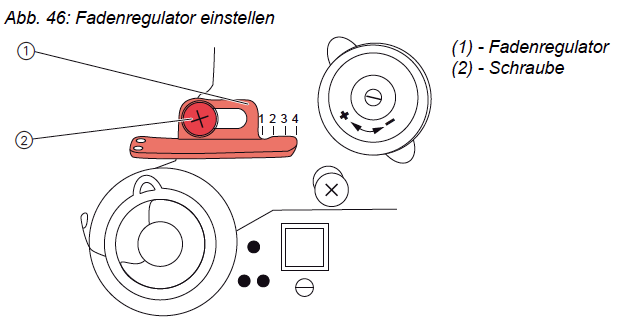
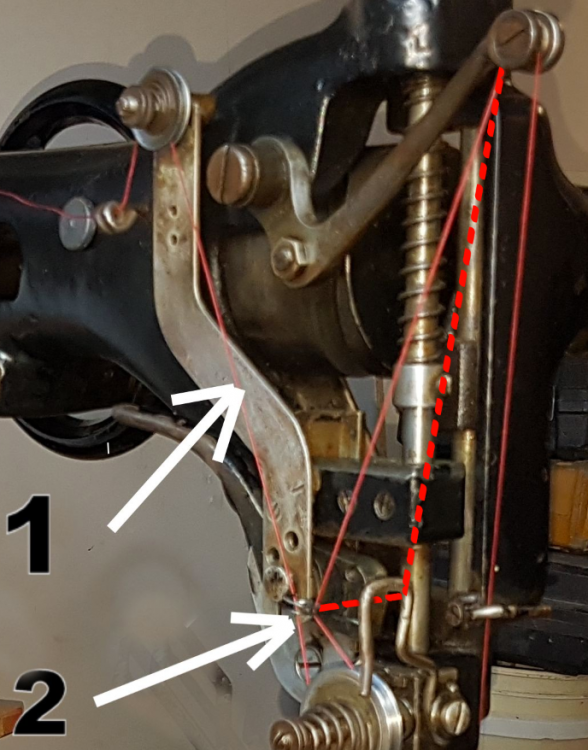
I believe your #9 part just looks like and is called a thread guide, but is really an around-the-hook thread tension regulator. With the thread take-up lever in the bottom-most position, the regulator #9 allows a very subtle adjustment of exactly how much slack or tension the thread has as it is wrapped around the farthest part of the hook. Too much tension: thread snaps around the hook and may cause more thread to pull from the spool when it shouldn't. Too little tension: thread is not taught enough to nicely pull through the gap between the bobbin case tab and throat plate cutout at the right moment, potentially causing a snag that pulls more thread from the spool when it shouldn't. Just right tension: thread consistently and smoothly pulls through the gap at exactly the right time. The Durkopp Adler 867 has a similar device, except it is adjusted horizontally. It essentially has the same function as your #9 part: The DA service manual simply states to observe the thread getting wrapped around the hook, and to adjust the red regulator until it's just right. On older machines that do not have this regulator, the bottom position of the thread take-up lever alone (and relative timing with hook rotation) determines how taught the thread is when it wraps around the hook. I remember topics where the thread take-up lever seemingly arrives at the very bottom a wee bit too early or too late. This regulator eliminates that potential problem. The regulator allows more freedom to adjust the around-the-hook thread tension somewhat independently of the thread take-up lever timing. Anyways, that's my theory.
-
The only two machines I can think of that will handle your desired range of thread and materials in a single machine is the Juki LS-2342H and the Durkopp Adler 869. Both run well over $7K and are probably worth every penny. Our collective views of what something is worth or should cost have been greatly distorted by the multitude of clone machines.
-
I'm voting for the TechSew 2750, Cobra 26, or Cowboy 7341. All three are copies of the same original - the Juki LS-341 (the predecessor to the current model Juki LS-1341.) It's a great design and should serve you well. I suspect you'll be hard pressed to tell the difference between the three in actual use, other than paint color. Pick a dealer who's close and gives you good vibes.
-
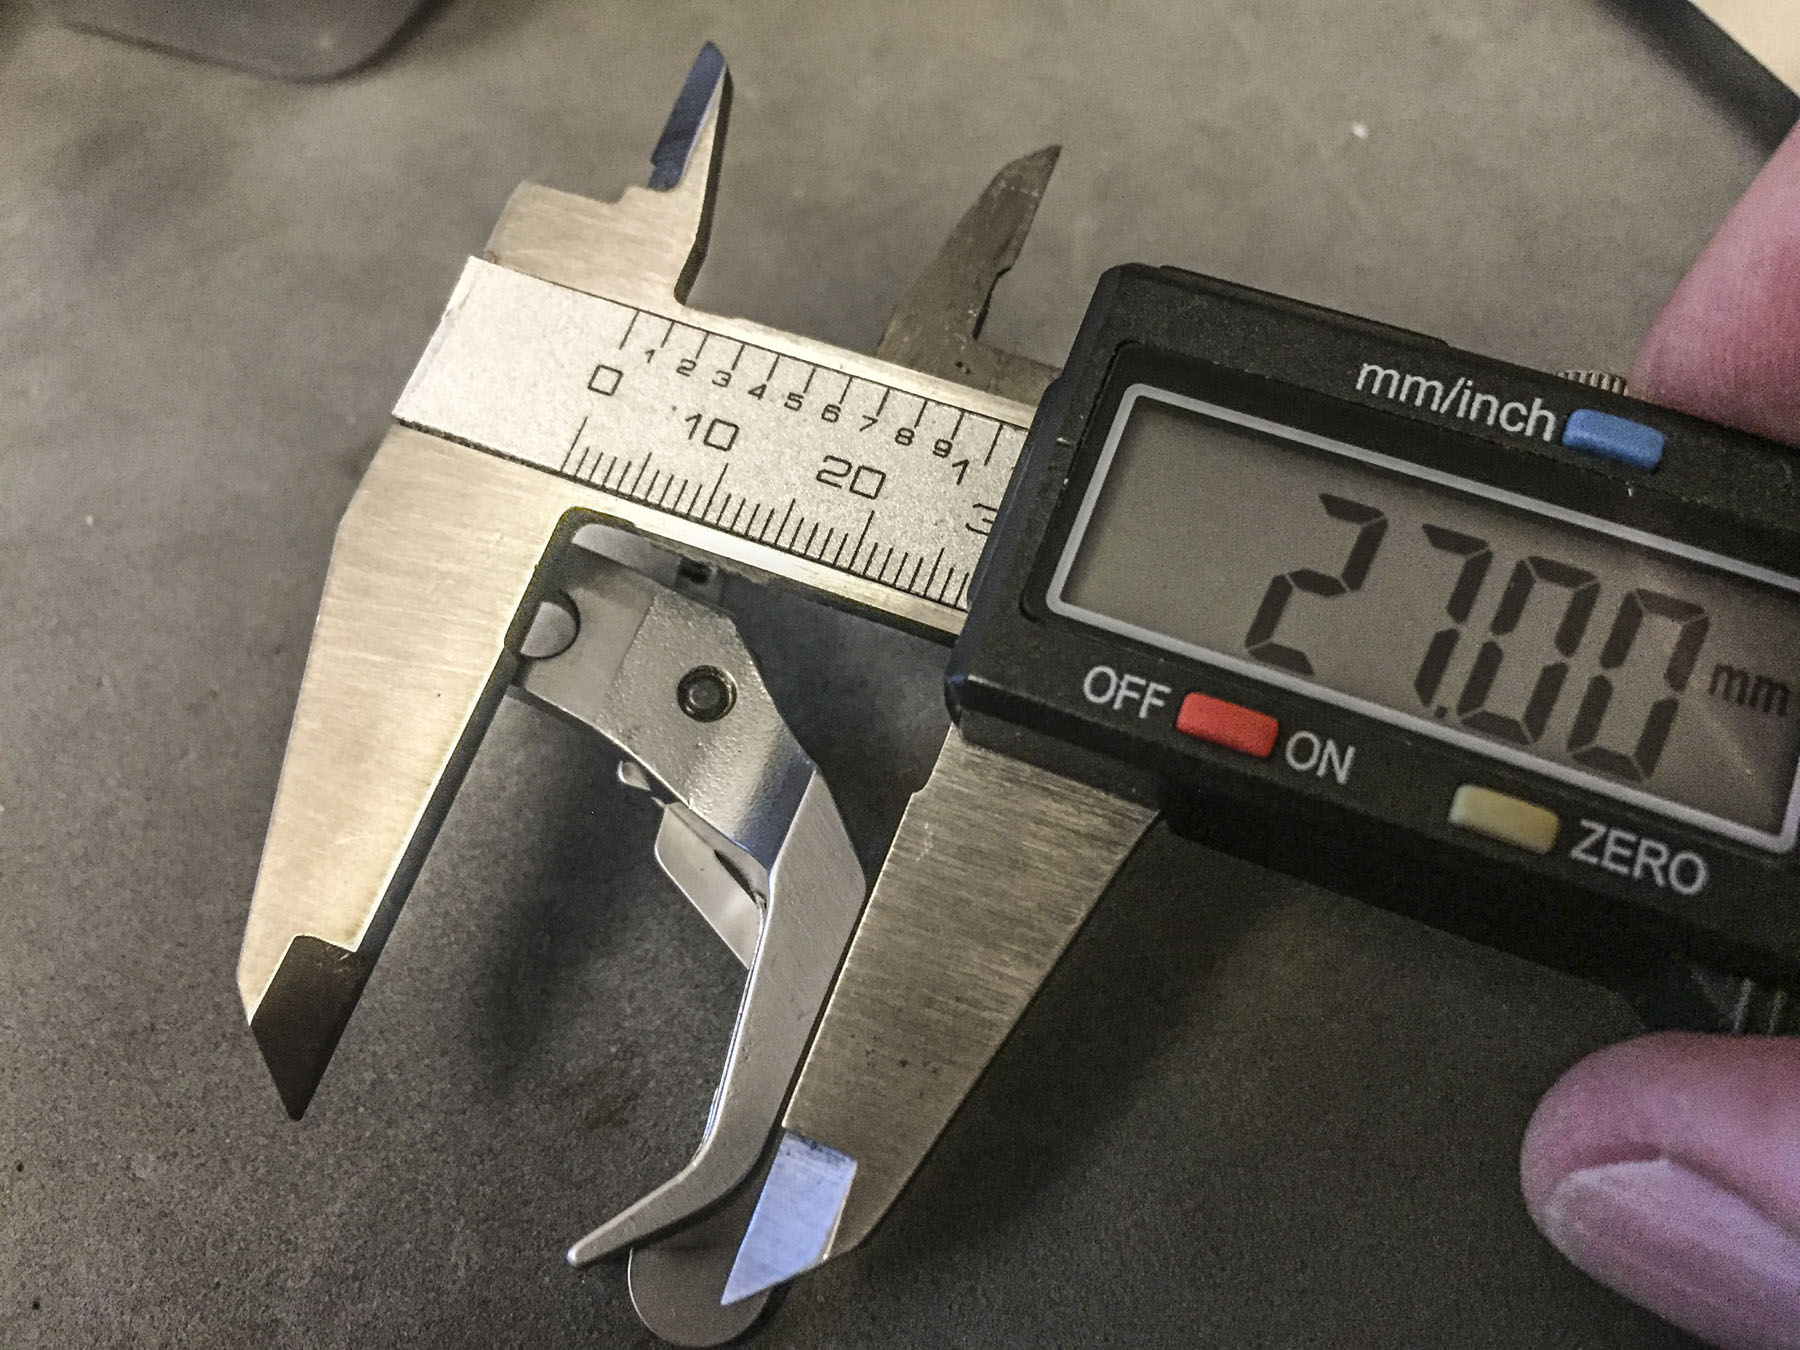
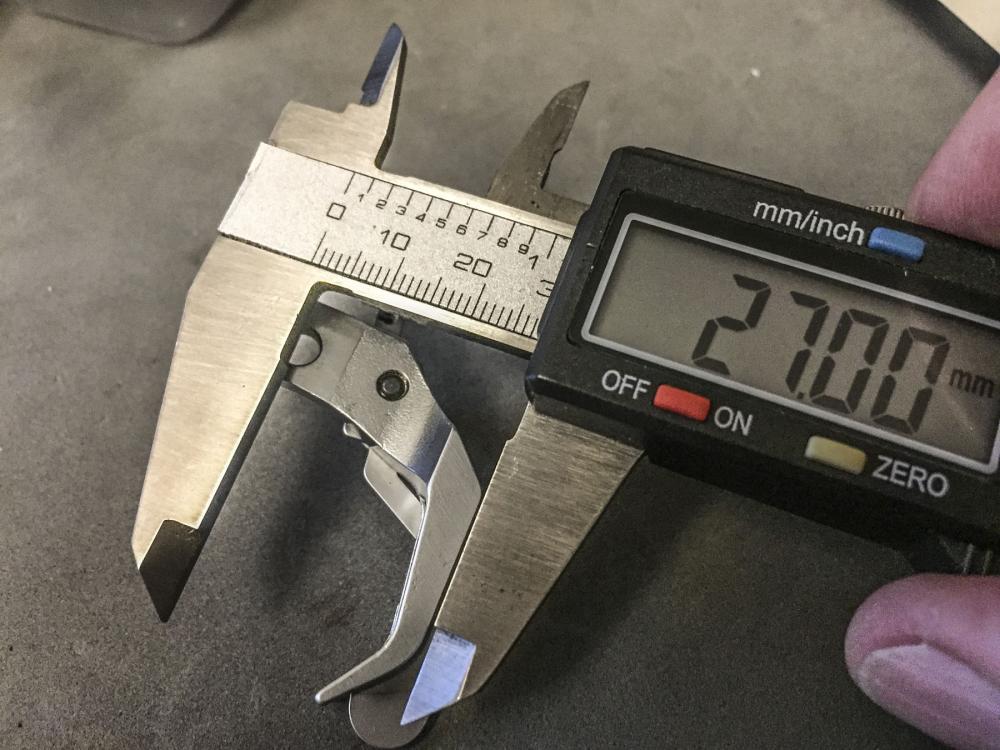
I'm guessing your zipper foot is a few millimeters shorter than the piping foot. The rear presser bar height can be adjusted, but it's not entirely trivial and you certainly don't want to do that everytime you swap feet. All the "correct" Pfaff 145 feet (also fit Pfaff 545,1245, 335,etc.) should be the same height, regardless of H1/2/3/4/ subclasses. My Pfaff feet measure 27mm from the bottom of the feet to the center of the mount hole: Assuming your zipper foot is the "correct" foot, it would make sense to adjust the rear/outer presser foot bar to work with that foot. That lowered presser bar setting may also work with the taller piping foot. Don't start loosening screws just yet! Spring loaded parts may pop out of position and really ruin your day/week. Post some measurements of your feet and perhaps some photos.
-
You must not have looked super hard - the topic of presser feet leaving marks has been discussed ad nauseam in this forum. It all comes down to pounds per square inch of foot pressure. To get below the p.s.i. level that leaves marks, you can either lower the spring pressure or increase the square inches on the feet. The discussions generally boil down to this: 1. Use the lowest possible spring pressure that will still adequately hold the material (modifying the spring may be required.) 2. Use feet with the biggest possible smooth footprint that still allow you to see what you're sewing. 3. Use a big, smooth feed dog, or skip the feed dog entirely and use a throat plate with a needle feed slot.
-
So that statement turned out to be not entirely true, only partially. I'll have to have a word with my fact checker . . . It sounds like your hook timing is retarded, (hook arrives at the needle too late). I'd try advancing the hook timing a little and adjusting needle bar height to suit. Can you post a picture of the top of the hook when the needle is precisely at bottom dead center? To my knowledge, there's no way to adjust the relative movement between needle bar and take-up lever on this machine. But I have a history of being wrong on occasion.
-
The bird's nesting may be due to operator error. On these vertical axis hook machines you have to hold both threads for the first few stitches, otherwise the loose thread may get pulled into the works and create a bird's nest underneath, even on a perfectly adjusted machine.
-
That's helpful info, and yes, obviously within topic. My recommendation is to get BOTH machines. Give the good one as a gift and use the second head to learn sewing machine maintenance on. Being able to fix the gifted machine when it has issues will be the true gift that keeps on giving.
-
Sometimes apparent tensions issues are easy to fix, sometimes they're just the tip of the iceberg of a machine's real problems. I don't recommend gifting a machine with known issues. Try to keep this topic focused on the Seiko. It's okay to start a new topic with questions not related to this machine. We have quite enough runaway my-personal-journey-of-considering-a-dozen-machines type topics.
-
Looks like the machine is in very nice condition, actually. Price seems reasonable, but obviously it varies across the globe. I've paid less for machines, but then I spent better part of a week making them work. This must be the Seiko model that was sold under the Consew brand as a 226 model here in the US. Parts are cheap and everywhere. These are great starter machines and they're reliable workhorses at the same time. The motor may be on the fast side, but the motor pulley itself looks just about as small as they come. If the clutch works well, it may not be a bad starting point for upholstery. The best way to find out is to just try it out. Swapping out the motor with a modern servo motor is relatively simple and you can spend as little or as much on a servo motor as you like.
-
That locking lever is actually a very cool solution. Thanks for posting the details!
-
juki Thread take up replacement Juki 562/563
Uwe replied to KCB346's topic in Leather Sewing Machines
The rear presser foot bar itself is just about the only that can stay in place. But frankly, you might as well take the whole thing apart and inspect/clean all the parts. I'm curious as to why you want to replace the thread take-up lever at all. Is it actually broken? Can you post some pictures of your machine? -
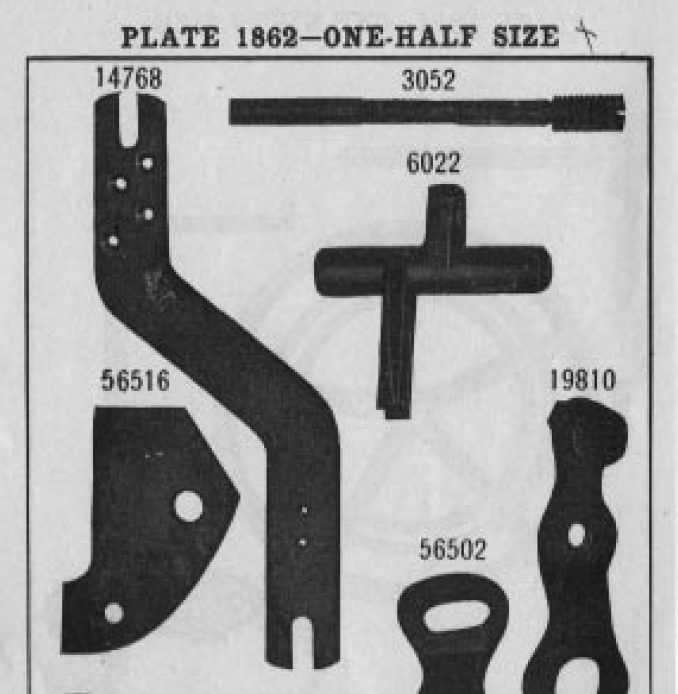
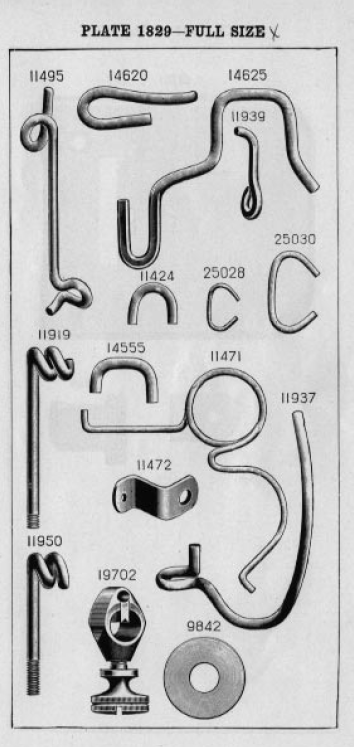
Looks like that #1 part in your photo is Singer Part No. 14768 (according to the Singer 11-24 Parts list) . It turns out I have one of those monsters hiding under my shelves, too, and that part is missing on mine (along with the various tension units). It also seems like your thread path is not quite right. I'm picturing something like this, but I haven't seen an actual owner's manual yet: There's no shortage of thread guiding items in the parts diagram. I suspect that Part 11471 is the actual check spring, although I'm not sure exactly where it would go.
-
juki Thread take up replacement Juki 562/563
Uwe replied to KCB346's topic in Leather Sewing Machines
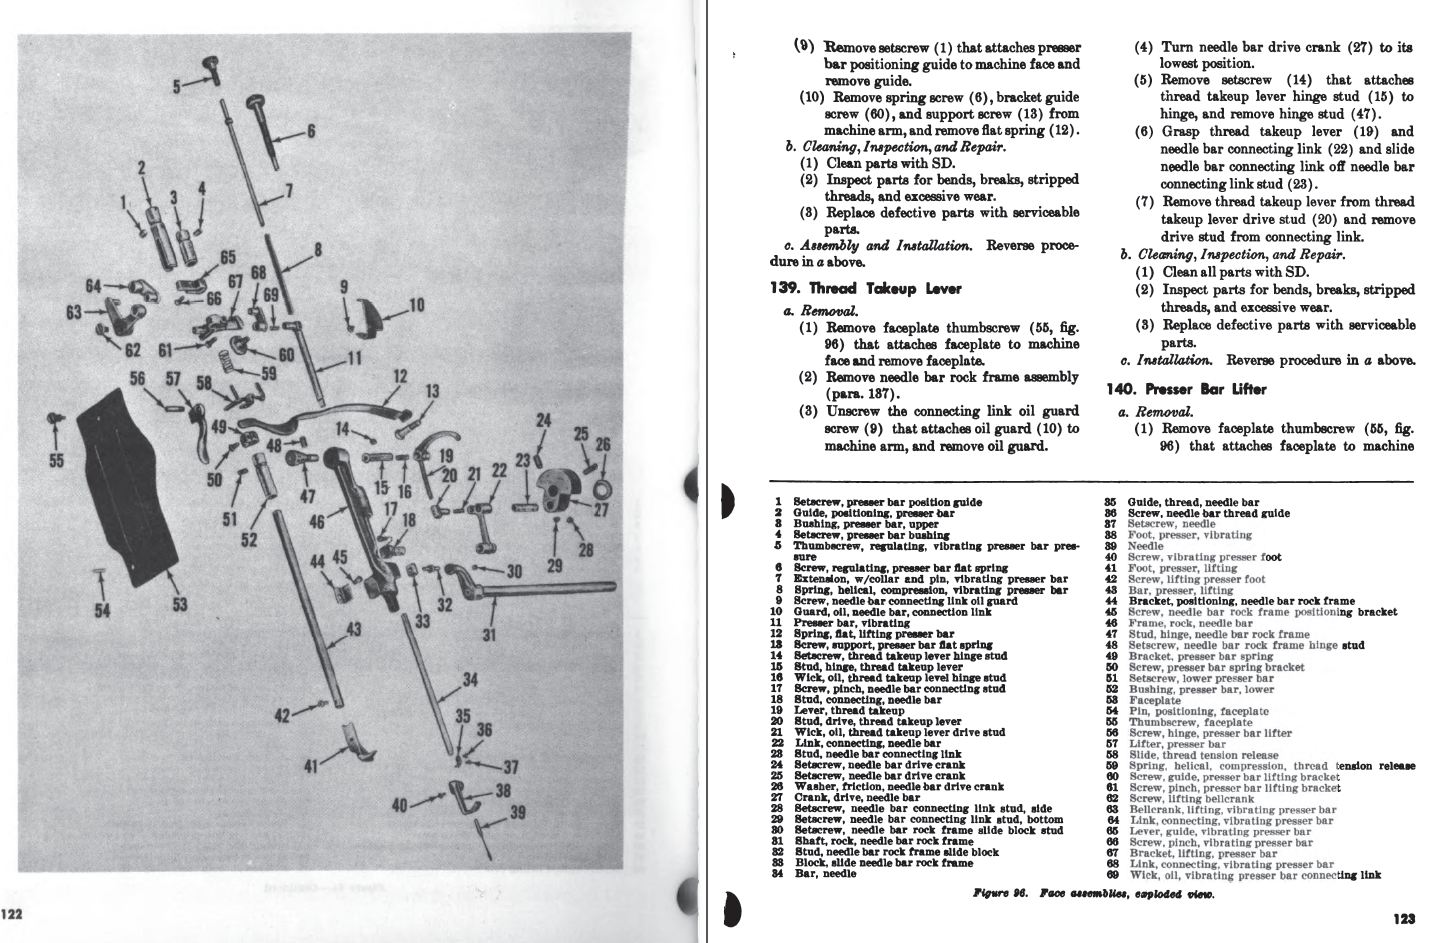
The closest thing I know of is this section of a US Army service manual ( https://archive.org/details/TM10-3530-202-24 Pages 122/123) that describes the procedure on a Singer 111W155 (a relative of the Juki LU-562 in certain design elements):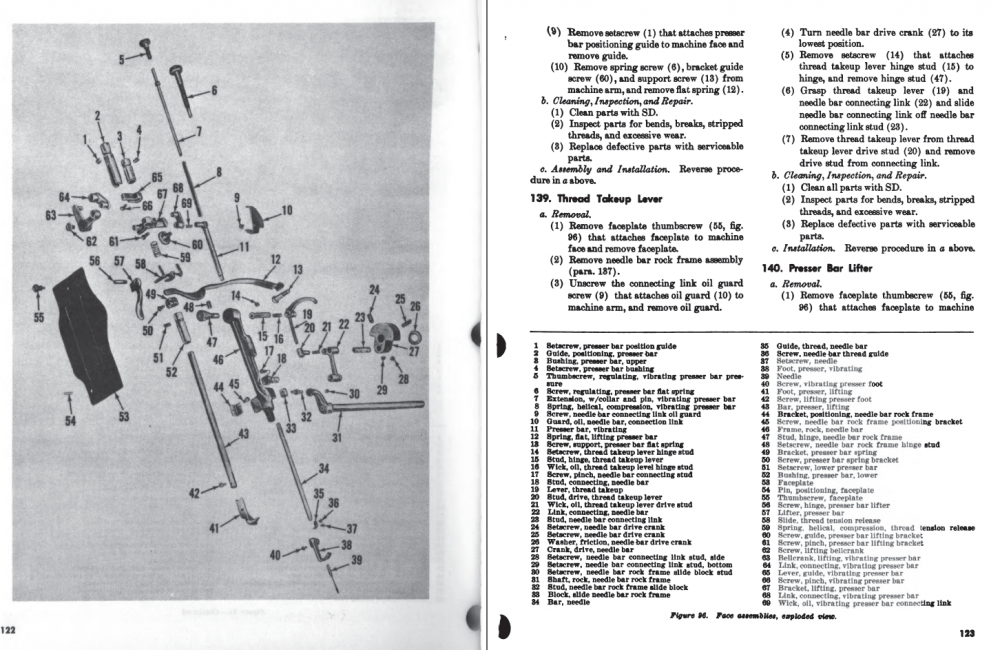
-
juki Thread take up replacement Juki 562/563
Uwe replied to KCB346's topic in Leather Sewing Machines
I've done it and I wouldn't describe it as a trivial undertaking. I'm not aware of a simple set of instructions or a video showing the procedure, sorry. You basically have to disassemble everything in front of the take-up lever inside the head of the machine. -
When I decided to do some 3D CAD design work, I researched a few options and I ended up settling on Autodesk Fusion 360. The learning curve with any powerful 3D CAD programs is steep and painful, so I only wanted to do it once. I don't regret my decision. Fusion 360 is one of the very few, very powerful 3D CAD programs you can use for free. In fact, I don't know of another 3D CAD program that's as powerful AND free. The importance of the CAM (Computer Aided Manufacturing) end of the 3D CAD program is not to be underestimated - I've used Fusion 360 to design CAD parts and generate CAM G-Code files for Tormach CNC mills, ShopBot CNC wood routers, as well as export files for use with my Cetus 3D printer. I learned most of what I needed to know from watching videos made by NYC-CNC on YouTube. The "cloud" aspect hasn't interfered with my work. Fusion 360 is a program installed and run on your computer, not just some web browser interface to a program that runs remotely. I've used Fusion 360 with and without an internet connection on my Mac laptop. I occasionally use the Windows computers at my MakerSpace to just log into my Fusion 360 account and have access to all my designs for quick little tweaks. For simple 2D CAD design work, other options like SketchUp etc. may be fine, but the topic question was about 3D CAD design programs.