-
Posts
2,221 -
Joined
-
Last visited
Content Type
Profiles
Forums
Events
Blogs
Gallery
Store
Everything posted by Uwe
-

Broken screw head on needle assembly juki lu563
Uwe replied to Nate88's topic in Leather Sewing Machines
You can always replace the needle bar itself in case you can’t get that screw out. Needle bars are not expensive, but installing them is often a bit of work. Usually only one screw holds the needle. That second screw you see is likely just holding the thread guide in place - that screw should not need to be turned unless you replace the thread guide. I’ve used a Dremel in the past to grind a new slot into the broken-off screw to try and extract it. It worked, but the area around that screw wasn’t going to win any beauty contests. Buy a couple OEM Juki needle screws and replace them when they start to wear. Some people need to change needle several times a day, for others a needle lasts several months. Needle screws are cheap, even if you pay $2 each. Don’t buy the too-cheap ones - they’re likely made with inferior metal and are more likely to shear off. In general it‘s better for the screw to shear before the female thread strips because screws are usually cheaper than the part it goes into. Pictures are super helpful when crowd sourcing help. I’m sure it’s all obvious to you since you’re looking at it, but we don’t see what you see unless you post a picture. -
Apparently there are different versions of the CB-4500 floating around different parts of the world. I have yet to see one with pre-drilled holes for mounting an edge guide. Can you upload a picture of the back of your machine where the guide would mount? There are lots of edge guide options available on Ebay and other sources. Common names include KG-867 and KG-967. You’ll need an adapter like the KB-205 in order to install most of the suitable edge guides to your machine. You should also consider an extension for the manual foot lift lever, since the original lever will interfere with the edge guide operation. If your machine doesn’t have pre-drilled holes, this video I will give you an idea of what you’ll need to do:
-
This video shows how that tab fits into the cutout under the throat plate and how things are supposed to move as you sew:
-

Newbie needs help getting a neglected Seiko Stw 8b up and running
Uwe replied to MaliMac's topic in Leather Sewing Machines
Removing the entire hook to adjust bobbin tension seems rather excessive. I'd go buy a suitable screw driver that lets you turn that bobbin tension screw without having to remove anything. Those little screwdrivers you can buy as part od a eyeglass repair kit at most drug stores work really well. -

Correct Bobbin Case Size for Thor GC-1541s
Uwe replied to rchaven's topic in Leather Sewing Machines
Just buy a bobbin case from the dealer who sold you the Thor machine! -

Newbie needs help getting a neglected Seiko Stw 8b up and running
Uwe replied to MaliMac's topic in Leather Sewing Machines
Your machine uses system 135x17 (fabric) or 135x16 (leather) needles. Neither of your needle packs in the photo are the correct needle system. It’s probably best to just discard all the needles that came with the machine, seriously. None of the numbers on the package tell you the length, sorry! Needle systems are a science in itself. Search Ebay for “135x16 needles” or contact one of our resident vendors. Buy some of the correct needles and then adjust the needle bar height to get the needle position and timing right, as shown in the video above. Use the Consew 226 manual as a reference, courtesy of @Gregg From Keystone Sewing. Seiko built the machines and sold them under the Consew brand back then. -

Newbie needs help getting a neglected Seiko Stw 8b up and running
Uwe replied to MaliMac's topic in Leather Sewing Machines
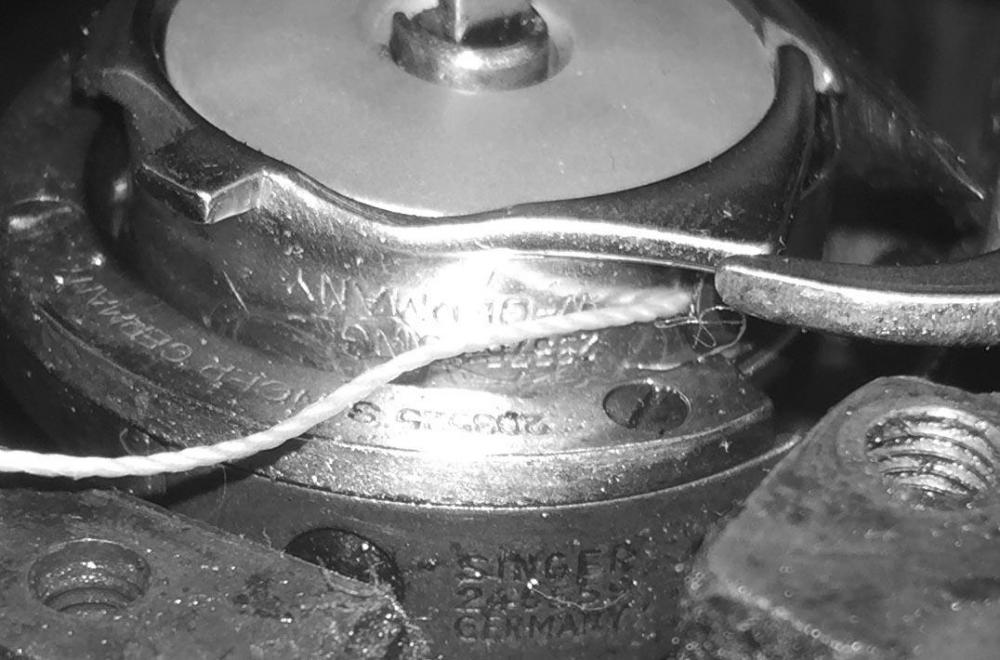
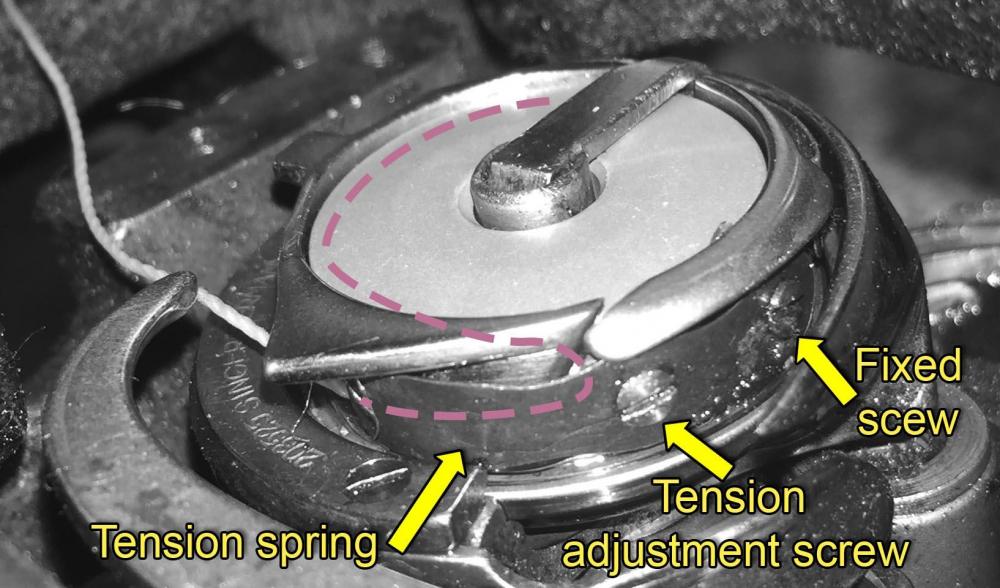
Your bobbin threading doesn’t look right, your bobbin thread goes over the edge of the bobbin case. You need to pull the bobbin thread into the slot of the bobbin case ( near the 4 o’clock position) and under the tension spring. Your bobbin threading is likely to cause skipped stitches and other issues. On the top thread tension unit, don’t run the thread around pin on the edge of the tension disks - several youtubers show this threading for unknown reason, but not a single manual that I’ve read shows that. Post some detail photos of the check spring area, it’s hard to tell exactly what’s going on there. As for timing, your machine is a very close relative of a Consew 225. You can use this hook timing video as a guide: -

Necessary Adler 205-370 parts for leather
Uwe replied to thecruffler's topic in Leather Sewing Machines
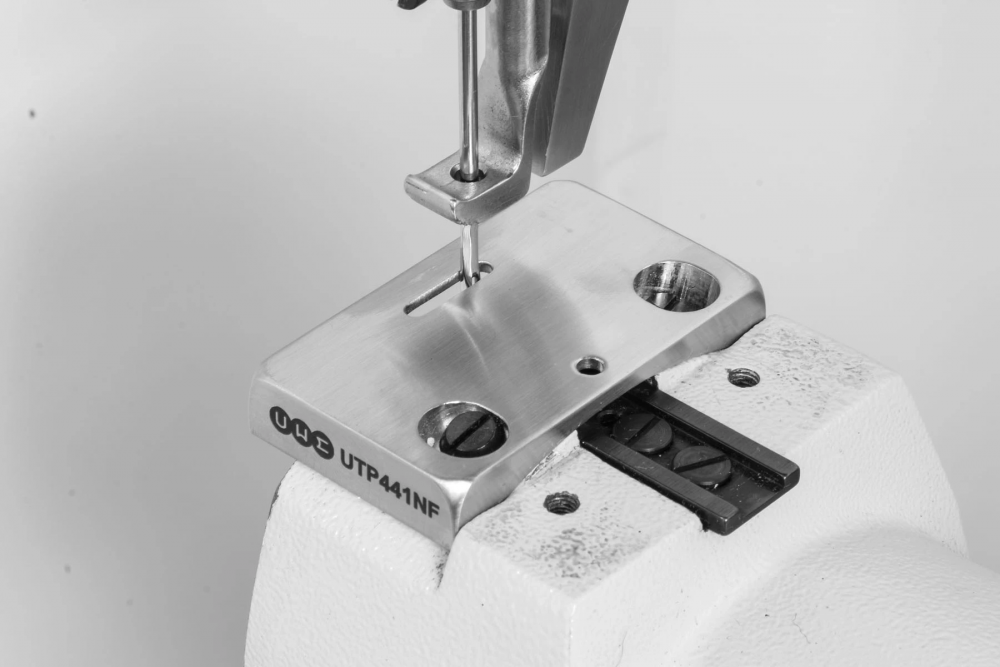
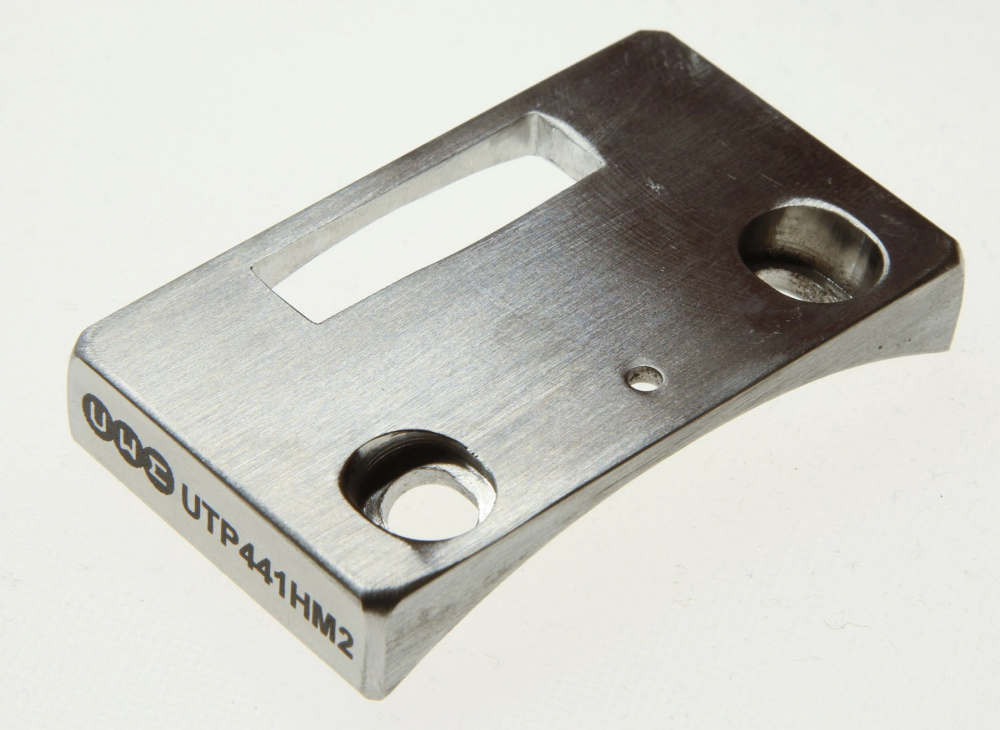
In general you want to look for parts without teeth to avoid the dreaded marks on the leather. Most Adler 205-370 I've seen already had smooth (tooth-less) feed dog and presser feet installed. The curved throat plates usually have some subtle teeth. I'm sure Weaver will be happy so sell you these parts if you don't already have them. You can also source high quality aftermarket parts directly from manufacturers like Kwok Hing (http://www.khsew.com/index.php?route=product/search&search=205). Shameless self-promotion: I make flat-top throat plates for needle-feed (UTP441-NF) and for use with feed dog (UTP441HM2) that are based on a throat plate design for the Adler 205 (my versions have no teeth and they also fit 441 class machines, hence the 441 name): -

Old 335-H3 restoration. Feed dog and plate problem
Uwe replied to Flaminio's topic in Leather Sewing Machines
Your Pfaff 335 was made in many different subclasses, some of them with parts unique to a particular subclass. The attached PDF file gives you some idea of the complexity behind the subclasses. Generic aftermarket parts often only cover the common high-volume parts. Few aftermarket manufacturers bother to make low-volume specialty parts for rare subclasses. You'll need more than just the throat plate and feed dog to turn your Pfaff 335 into a different subclass. Here's the PDF file with details: Pfaff-335-subclasses-old-casting.pdf -

Adding drop down guides ,,assistance,
Uwe replied to greystoneleatherllc's topic in Leather Sewing Machines
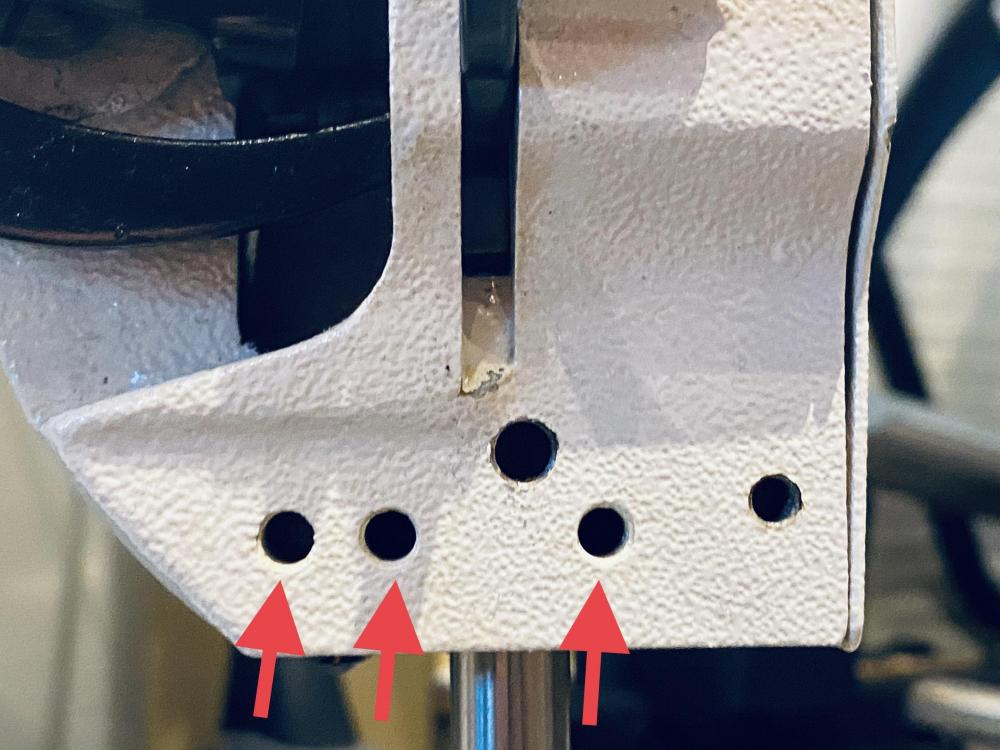
The hole positions on the Singer 211 look reasonable, but I don’t have a 211 to verify. On the Consew 227, however, your proposed hole on the right is directly in line with the presser bar - NOT a good spot! My 227 clone came with three tapped accessory holes as shown in the image below. Those are obviously good locations. -
Apparently a guy named Eli Schlabach is THE authority on Landis 16 machines. Eli is also the source for manuals and Landis 16 parts, for a price. Hopefully the contact info below is still valid. Member @shoepatcher posted the info below in another topic related to Landis 16: >>>>> You can contact Landis Sales & Service in Arthur, IL. Ask fro Eli Schlabach. He rebuilds Landis 16 machines and has parts and needles. He should have the manual and parts list. Their telephone number is 217-543-3464. Hope that helps. <<<<<
-
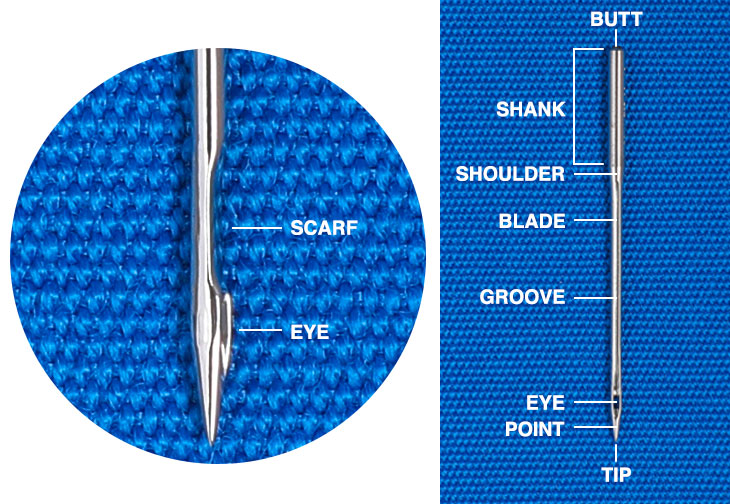
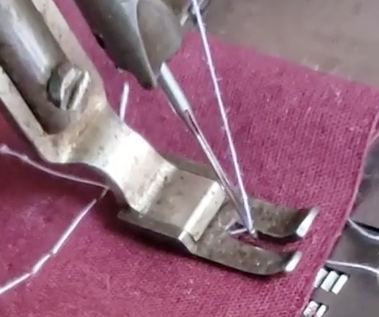
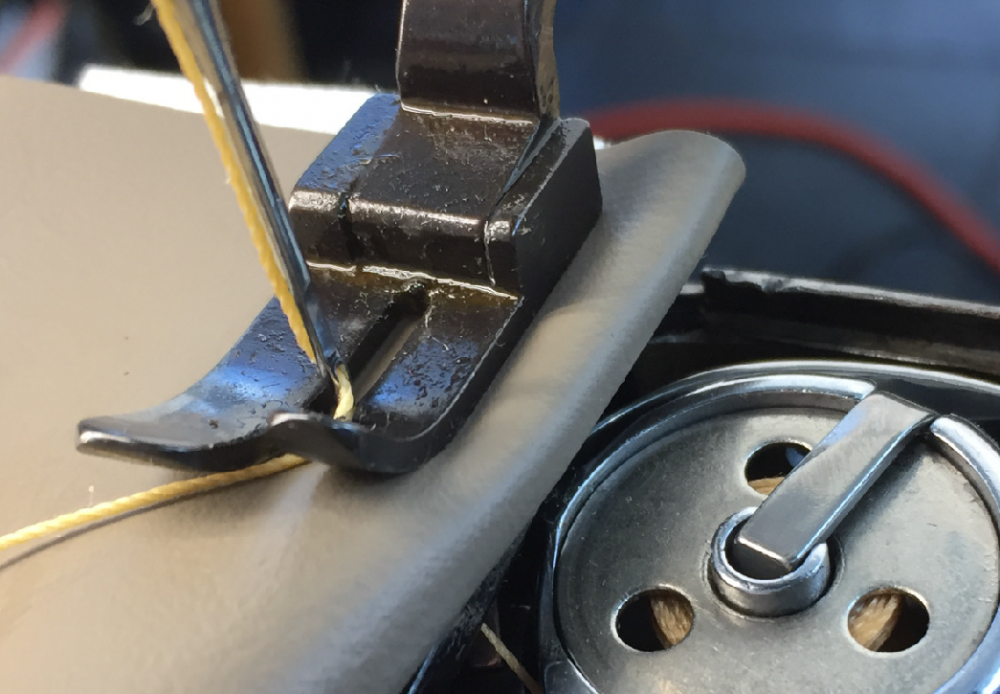
It looks to me like your needle is not installed correctly. The scarf of the needle needs to face toward the right, facing the hook. Your needle scarf is facing towards the rear on your machine (See screen shot of the video below.) Rotating the needle 90 degrees clockwise may resolve some of your issues. You're also missing a thread guide that is normally is attached to the bottom of the beedle bar - not a show stopper, but it will help with reliability. Also, just turn the machine over by hand until it picks up the thread reliably. Running the machine under motor power while things are not quite right may break something. This is how your needle should be positioned:
-
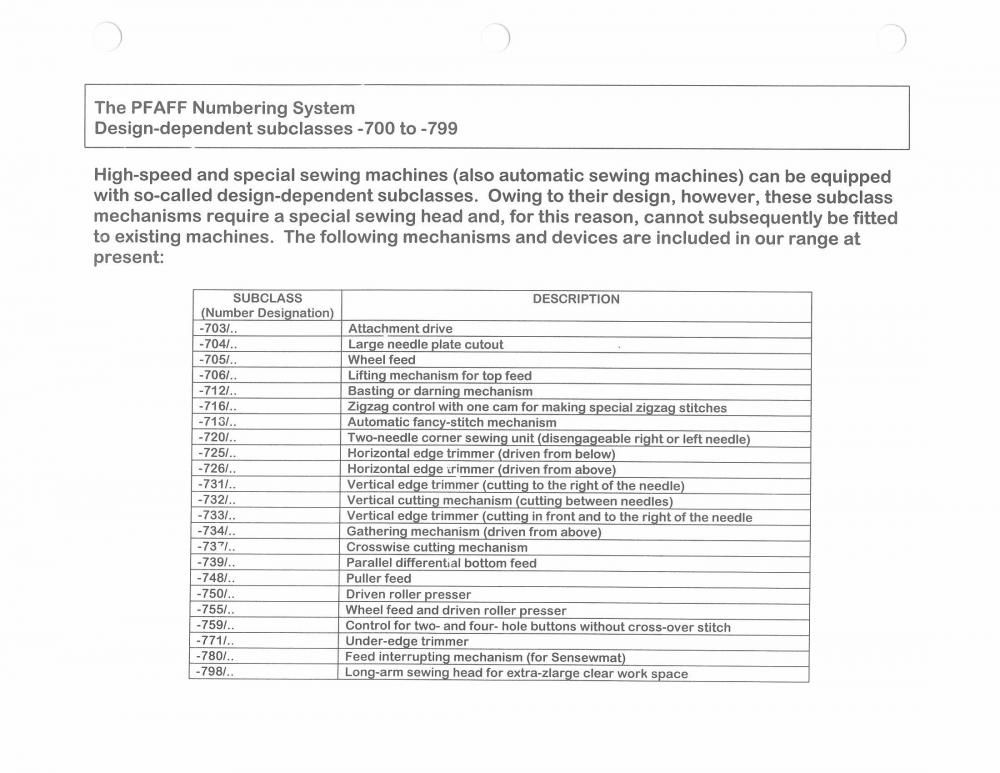
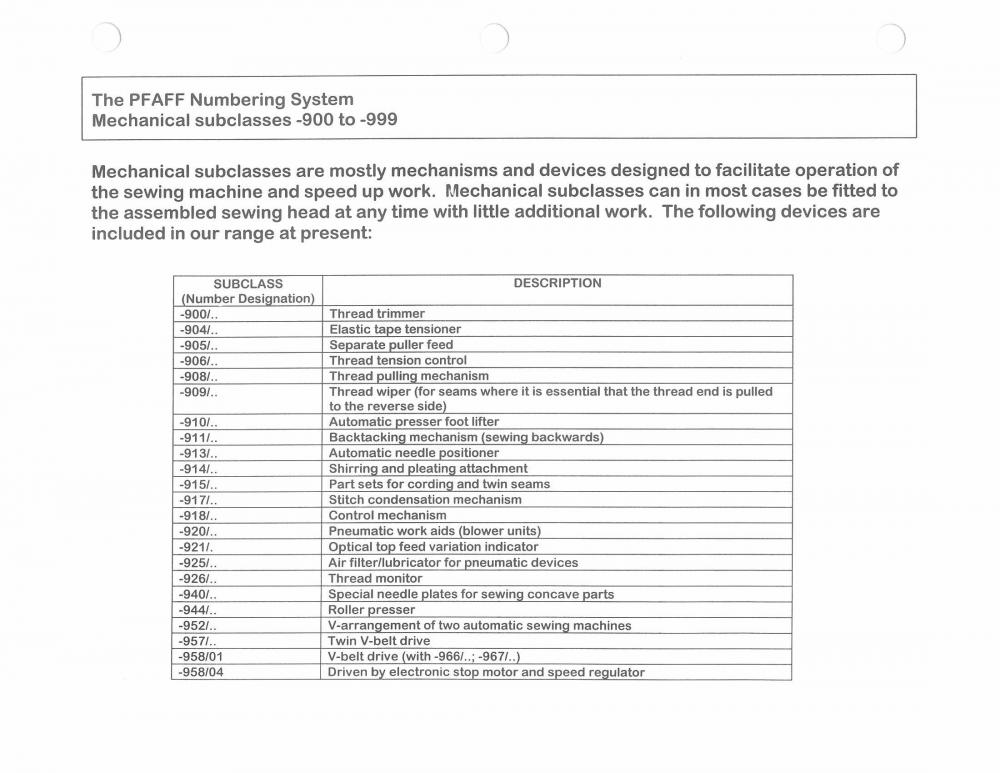
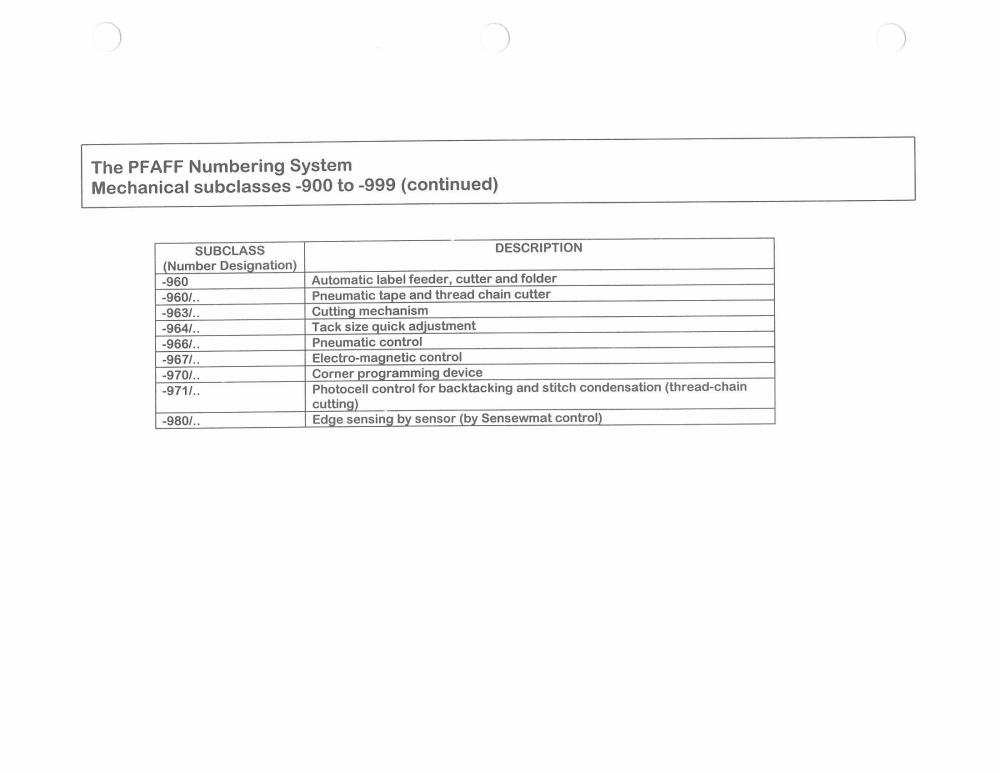
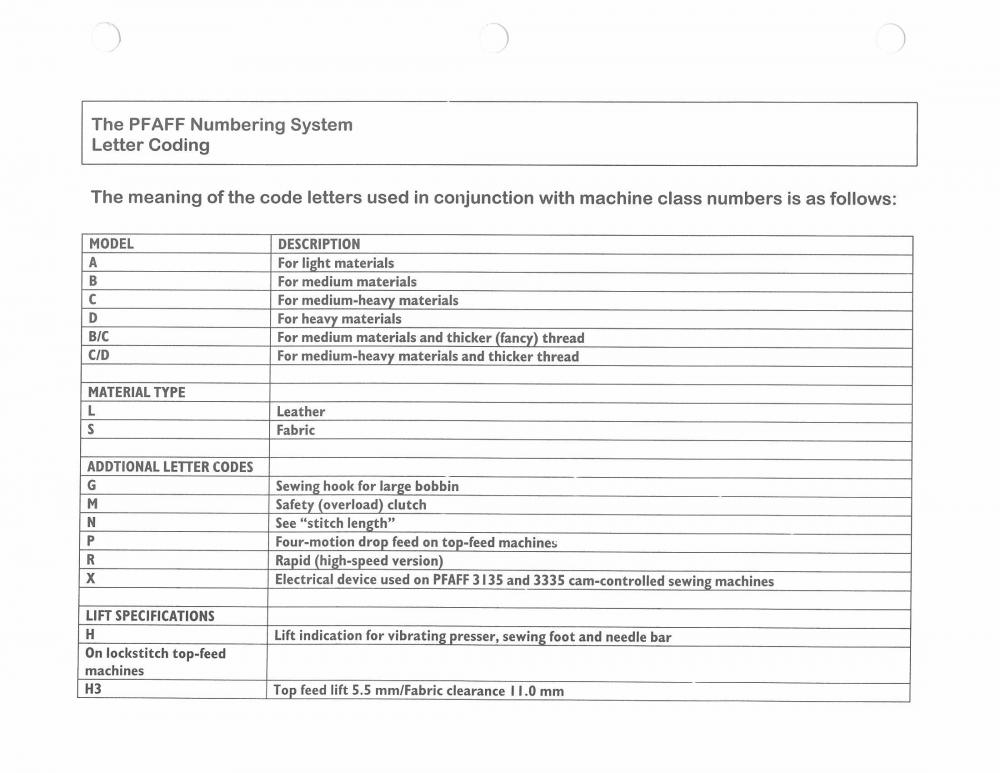
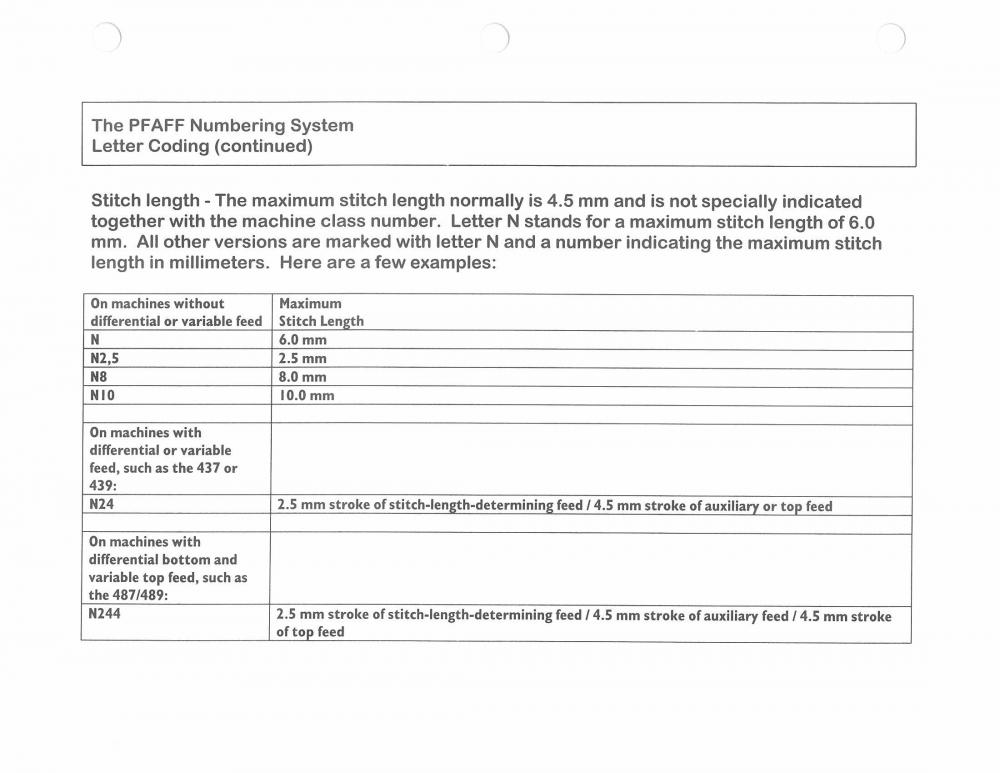
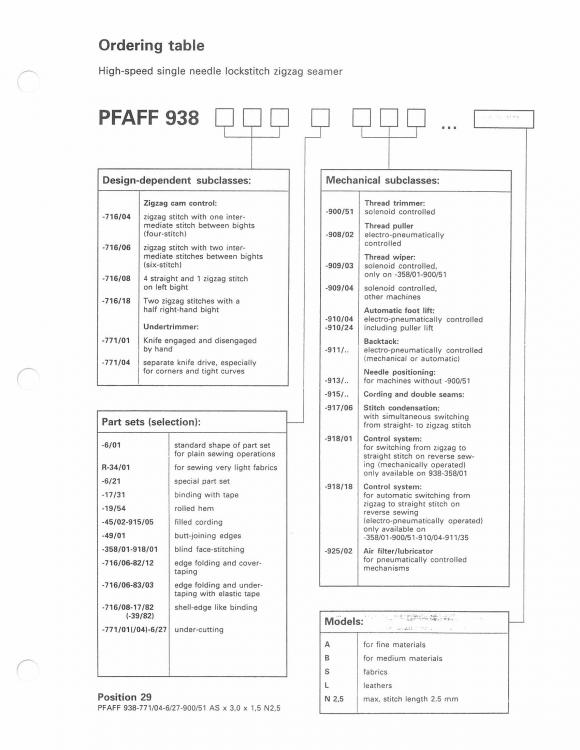
I keep getting requests for an updated link to the PDF file for the document "An Introduction to the Pfaff Numbering System" Here's the PDF file again: An Introduction To The Pfaff Numbering System.pdf Depending on how your web browser is configured, clicking the link above will do one of the following: 1. Open the PDF file directly in your browser 2. Open the PDF file in an external Adobe Acrobat Reader application 3. Download the PDF to your local device and you have to open it separately (check your downloads folder.) In case you have trouble opening the PDF file, here are JPEG versions of the pages: Hopefully this will help folks decode their Pfaff model designation. Cheers, Uwe
-
I made a video about this topic sometime ago, perhaps it will help:
-
I don't actually have one of those Dürkopp 17 machines, nor do I have parts for it, sorry! The picture I posted was just one that I found online to illustrate how the machines are indeed similar.
-
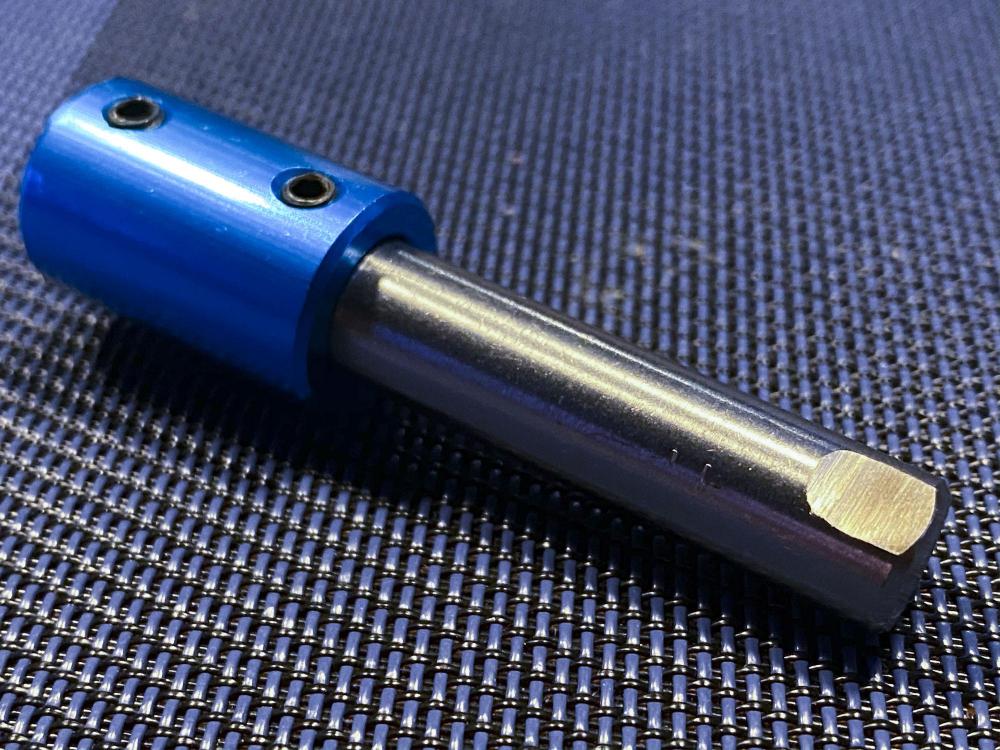
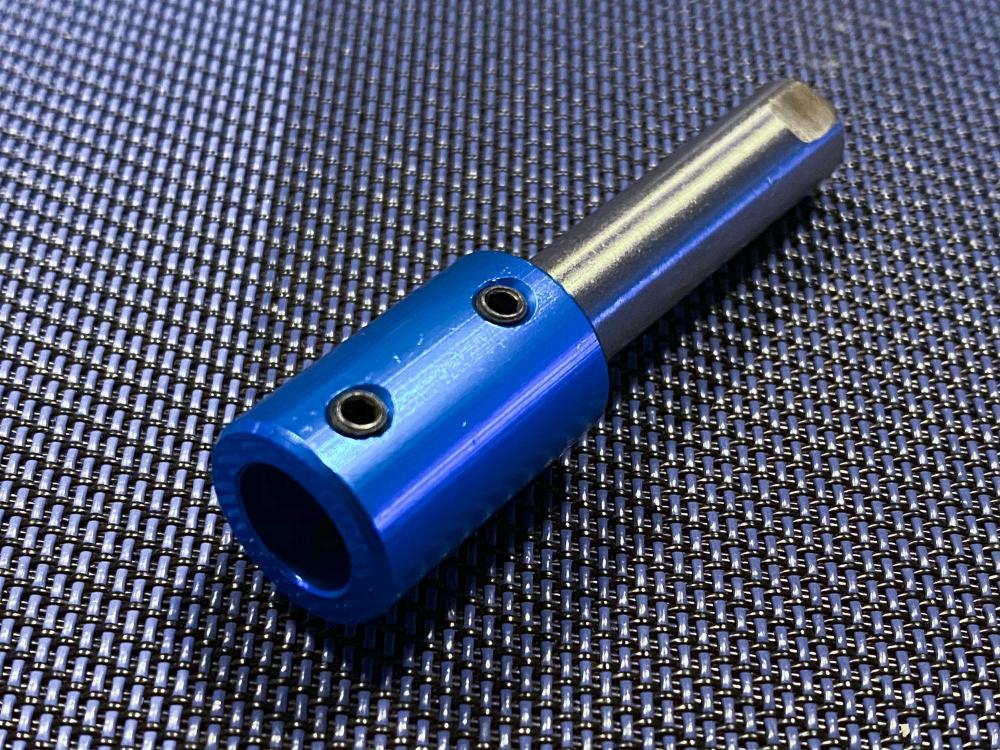
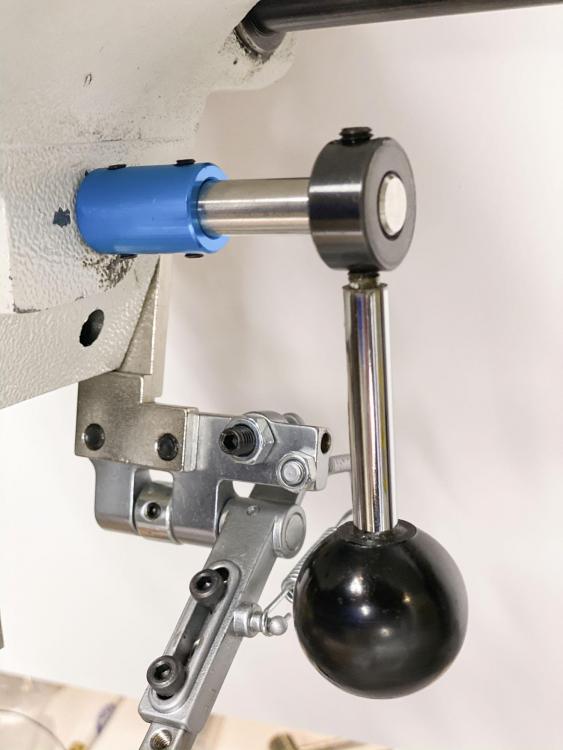
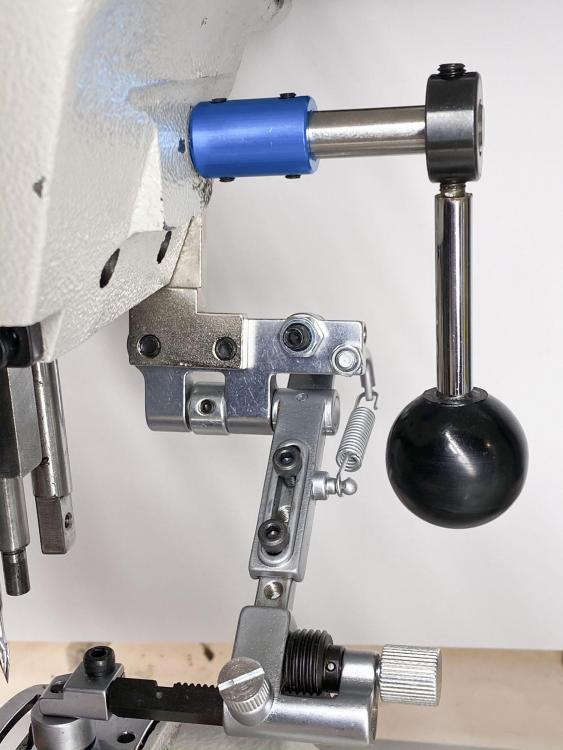
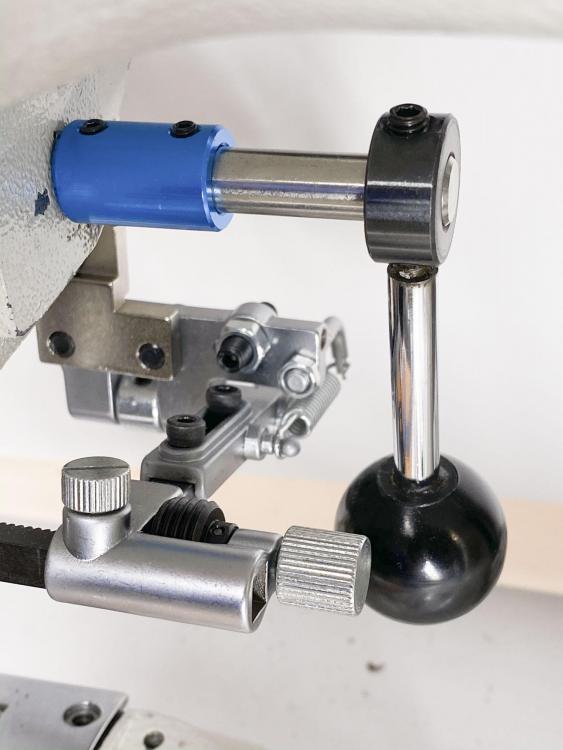
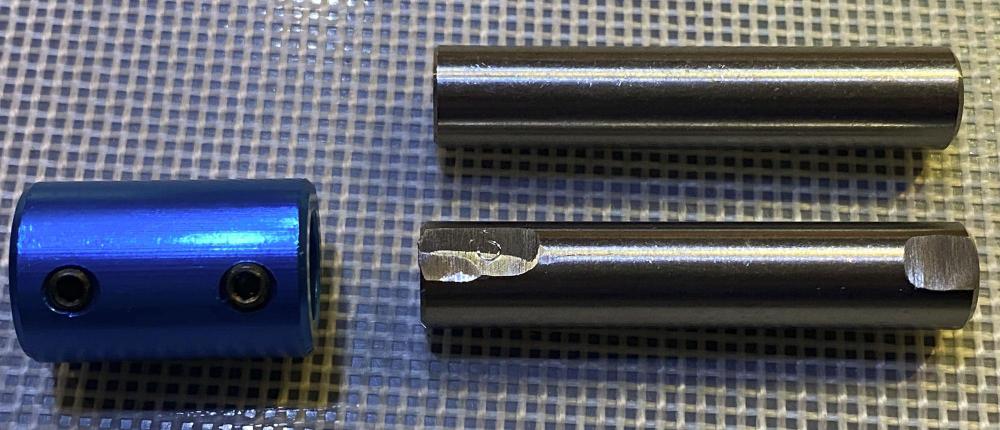
Lately I've been contemplating the recurring theme of footlift handle extensions for the 441 class of sewing machines (Juki TSC-441, Cowboy CB-4500 CB-3200, Techsew 5100, etc.,) mainly to avoid having to make more of my UX441 handles, which were just much too labor intensive to make. These footlift handle extensions become a necessity if you install a swing-down edge guide. The original handle interferes with the edge guide and needs to be either removed or extended. I think I found a decent solution that is low-cost, almost pretty, and it actually works. Most importantly, you can make it yourself from parts readily available on Amazon or Ebay. For about USD $15, you can make TWO handle extensions and still have one dowel pin left over. I don't think I can come up with a simpler solution, so this is likely my final take on this topic. The parts should be available outside of North America, too - shaft connectors and dowel pins are somewhat generic items. Here's the Amazon shopping list (with both blue aluminum and silvery steel shaft connectors) : https://www.amazon.com/hz/wishlist/ls/ISFGAFA3QMTY?ref_=wl_share The ONLY modification I made to the parts is grinding two flat spots onto the dowel pin, one on each end. This takes about one minute. Step 1: Remove the existing handle (this may be harder than you think - it took me nearly half an hour to get my glued-and-screwed-on original handle off using Acetone to dissolve the glue) Step 2: Grind two flat spots on the dowel pin Step 3 : Assemble the extension (see images below) Step 4: Attach original handle to the extension Step 5: Install extended handle back on machine(use Lock-Tite or similar glue to make it as permanent as you want) Here's a picture of the parts. The dowel pin on top is the original, the bottom one shows the two ground flat spots: Here are the pictures that show the assembled extension by itself: Here's how the complete assembly looks installed on my Cowboy CB-3200: If you don't think you can handle this DIY task, you can buy the handle extension ( I call it UX441N ) alone or as part of an edge guide kit on my website at http://uwe.store soon.
-
Sorry, I have none left. A few sellers on Ebay have them, just search for "KB267", order and then be patient for free shipping from China.
-
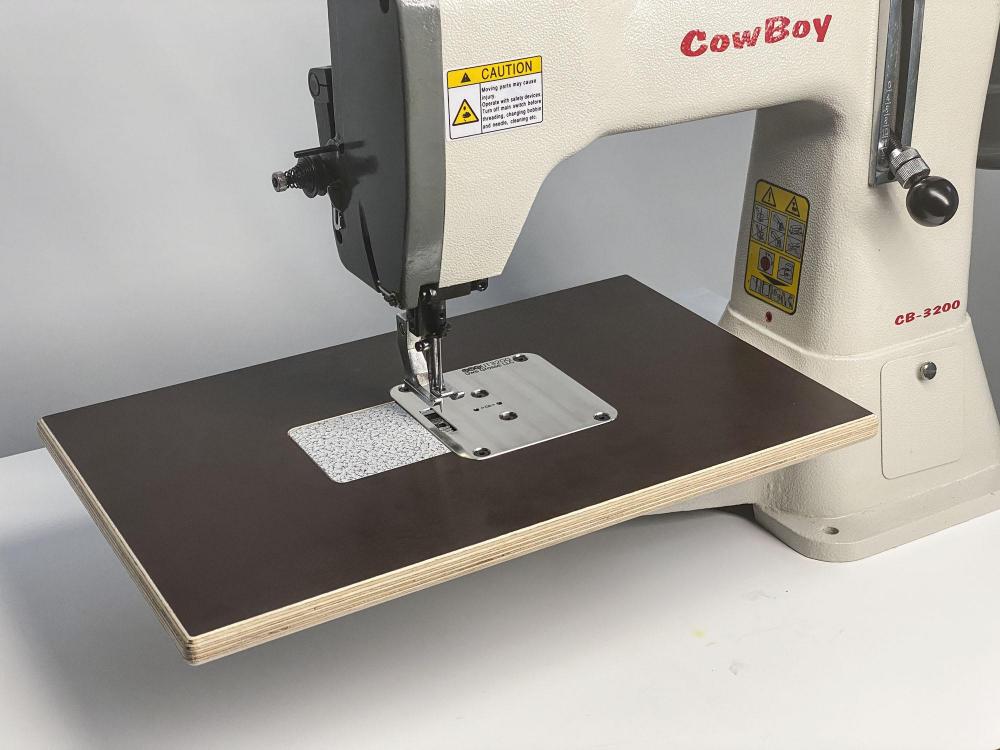
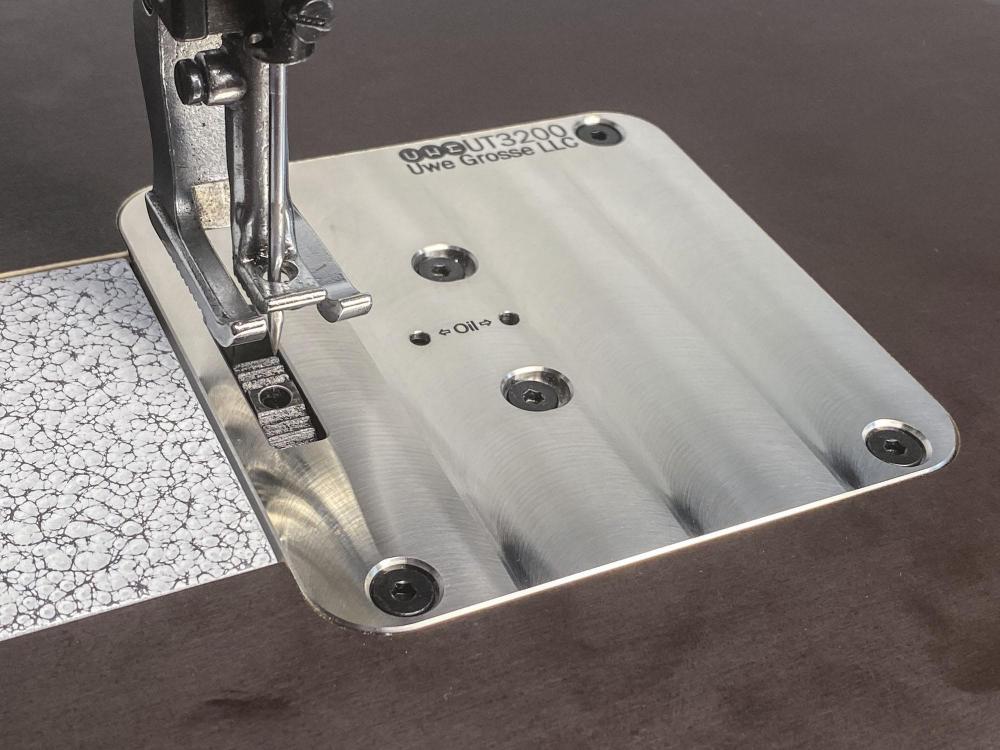
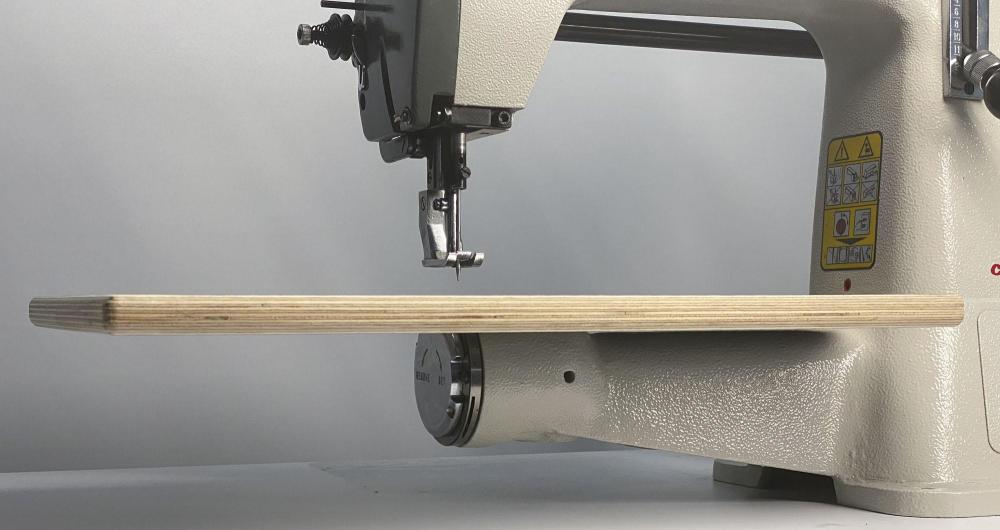
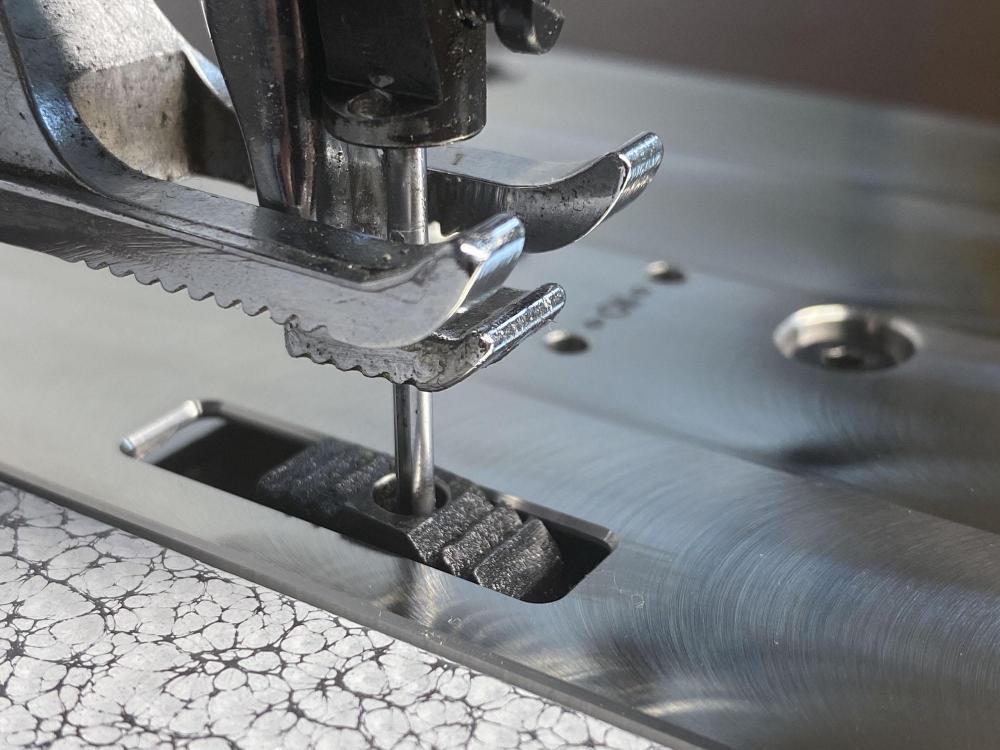
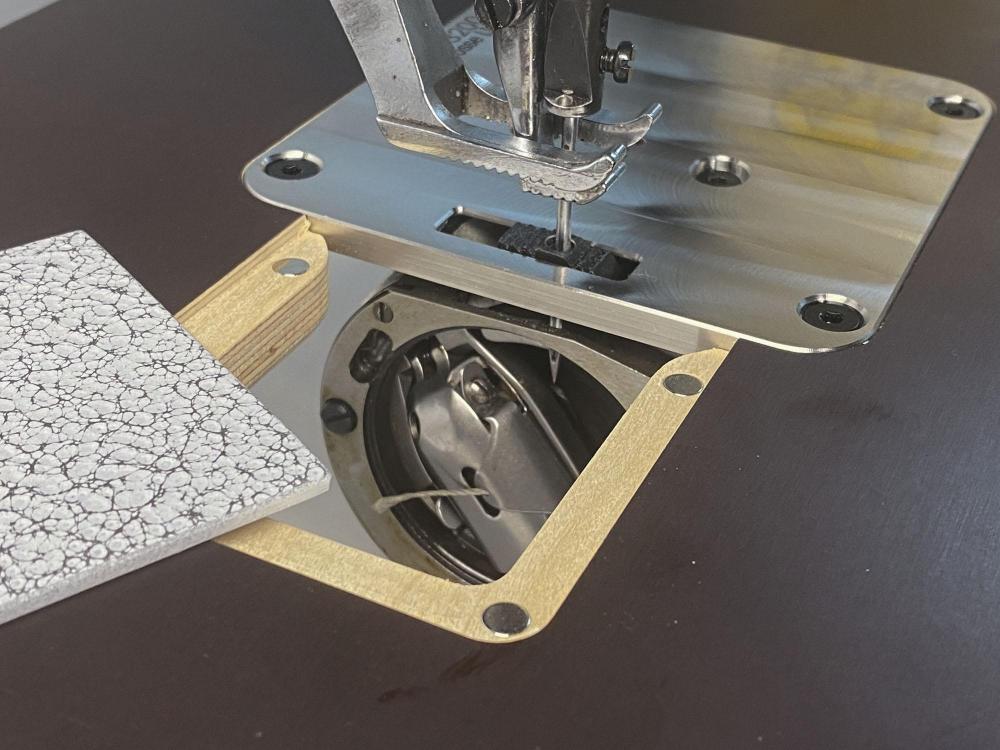
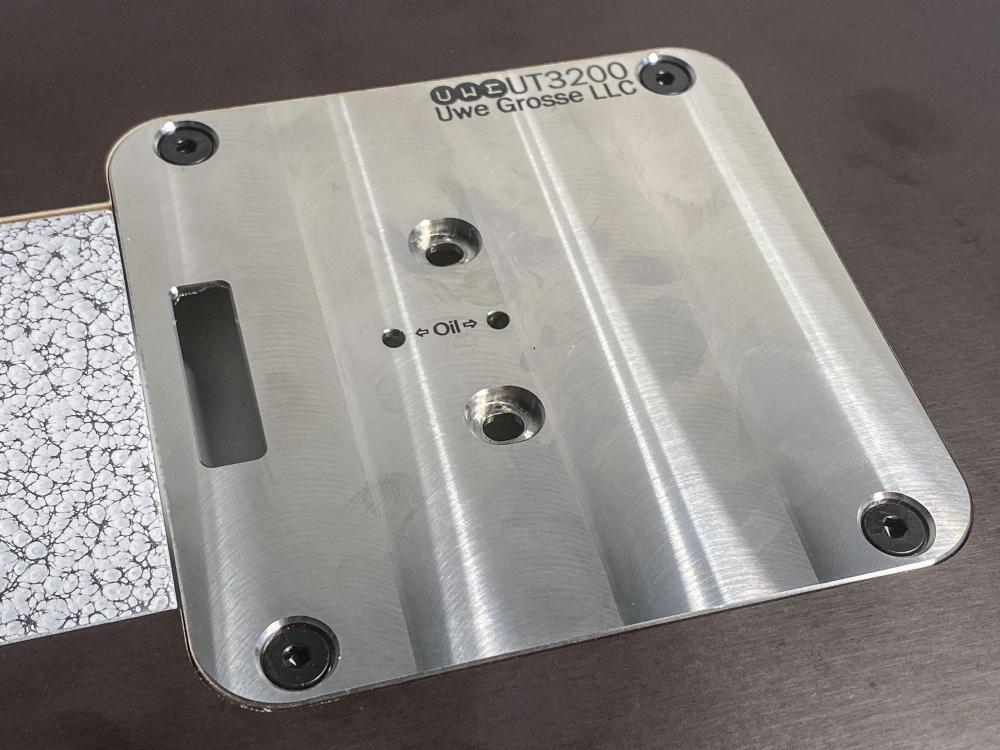
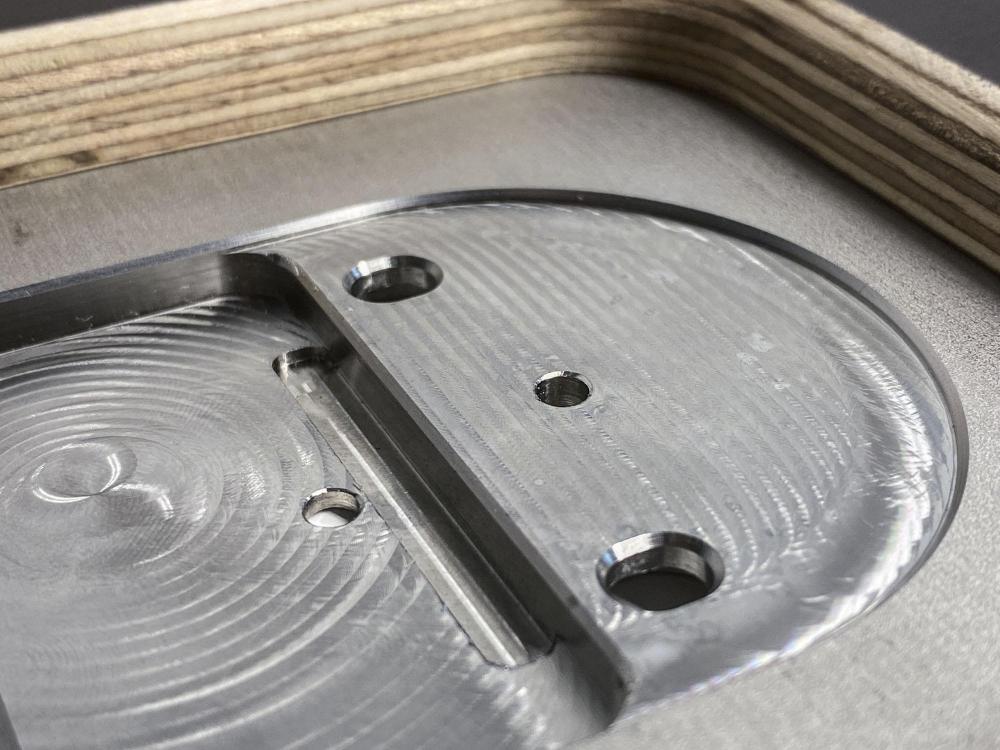
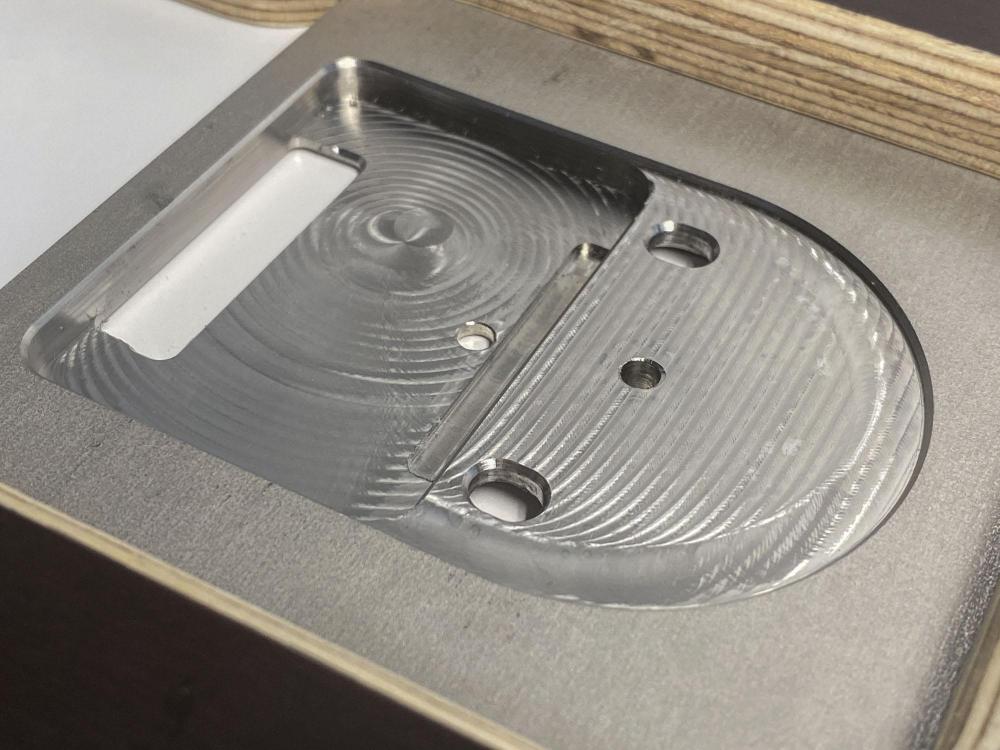
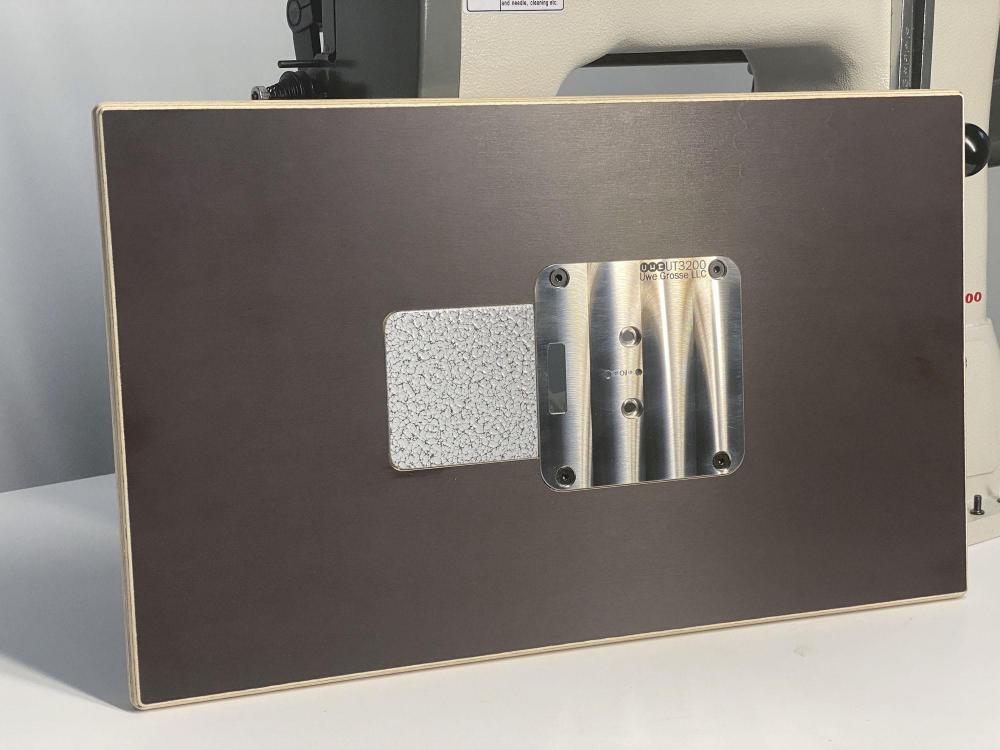
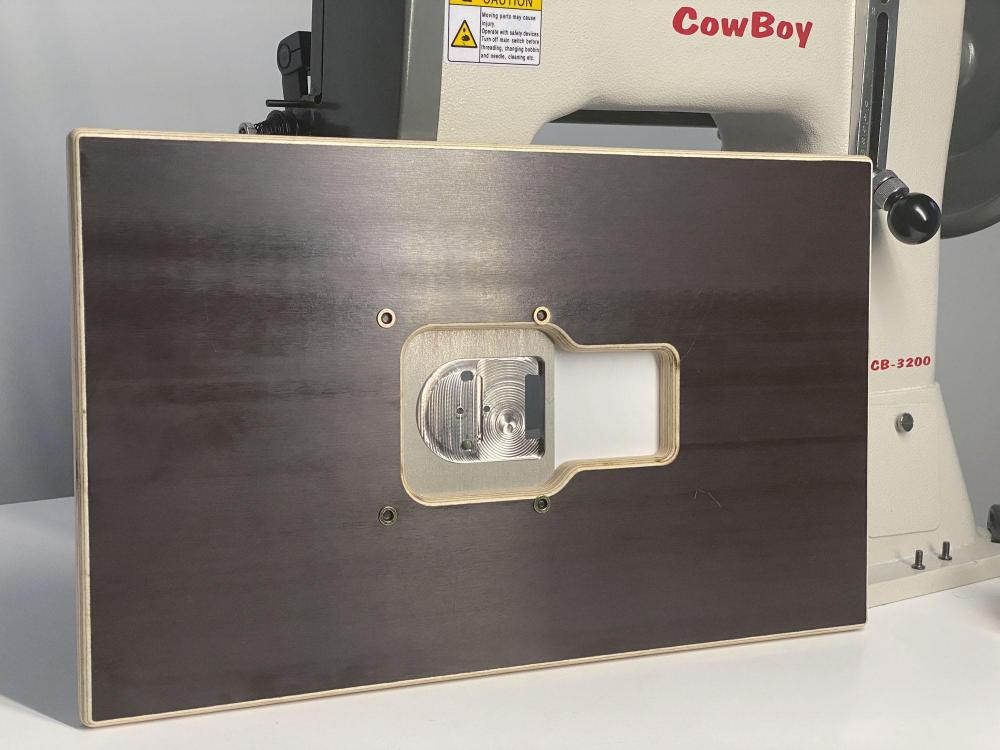
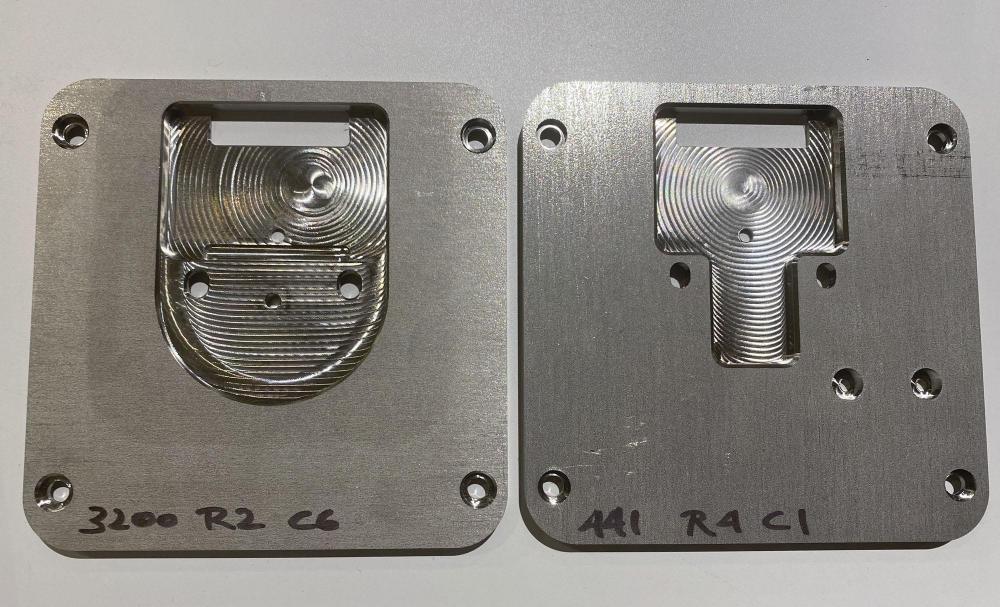
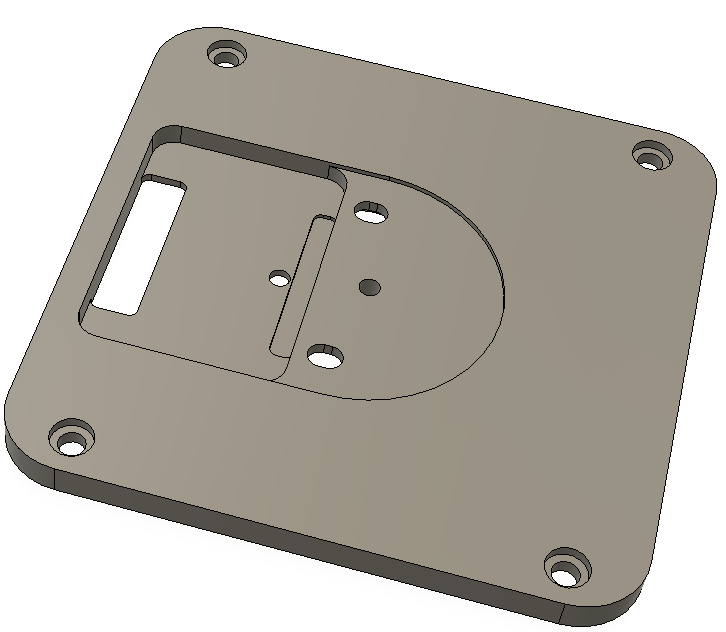
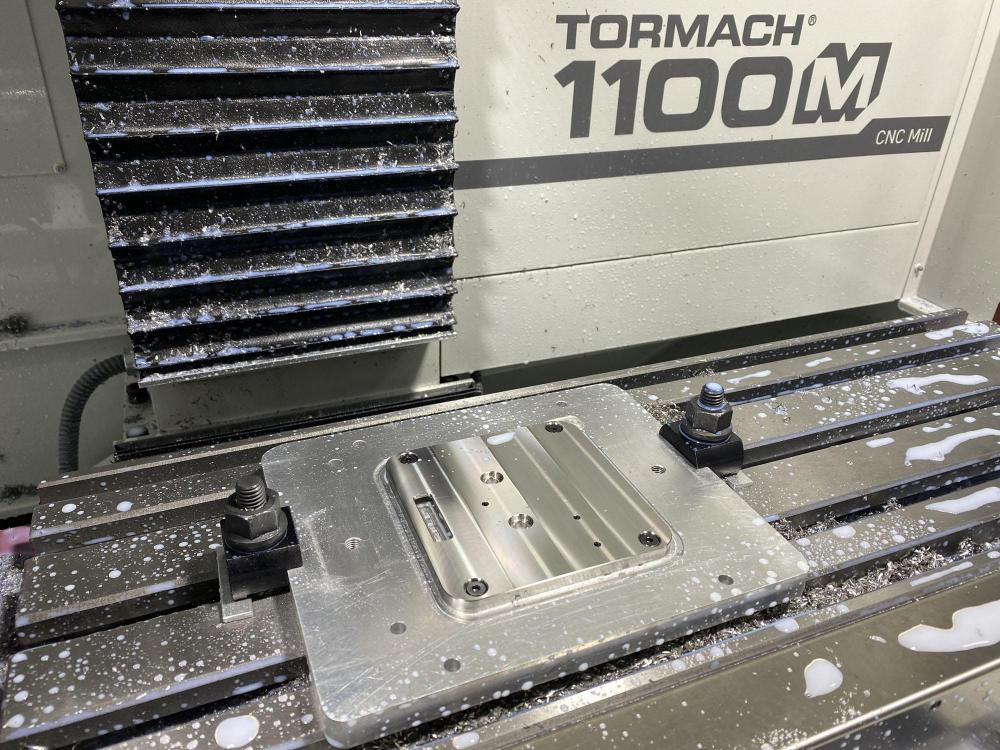
Sorry about the little infomercial, but I finally got around to making a flatbed attachment that fits the Cowboy CB-3200 machine. I call it the UT3200. It's available in my webstore at http://uwe.store I had hoped to make a mounting plate that will fit both the 4500 and the 3200, but soon abandoned that idea. The design in the mounting area of the arms is just too different. It took half a dozen prototypes to get it right. This little exercise reinforced the notion that you simply won't know for sure until you try it out. The Cowboy CB-3200 also lacks the mount point in the middle of the arm like the CB-4500, but it turned out plenty sturdy in my opinion. The UT441 and the UT3200 look deceptively similar from the top, but they are NOT interchangeable! The underside of the mounting plate is quite different: Here's the image of the CAD model of the underside of the UT3200 plate: Here's what the mounting plates look like coming off my new Tormach CNC mill (UT441 plate) It turns out the CB-3200 only looks like the little brother of the CB-4500, but in reality it's a distant cousin, once removed. The UT3200 *may* fit a few other short arm machines but, again, I won't know for sure until somebody tries it out. Here are a few photos of the new flatbed table attachment followed by the installation video: Here's the installation video:
-
You got yourself a really good deal there! The downside is that everything else associated with this machine will appear wickedly expensive in comparison. Kwok Hing makes very nice presser feet for the Adler x67 and x69 series (http://khsew.com) some are knurled, some are perfectly smooth. Don't obsess over the "very aggressive knurling", just try it out and see if it works for you. Thread and needles specs are listed in the manual, generally size 138 thread is your max on this class of machine, needles are spec'd at a rather narrow range of 120NM-150NM. The brochure and user manual has details. Adler 67-372-373 Brochure.pdf Quick Guide.pdf
-

Show & Tell: Thumb Controller For Needle Positioning
Uwe replied to Uwe's topic in Leather Sewing Machines
I think that spline shaft belonged to a second potentiometer that was originally wired in series with the pedal-driven potentiometer. It’s only used to offset pedal volume in the original music application of the pedal. It’s not used for the motor control modification. -

Adler k204-370 forward return spring??
Uwe replied to William74080's topic in Leather Sewing Machines
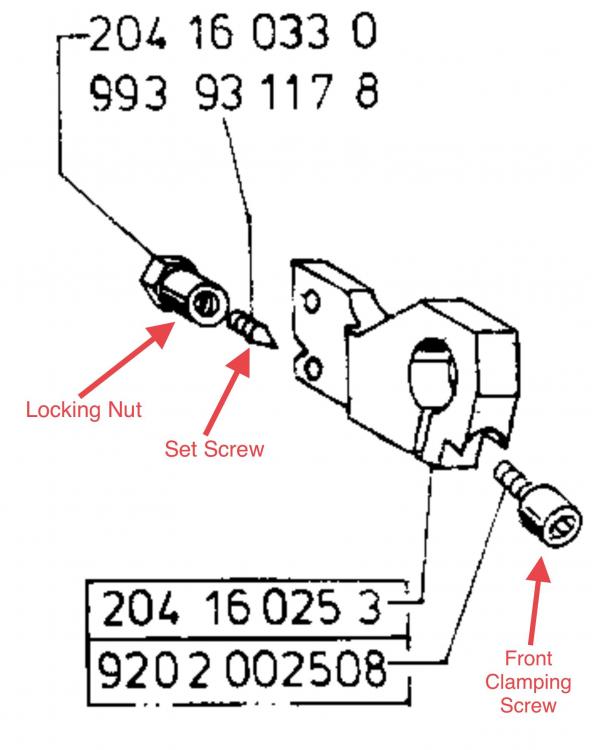
Normally the reverse lever on the DA 204/205 has enough friction to stay wherever you put it. The DA 204/205 lever mechanism is different from the Juki 441 class that uses a return spring. You can adjust the lever friction in two different ways. 1. There‘s a small set screw inside an outer locking nut directly behind the reverse lever on the backside of the machine. Loosen the outer lock nut and then you can adjust the inner set screw until the friction is „just right“, meaning you can still move the lever and it stays wherever you put it. Small adjustments do the trick. Don‘t loosen that set screw all the way - it‘ll disconnect from the part it‘s holding and then you have to disassemble a few pieces on the top to get access to put everything back to where it was. The set screw needs to sit in side the notch on the larger clamping part. 2. Adjust the clamping screw that is accessible under the lever ( a little tricky to see and get to) Hopefully the snippet from the parts diagram will help illustrate the parts I‘m talking about. In my experience both adjustments work fine and I honestly don‘t know which way is „better.“ The screw on the backside of the machine is easier to get to but also more prone to causing problems if loosened too much. -

Speed Reducer mounted directly onto Servo Motor
Uwe replied to Constabulary's topic in Leather Sewing Machines
Thank you for inventing this elegant and simple mounting solution and sharing the details with us. Thanks also for the sourcing links - interesting that the identical part is available in Germany for a mere third of what vendors here in North America charge. -
That's a "no" on both questions, sorry!
-
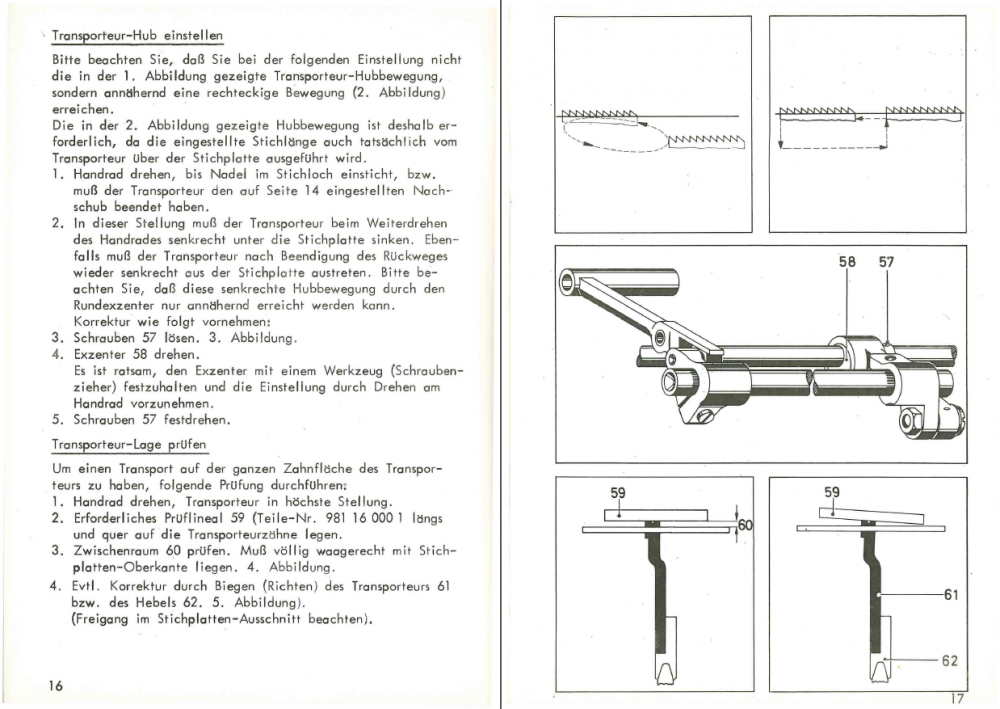
I only have the German language version of the Adler 68 Service Manual: Adler 68 Justieranleitung.pdf I does describe how to adjust the feed motion to make it as close to a rectangle as possible on Pages 16 and 17. Basically, the eccentric 58 can be adjusted to change when the feed dog comes up and goes down.
-
Can you post a few picture of your machine from all sides, including the top and underside? It seems to me the feed motion needs to be advanced a little so that it is all the way forward by the time the needle comes down. It's hard to guess exactly how your machine is configured underneath. My Adler 68 had independent top and bottom feed, so it probably looks very different from your machine underneath. In any case, a few detailed pictures with good lighting and focus may allow us to suggest possible adjustments and draw arrows on the pictures to explain what we are talking about.


