Uwe
-
Posts
2,221 -
Joined
-
Last visited
Content Type
Profiles
Forums
Events
Blogs
Gallery
Store
Everything posted by Uwe
-
The twice-per-handwheel-turn tightness/friction points to something that moves or rotates twice for every full hand wheel rotation. The hook area is a key suspect since parts move twice for handwheel rotation. I’ve worked on machines where the large hook driving gear was not centered very well with the smaller gear on the hook’s shaft. It’s possible to adjust hook timing correctly even with the large gear being off-center with the small hook gear. Since you slide the large gear sideways to adjust hook timing it will end up being slightly off-center most of the time. A problem may arise if the large gear is far off center relative to the small gear. If that’s the case you can separate the gears and adjust the tooth meshing by one tooth to get the large gear to run better aligned with the hook axis. Running the large hook driving gear near the gear’s edge may cause tightness because of imperfection of the gear teeth near the edge. It also takes just a little bit of dirt or grit stuck between the teeth of the hook axis gear to cause tightness or friction on every hook rotation, or twice per hook driving shaft rotation. Some oil and a (dedicated) old toothbrush do a nice job of cleaning gear teeth. Dirt stuck in the mechanism that drives the bobbin case opener is also a suspect.
-
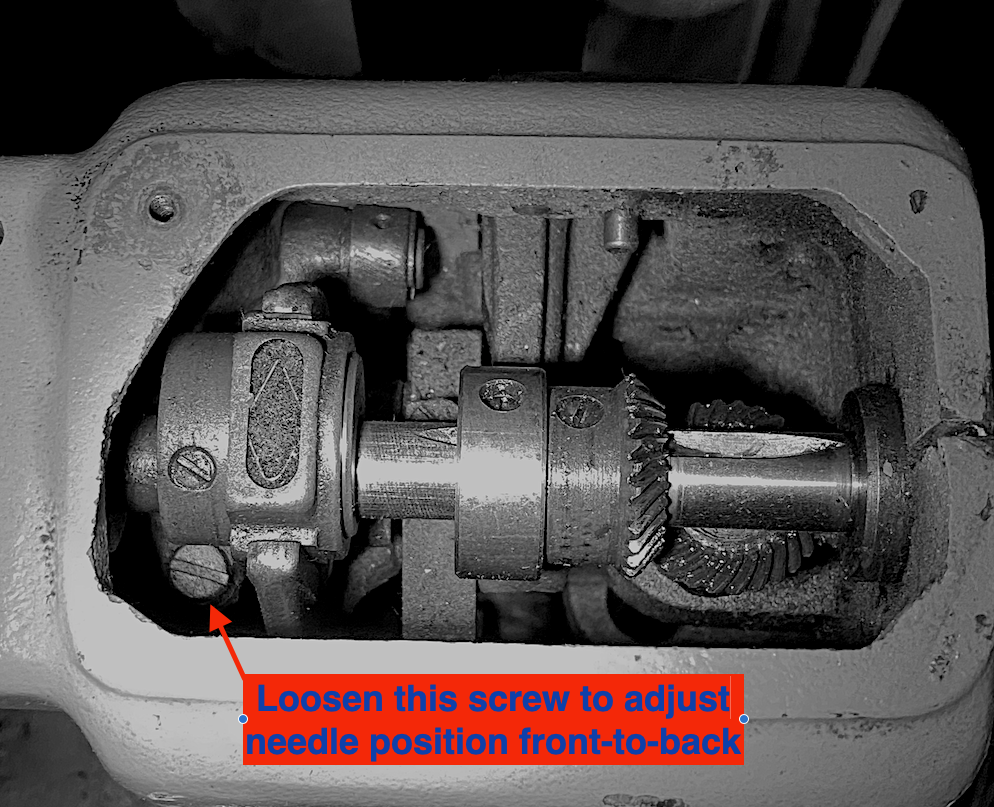
The screw they're talking about is accessible after removing the cover on TOP of the machine. Loosen the screw shown in the photo below to adjust the needle position front-to-back relative to the feed dog hole. After you loosen the screw you can push the needle bar by hand front to back to the correct position. Tighten the screw well after adjustment. Test movement and alignment by hand before using motor power.

-
 I looked for more info on this. As it turns out, the correct needle position for no movement when flipping reverse lever is neither BDC nor hook-timing position - it's in between. The manual linked below contains some service instructions at the end: Pfaff 145 545 User Manual.pdf The screenshot below shows the relevant feed driving section from that manual The feed driving eccentric is shown this picture. You can loosen both set screws and rotate the eccentric on the main shaft to adjust the timing of the feed driving motion. Your non-P machine will not have the eccentric on the left, which controls lifting motion of the feed dog. This video goes over how the walking foot lifting motion should be adjusted. Yours looks pretty good as it is:
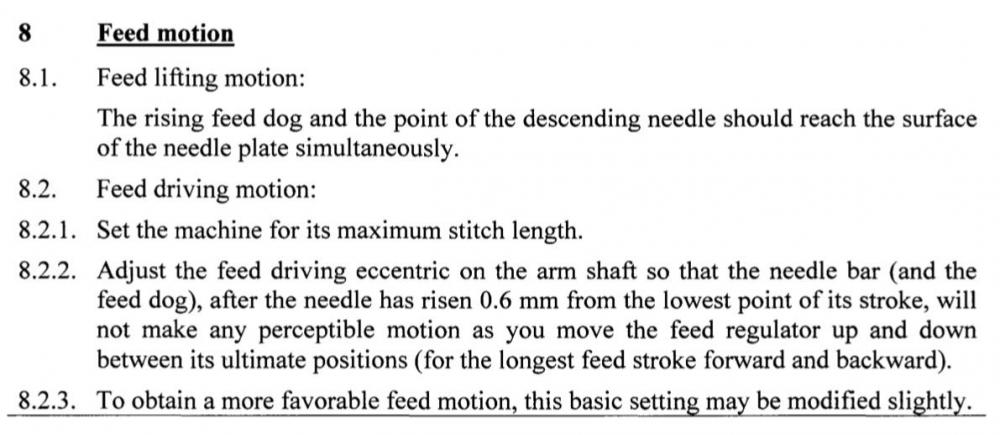
-
Thanks for that video - nicely done! I really don't see anything obviously wrong that needs to be remedied. The feed dog definitely does not move up/down. But it has a pretty good front-to-back movement - try to measure that if you can. I have a feeling it actually moves more than 6mm. Then the real world decrease in stitch length may have to do with how much the material may slip during the stitching. Sometimes the act of pulling the knot tight also pulls the material forward a little if it's not held in place securely. Your current feet and feed dog have a fairly small footprint. Be careful not to run the machine under power with the throat plate removed (bad things may happen if the bobbin case rotates freely). Also make sure you align the tab of the bobbin case in the cutout under the throat plate when reinstalling it. My recommendation would be not to obsess over the exact maximum stitch length for now. Just get the machine sewing as well as you can. Then you can fine tune things one step at a time. One candidate may be the eccentric that generates the feed movement - it may not be perfectly "centered". Normally, when the hook is in hook-timing position, moving the reverse lever should NOT move the needle at all. I had one machine recently where that was the problem. I had to rotate the feed eccentric on the main shaft to center it with the hook timing position. I'm leaving on a camping trip shortly, so I may be offline for a while
-
Congratulation on your Pfaff, they are generally really good machines. The model letter code of your machine does not include a “P”, which indicates that your machine does not have a four-motion feed dog. The feed dog only moves front to back, but not up and down. This feed mode is often found on machines intended for binding operations. The feed dog does not drop down to get out of the way as it moves towards the front. Friction from the feed dog rubbing against the underside of the material as it moves towards the front may cause the material to slip a little and shorten stitch length. I’d recommend doing a stitch length test with a piece of cardboard or thick paper, and without top thread. You can print out this template to make it a little easier: http://docs.uwe.net/slg.pdf You can also just measure the how far the needle moves front to back as you flip the reverse lever up and down. Turn the hand wheel until the tip of the descending needle is level with the throat plate. Then move the reverse lever up an down. Put a ruler next to the needle to measure how far the needle moves. This measurement is the max stitch length the machine can produce with current adjustments. If the stitch length on paper is far below the 8mm target, you may need to look into timing of the feed movement. For example, if the needle penetrates the material before is reaches the very front of its feed movement, it will also shorten stitch length. Get ready to take some clear close-up photos or better yet a video of your machine’s feed movement.
-
First leather sewing machine: Pfaff 545-H3-6/01 or Singer 111G156?
Uwe replied to johnny91's topic in Leather Sewing Machines
Just my 2 cents: The Pfaff gets my vote by a pretty good margin. Key parts like feet, throat plate, hook, thread tension unit, etc. are all readily available from various vendors, both OEM and good quality aftermarket. A properly adjusted Pfaff is a thing of beauty and a joy to use, in my experience. -
For me that Gumtree link points to a domestic Janome serger. Please copy/upload some pictures directly here, so that we know what you’re looking at long after that original link becomes useless. It may already be too late for that.
-
Durkopp Adler once made a set of parts specifically for making purse straps like the one you pictured https://sew24.blogspot.com/2012/09/sew-luxury-leather-bag-handles-with.html?m=1 Unfortunately, the Durkopp Adler 205-370 machine went out of production over ten years ago and may not fit your budget even as a used machine. Copies of the DA 205-370 are still available for purchase for around $3-4K.. Regardless, it’s a good reference point for the type of machine that would be perfect for that particular task, Anything else will be a compromise. Purchasing ready-made straps may be the way to go.
-
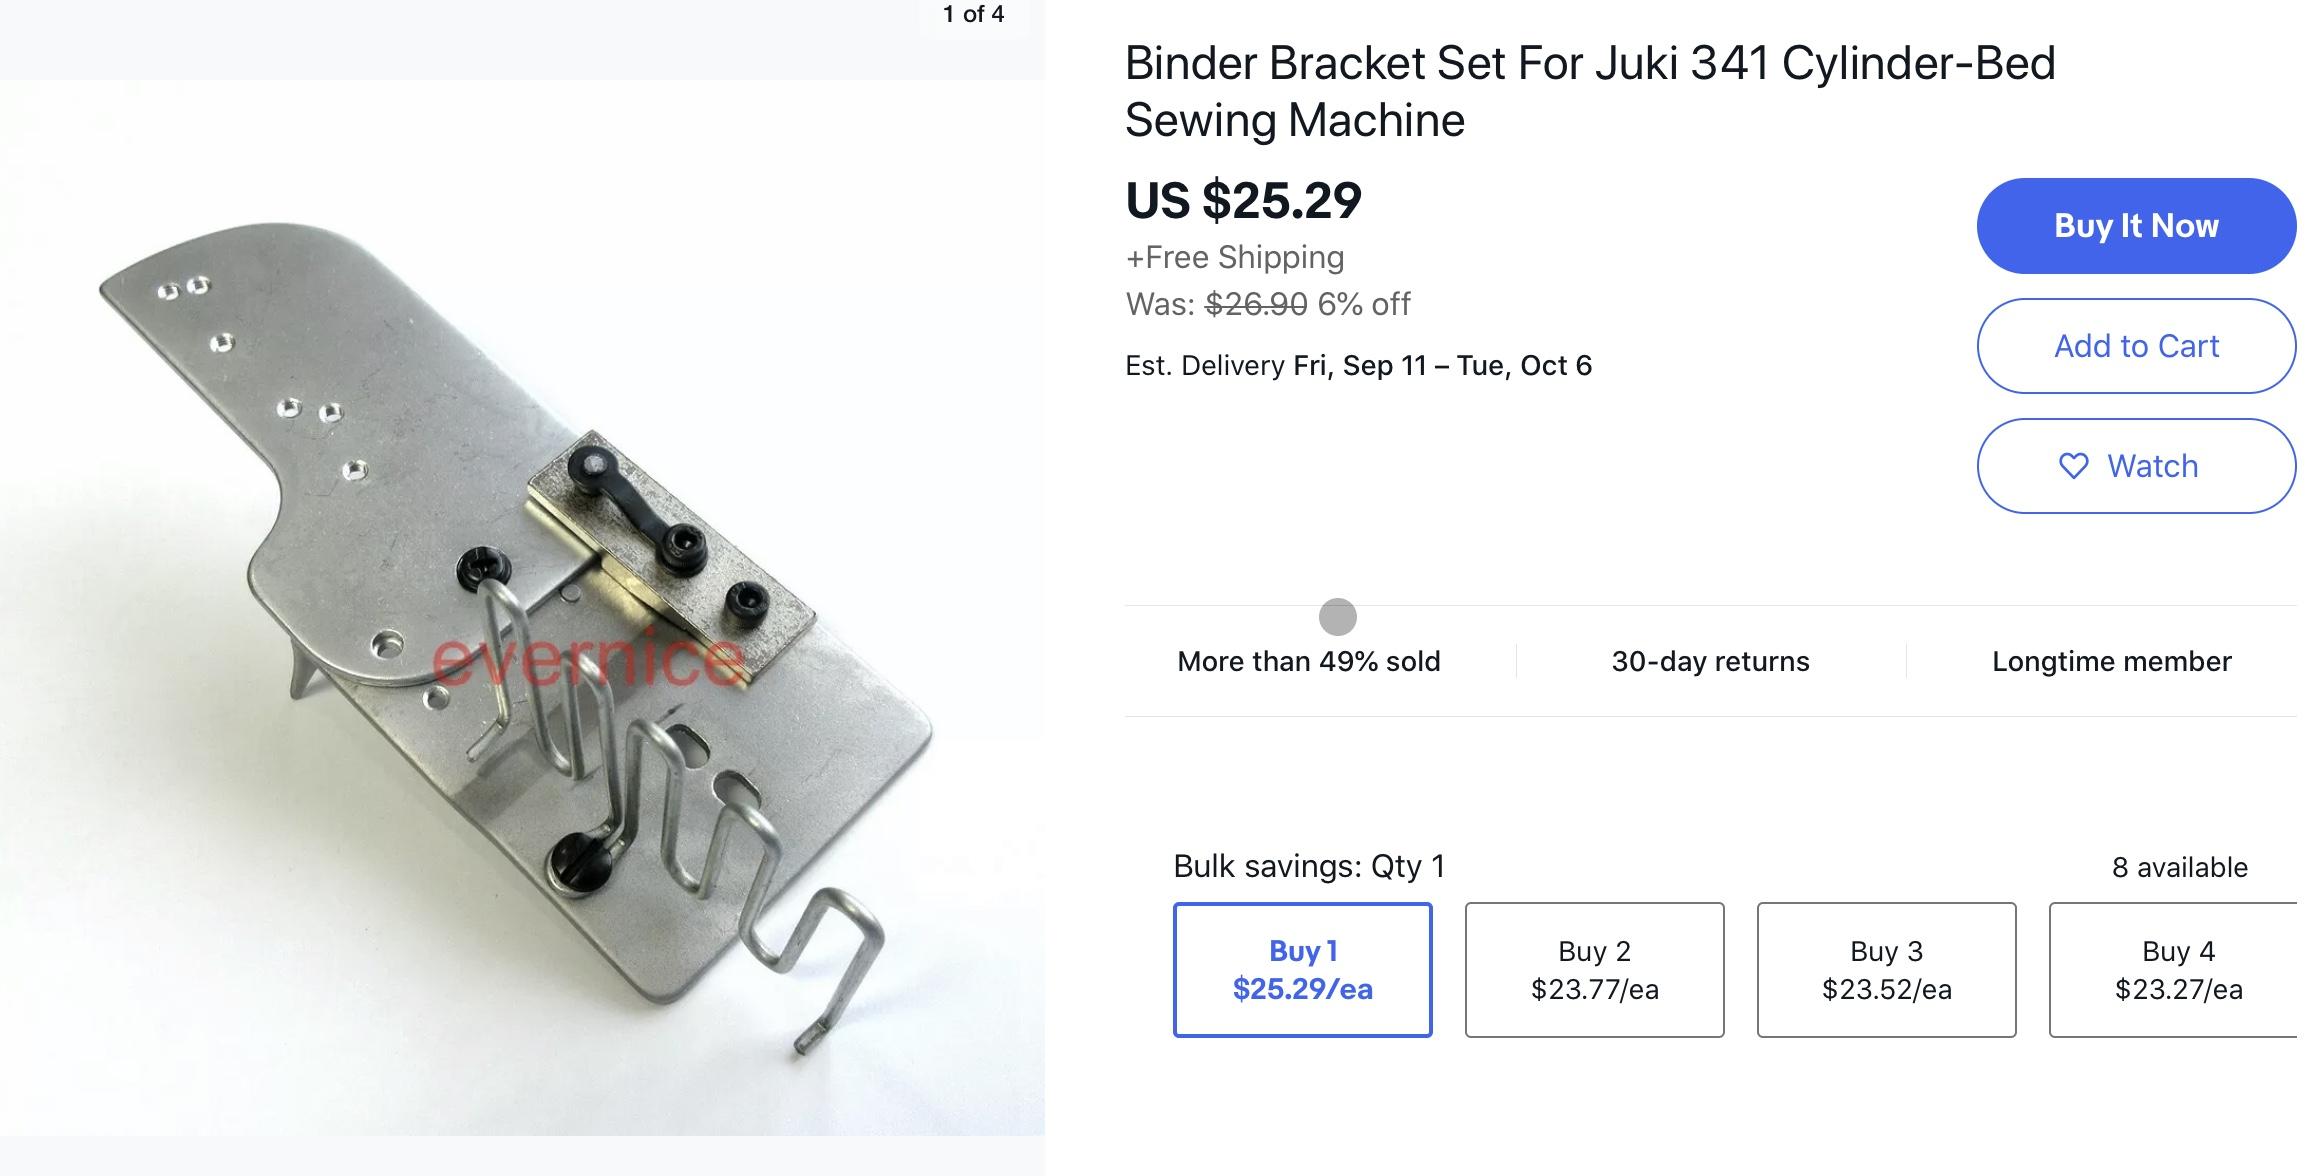
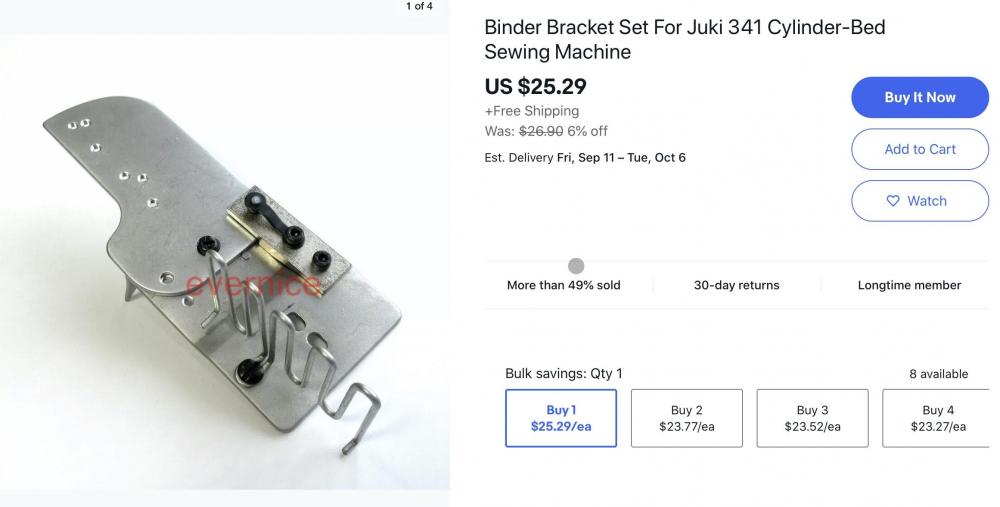
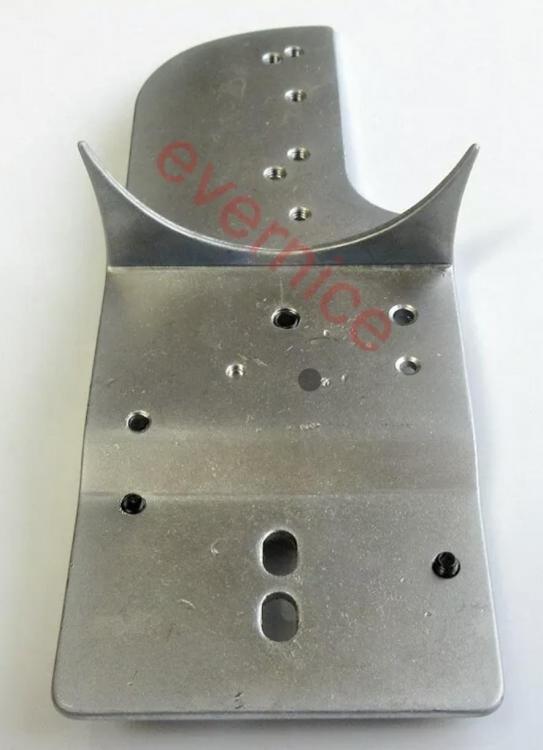
I just ordered that bracket from Ebay to evaluate it out on my Juki LS-341. I’ll report back in a month or two.
-
You may no longer have the original needle bar in that machine, who knows. If it is some cheap aftermarket part, it may just not be to spec or the needle hole is a tiny bit off center or angled. One way to check for that is to loosen the needle bar clamping screw and rotate the needle bar. Observe the tip of the needle as you rotate the bar. If the tip of the (new, unbent) needle moves in a circle while you rotate the bar, then the bar itself is faulty and needs to be replaced. I strongly advise against trying to move the position of the upper casting, little good can come from it. It may not be possible at all due to registration pins, and I strongly suspect that part was never intended to be adjusted once it left the factory. If your needle bar and needle are indeed perfectly concentric and there’s nothing weird about your feed dog, then revisit checking the position of the rocker bar frame as @Constabulary suggested earlier. The right surface of rocker bar frame pivot point needs to sit flush against the casting. A bunch of linkages may need to be loosened or disconnected in order for it to move sideways at all. Normally this is done with most of the head disassembled when you install the rocker bar frame without anything else connected to it. That is really the only way to adjust the needle position sideways a tiny amount, and only if everything else is indeed perfect. The sideways needle position is normally never adjusted after the machine leaves the factory, mainly because it’s not really “adjustable” due to the design of the machine. You can only fix an incorrect installation of the rocker bar frame.
-
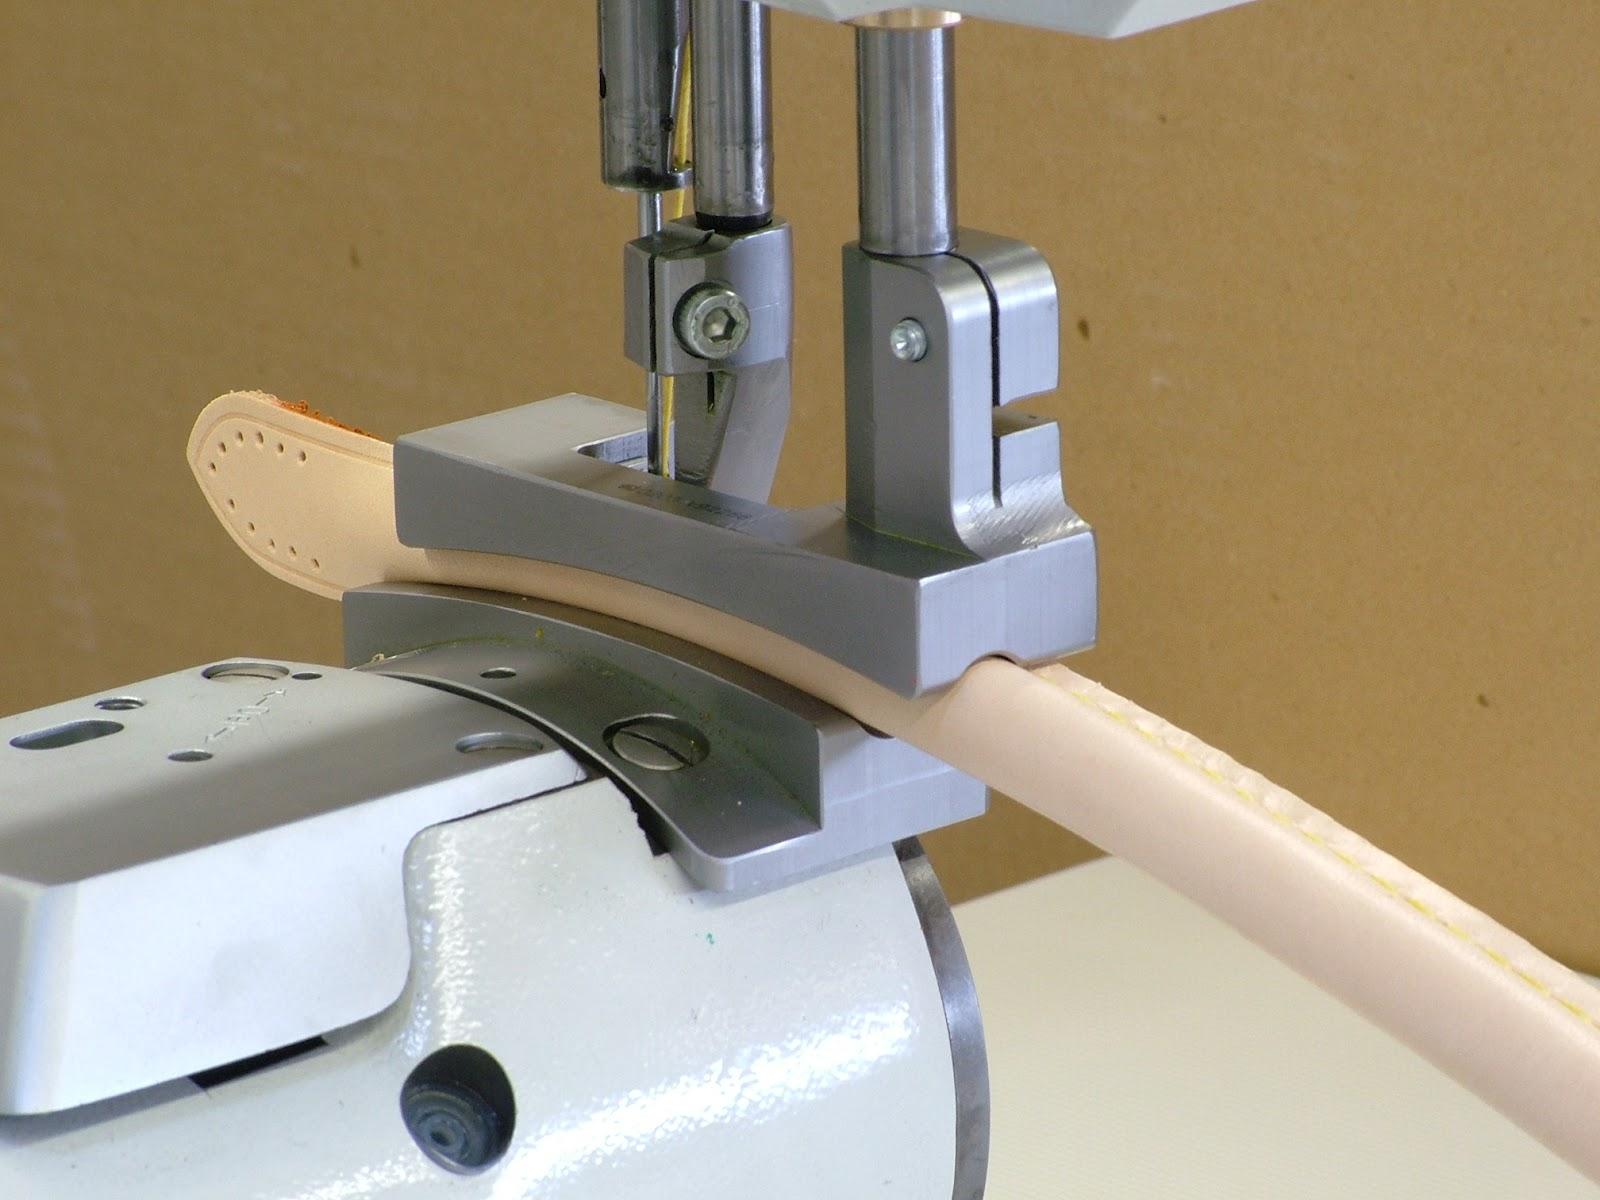
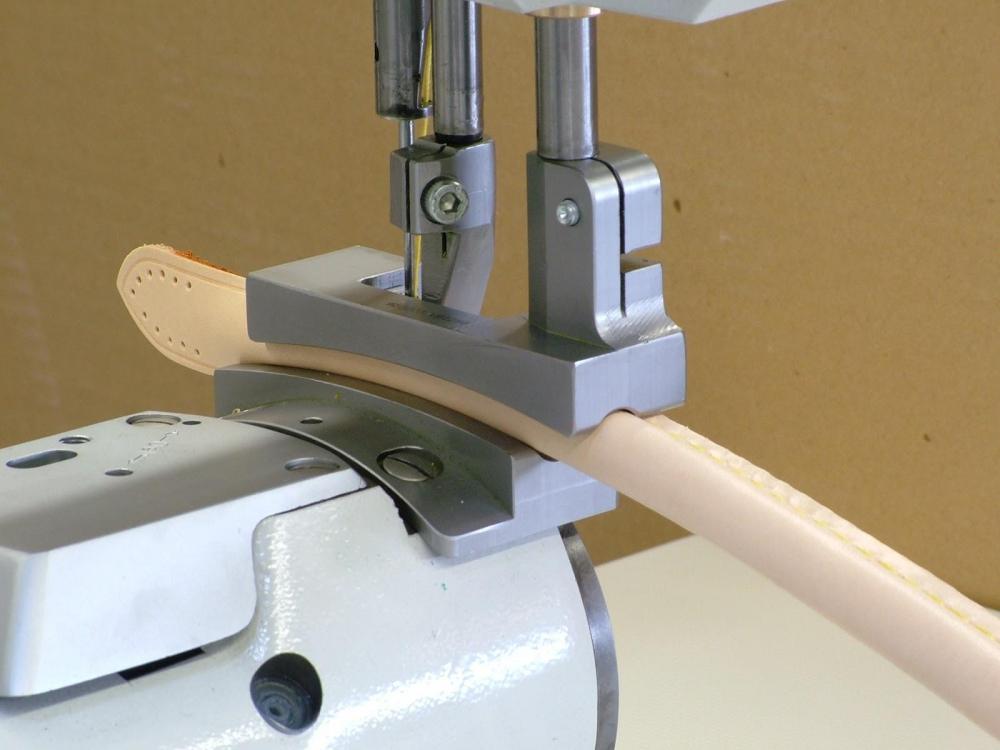
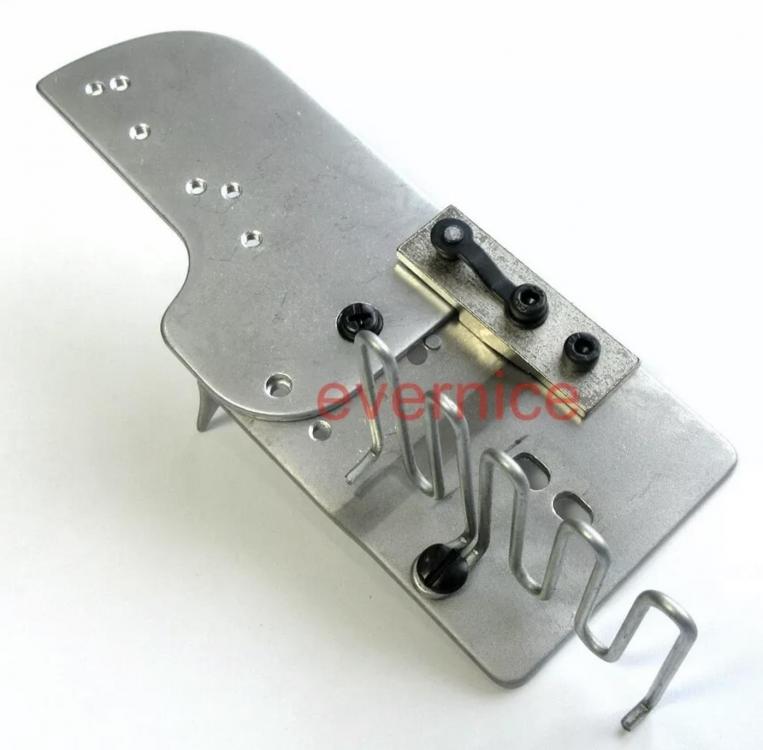
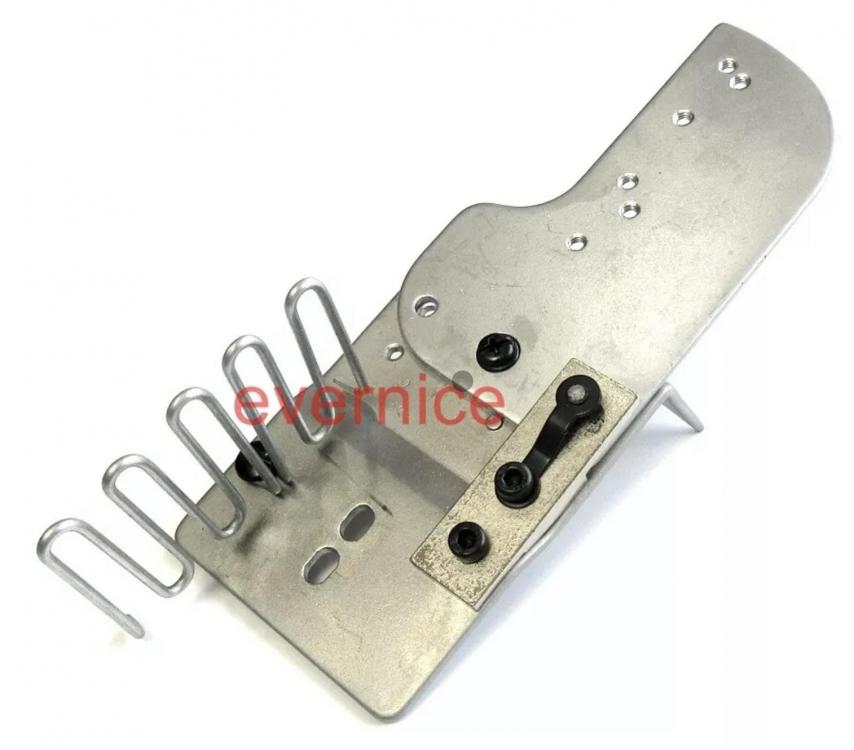
Nice work on that custom binder! Fairly often none of the commercially available binder options are quite right for a particular task. Making specialty binders is big business for some companies like Atlanta Attachment Company and others. Being able to make your own binder is priceless. Since the TechSew 2750 is a clone of the Juki LS-341, this binder kit I found on Ebay today might be an option too, for those less handy in manufacturing their own (and for those not worried about items coming from Wuhan, China.) Here are some screen shots of that binder since the link to Ebay will expire soon. For the successor model of the Juki LS-341, the Juki LS-1341 (also TechSew 4800), Juki offered synchronized binder kits like the one shown below.The swiveling binder plate hooks into a hole in the feed dog to follow the feed movement. I don’t know if these kits are backward compatible with the Juki LS-341 class machines. The kits run about $400, I believe.

-
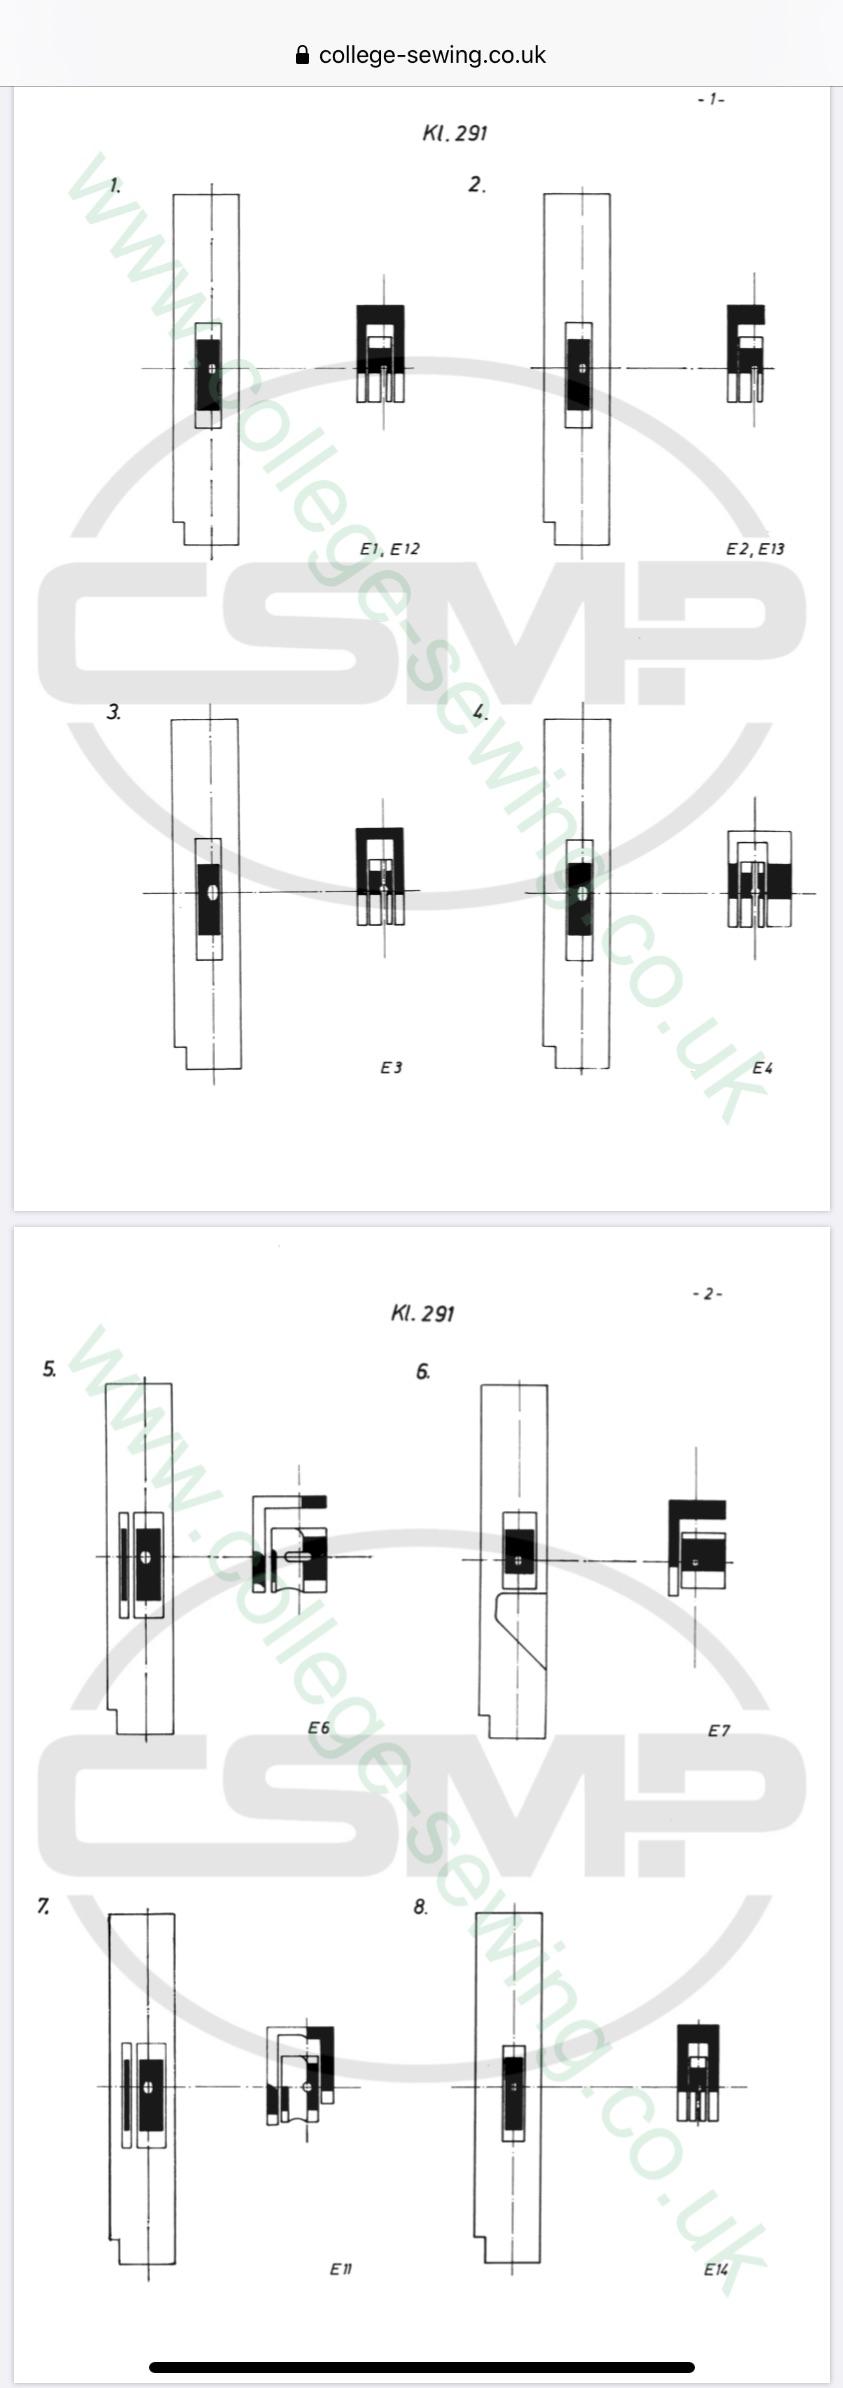
The sewing equipment with the “E” number refers to various available combinations of throat plate, feed dog, and presser feet. You can find the detail in the parts manual starting on page 98 https://www.college-sewing.co.uk/wp/wp-content/partsbooks/Durkopp_Adler/Durkopp Adler 291%2C 292%2C B291%2CB292.pdf Here’s a screen shot from that section of the manual.

-
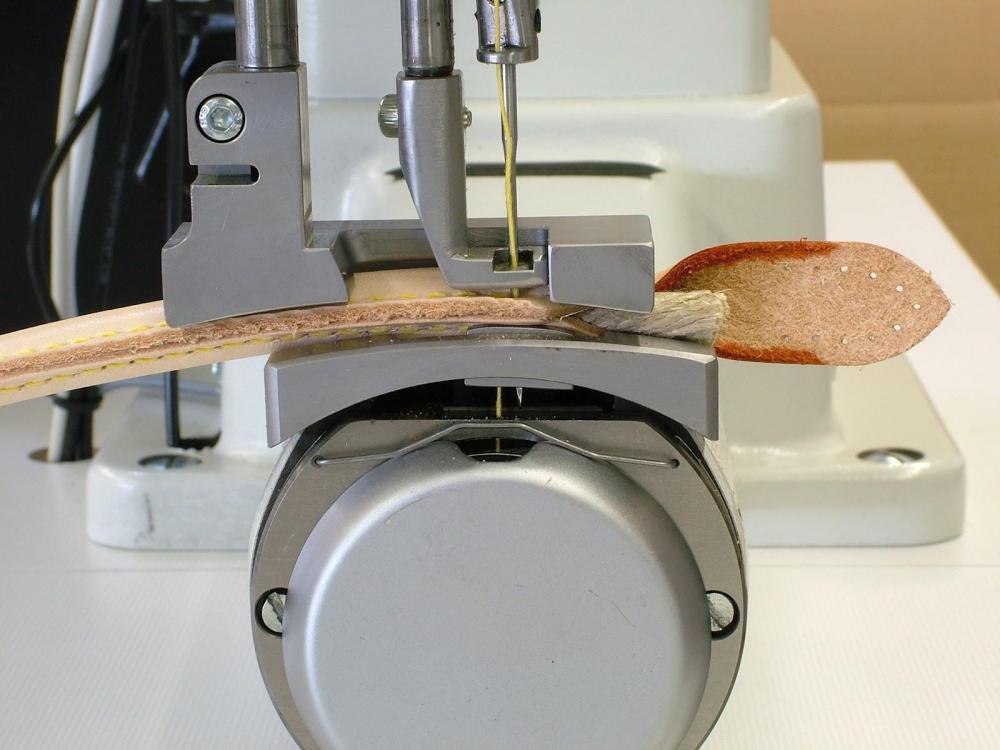
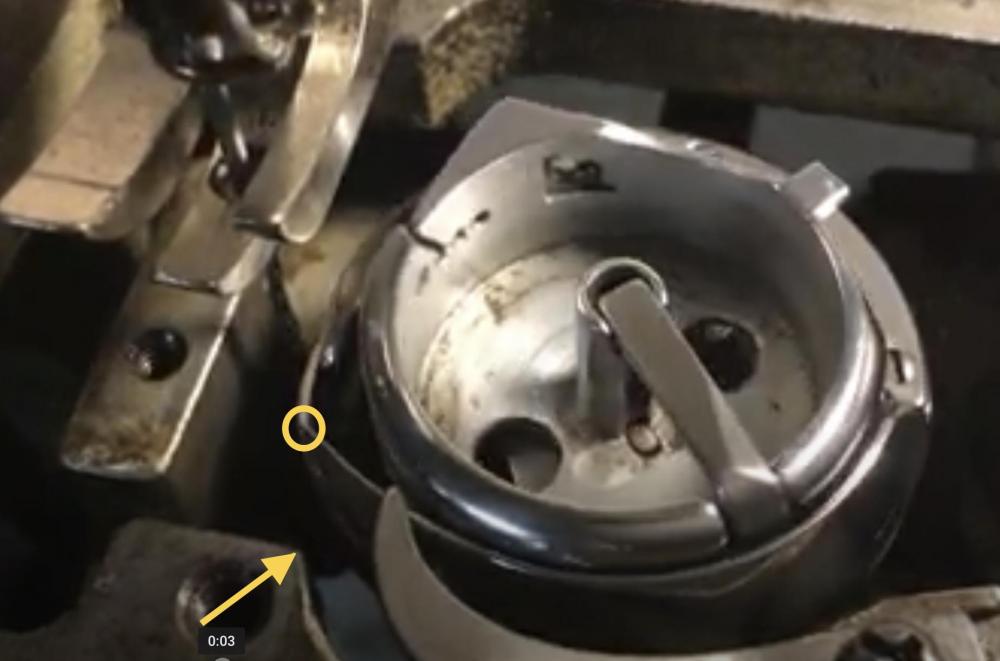
That bobbin case opener can cause a bind if adjusted incorrectly (or if you run the machine without the throat plate installed), and it will break if it gets stressed too much. I made a video some time ago that shows the function of the bobbin case opener on a different machine (Juki LS-341). Your Adler 67 has a nearly identical bobbin case opener design. Hopefully it will help you understand what this part is supposed to do and how it can bind, cause problems, or even break. This video shows the removal of the hook on an Adler 167, which is nearly identical to your Adler 67, just with.a larger hook. You obviously already did this part. I’m just adding the video again for others who might view this post in the future. Once you get your bobbin case opener replaced, you can use this video to check and adjust hook timing.
-
Yay, I’m glad to hear you got it resolved!
-
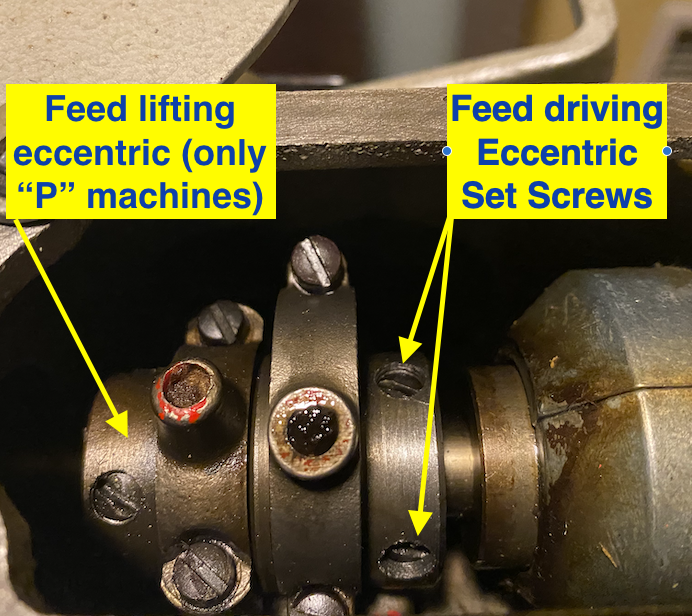
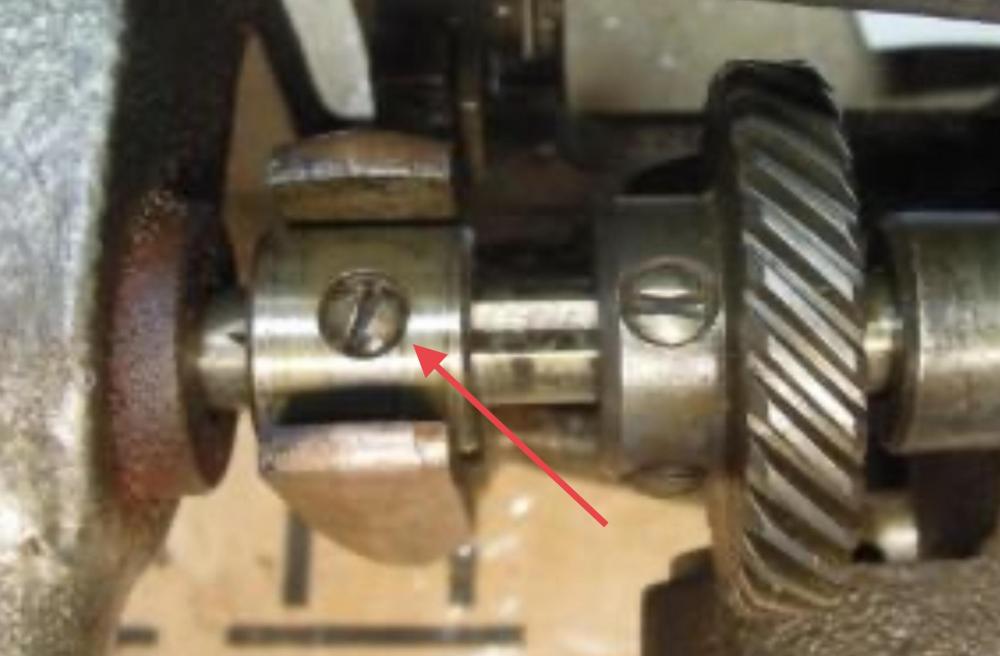
thanks for that video! It looks to me like the front to back movements of both feed dog and needle are just about right. It’s the up/down movement of the feed dog that’s not right. I’d recommend rotating the feed dog lift eccentric to have the other set screw seated inside the groove. It’s possible that both the feed lifting eccentric and hook driving gear have the wrong set screw inside the groove on your machine. The difference is that the hook driving gear can be adjusted to make it work correctly in either position, since you can “disconnect” the large hook driving gear from the small gear on the hook shaft by sliding them apart to rotate the hook into the correct position before re-engaging the gears. The feed lifting eccentric on the other hand can only work correctly in one position relative to the groove on the hook driving shaft. Remove each set screw entirely, one at a time, and inspect the tip. Make sure that the set screw that will rest inside the groove has the pointy or domed tip, the other should have a flat tip. Make sure you tighten the set screw inside the groove first, before the other one. The second screw on each gear with the float tip that rests on the rounded part of the shaft just adds additional holding power to the gear to make sure the main set screw inside the groove doesn’t easily wiggle loose. Since you disassembled the shaft, you may also have inadvertently re-installed the feed lifting eccentric backwards (flipped 180 degrees around the vertical axis) which may be a problem if the eccentric isn’t symmetric relative to the groove. I’ll have to look at my machine in storage to see which way the feed lifting eccentric is oriented on my machine.
-
In general, on Singer based machines the set screw marked with “S” is the one that goes into the groove on the shaft. Other manufacturers have different rules. Make sure you tighten the set screw in the groove first (to properly seat it,) before you tighten the other set screw. The set screw that goes into the groove also generally has a pointy or domed tip, whereas the other set screw usually has a flat tip. If you remove the set screws, pay attention to that when re-inserting them. You also have (or had) a loose set screw on one of the timing pulleys poking holes into your timing belt, by the way. What we really need is a video, not still images, to debug the feed timing. Take a short close-up video of your feed dog and needle moving very slowly, upload it to YouTube and share the link here (easier said than done, I know - it’s the price you pay for crowd sourcing help.) On many machines the key feed timing position for maximum forward feed is as follows: When the feed dog is in the very front and rising, it is supposed to reach the top of the throat plate at the exact same time that the descending needle and vibrating presser foot also reach the top of throat plate. If that’s not the case, you have to figure out which of these movements is out of synch and adjust that. Sometimes it’s more than one thing out of synch. Again, we need to see the movement to give meaningful advice.
-
Since you have both machines and can’t answer that question yourself, you don’t really need the small diameter cylinder arm machine. In general, the smaller diameter cylinder arm allows you to sew things that the larger diameter cylinder arm can’t (like small three-dimensional objects, whatever they may be - Barbie Doll purses, baby shoes, pencil cases, arrow quivers, etc.) Since you apparently don’t sew anything that the large diameter cylinder arm can’t handle, there’s no real reason for you to use (or buy more of) the small diameter cylinder arm machine (other than the fact that you already have one - might as well use it.) Many engineering compromises have to be made to squeeze all the moving parts into the small diameter cylinder arm (e.g. limited feed dog movement and stitch length, smaller bobbin, limited thread size handling, etc.) There’s no need to put up with those compromises unless you have to. Sometimes it’s the available accessories like binding equipment that makes the difference. Small diameter cylinder arm machines sometimes have better synchronized binding accessories available.
-
On my Juki LS-341 that button actually does work for both re-setting and popping (on many machines that button only works for resetting, not for popping.) The Juki LS-1341 may have a different mechanism. Using the hand wheel to pop the clutch puts stress on the belt, which may be a problem if the belt is not in good condition. You can also use a screwdriver to pop and reset the clutch, similar to what you showed in your last video. I made a short video to show how I use a screw driver to pop and reset the clutch. This technique might be useful in certain situations.
-
Some metal surfaces corrode over time and no longer move smoothly against each other - especially if they don’t move at all for long periods of time. Sometimes oil evaporates and leaves behind a hard varnish that acts like glue. I’ve encountered several clutches that were complete ceased up and wouldn’t release no matter how much force I applied. It took several oilings over a day or two to get things moving again. Heating things up with a hair dryer also helps if dried oil varnish instead of corrosion is the culprit. “Exercise” the well oiled clutch by purposely making it pop and then re-setting it several times. This will wear down any surface corrosion and get oil in the spaces that need it. Once the clutch pops in and out the way it should, test it once a month or so to make sure it actually still works.
-
Just a little fact check: The Seiko CH-8B is NOT a clone of the Juki TSC-441. They may look similar at a superficial glance, but upon closer inspection they turn out to be totally different designs. It seems Seiko looked at both the Adler 205 and the Juki TSC-441 to design a new machine that incorporates a few design elements from both Juki and Adler, and then added their own design elements. For example, the arm and shuttle design looks almost identical to an Adler 205, but the presser bar arrangement and top feed mechanism on the Seiko is totally different from both Adler 205 and Juki 441. The Seiko uses a rear presser bar arrangement that is offset to the side instead of in-line with front presser bar and needle bar, like both Adler and Juki use. Presser feet from all three machines are definitely not interchangeable with each other. Seiko detail (notice the offset rear presser bar and foot):

-
I’d recommend trying to get the machine working as it is before making any modifications. Removing automation parts is not always trivial and may have unintended consequences. You can ignore the automation functions but you may find it very useful, actually. there’s no need to remove the hardware unless it causes problems. Much depends on how you’re intending to use the machine. By the way, your machine is not a double needle machine, those have two needles and two hooks. Mitsubishi did make a double-needle version of this machine, so the manual may cover both models. Your machine is a single needle, medium duty walking foot machine with top, bottom, and needle feed. It’s not a machine intended to repair horse tack. The video below shows how this machine operates when it’s properly set up. It’s a very nice machine, actually. Also, please share what useful information your already found on the machine, like links to the manuals.
-
You may have to bend the needle guard inwards (away from the needle) a little so that you can properly adjust the hook-to-needle distance closer to the needle. Right now, if you move the hook closer to the needle, the needle guard would bend the needle away from the hook. Once the hook-to-needle distance is correct, bend the needle guard outward again to brush up against the needle right when the hook tip is closest to the needle.
-
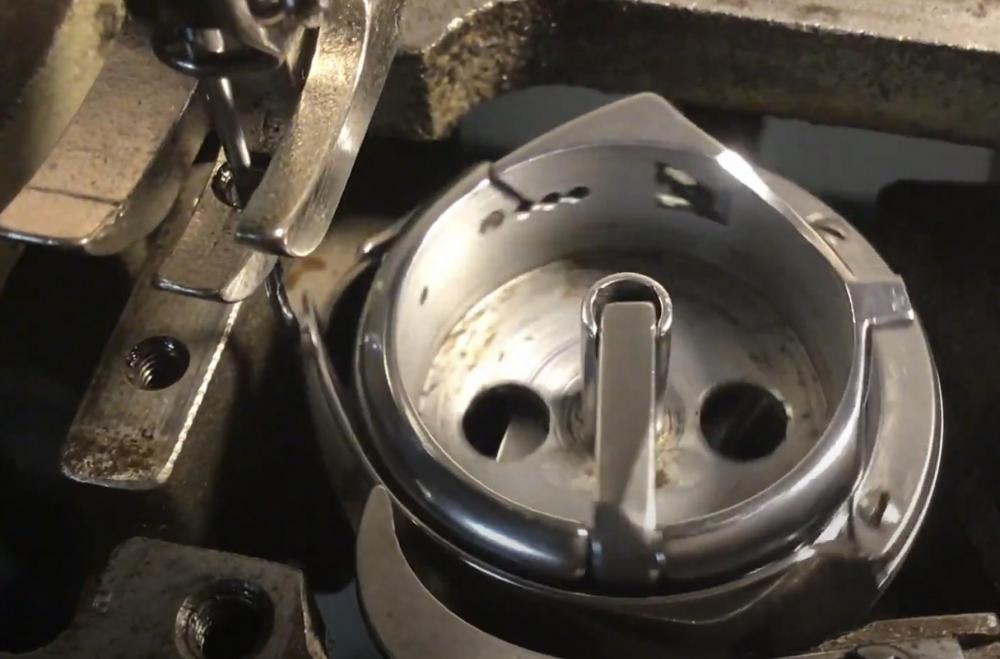
(This is a copy of my reply to a personal message I posted before I realized there was a public post as well.) From what I can tell in the video, your hook tip arrives at the needle too early and it’s actually too far away from the needle. Maybe it’s the angle but what I see does not match what you described. In the bottom dead center position the hook should be roughly pointing at the corner of the casting as indicated in the photo below. Your hook is already half the way advanced to wards the needle. Also, it really looks like the tip of the hook is not close enough to the needle when it needs to pick up the thread loop.
-
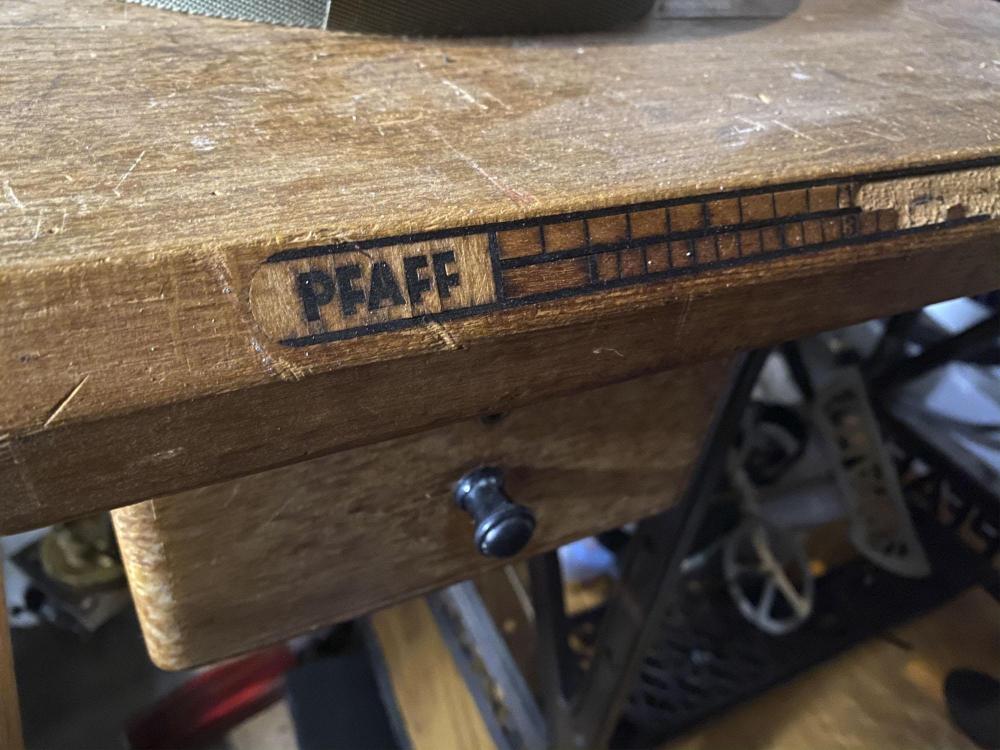
I'm guessing 1950's. Pfaff started making the 145 in the mid-1930s, but they introduced the various H1/2/3/4 versions later in the 1950's. Hammered paint and formica pattern also hint at the 50's. I have a Pfaff table with that same spool holder, a heavy cast iron base and a solid wood top with nice wood inlay ruler. They sure don't make them like that anymore.

-
If the 10x32 screw fits both threaded holes, then that’s your tap size. That size very close to a metric M5, so that may be a candidate. Sewing machines are notorious for using oddball screws. Some machines happily mix metric, imperial, and custom screws. Some manufacturers tell you what screws size it is in the parts manual, but many don’t. If they don’t, they want to you to buy that screw from them, not from the local hardware store. Not sure what the foot pedal temperature question is about. If it gets warm during use that may be normal. If it gets hot, it may be faulty. If it catches fire, that’s really bad. Also, going forward, it’s good etiquette to just provide all the information you already have, like a photo, screen shot or a link to the parts manual you are talking about. Otherwise a bunch of people will spend time and effort looking up information you already have right there in front of you. A photo really helps a lot because we can’t see what you are looking at unless you show us. Sailrite apparently based their machines on the Thompson, so they may have some answers if you contact them (Sailrite.com) Best of luck with your new acquisition!