-
Posts
2,221 -
Joined
-
Last visited
Content Type
Profiles
Forums
Events
Blogs
Gallery
Everything posted by Uwe
-
Time to post some detailed pictures of your machine. I'm just guessing what you are looking at. Your machine may be very different from mine. Oil lines material is probably available at any hobby store that sells model airplane stuff. Also, spend some quality time reading the topic below - it's a somewhat cautionary tale that goes into great detail about the DA 467 oiling system.
-
It may be a Frobana, just a different model from the more common design. At least this defunct Kijiji ad in Calgary showed a very similar machine and called it a Frobana. Do you have any more pictures? How do you know it's Swiss made?
- 9 replies
-
- sewing machine
- antique
-
(and 3 more)
Tagged with:
-
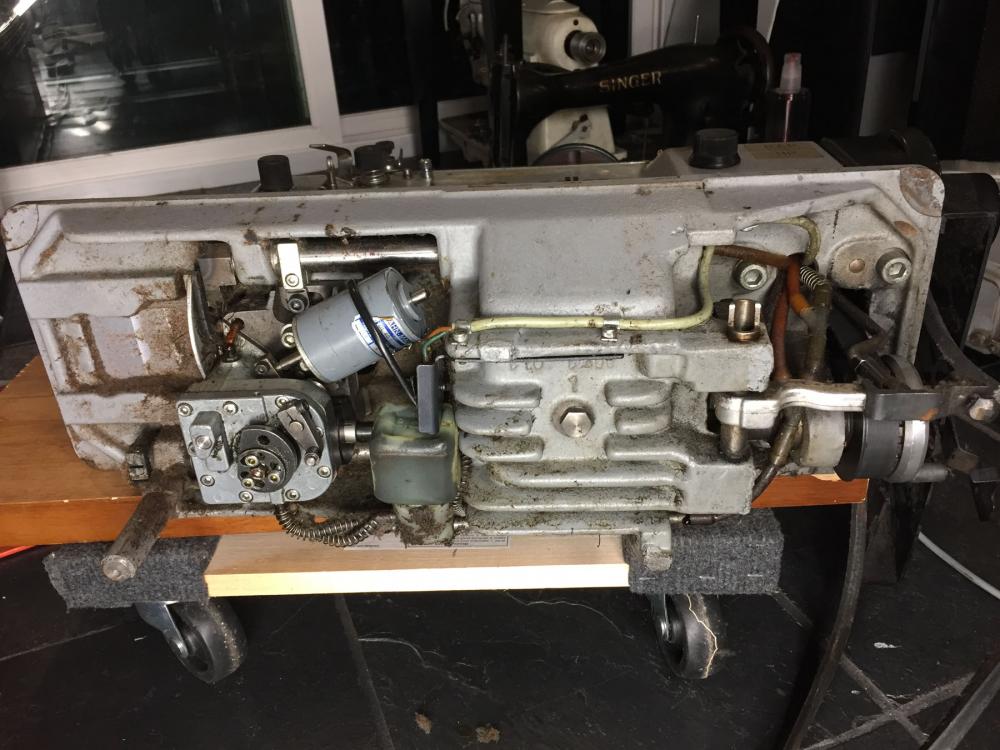
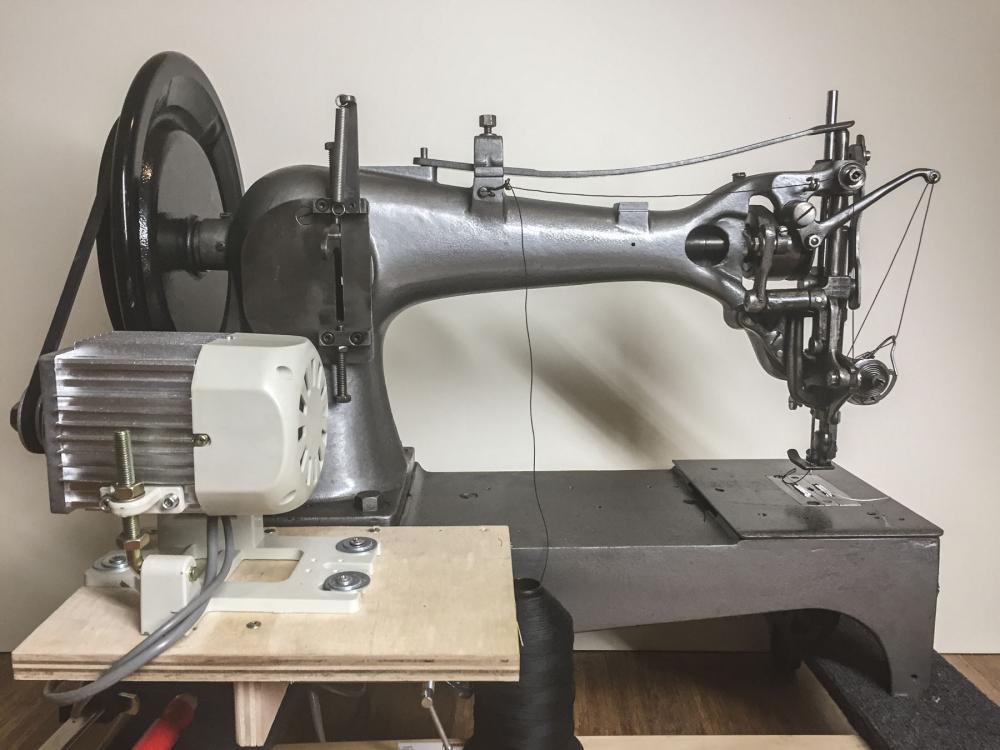
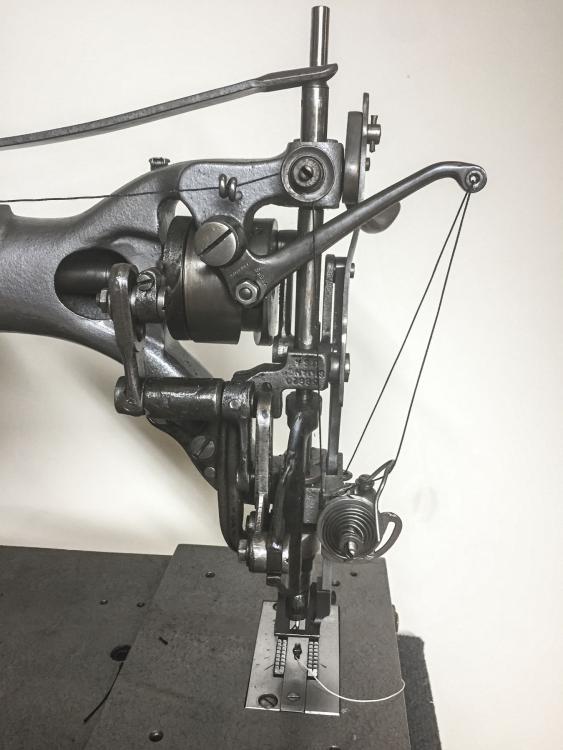
So, I'm curious, does your feed dog move when you turn the hand wheel with the timing belt off? If yes, then it does not really matter exactly in what position you put the timing belt back on (because, technically, that belt would not be a timing belt, just a drive belt.) The hook will need to be timed no matter what. It appears that the DA 467 does not require top/bottom shaft synchronization at all, since feed dog movement can be adjusted individually (sections 3.2.3 and 3.2.4). The feed dog movement is driven by the same eccentric on the top shaft that also moves the rocker bar (needle and feeding foot). Hook-to-needle timing is of course also adjustable independently. I've actually not yet adjusted hook and feed timing on a DA 467 myself, so can't really speak from direct experience on that particular machine. One quick glance at the underside of my grimy project Durkopp Adler 467 tells me that this is not your typical vintage mechanism.
-
The Durkopp Adler 467 Service Manual ( 467_service_instructions.pdf ) may help you get started on the right path. Alas, that manual does not have a section on how to replace timing belt or how to synchronize top and bottom shafts. Often there are some markings that need to line up. I'll have to check my 467 to see if I can find some.
-
It would look very cool and, unfortunately, it would also be uncomfortably cool. Resting your arms on that steel top as you sew may get uncomfortable quickly because the metal will quickly suck the heat out of your forearms, making them feel cold. Just like a tile floor feels colder under bare feet than a wood floor because stone is more thermally conductive and quickly cools off your skin from near 100˚F body temp to 70˚F room temp. This will not be an issue if you're sewing in a place where the ambient temperature is close to 100˚F.
-
[edit] D'oh, of course that's just what brmax said earlier. Oh well, one more time:[/edit} The Singer 153W101 has come up in several topics here on LW. The search engine on LW is not super helpful at times. I always use a site specific Google search to find topics and posts on LW. Try googling for "site:leatherworker.net 153W101"
- 5 replies
-
- singer 153w101
- leather
-
(and 2 more)
Tagged with:
-
I suppose the problem could also originate in the arm when downward pressure is applied to the feed dog (which is relieved when you raise the feet). Perhaps try raising the feet and press down on the feed dog with your thumb and see if the groan/bind manifests (remove the needle for this test).
-
Post some close-up pictures of all the linkages involved (external and internal) in lifting the foot. Max lift is normally when needle is at bottom dead center, but your bind appear sto start much earlier. Since the problem disappears when you raise the feet, the source of the problem is very likely found in the parts that move when you raise the feet. Put the machine in the position where it starts to bind, then raise the feet and closely observe all the linkages moving. I have a strong feeling that something will be moving away from something else, changing from touching to not touching (other than the obvious feet moving away from the throat late.)
-
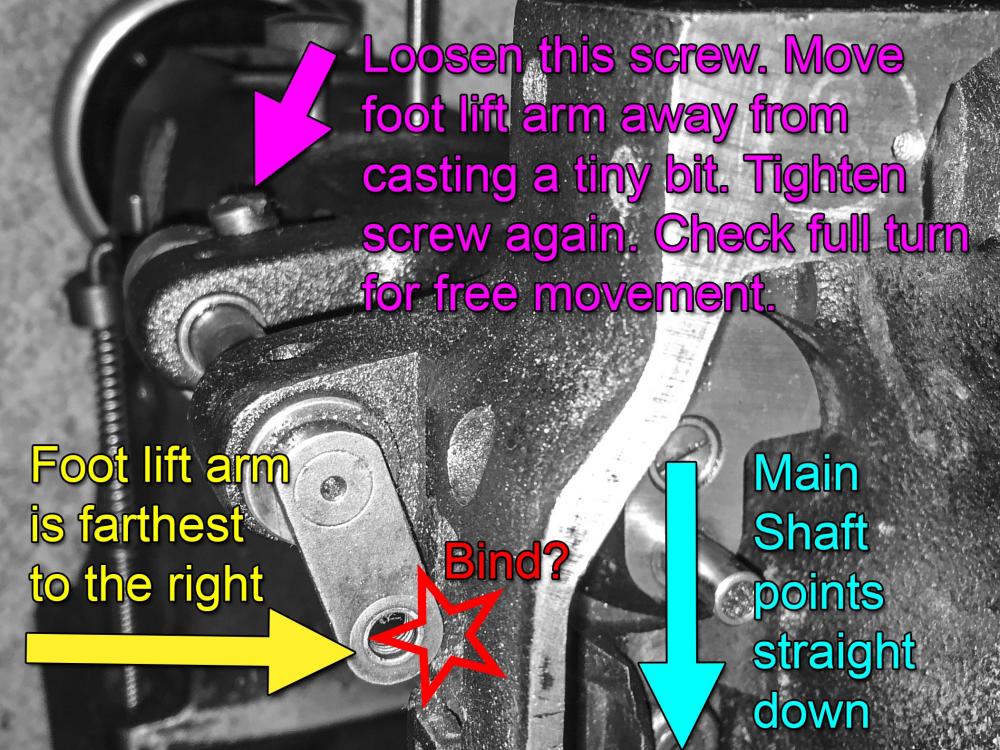
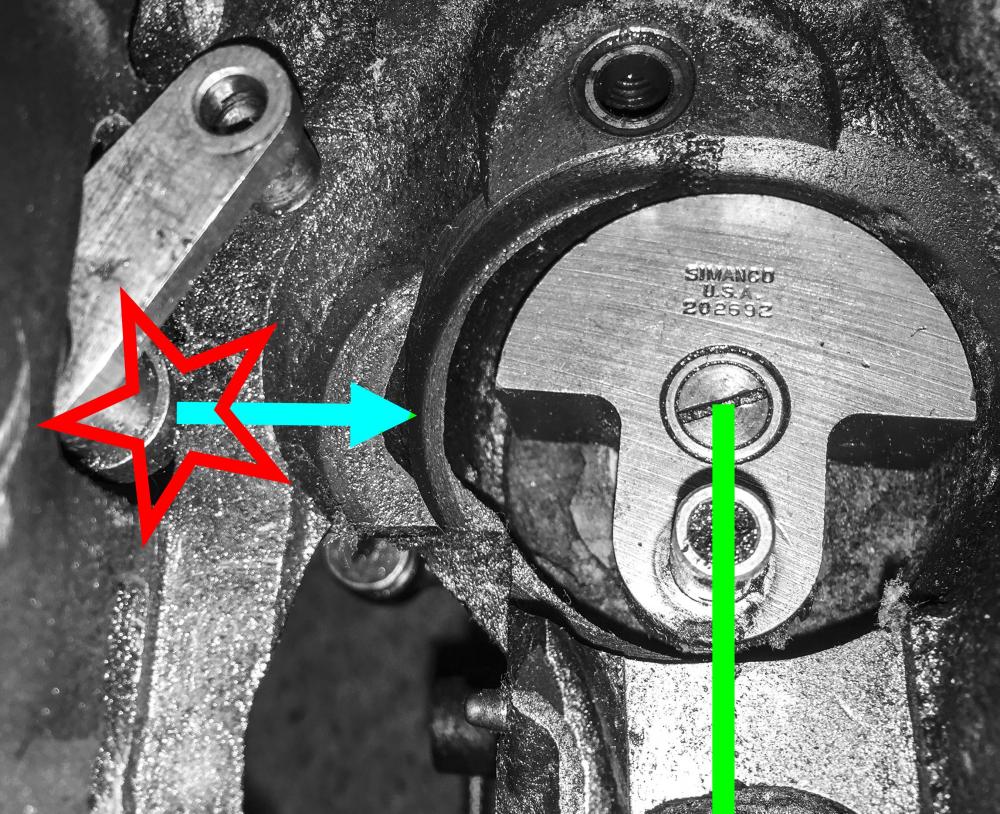
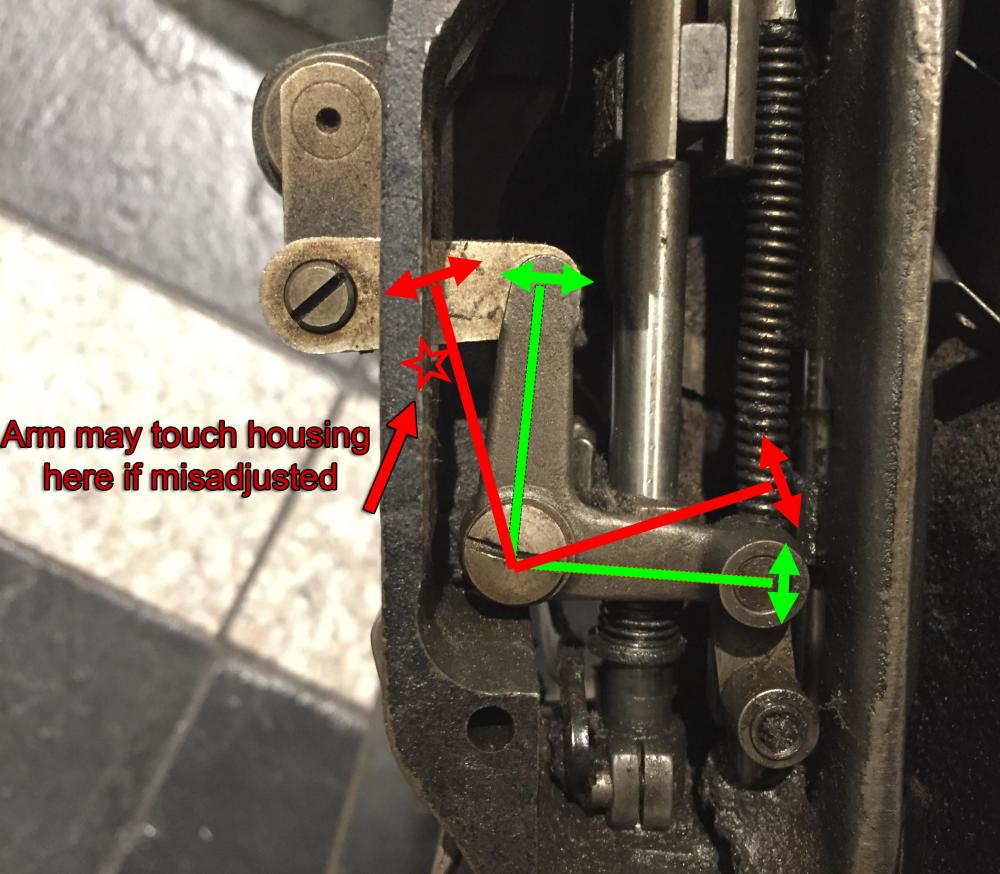
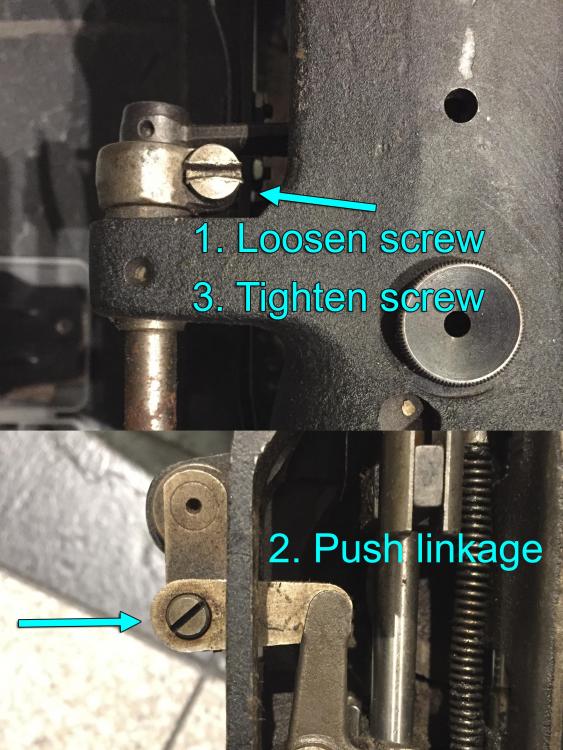
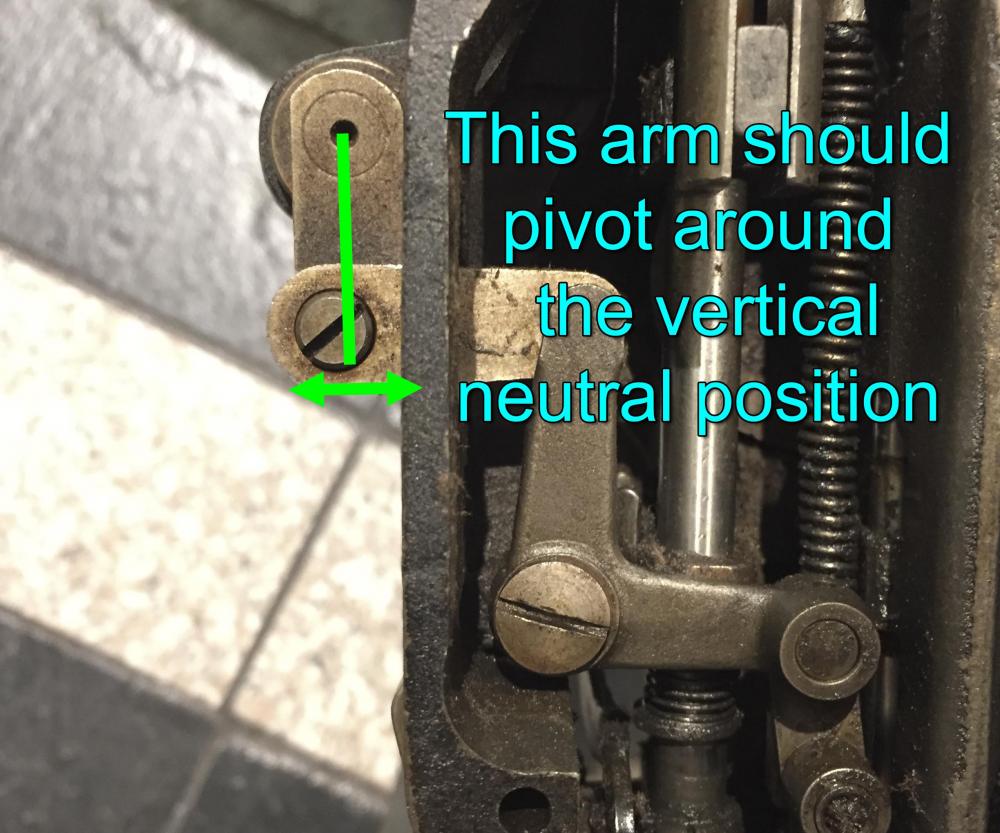
I'd check for walking foot lift linkages touching the casting. I made some annotated pictures for previous topics on foot lift related binds. I don't know if your 335 with the bind problem is a modern casting 335 or a vintage casting. They have very different casting and things may look quite different. The pictures below are of a Singer 111W155 machine, but they illustrate the concept of the two types of potential binds due to out-of-range linkage movements.
-
The whole thing should fit in a Yukon, perhaps with some disassembly. Personally, I'd be tempted to say "Just the head, Ma'am. Would you mind dragging that sagging table, rusty legs and infernal clutch motor to the curb on trash day?" If that free head is worth bothering with, you can probably justify a few hundred bucks towards a new table and servo motor. If that's not in your budget, then industrial sewing machines are probably not something you should get involved in.
-
The Sailrite type design moves the hook axially during zig-zag, which also avoids the particular timing challenges illustrated earlier:
-
I took a closer look at my Singer 143W2. My machine is a 4-step variation of the basic zig-zag machine. The real world vertical hook-to-needle position correlates closely to the concept graphics I posted earlier. My personal hook timing procedure for any lockstitch machine where the hook makes two rotations for each stitch: 1. Bring needle to bottom dead center position 2. Rotate hook tip to 60˚ (10 minutes on the imaginary clock face) before reaching the needle, tighten hook 3. Move hand wheel to line up hook tip with needle 4. Adjust needle bar height so that hook tip is in the middle of needle scarf (use near-center position for zig-zag machines) 5. Adjust hook-to-needle distance if need be I have yet to meet a machine that will not make a stitch after doing this. It's a great starting point for machines where you don't have a service manual. It avoids all that annoying measuring-needle-rise business. Here's a video showing a close-up of this zig-zag hook timing business after the procedure above.
-
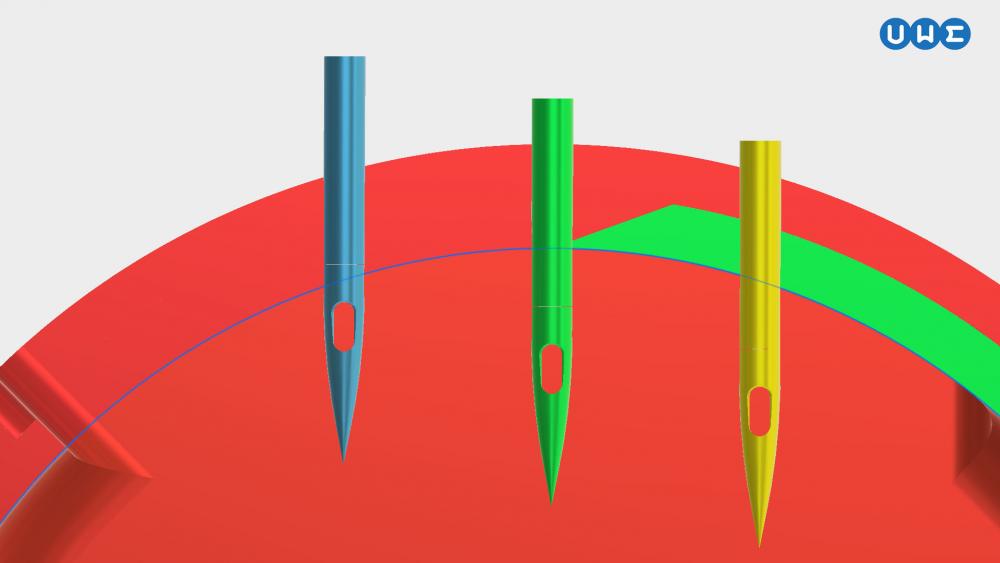
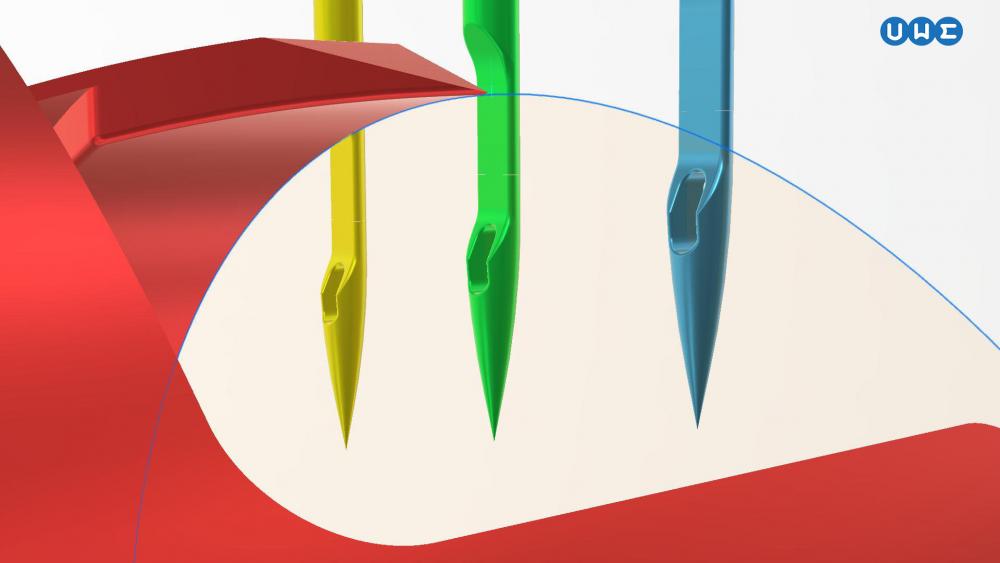
That Singer manual conveniently make no mention of the zig zag position for hook timing. I burned a little midnight oil contemplating this zig-zag hook timing business. In order to visualize what's going on, I modeled it up in my CAD program to see how things line up. To my surprise, things didn't line up the way I was expecting them to. Since the needle rises steadily after BDC while the hook rotates along a circular path, the timing changes a little or a lot, depending on which side of the center position the needle is located during zig-zag. The images below are color coded to make it easier to reference center and either zig-zag position of the needle. The needle positions show the horizontal zig-zag at vertical position at the moment the hook meets the needle. The green needle indicates the center position. The yellow needle represents the early zig-zag position (he hook arrives at the needle earlier than in the green center position.) The blue needle represents the late zig-zag position (the hook arrives at the needle later than in the green center position.) It turns out that the yellow early and green centered needle positions are nearly identical in terms of where the hook meet the needle - near the top of the scarf. This is because between the yellow and green positions both the hook and the needle are moving in the same vertical direction - upwards. The blue late needle position is the critical one - timing changes drastically and the hook meets the needle at the very bottom of the scarf. This drastic change is due to the fact that hook and needle start moving in opposite vertical directions after the center position - the needle keeps moving upwards but the hook starts to move downward again after the center position. So, to make sure the worst-case zig-zag needle position is timed correctly, I'd verify the late (blue) zig-zag position. The early and center needle positions will very likely be fine if the late zig-zag position is timed so that he hook meets the needle at the lowest allowable point of the scarf. The picture below shows the front view of the hook that is rotating counter-clockwise behind the needle. The center and zig-zag needle positions are shown in the vertical position at the moment the hook tip meets the needle in that position. This image is a view from a different angle that shows where the hook meets up with the scarf of the needle at the different zig-zag positions. Center green and early yellow positions are nearly identical. The late blue position is very different. Going through this exercise helped me understand how this zig-zag hook timing thing works. Hopefully others can make sense of it, too.
-
@Gregg From Keystone Sewing already uploaded those manuals in your own topic. You have to follow your own topics!
-
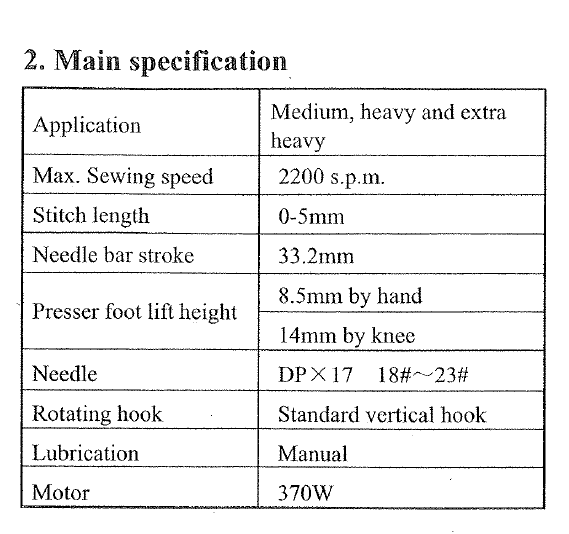
The Consew 227R is supposed to be able to use up to size #23 needle, according to the Consew 227R manual (spec table below.) Feed dogs from other machines or manufacturers may fit the machine but may not have quite the right shape to allow for the same needle range. If the feed dog is cheap, a Dremel may fix that problem. You may also be able to adjust the position of the feed dog carrier slightly to the left to provide a little more clearance. It's important that the needle stays centered with the hole in the feed dog, otherwise it'll start hitting the feed dog when it gets deflected.
-
You may also be able to grind the feed dog a little with a Dremel style tool to improve clearance for the needle. As Bob mentioned, the needle guard should just brush up against the needle, not deflect it much to the left. At some point you will just run into the design limitation of the machine, which only has room built-in for a certain size needle. Here's a video snippet I made when we first talked about hook timing on this machine. I thought I'd share it here again for all. It shows how the needle guard should brush up against the needle and protect it when the needle gets deflected towards the hook.
-
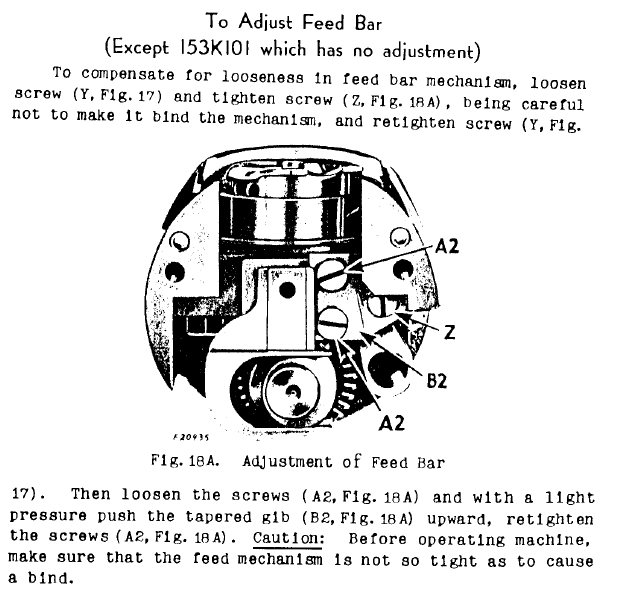
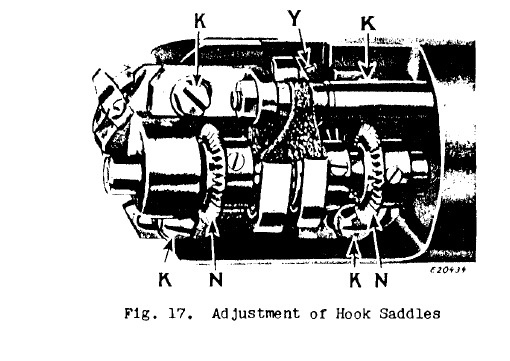
I remember making this adjustment described in the Singer 153W manual on my Singer 153W102, which is very similar to the Consew 227 in this mechanism:
-
Yes, that is definitely way too much play in that feed dog. Either there are some screws loose or parts are worn and/or misaligned. Exactly which is the case is hard to tell without sitting in front of the machine. Based on the video, here's my take:
-
Certain Singer 7 class machines can be upgraded/retrofitted with a set of parts that replace the original stitch length adjustment mechanism (feed eccentric). The new parts add the combination stitch-length/reverse lever on the back of the machine that you normally operate via a foot pedal chain. Limit screws on top and bottom of the lever travel allow you to adjust forward and backward stitch length independently to make them match up on whatever material you're sewing. I've not yet done the conversion myself, actually. It's a very desirable upgrade to that class of machines, I think.
-
We should really continue the power conversion discussion in the topic below:
- 18 replies
-
- walking foot
- industrial
-
(and 3 more)
Tagged with:
-

Converting Efka 3 phase to single without convertor
Uwe replied to radrider's topic in Leather Sewing Machines
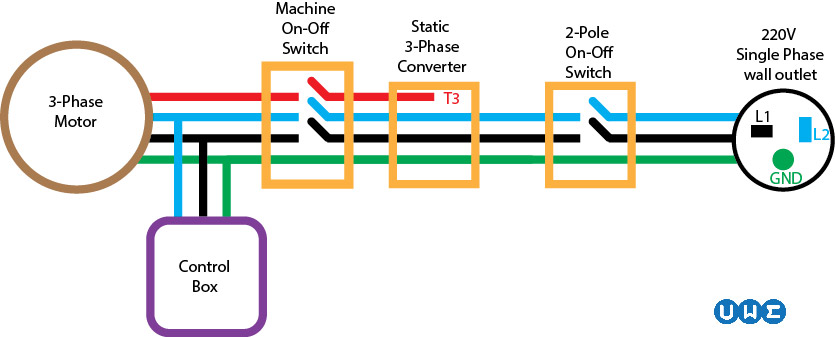
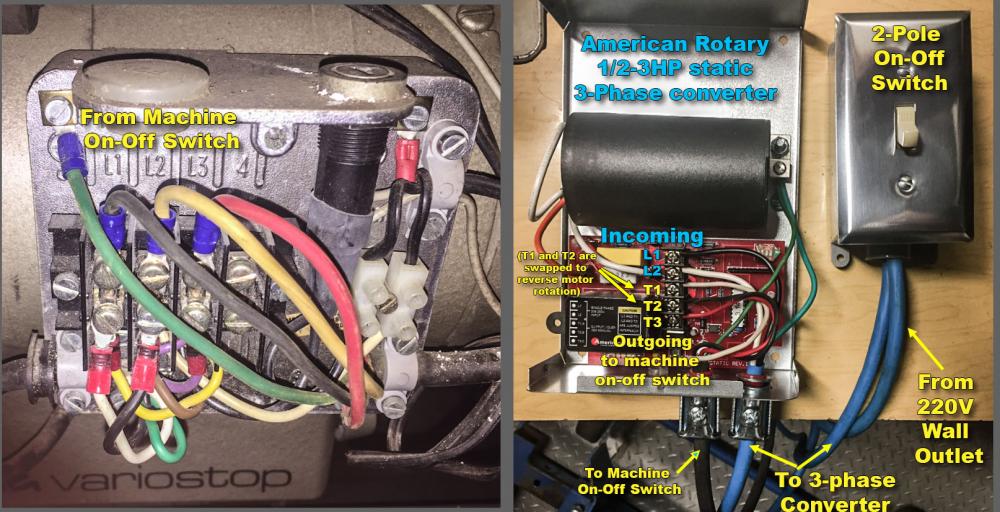
Disclaimer: Don't blame me if your machine/house/neighborhood goes up in flames while attempting what I describe below. If you have any doubts whatsoever about doing this - DON'T! I did some testing on my Durkopp Adler 467 setup that uses an Efka motor and control box that is similar to what is on the DA 291 pictured above. I already had a static 3-phase converter made by American Rotary (1/2-3HP rating, $65). I wanted to see if it would power the machine. Executive summary: The machine did power up, the motor also spun right up. No electrical smell/smoke/fire/explosion. Unfortunately I wasn't really able to test the machine during normal use since it was sitting in my 40˚F garage and its joints were stiff (as were mine.) So, while initial results are encouraging, I don't yet have full confidence in this setup until I can test it fully under normal operating conditions. I added a 2-pole switch to disconnect the power from the 3-phase converter when not in use. Do NOT connect the plug to the wall outlet until you are positive that all the wiring is correct! Here's a wiring schematic of how I connected the pieces: The actual real-world wiring looks a little messy. I hope the annotations help: I did swap T1 and T2 wires inside the 3-phase converter to change the rotation of the motor. You will read in many places that to change the rotation of a 3-phase motor, you can swap any two wires. The only two wires you are allowed to swap in this scenario with a static phase converter is T1 and T2! Otherwise you will send crappy T3 power to the control box and it may die. With static phase converters T3 can only be used to help get the motor spinning! Since there are no guarantees how wiring runs through the machine's on-off switch, you can't count on wire colors matching up end-to-end. You really have to verify which wire in the phase converter (T1,T2,T3) matches up with which wire (L1,L2,L3) in the wiring box on the motor. I turned on the machine's on/off switch, disconnected the wires (T1,2,3 inside the phase converter and L1,2,3 in the motor connector box) and used a multimeter to check continuity between wire ends to positively identify which wire goes where. Of course I did all this before I ever connected to the wall outlet! -
Sold
-
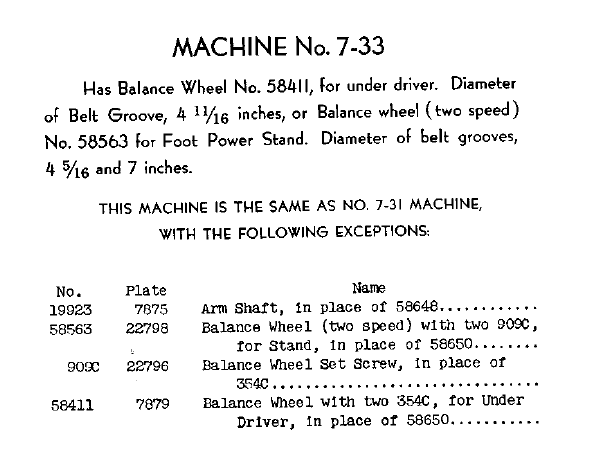
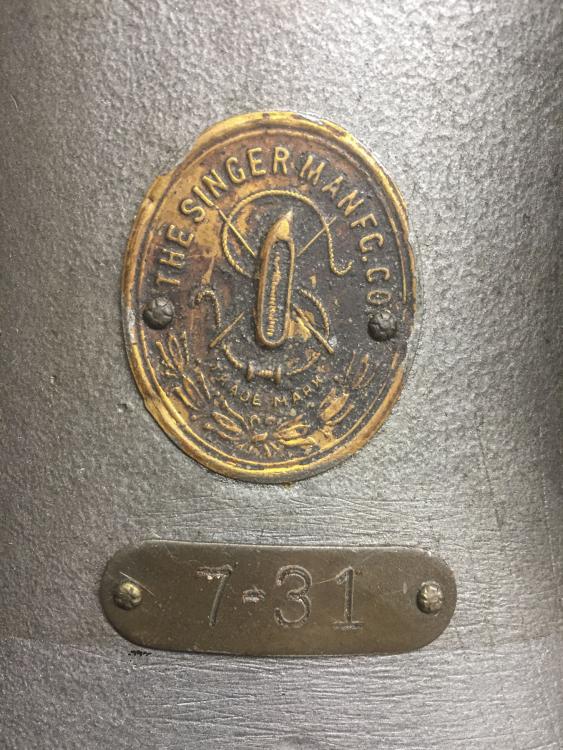
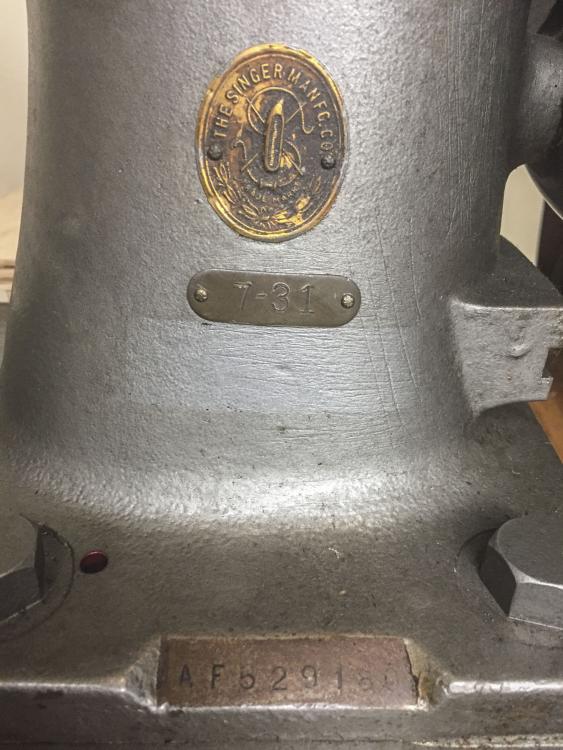
Here's the Singer 7-31 Parts Manual (SINGER 7-31.pdf ) snippet that explains the difference between a Singer 7-31 and a Singer-7-33. It essentially is just a different hand wheel. The Singer 7-31 originally had a wheel with a built-in clutch mechanism that was designed for overhead drivelines in a factory. It's probably safe to say that most surviving Singer 7-31 outside of factories have been converted to 7-33's with a handwheel that accommodates under-the-table motors and normal V-belts.
-
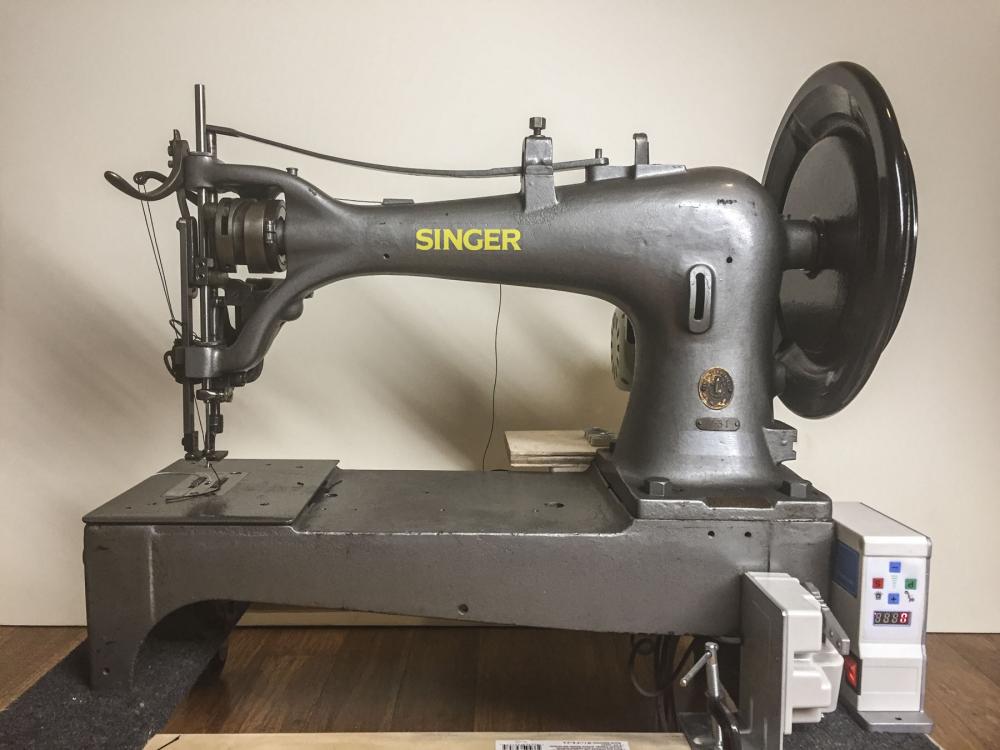
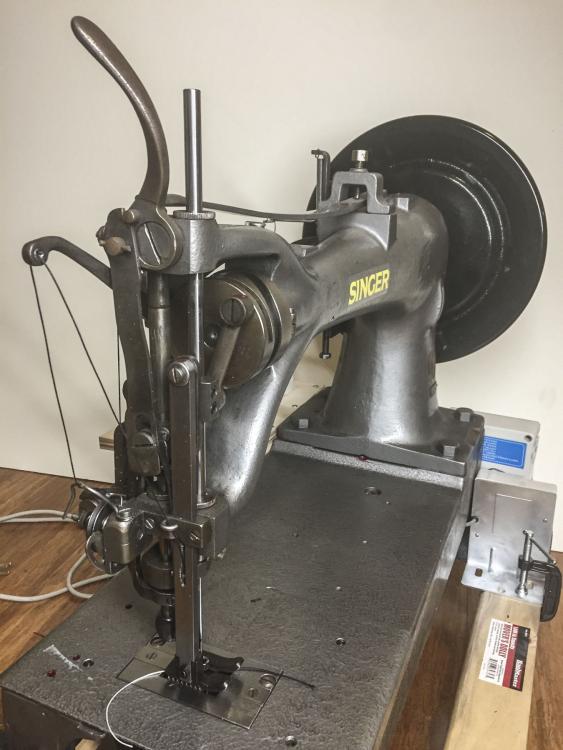
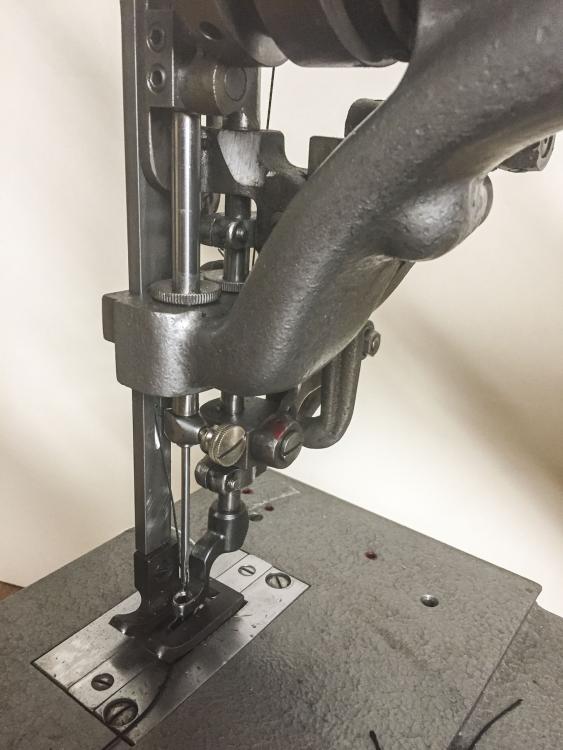
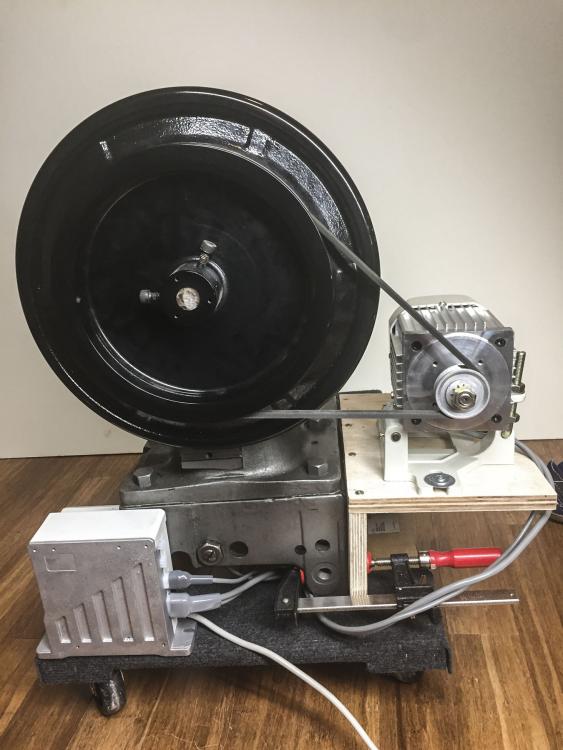
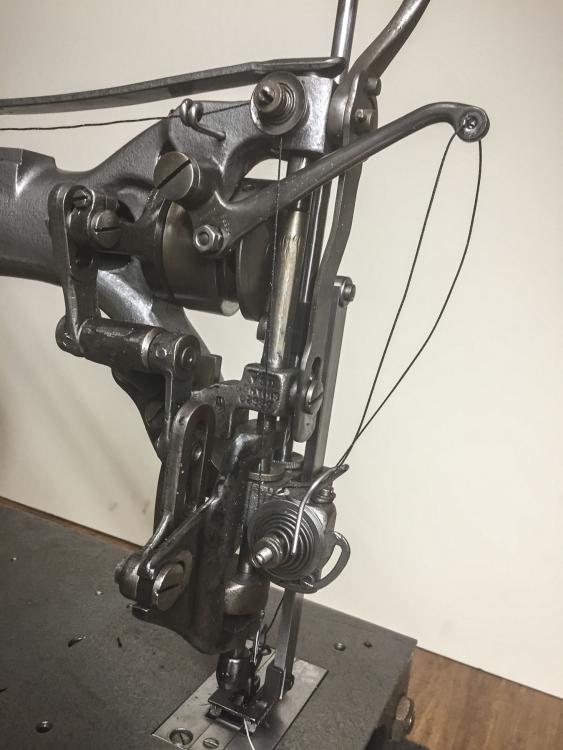
I have a very nicely refurbished Singer 7-31 for sale. This one has the retrofit reverse mechanism installed for pedal operated reverse. It also has a normal, yet monstrous, hand wheel installed which apparently turns it into a Singer 7-33 (the type plate still says 7-31, though) Everything works just like it should. The Serial Number is AF-529180, which indicates it was born in 1940. The head by itself is $1,600 if you pick it up in the Detroit Area. Do some Googling and you'll realize that this is a great price. The closest new machine with similar specs and features (e.g. Consew 733R) runs upwards of $6K. The Sewpro SP1100 1,100 watt servo motor that you see in the photos and that was used in the demo video below is an optional $250. The motor is new and has only been used to test and demo this machine. Shipping is available if you are willing to arrange it. Send me a PM for details. Here's a demo video I made sewing some heavy webbing material on this machine: And here are some photos that show the overall condition of the machine:


