Uwe
-
Posts
2,221 -
Joined
-
Last visited
Content Type
Profiles
Forums
Events
Blogs
Gallery
Everything posted by Uwe
-
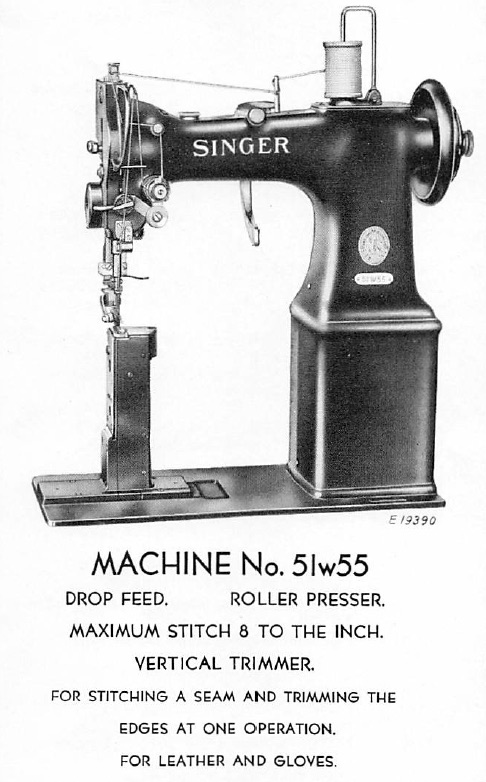
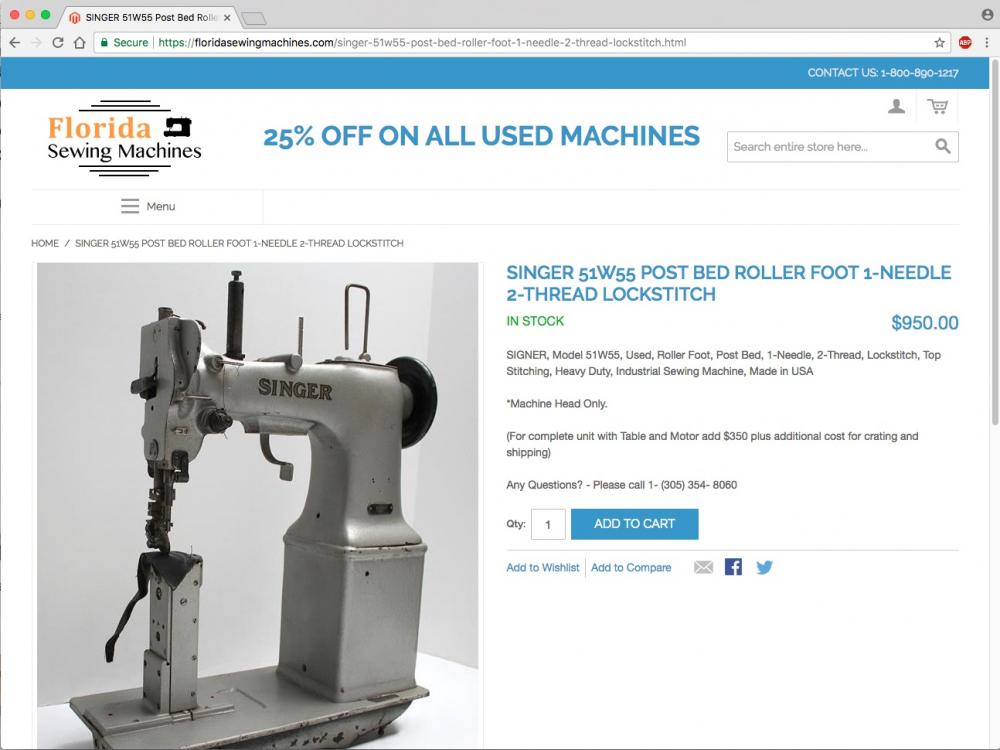
Well, the LW let-me-google-that-for-you service (me) says it's a drop feed post bed with roller foot and edge trimmer for sewing leather and gloves. Apparently made in the late 30's and 40's, perhaps longer. I'm sure it's great if you want to sew gloves, not so great for saddles and holsters. Relatively small stitches at 8 per inch. No reverse. It's not a very common machine, since today is the first time I've ever heard of it. There's one for sale for $950:

-
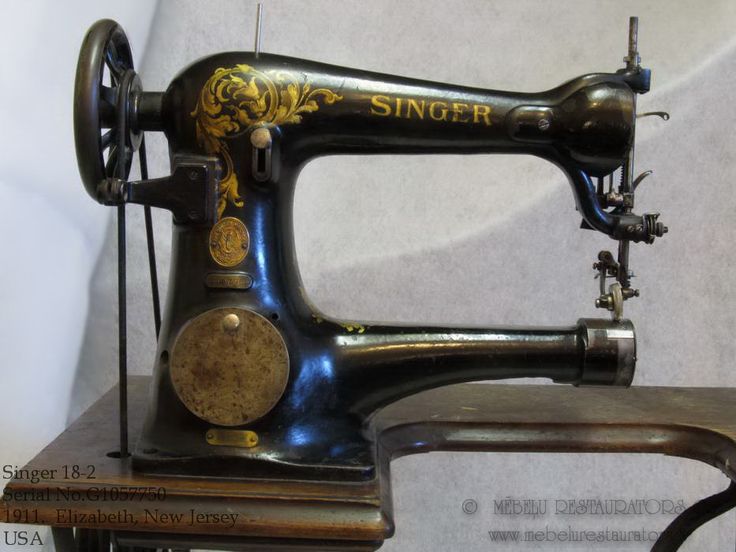
If it's complete and works then it's probably worth way more than 120€. I doubt you can get many (or any) parts for it other than generic needles and maybe a hook, if you're lucky. This Singer 18 is a totally different design and super rare compared to the common Singer 29K. The Singer 18 probably weighs three times as much as a Singer 29K, too.
-
Lights-on picture of a Singer 18-2:
-
Ask the seller for a picture where we can actually see something. It looks very much like a black cat in a dark alley on a moonless night to me. Or just go there, check it out in person and take some decent pictures yourself to share here. It may be a very cool machine, actually. You'll never know for sure unless you go see it in person.
-
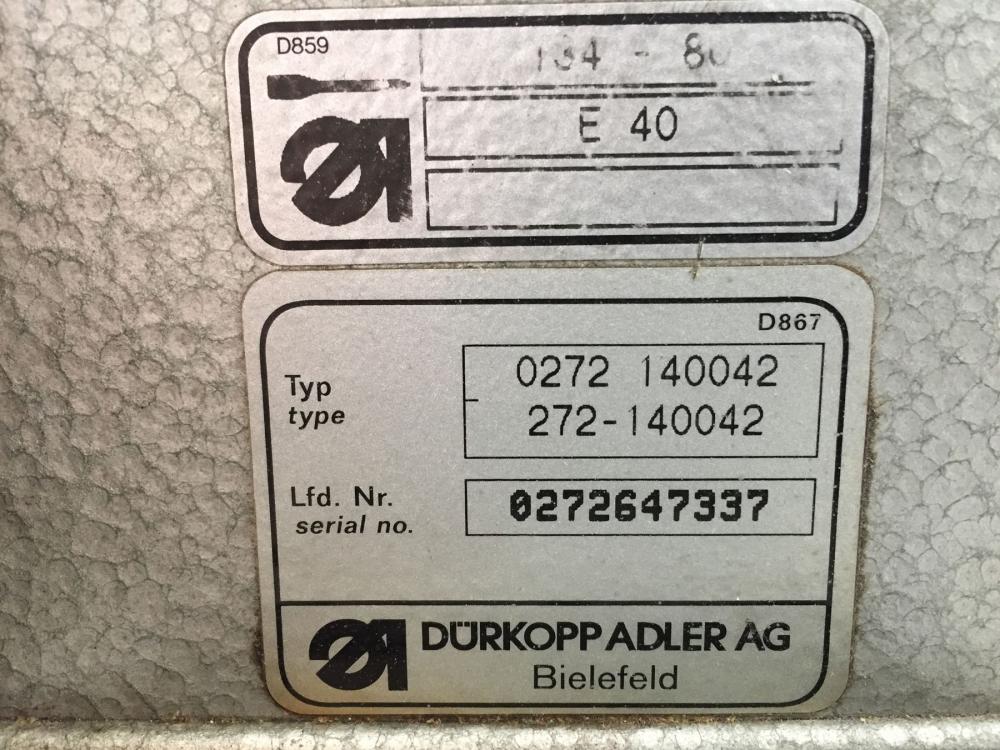
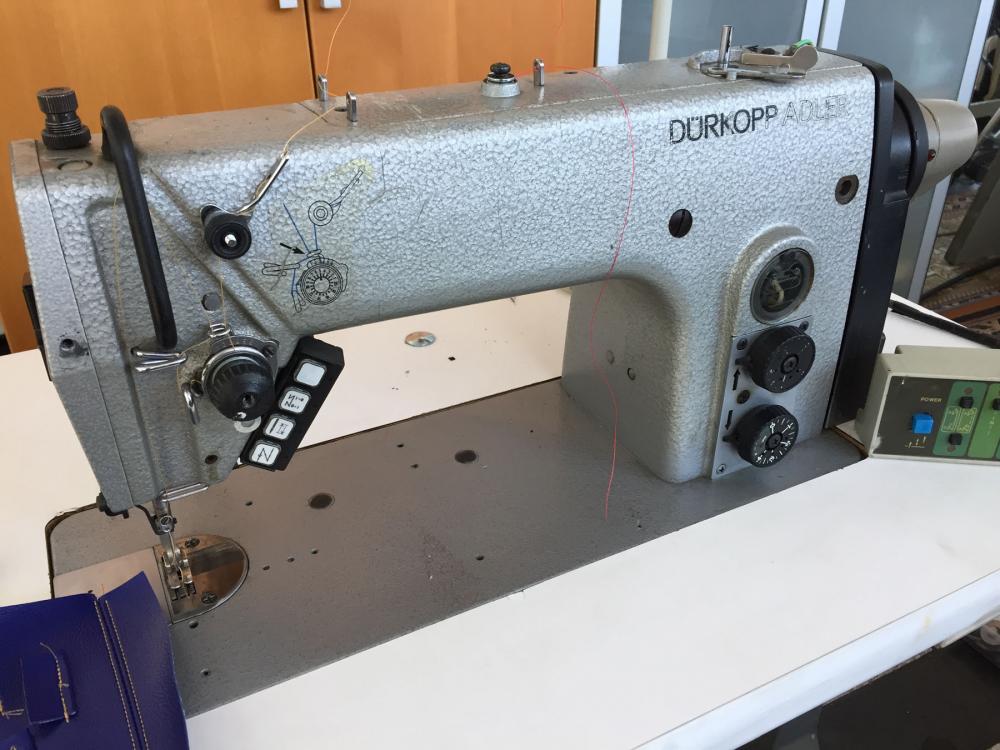
I have a Durkopp Adler 272 in very nice condition and ready to sew. Full function with all-electric actuators - no compressed air required. Back tack, reverse, thread wipe, thread cutting, needle positioning, stitch count mode, bar tack mode. It won't sew holsters or saddles, but it'll do plenty of other useful things with lighter weight leathers, vinyl, or canvas, and of course garment fabrics. This machine runs on 220V 3-phase. A basic rotary phase converter will allow you to run it in your basement. Priced to sell at $600. No shipping, sorry. It's worth a day trip to the Detroit area for sure. Pictures: I made a sewing demo video, but Youtube is currently overwhelmed by people uploading cat videos - it may be a moment or nine before this link works . . .
-
If you installed the thread guide where it belongs, I really don't see how it could cause the trouble you're describing. There may be something else going on.
-
This binding trouble may have to do with the bobbin case opener in two totally different ways. 1. When the throat plate is removed like in your first video, the bobbin case rotates more than it normally does and the bobbin case opener finger pushes against the triangular bobbin case tab and causes a bind. You can see the bobbin case popping backwards when the bind releases. 2. When the throat plate is installed, your bobbin case may simply be pulled back too much, causing the tab inside the throat plate cutout to touch and cause a bind. Neither of the videos shows that detail to verify or disprove. I made a video that hopefully will illustrate what I was trying to say in words above:
-
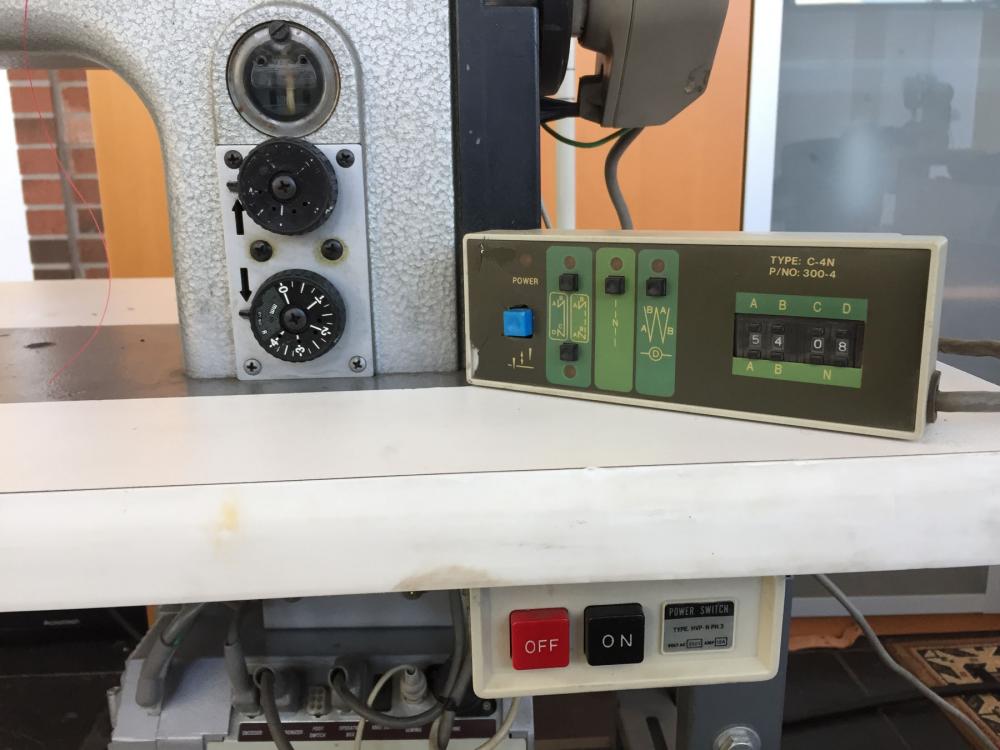
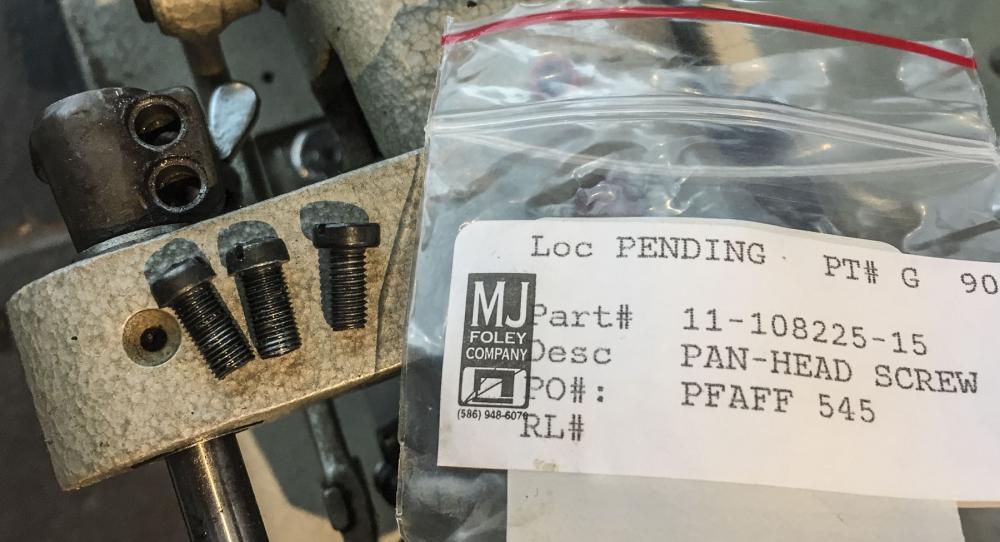
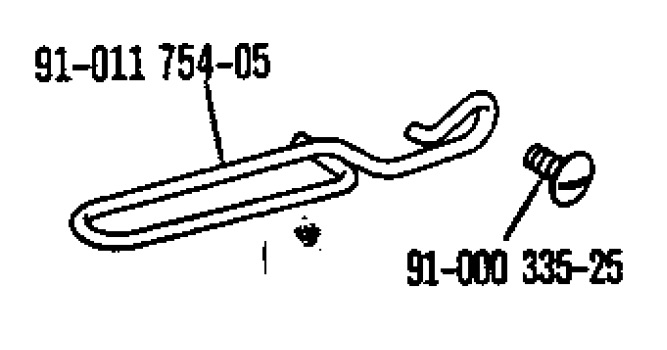
Ha, I'm having a déjà vu experience here. My Pfaff 545 also had mangled screw heads in the clamps on the foot lift linkage bar. I had ordered new screws based on the parts manual numbers (11-108 225-15) but they don't fit my machine either. Based on my measurements, I'm voting for the screws in my Pfaff 545 being size 7/32"-40, which is a weird size even in the sewing machine world. I was expecting it to be a 15/64" or 13/64" , which are somewhat common in sewing machines. I had some Juki 1/4"-40 L-11 screws which looked promising, but only for a brief moment. Who knows, maybe Pfaff just found a big box of weird screws on their shelves and decided to just use them somewhere (I really hope I'm wrong here.) I found taps for size 7/32"-40 on Amazon so that weird screw size does exist. Your best bet for finding screws of that 7/32"-40 size is to look at part lists by manufacturers like Juki, Mitsubishi, etc. that list actual screws sizes. Then order some of those screws and hope for the best. I've not been able to locate any OEM screws with that size. Regarding that mystery pin on top of the stitch length mechanism, it's for attaching a return spring. It's only used on the N10 subclass (like on my Pfaff 545), where the stitch length mechanism operates in the opposite direction (there's also no reverse with N10).
-
 After 32 replies I was really hoping to see a roller foot on that machine.
 -
Singer 31-15 tension pin + any tips?
Uwe replied to DominickTuroski's topic in Leather Sewing Machines
The tiny pin inside the tension disc post pushes the tension discs apart when you raise the presser feet via the manual foot lift lever. If that pin is missing (likely) or worn down (less likely) then your thread tension won't release when you lift the feet. It's not a super big deal since it doesn't really affect the sewing itself, just when you try to pull out the material after lifting the feet. You can make a pin yourself from a suitable nail that you cut off at the right length and file the ends smooth. Simple trial and error will get you there. Once you file the pin too short (oops) and it no longer pushes the tension discs apart, you start over. I must have made a dozen of these little pins by now. I even managed to lose a few original pins myself, knowing full well here they are hiding and that they go AWOL in the blink of an eye. Please upload your pictures directly here to your LW posts (drag your resized image files on top of the editor area where it says "Drag your files here to attach".) Those Google drive links or other workarounds won't be around a few years from now when people browse the LW archives, and they're cumbersome to click on just to see the picture in a new window. -
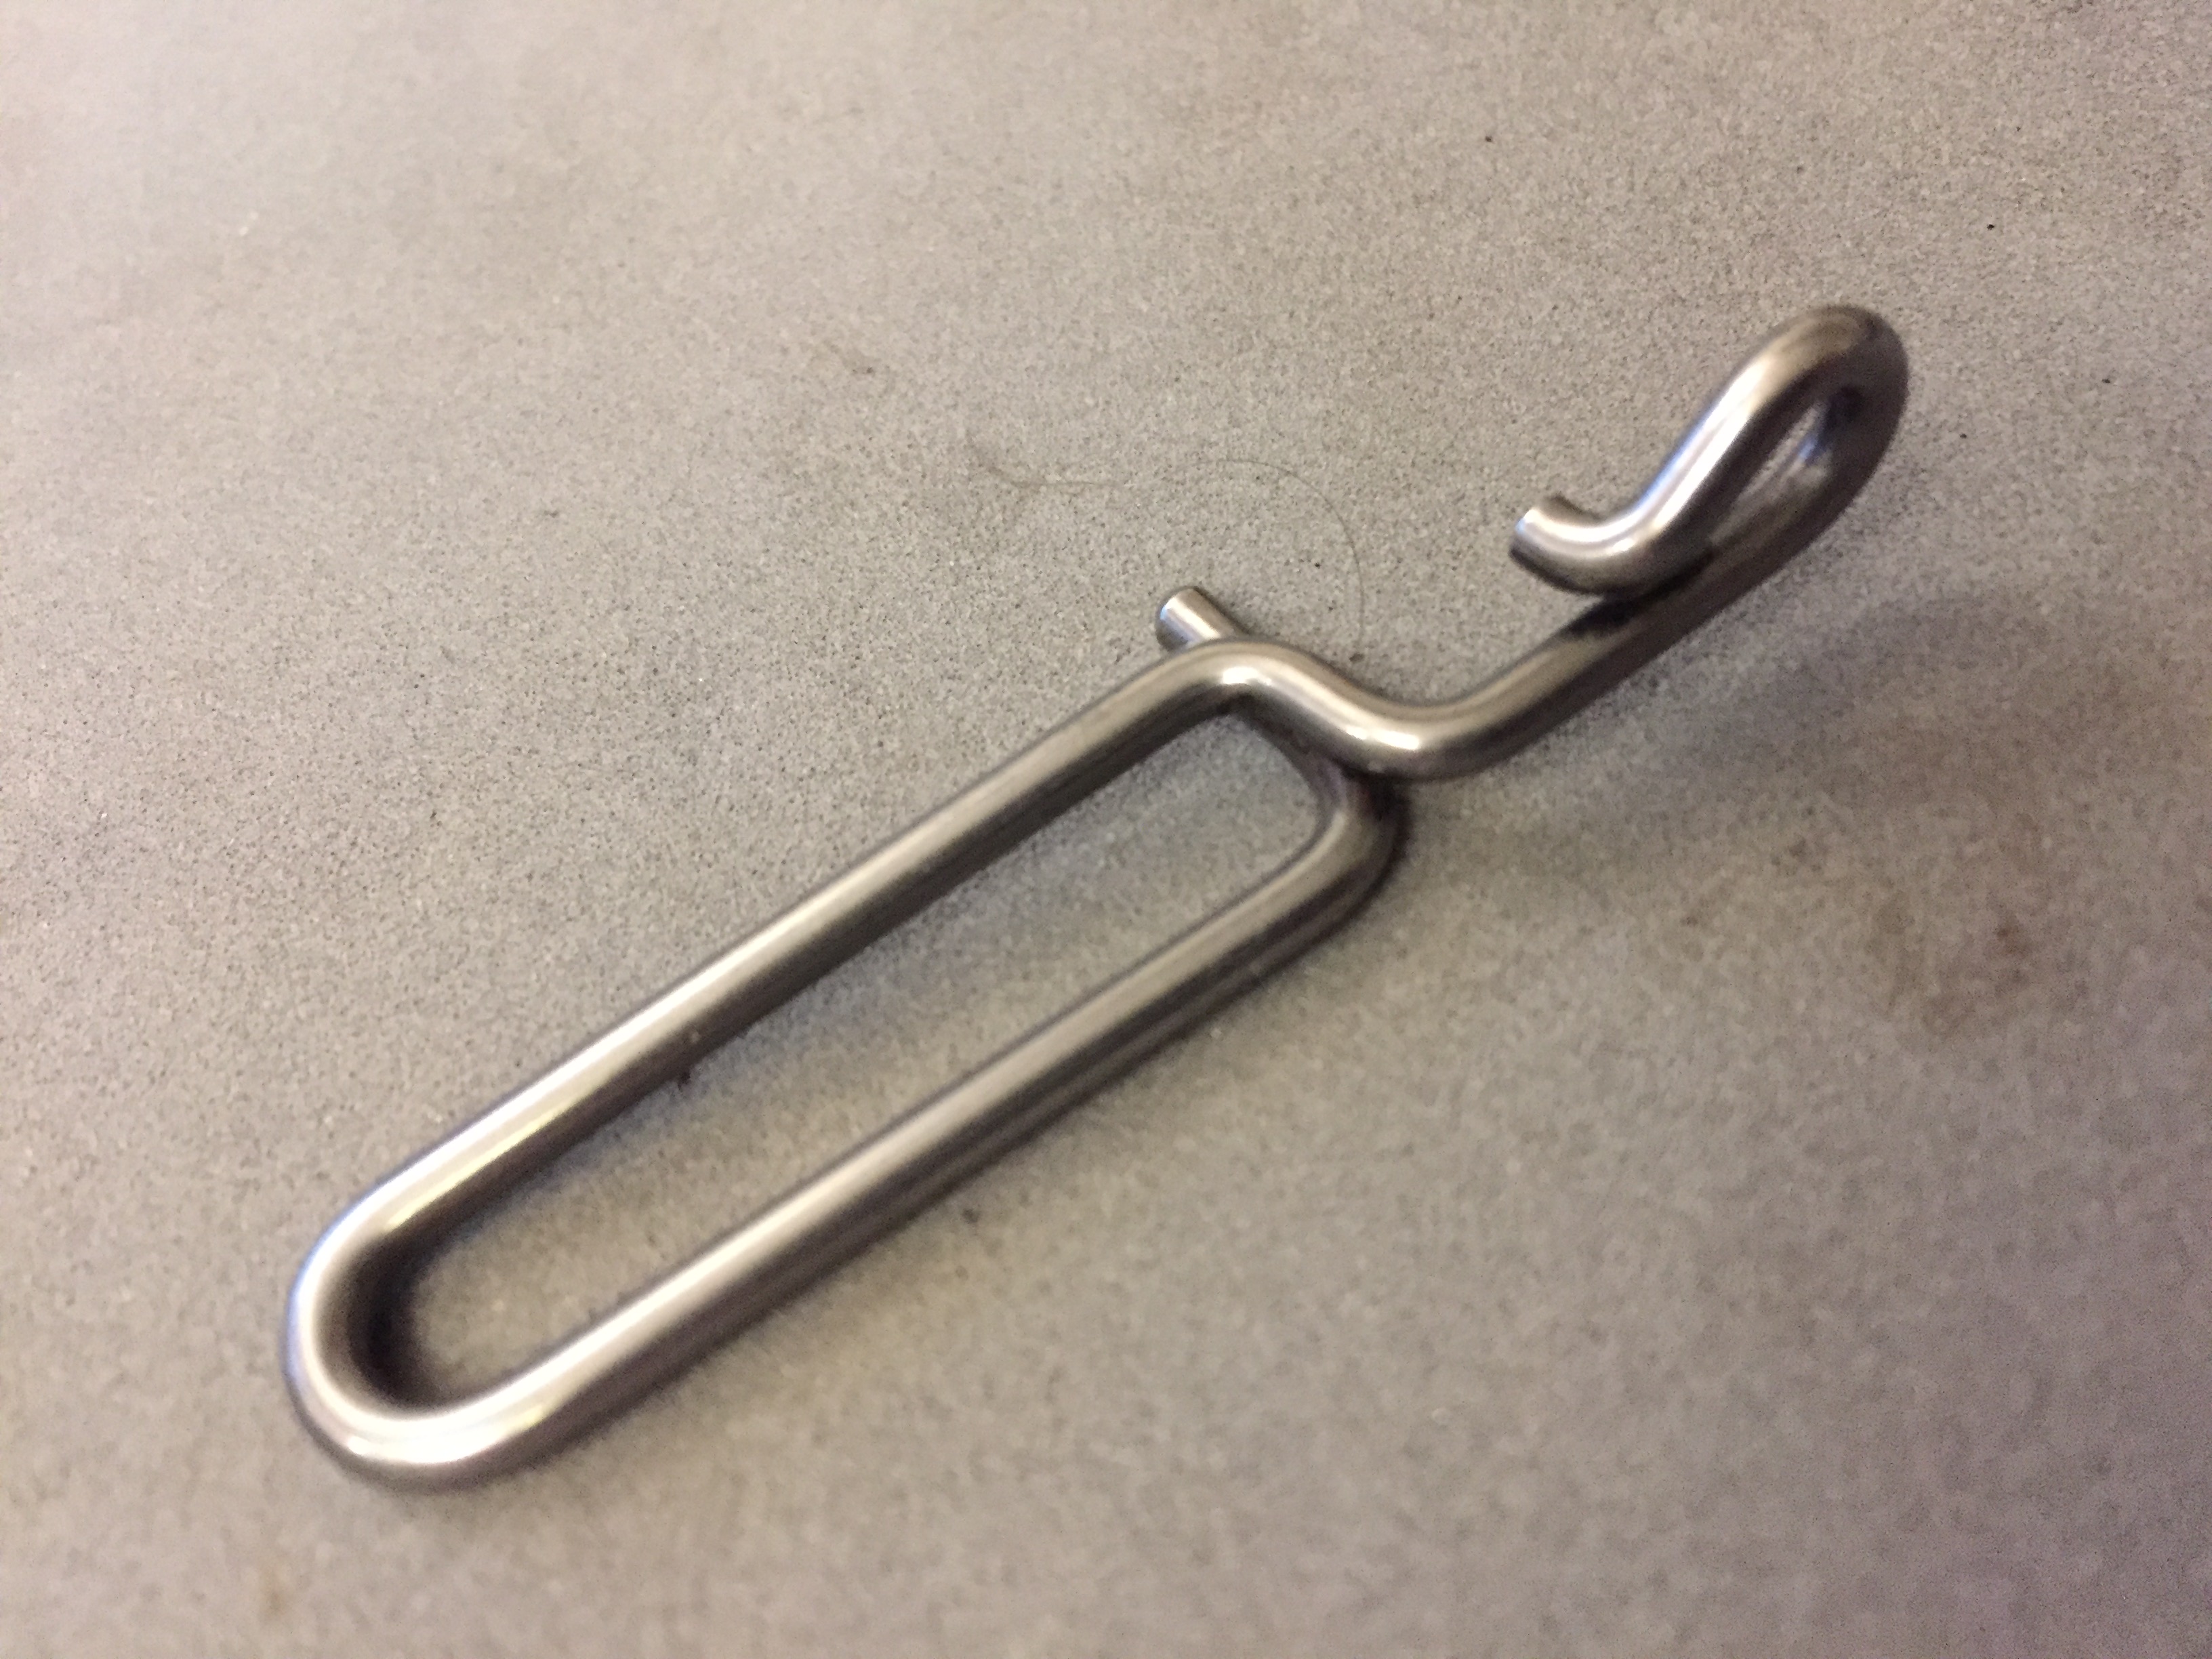
While you're fine tuning your machine, I'd suggest installing a proper lower thread guide. The one on your machine looks like a homemade replacement for the original, which looks like this:
-
PFAFF 1445 , How much play can the hook have
Uwe replied to chasman52's topic in Leather Sewing Machines
I'd say 3/16" (almost 5mm) is way too much play in the hook rotation. Aside from potentially causing hook timing and skipped stitch problems, the cone gears are likely to be more noisy and probably wear quicker when they're not meshed properly. On my Pfaff 145 the hook driving cone gears are tightly meshed and have almost no play between them at all. The hook itself has perhaps 1mm play at the tip, but it does not originate in the hook driving cone gear meshing (I suspect some play between the hook driving pin and the mating hole on the bottom of the hook.) Here's a video snippet of me wiggling the gears and the hook on my Pfaff 145 just for reference: -
Congratulations on getting a great deal on some fine machinery! Only downside is that everything else will seem really expensive in comparison from now on
-
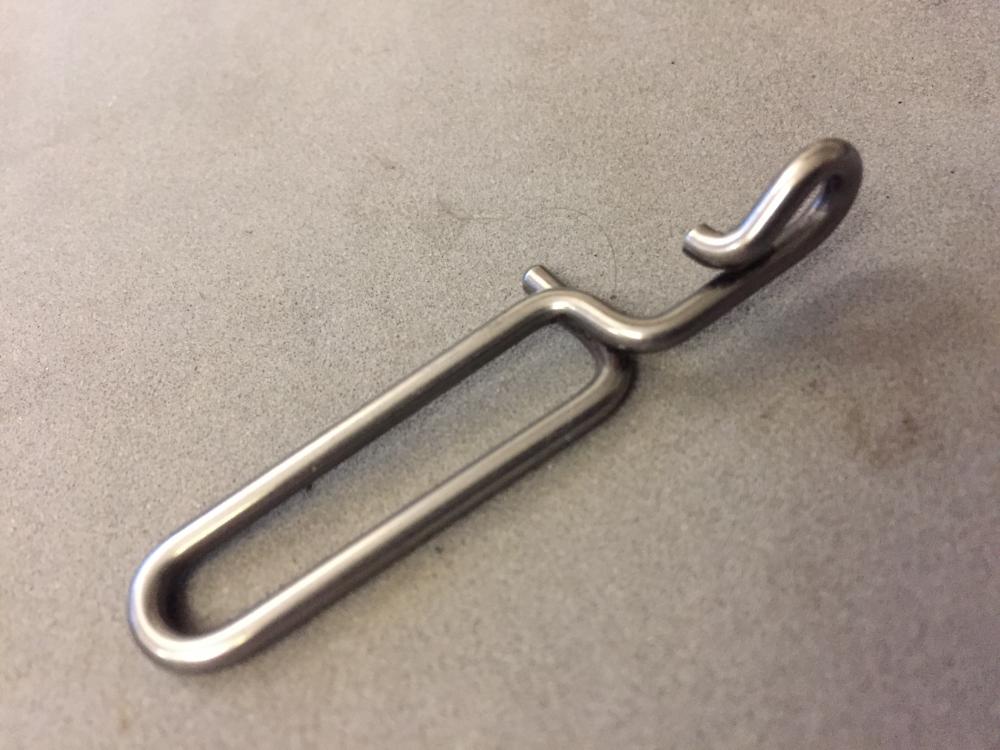
*wanted* 441 clone double toe presser foot
Uwe replied to JKHelms's topic in Leather Sewing Machines
A picture is worth nearly ten topic replies: -
You need to find out exactly why and where it binds. "Pushing through" on motor power is almost never a good thing on a sewing machine. Disconnect the motor and turn it by hand. It's only way to really feel the bind and debug it. I had one 341 class machine that had a set screw on the hook driving cone gear touching the opposing cone gear. Took me hours to figure out.
-
*wanted* 441 clone double toe presser foot
Uwe replied to JKHelms's topic in Leather Sewing Machines
I still don't know which foot you're looking for, "double toe close presser foot" neither rhymes with blanket nor harness. -
If the needle bar is still descending when the tip of the hook passes, something is most definitely wrong, regardless of needle system or needle bar height.
-
*wanted* 441 clone double toe presser foot
Uwe replied to JKHelms's topic in Leather Sewing Machines
If you're talking about the standard double toe foot set you can just buy those new on Ebay http://r.ebay.com/azPYfk I'm sure our trusty banner vendors have some, too. No need to complicate things with a request for quote process.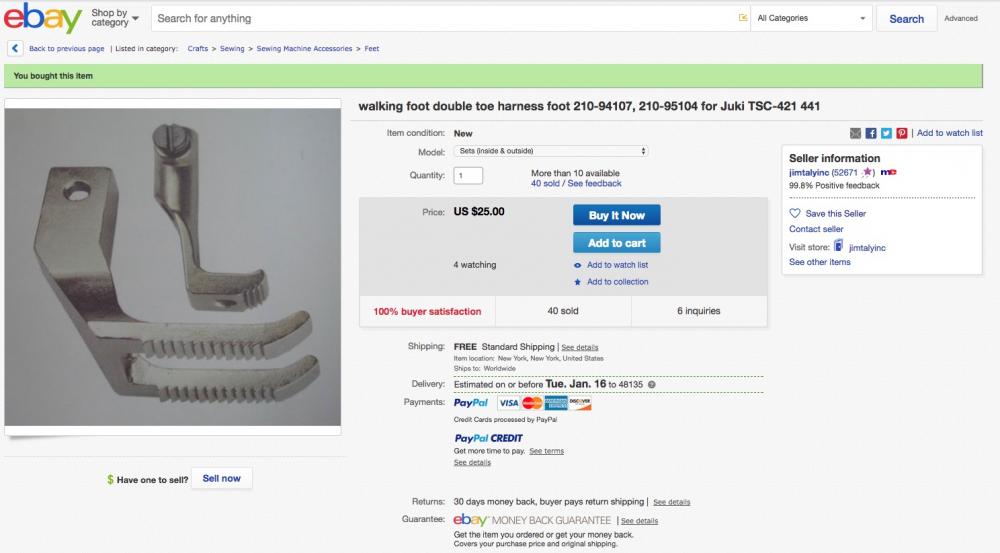
-
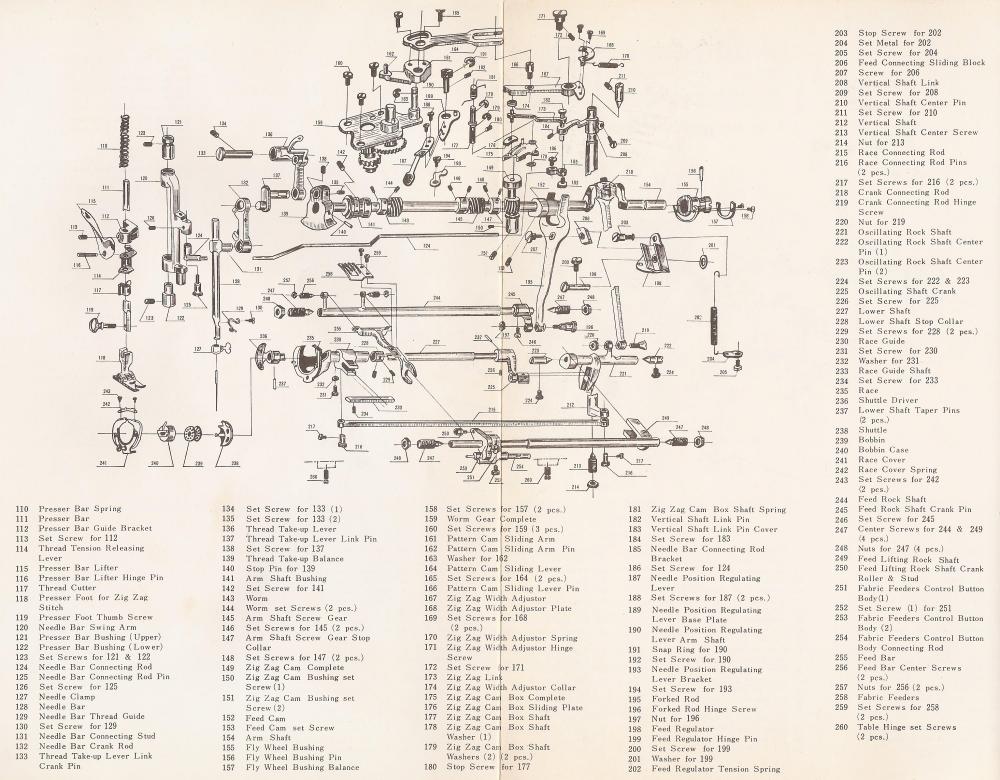
This LW forum is geared to towards leather sewing machines of the heavy duty industrial variety. Hopefully there are other forums out there better suited to support domestic sewing machines. If you're on Facebook, you may want to shoot FB member Sew Restored a message . Apparently your machine is a Emdeko/Morse model NH, made by Toyota. He seems to know about this model of domestic machine and how to fix them. I stumbled across a parts diagram for your machine. It may be helpful. It's not clear to me how this design can even go out of timing. It seems all locked down with pins through shafts and other rigid connections.
-
Patchers are a stage seemingly everybody goes through while trying to decide on a sewing machine. In reality very few people end up using a patcher to make things. Patchers are machines mainly used to repair things that were made on other machines. Of course there are exceptions. Patchers are like horse-drawn Amish buggies that can do things no modern car can do. It looks all romantic in pictures and when you pass them on the road, but precious few people are prepared to deal with hoof prints, droppings, and equine flatulence on a daily basis. I once took a very memorable open carriage ride up to Neuschwanstein castle pulled by a flatulent horse - I nearly fell off the cart from asphyxiation and juvenile laughing fits. Yes, you can make beautiful things on a Patcher that you cannot do on any other sewing machine. I had a Techsew 2900 patcher some time ago that made an absolutely beautiful stitch on vinyl material ( https://www.youtube.com/watch?v=hiFOOdQydD0), but would likely leave undesirable marks on the type of leather you want to work with. Your best bet is really to take some material to a place with a showroom full of demo machines and try them out or have them demo it for you. In Ohio you have several day-trip options to choose from (Weaver, Neal's Saddlery, Toledo Industrial Sewing Machines). No doubt the patcher crowd will chime, too (edit: like Wizcrafts did a few seconds before I hit Submit.)
-
Durkopp Adler 267 are seriously nice machines and worth considerably more than $750 in good condition, at least in my book. Check the subclass - the Durkopp Adler 267-373 is perhaps the most desireable one for general upholstery and leather type work. Some subclasses are specialty one-trick ponies and not desirable for general purpose work. They're well supported in terms of manuals and common parts availability like presser feet, throat plates, hooks, tension unit, etc. Some parts are available reasonably priced from quality aftermarket manufacturers like Kwok Hing, the OEM bits can add up quickly. Make sure the machine you pick is complete and turns over smoothly by hand. Get a spare if you can afford it. Here's a brochure that describes the various models in the Durkopp Adler 267 range: http://docs.uwe.net/Durkopp_Adler_267_leaflets.pdf
-
Let's keep this topic focused on Permata Sewing and take the UT441 discussion back to the original topic. I just added some info there:
-
Sneak Peek: UT441 flatbed table attachment for 441 class machines
Uwe replied to Uwe's topic in Leather Sewing Machines
I often get questions about which variations of 441 clones this table will fit. The UT441 table was designed for the 16.5" arm of the original Juki TSC-441. The model names and numbers on the various Juki TSC-441 clones and variations can be very confusing, even within the same brand. I double checked the arm length specs of common 441 variations: Juki TSC-441, Cowboy 4500, Techsew 5100, Cobra Class 4: 16.5" arm (UT441 table is designed to fit this arm as-is) Artisan Toro 3200: 12.5" arm (drill & tap hole in arm to accomodate UT411 table) Cowboy 3200, Techsew 3850: 10.5" arm (too short for UT441 table) Artisan Toro 3000: 9.5" arm (too short for UT441 table) Cowboy 3500: 9" arm (too short for UT441 table) I do plan to make a short version of the table for the popular Cowboy 3200, but it'll be spring 2018 before that becomes a reality. -
The warning bells in my head are chiming in loud and clear, too. Most of the used sewing machine offerings on the Permata sewing website seem too good to be true, with prices too low, pictures taken anywhere but Indonesia, and descriptive text copied from other websites. My sample check was that Cobra Class 4, the text is copied from the Cobra website, and googling Cobra Class-4 pictures brings up that same machine in front of the same garage door from various websites. You're better off checking in with a reputable dealer in Texas, like @SolarLeatherMachines of Solar Leather , or one of our trusty vendors in the banner ads. More expensive but also more real.
-
Part of the difficulty comes from the common desire to find the perfect one machine to sew all seams on a product. This is the realm that domestic sewing machines are designed for - a dozen tasks, one machine. High volume and/or high-end production outfits take the approach from the opposite direction. They usually look at one seam and ask which one machine is best suited to sew that particular seam. Then they move on to the next seam or type of seam. A simple looking product may involve a dozen or more sewing machines. This is the realm that industrial sewing machines are designed for - one task, one machine. And each machine runs north of $6K. At times it seems that the bulk of effort amongst participants on this forum is spent on trying to make industrial machines do things they were not designed to do. Some machine designs are inherently more versatile than others. In my book, a cylinder arm machine with a good flatbed attachment is one of the most versatile combinations you'll find among industrial sewing machines.