Uwe
-
Posts
2,221 -
Joined
-
Last visited
Content Type
Profiles
Forums
Events
Blogs
Gallery
Store
Everything posted by Uwe
-

Sewing shoe upper using a zigzag machine
Uwe replied to George1520's topic in Leather Sewing Machines
What you probably really need is a feed-off-the-arm zig-zag machine like the SewPro 2156 shown in the video below. They are complex specialty machines and not cheap. Sewpro is located in Ephrata, PA, a bit less of a logistical challenge than ordering directly from China. -
In the absence of a service manual for the exact machine you have, a manual for a close relative or successor model is the next best thing. The Durkopp Adler Manuals Resource page actually has a full set of documentation listed for the Adler 221, including an Adler 221 service manual. With a little luck, there will be a LOT of carryover from the Adler 220 design.
-
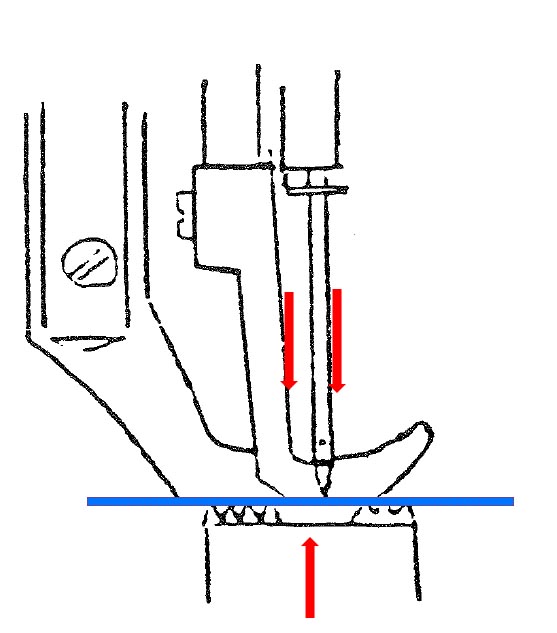
There's a chance that the lack of synchronization marks is due to fact that the shafts may not need to be synchronized. On the Adler 220 the front/back movement of the feed dog is directly linked to the stitch length excenter on the top shaft. The hook position can be adjusted freely and is not tied to the top/bottom drive shaft synch position. The only thing potentially affected by the relative top/bottom drive shaft position is the up/down movement of the feed dog. There's a little excenter on the bottom drive shaft that moves the feed dog fork up and down. If that excenter can be independently adjusted, there's really nothing left to synchronize between top and bottom drive shaft, which would explain the lack of synchronization marks. I don't know this for certain yet - moving my Adler 220 from its storage spot to verify is not practical right now. On most machines with a triple feed walking foot design, the general rule for vertical movements of needle, inner presser foot and feed dog is: When the descending needle tip is level with the top of the throat plate, both the descending inner presser foot and ascending feed dog should also be level with the top of the throat plate. This should be easy to verify. One other timing aspect that affects smoothness of a machine is the relative position of the thread take-up lever and the hook. Verify that the thread take-up lever is at its very bottom position exactly when the thread wraps around the farthest point of hook. If that is not the case you may get thread snapping noises and other unrefined side effects.
-
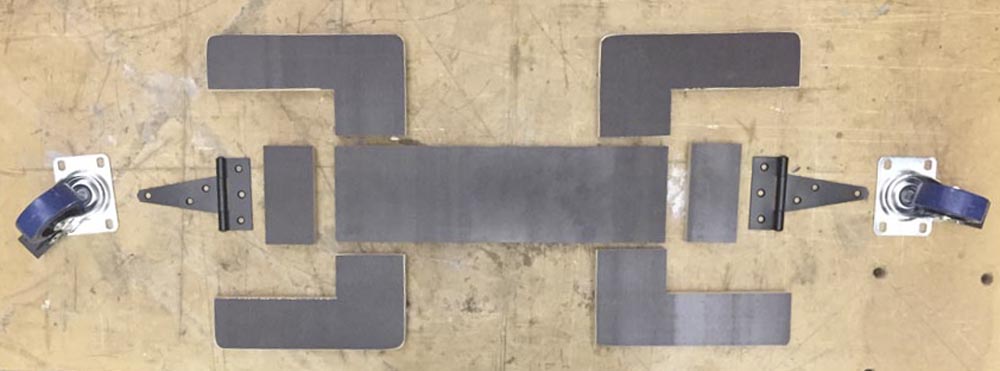
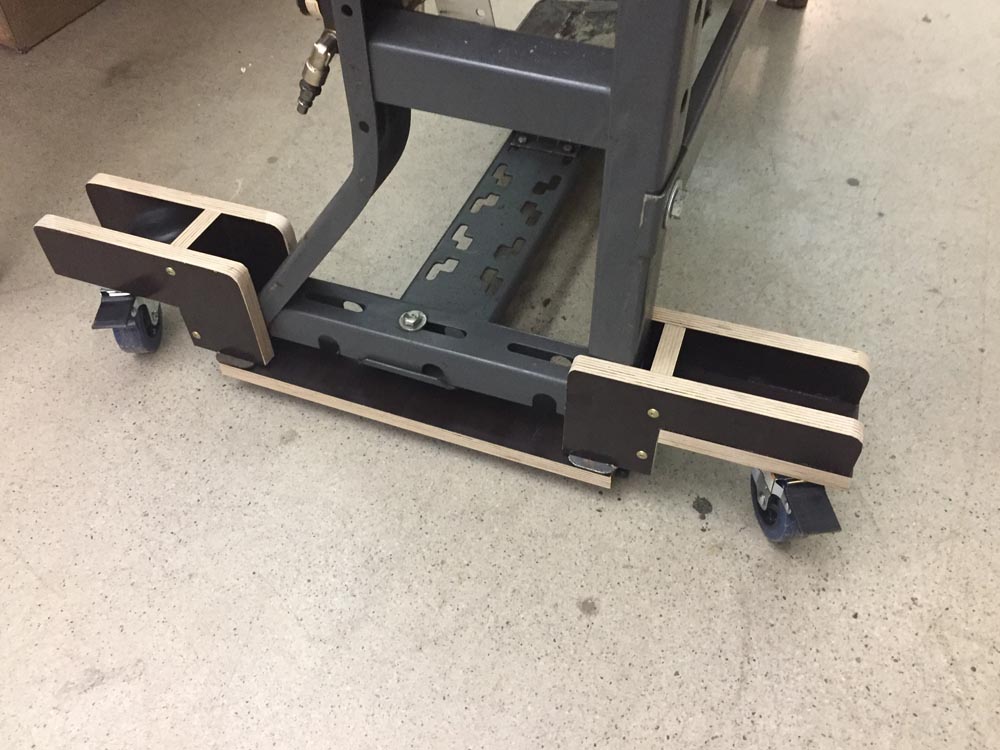
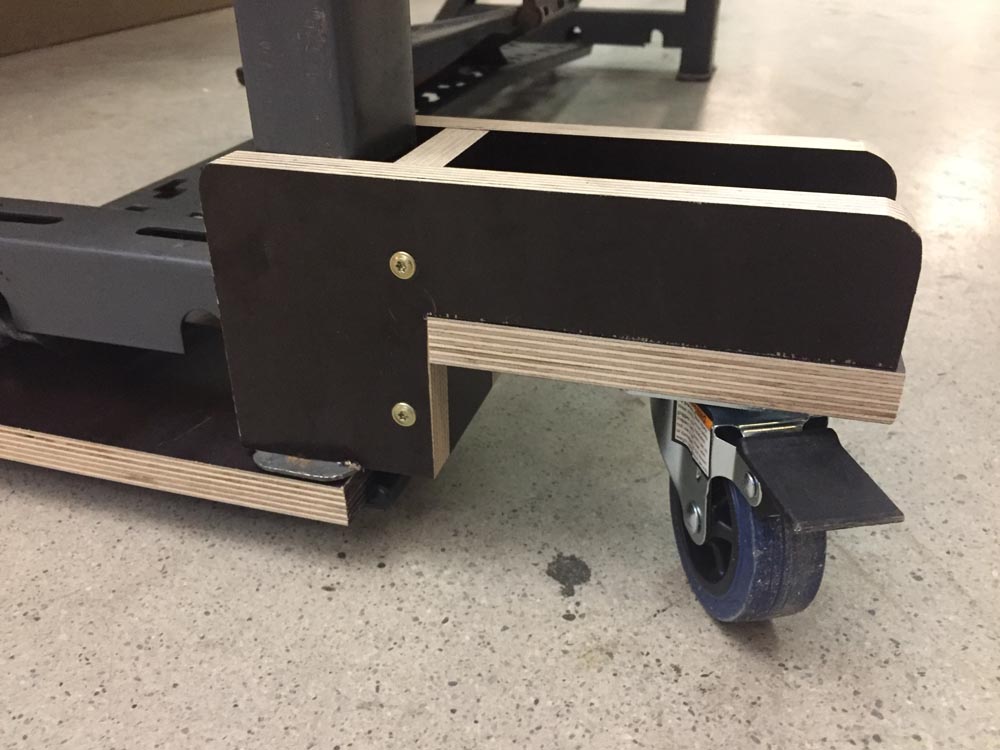
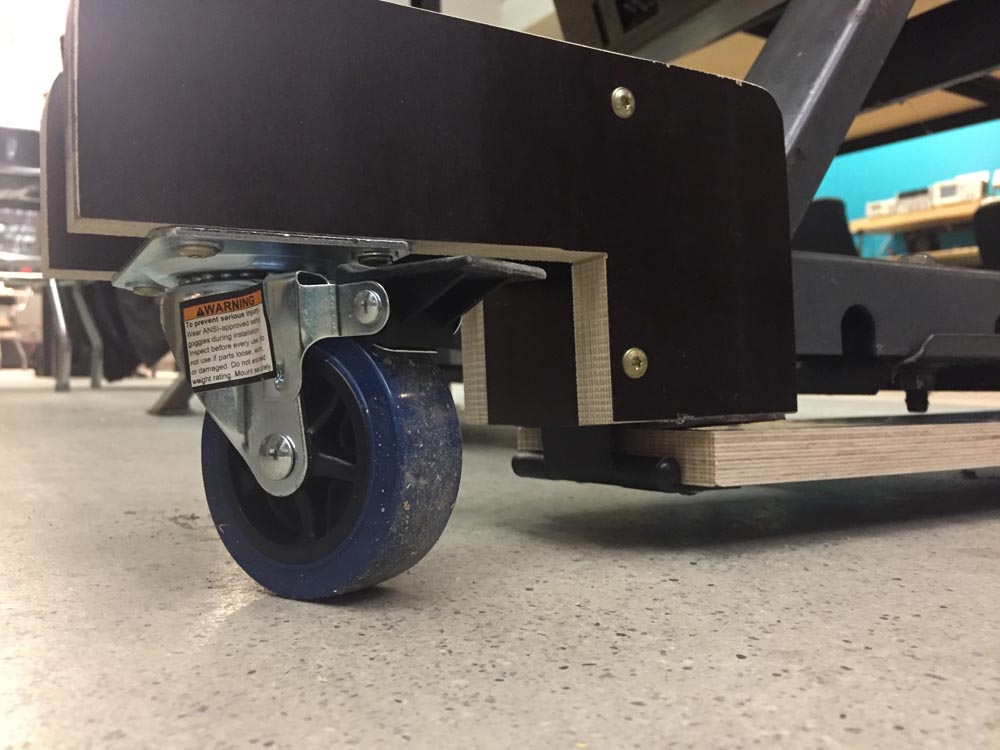
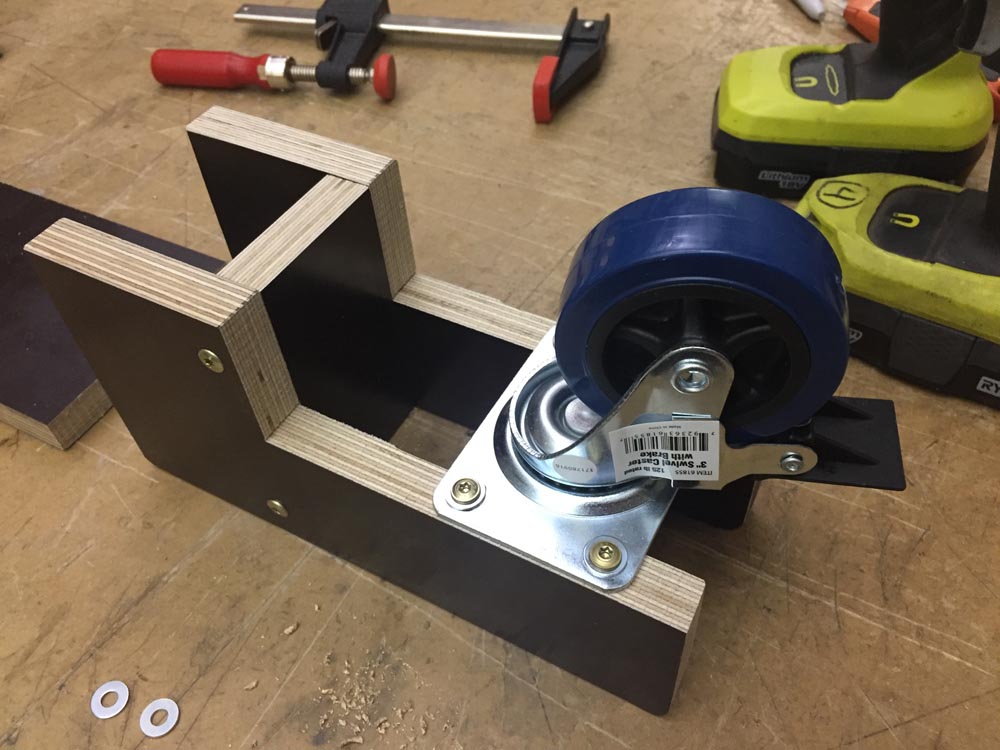
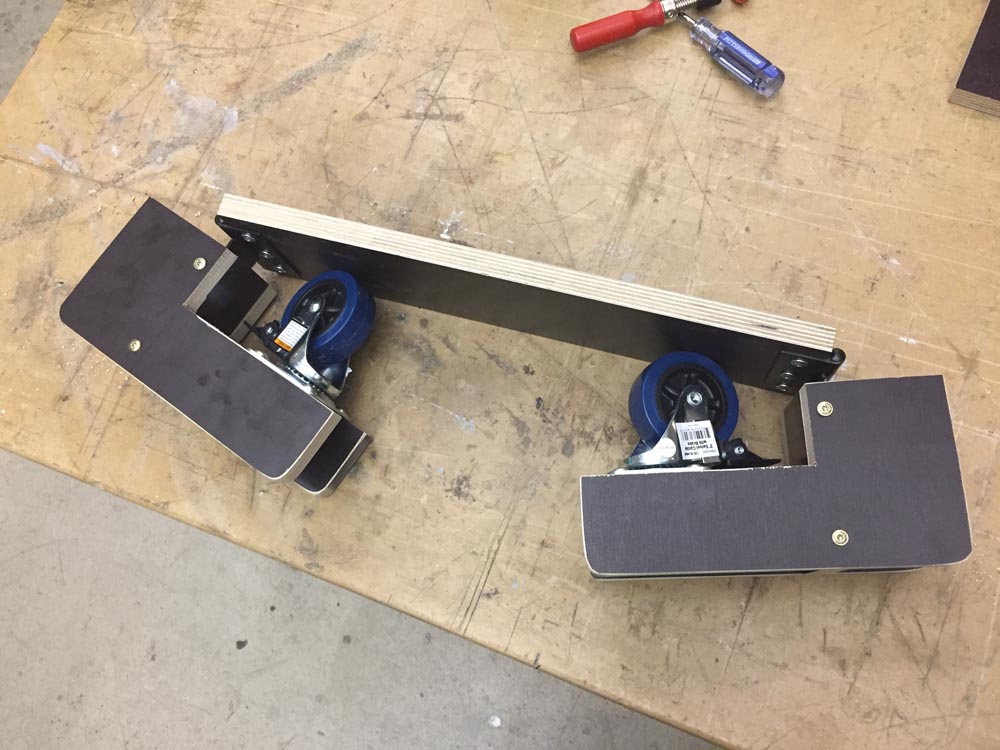
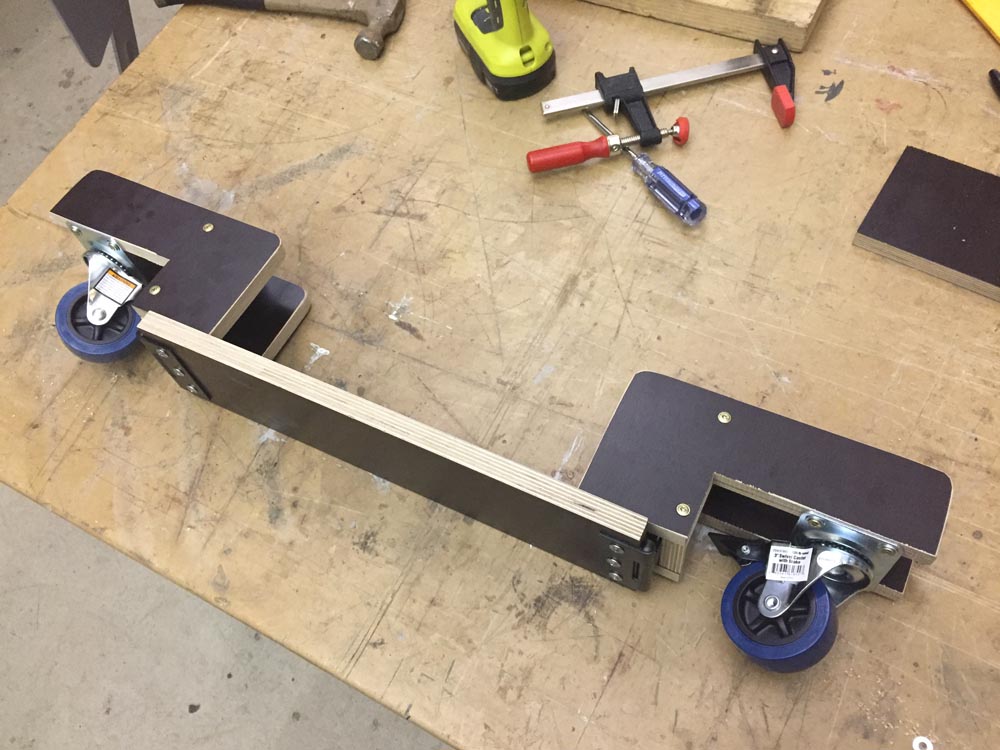
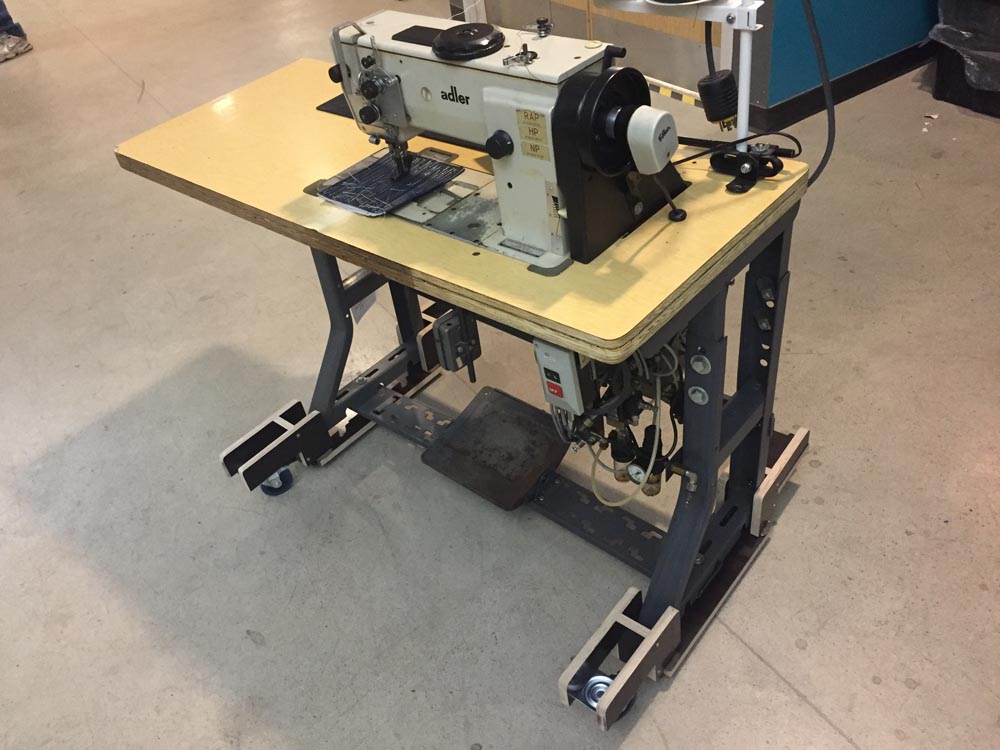
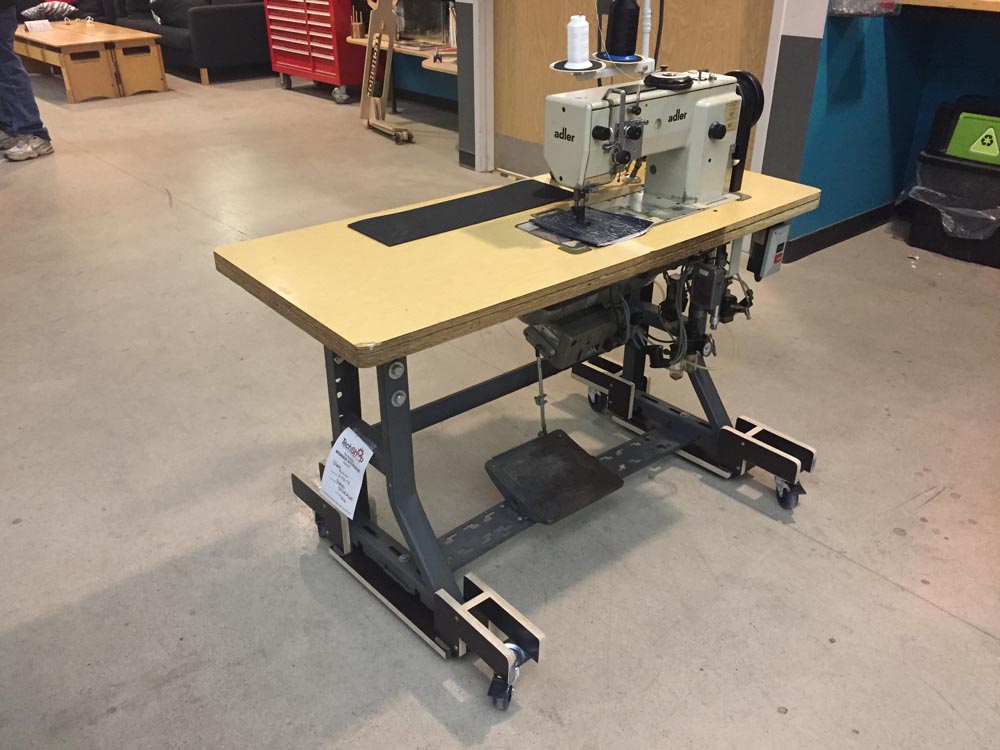
I'm certainly not the first one to do this and tables that are designed with wheels in mind are the best solution. But I wanted to figure out a way to retrofit my tables with removable wheels that wouldn't raise the table much and be very sturdy. I spent the day at Techshop to put my Adler 467 on "proper" wheels. I have to move it from storage area to the work area whenever I want to use it. It's been strapped on top of mover's dollies, but that was just a temporary solution and not very ergonomic at all for actual sewing. Here's what I came up with today. Perhaps it'll inspire some folks to make something similar or to improve upon my design. Design goals: Wheels must install without tools and be easily removable. Raise table less than 2" (5cm) to keep table height and pedal ergonomics good. No modification of original table legs. Lockable swivel castors. No decrease in overall stability. This project has been bouncing around in my head for some time. The solution shown here consists of two skateboard-like units that clamp onto the original legs on either side of the table. The hinged wheel units on each end clamp onto the floor mount tabs of original table legs. The weight of the table provides the clamping force via hinge levers - the heavier the table, the stronger the clamping force and thus stability. Total cost of materials was about $50 ($25 for the four swivels castors, $15 for 2'x4' fancy phenolic 3/4" plywood, $10 for fours hinges.) Here's what the table looks like wth the new wheels: These close-ups show how the hinged wheel end units clamp down on the tables mounting plates: Here are the parts for one of the wheel units (seven 3/4" plywood pieces, two locking swivel casters, two hinges): The center support board is connected to the two wheel end pieces via hinges - this provides the clamping action to hold the unit in place. The two end pieces have a vertical offset like a fifth-wheel trailer to keep the center support board low enough for good ergonomics of the table and pedal. The sides walls of each wheel assembly are spaced to fit snugly around the table's vertical metal legs to provide support against sideways tilting. It takes more than one person to put these wheel "boots" on. Taking them off is easy - just lift up one end of the table and the wheel boots fall off. The footprint of the wheeled table is considerably deeper front to back, compared to the original table. This provides room for the swivel casters to rotate 360˚ without compromising front-to-back stability. This setup is not going to tip over backwards when you tilt the sewing machine head back.

-
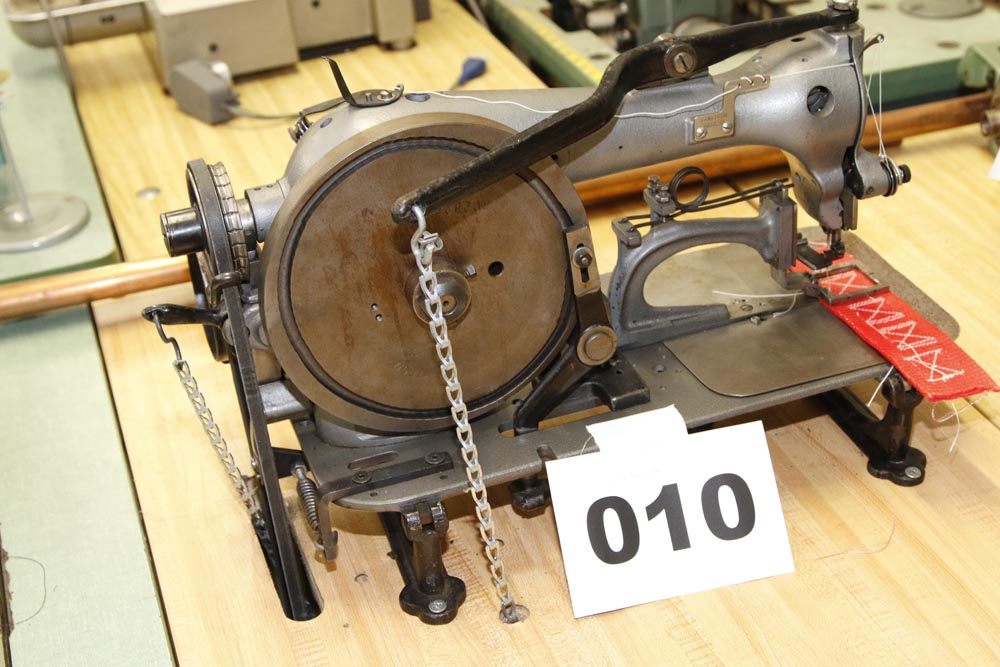
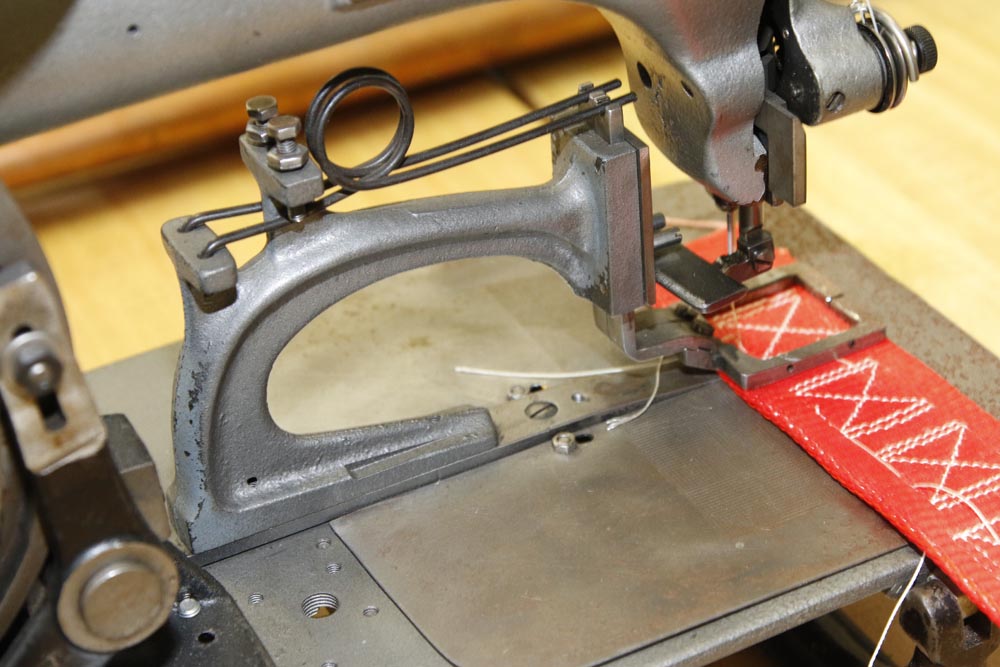
I have a few old-school Box-X machines (and a pile of cam disks) that I'm dreading to work on. The only one I have any real confidence in is this Singer 68, which seems to be in nice, functional condition, but I know very little about them: For reference just to see what's out there and for rough price guidance, I occasionally visit Miami Sewing Machine's website: http://www.miamisewing.com/specials/tacker.htm I've never dealt with Miami Sewing and can't really say if they're "worthy", but at least they put their inventory online with pictures and a price.On the plus side, they're a day trip away from the Tampa area, which avoids costly shipping of these complex, apparently hard to repair, heavy and fragile machines.
-
That Singer 42-5 hand wheel looks just right on that machine, I think. Sometimes it's the unexpected combinations that work surprisingly well. Nice job and cool setup!
-
Googling that exact term will bring up a bunch of reference charts, including one by our LW members TechSew Ron: http://www.techsew.com/blog/needle-thread-chart/
-
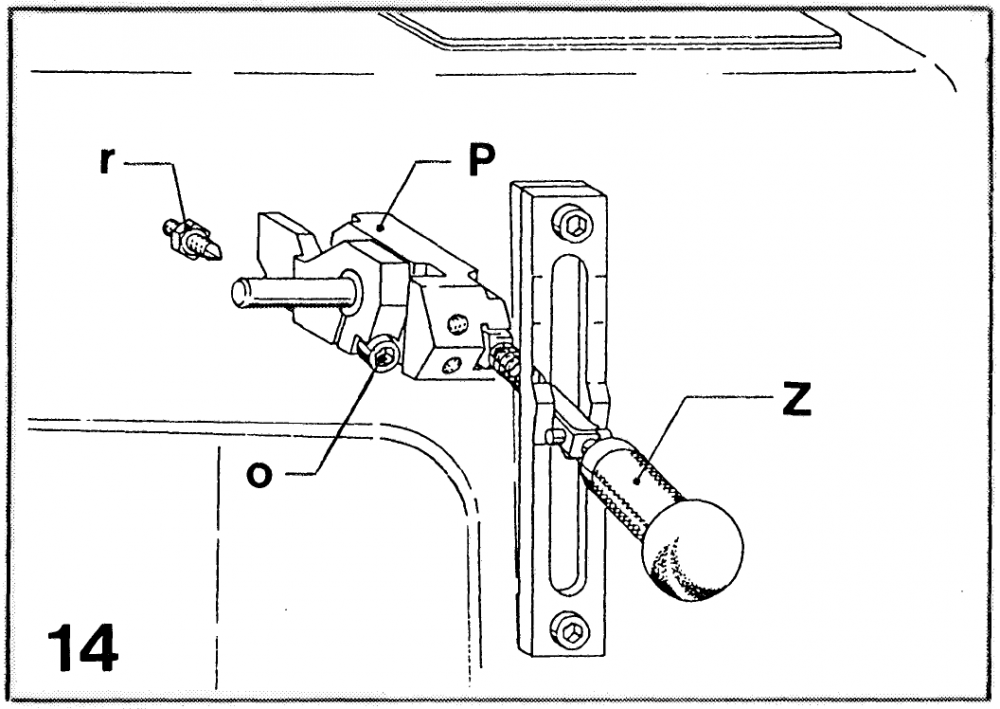
The Durkopp Adler 205-370 Service Manual (I only have the German version: Service -Manual.pdf) describes how the reverse lever mechanism has different friction settings, depending on whether pneumatic actuators are installed or not. Without pneumatics, screw "r" needs to be screwed all the way in, and screw "o" needs to be tightened to adjust the friction of the lever movement.

-
See below . . .
-
Are Pfaff 335 and Adler 69 cylinder arm caps interchangeable?
Uwe replied to Uwe's topic in Leather Sewing Machines
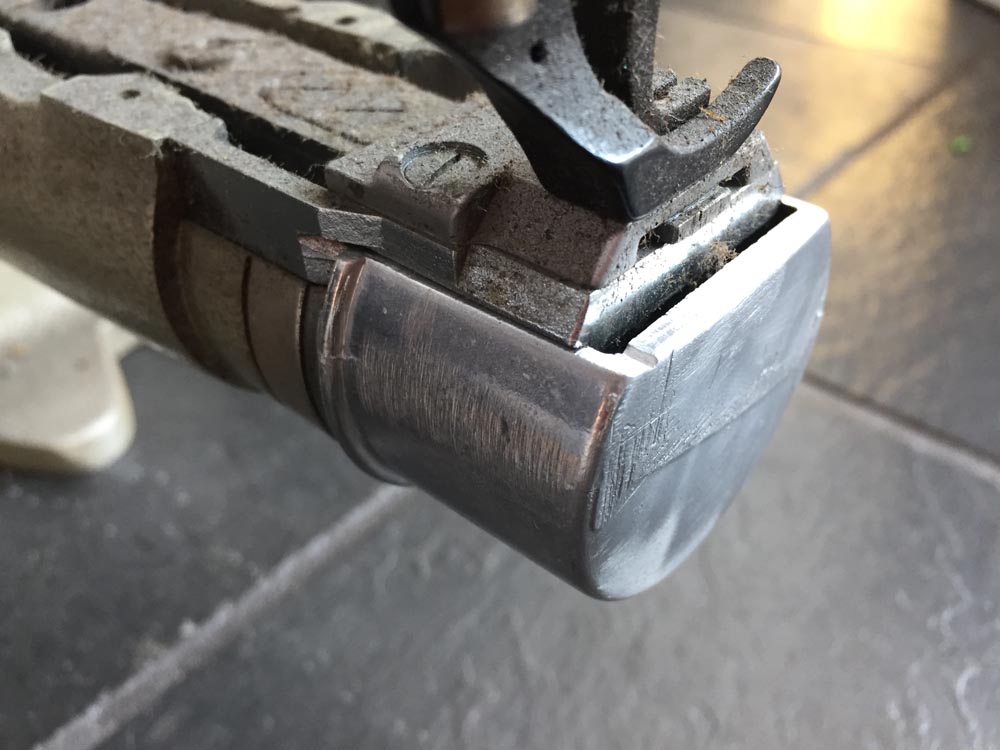
Upon further review, it turns out the cap I spent all of $1.29 and ten minutes on, actually DOES fit slim cylinder arm machines with "normal" size hooks and bobbins. The pictures below show the cap on my Sunstar KM-380. So perhaps the cap will also fit Pfaff 335 machines. The Mitsubishi CU-865 actually has a large hook and uses M-Size bobbins (now I really want to get that CU-865 to work!) Please note how dirty the SunStar KM-380 machine is. People have occasionally teased that my machines are too clean. It took considerable willpower to not wipe this one down before taking pictures - I'm making progress.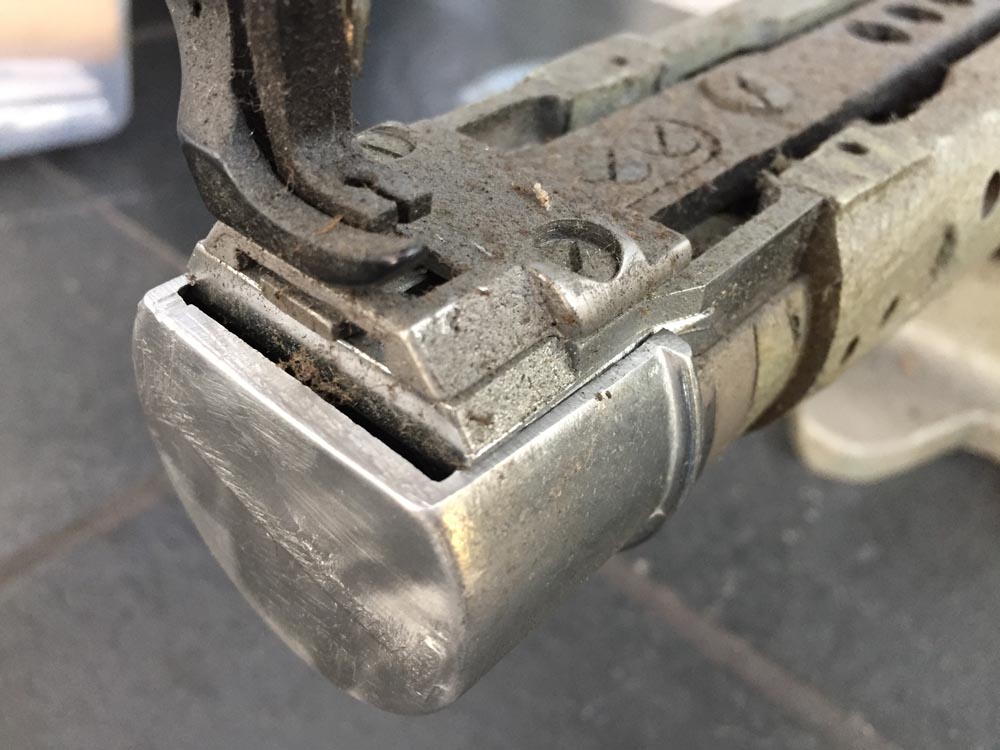
-
I've not yet come across a better version of that manual, sorry. Many areas and will be similar to other Pfaff 145/545 machines, especially in the head portion. The Pfaff 345 hook/bobbin should be nearly identical to the ones used in the other x45 machines and use the same bobbin threading scheme. The video below shows how I thread the bobbin of my Pfaff 545. If your hook and bobbin cap looks different, please post some pictures.
-
Sold.
-
Are Pfaff 335 and Adler 69 cylinder arm caps interchangeable?
Uwe replied to Uwe's topic in Leather Sewing Machines
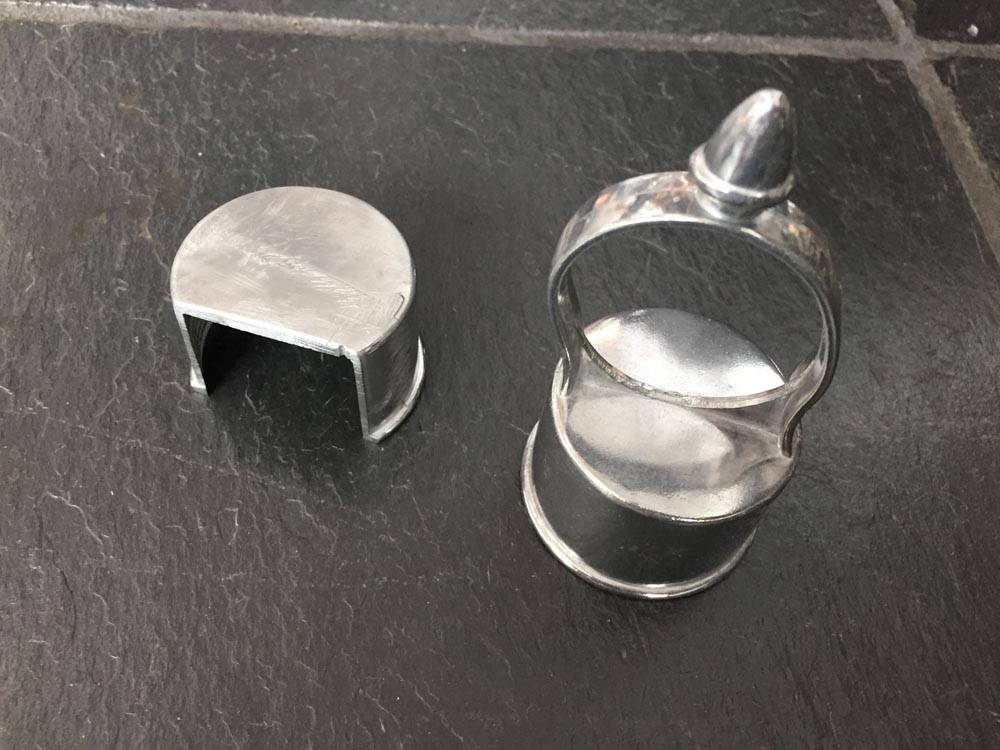
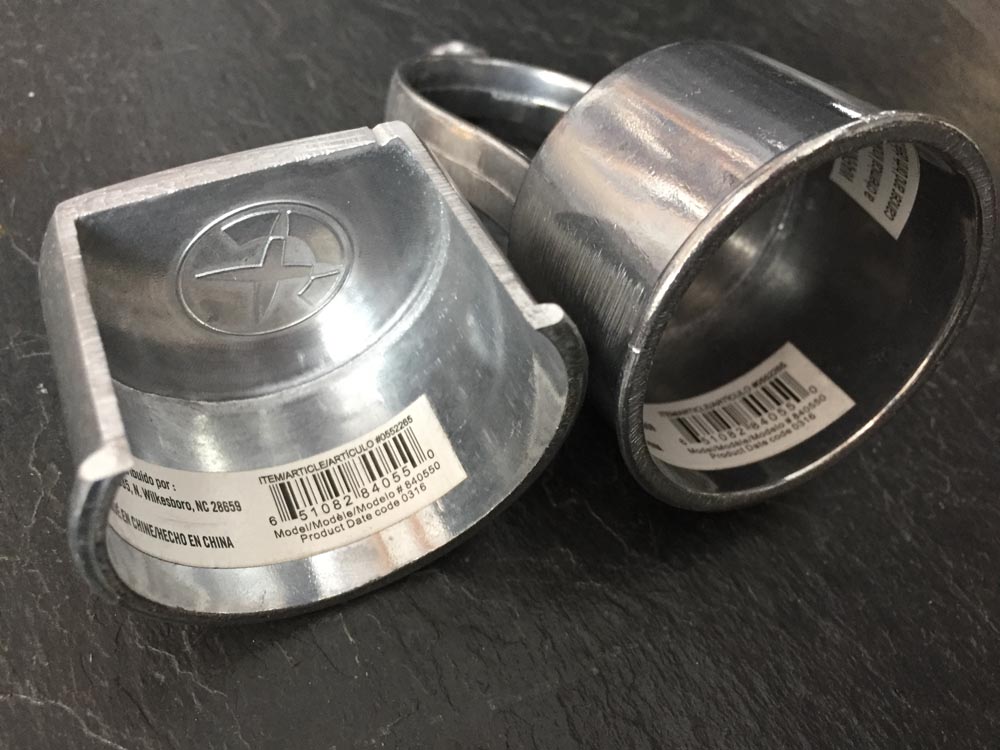
Thanks for that link, DC. I had come across that part on the aaasew.com website and I actually have ordered from them a few times before. It's a moderately clunky ordering process and takes 5-6 weeks if they can get the part. Meanwhile a made trip to my local hardware store to try out one base part candidate I had high hopes for. Alas, it wasn't meant to be ... I was really hoping these $1.29 chain link fence post caps would work out (original on the right, modified on the left): The inside diameter is actually big enough for the hook, but only if the cap is lowered and sits centered with the hook. I just put the cap over the hook for these photos. You can see it sits quite a bit below the grooves. When I align it with the grooves, the bottom interferes: It was worth a try, though.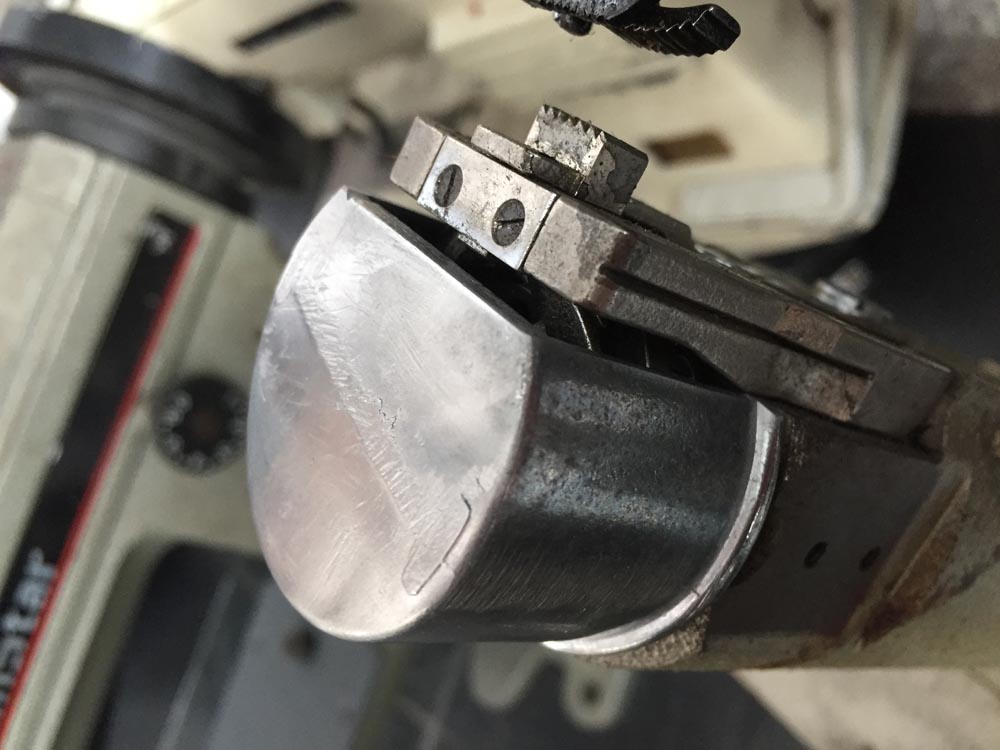
-
Are Pfaff 335 and Adler 69 cylinder arm caps interchangeable?
Uwe replied to Uwe's topic in Leather Sewing Machines
Thanks for the part number and measurement references! That CAD sketch is nice - thanks DC! I'll do some trials over the next few days. I'm hoping to find some suitable, readily available base part that I can easily modify to make these hook cover cups. -
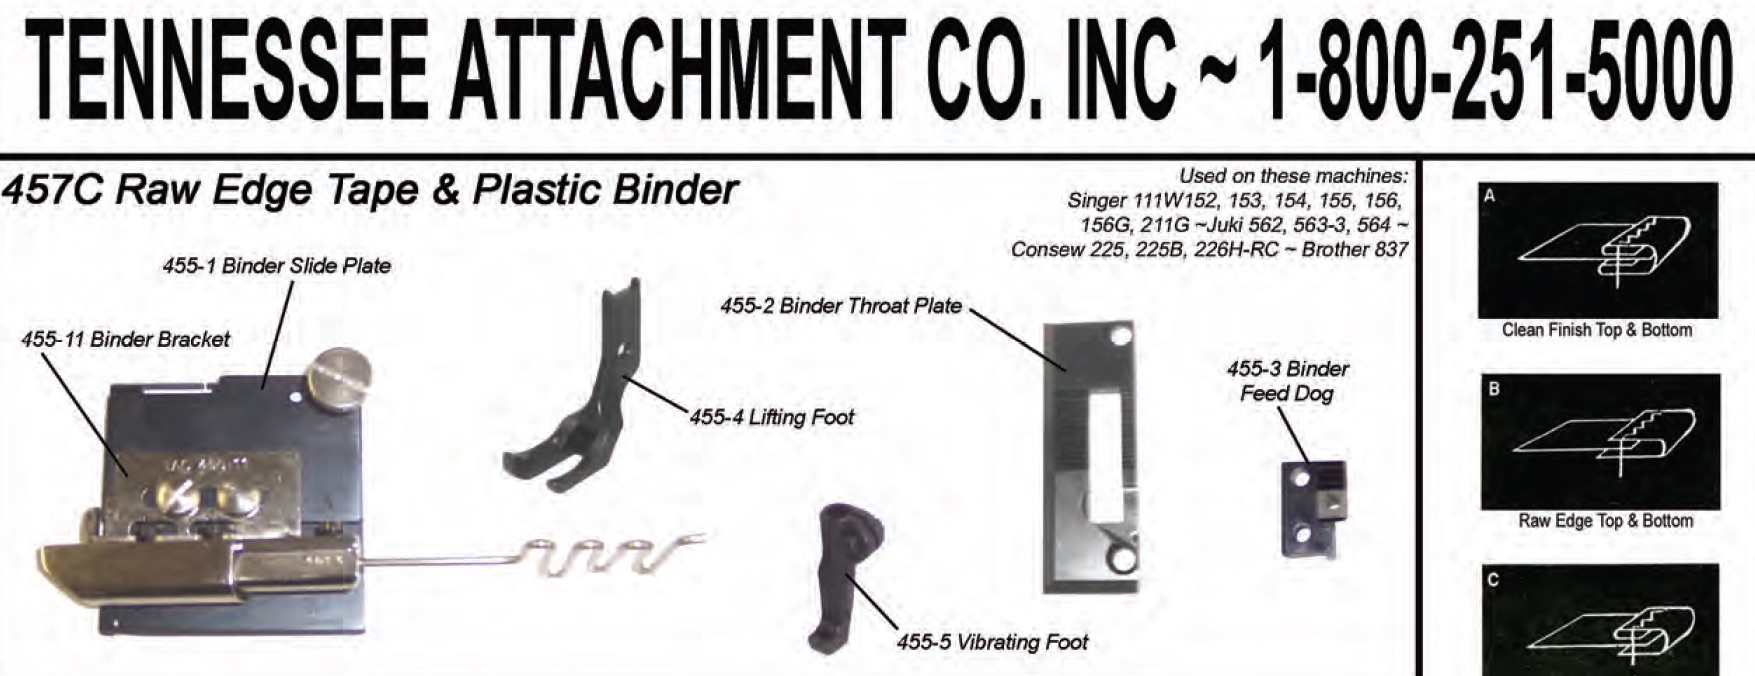
How to attach a binder to a Singer 111W155?
Uwe replied to Willie0's topic in Leather Sewing Machines
Here's a picture of a binder setup for the Durkopp Adler 205, which shows both an 80˚ binder and a 45˚ binder (tape folder): -
Are Pfaff 335 and Adler 69 cylinder arm caps interchangeable?
Uwe replied to Uwe's topic in Leather Sewing Machines
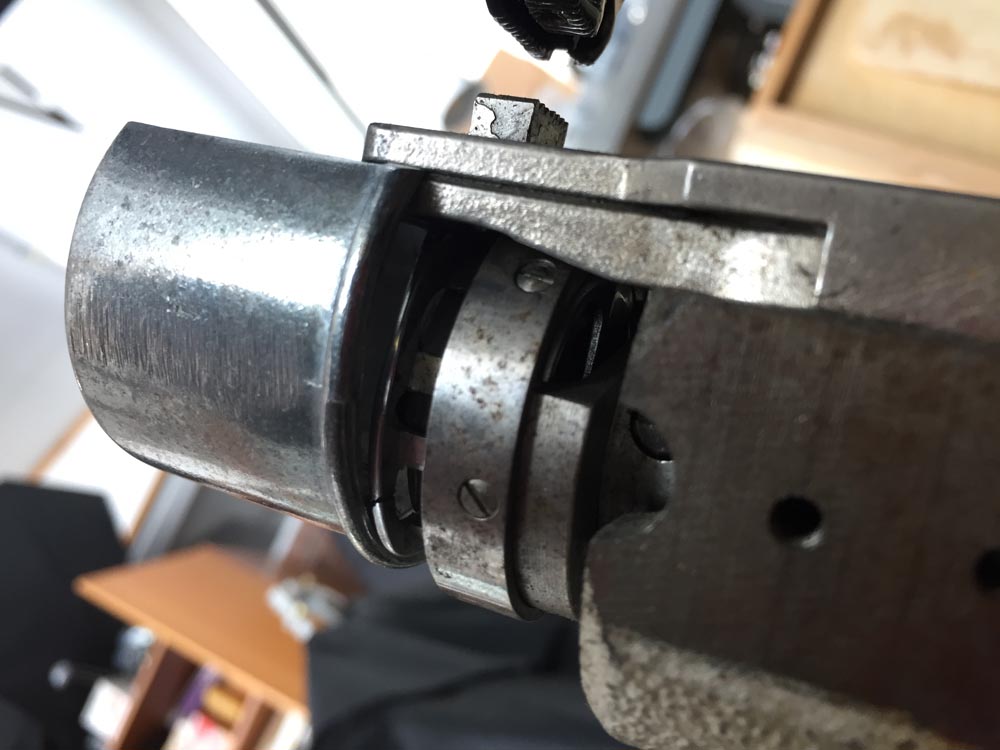
Good tip, DC! I actually have a Mitsubishi CU-865 project machine, but the hook cover is missing (as it turns out all three of my small cylinder arm project machines are missing the hook cover - argh!) CU-865 parts appear to be totally unavailable these days - my supplier just shows *NLA* for the last few CU-865 parts I tried to order. But at least I can use it to take some measurements to make my own hook covers. -
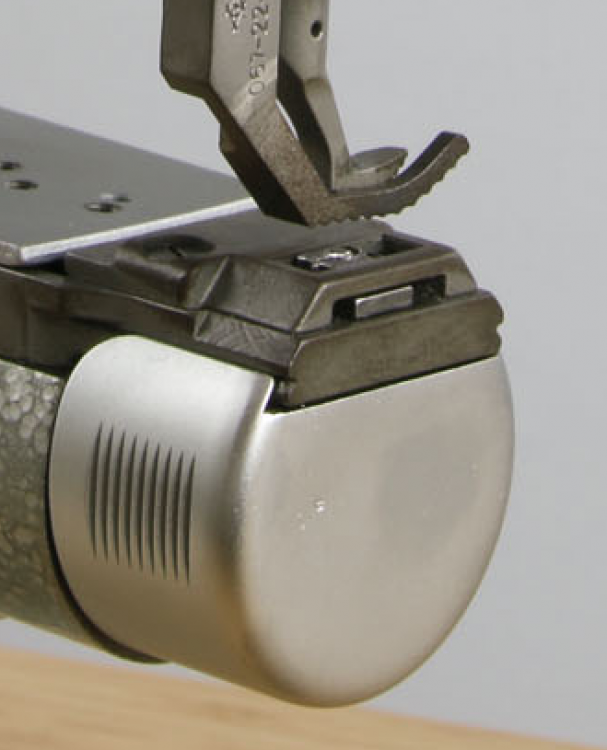
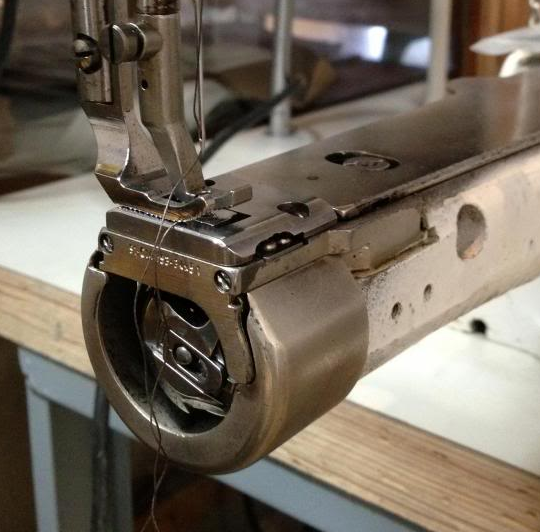
The question is, can you put a closed Adler 69 cap on a Pfaff 335 to avoid things getting tangled up in the open hook area? I'm hoping somebody has both machines sitting next to each other for a quick trial. The Pfaff 335 uses open caps: and The Adler 69 uses closed caps:
-
How to attach a binder to a Singer 111W155?
Uwe replied to Willie0's topic in Leather Sewing Machines
Tennessee Attachment Co. sells all manner of binding related things. The website hasn't quite made it into the current century, but they do have a Flyer for Binder Setups that includes the kit shown below :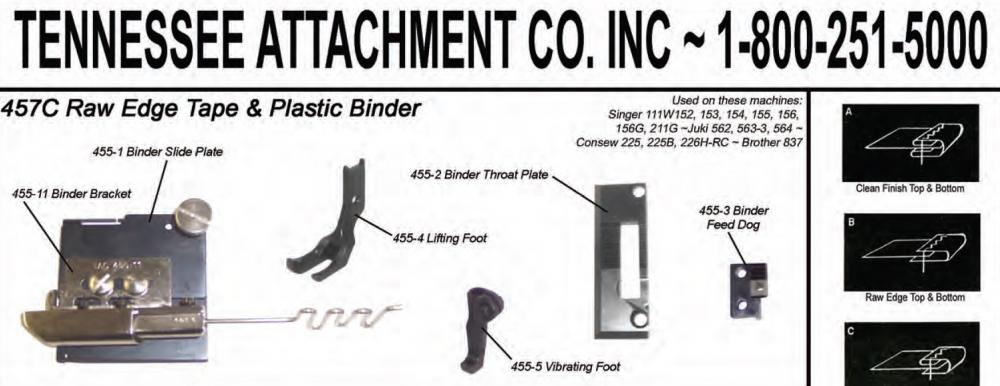
-
I have a like-new TechSew 2900 patcher that I got along with a few other machines from Recaro, the child safety seat people. I don't think they used it much, if at all. It was sitting shrink wrapped on a palette with a big "Storage" sign on it. The head is $1,150, on a table with servo motor it's $1,350. It's a very nice machine, still available new from TechSew for $1,895. I can ship the head within the U.S. for around $100-$130. If you want/need the table and servo motor you'll have to pick it up in the Detroit area. Here's a video that hopefully shows the condition and functionality of the machine well enough:
-
Juki DNU-241, Consew 206rb, request for advice
Uwe replied to pattyharrington's topic in Leather Sewing Machines
Establishing sewing machine lineage and pedigree is a messy affair. The Juki DNU-241 started life as a Yakumo 280L manufactured by Nakajima and later also sold as a Nakajima 280L. Juki eventually bought Nakajima and incorporated some of the Nakajima machines into the Juki lineup under new names. An adopted original, if you will. Consew 206RB1/2/3/4/5 machines were manufactured by Seiko until a few years ago. Consew was a brand/entity created by Seiko to sell their machines in the U.S. back when "made in Japan" evoked the same emotions that "made in China" does now. Consew and Seiko separated/divorced at some point and Consew changed sourcing of 206RB5 from the re-badged Seiko originals to a Chinese clone manufacturer somewhere in the middle of the 206RB5 model run. -
The motor part of the modular Efka Variostop system would be fine with a VFD or a Static phase converter, but the electronics inside controller box would likely not be happy. On my modular Efka Variostop system here in the U.S., the main power connection box has four wire connectors, one for each of the three power wires, plus ground. All three power wires continue on to drive the 3-phase motor. Only two power wires continue on to the control box to supply single phase power. The motor itself does not care how "clean" the incoming power is (perfect sine wave, choppy steps, or wobbly waves). The controller box DOES care and needs the clean, perfect sine wave power for its electronics. With a static phase converter only one of the three phases is truly "clean" (the other two phases are wobbly weaklings mainly there to help start a motor from a standstill). You'd have to make sure that the two wires carrying the original, single phase, perfect sine wave carry on to the controller box. Many VFD units output stair-stepping sine wave approximations on all three phases which are not suitable for powering electronics. Rotary phase converters do output perfectly synchronized pure sine waves on all three phases, which is why they are used on systems that integrate both motors and electronics ( e.g. CNC mills) You could, theoretically, power the two modular parts of the Efka Variostop system with separate power supply lines, which is what DC was suggesting above, I think. You could power just the motor with whatever phase converter you like. Then wire up the controller box separately, with a clean single phase power supply line. Some of the statements above vary depending on which country you live in and what type of power supply you have coming out of the wall. Personally, just writing this up gives me a headache and "don't bother" vibes. A nice new servo motor sounds like a GREAT option to me right now.
-
Juki DNU-241, Consew 206rb, request for advice
Uwe replied to pattyharrington's topic in Leather Sewing Machines
I'm curious if the manual states that or if a sales person made that claim. Very few machines in that size and weight class handle 207 thread well, if at all, or for a long time. A lot of things have to come together to operate machines at or beyond their design limits. I once got a Consew 225 to sew 207 thread ( https://youtu.be/zwVGkT0e5BU ) , but who knows if it would do it for long. Is your machine a plain DNU-241 or a DNU-241H? That little extra "H" sticker may be prone to falling off I suppose. I've not been able to find any info or specs on a non-"H" DNU-241 machine. If you're going to switch machines, I'd make the seller demo that it handles 207 thread on YOUR materials. Otherwise you're just swapping machines and inherit a different set of potential problems. The RB4 and RB5 machines are very nice, but really more of the same just like your Juki, with subtle differences at best. SInce you're making bags and other non-flat pieces, you should really consider getting (or adding) a cylinder arm machine with a barrel shuttle. Those hook designs are a totally different animal and handle thick thread MUCH better. The usual suspects include 441 class machines (e.g. original Juki TSC-441, copies like Cowboy 3200, 4500) or an Adler 205 class machine. Those will definitely sew 207 thread (up to 415) all day long with grace and without complaining. -
Page 6 of the Efka Variostop base manual (EN_BA_FKV_5(5)_090595.pdf) does talk about using single-phase and three-phase motors with the Variostop systems, so it is technically possible. Whether you'll be able to find a suitable single-phase motor is another questions.
-
I have a strong feeling (but no proof as of yet) that the Efka Variostop systems can operate with both 3-Phase and single-phase motors. The controller box itself actually runs on normal single phase power and it only controls the clutch/brake mounted on the motor, not the motor itself. The motor simply runs at full speed all the time. A call to Efka in Germany may a really good option before you start to dismantle things. They will be able to tell you which, if any, single phase electric motors are available for the Variostop systems.
-
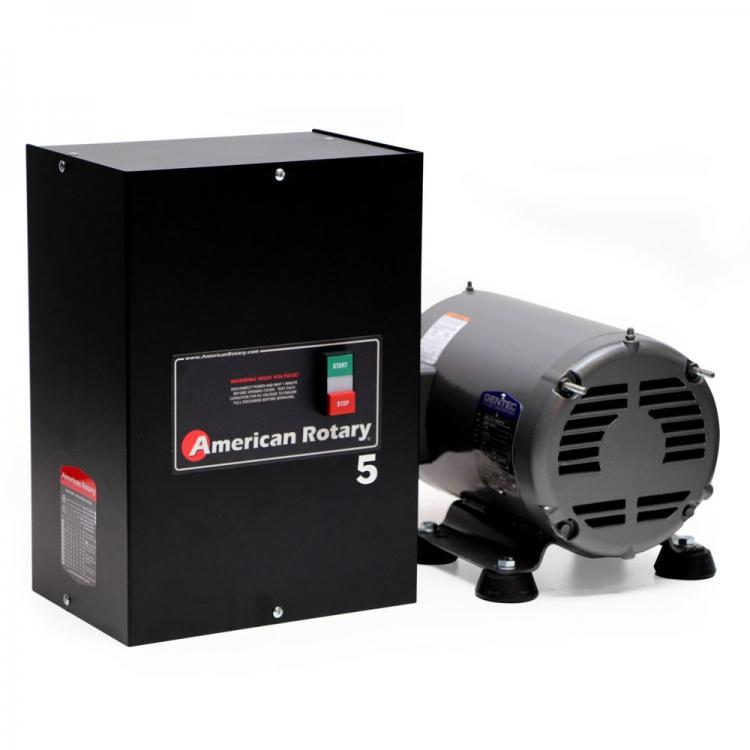
As for running 3-phase equipment on single phase power, you really need a rotary phase converter that look something like this: Those rotary phase converter are big and heavy - it's essentially yet another 3-phase electric motor that's even bigger than the one you're actually trying to run. That 3-phase motor is tricked into running on single phase power and then acts like a 3-phase generator. The rotary phase converters cost considerably more than a nice, modern servo motor that does not require 3-phase power. You can build your own rotary 3-phase converter, but that's not everybody's cup of tea. There are all-digital state-of-the-art phase converters, but they cost even more. To me it does not sound like it's a viable or even desirable option to make your current Efka Variostop setup work in your home setting. You may indeed be better off removing all the automation bits and air cylinders and convert the machine back to a simple manual setup, with a nice servo motor. Those Efka Variostop setups are actually awesome when used in the right setting. I just got done refurbishing a full-function Adler 467 that also has a 3-Phase Efka Variostop motor and controller. It's rather amazing to observe the choreographed dance of air cylinders and electric solenoids during the automated functions. While intimidating at first, it was also a little addictive to use while testing it. Alas I have no use for it in my home setting either. I hope to sell it to somebody in an industrial setting to do real production work.