Uwe
-
Posts
2,220 -
Joined
-
Last visited
Content Type
Profiles
Forums
Events
Blogs
Gallery
Everything posted by Uwe
-

pressor foot mods. Post any that you have done
Uwe replied to Gregspitz's topic in Leather Sewing Machines
That should say "Autodesk Fusion 360", not "Adobe ..." in the post above. -
pressor foot mods. Post any that you have done
Uwe replied to Gregspitz's topic in Leather Sewing Machines
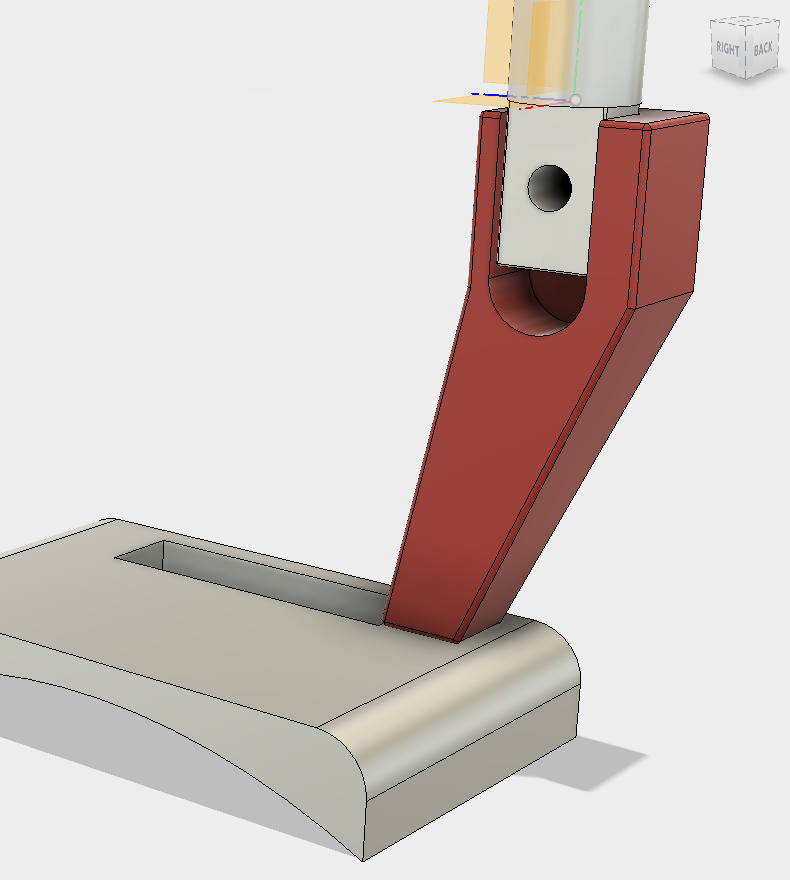
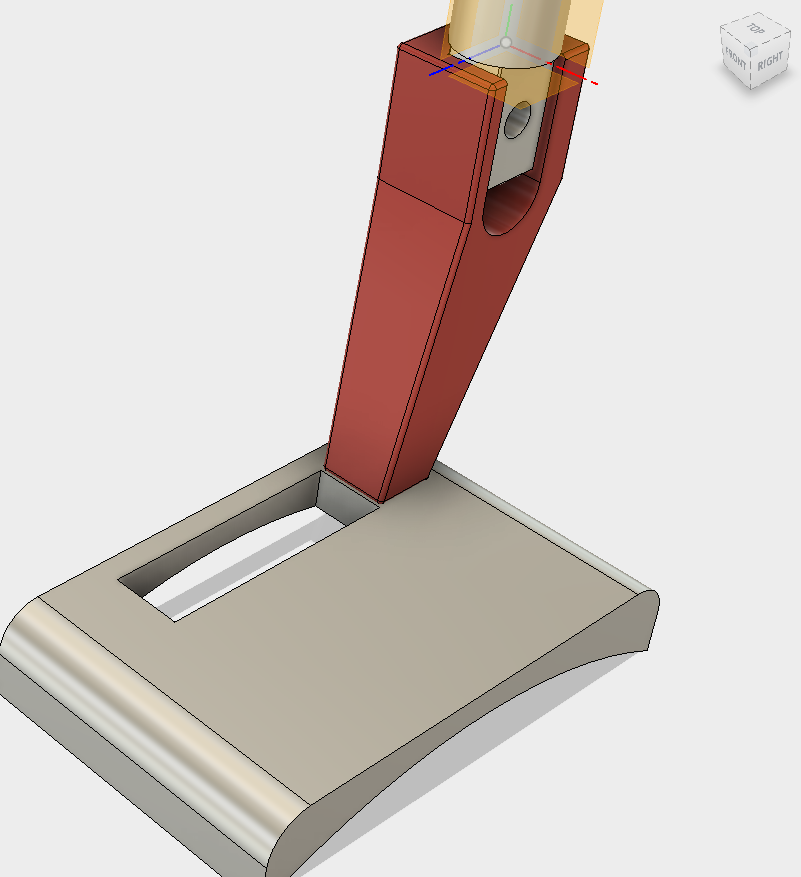
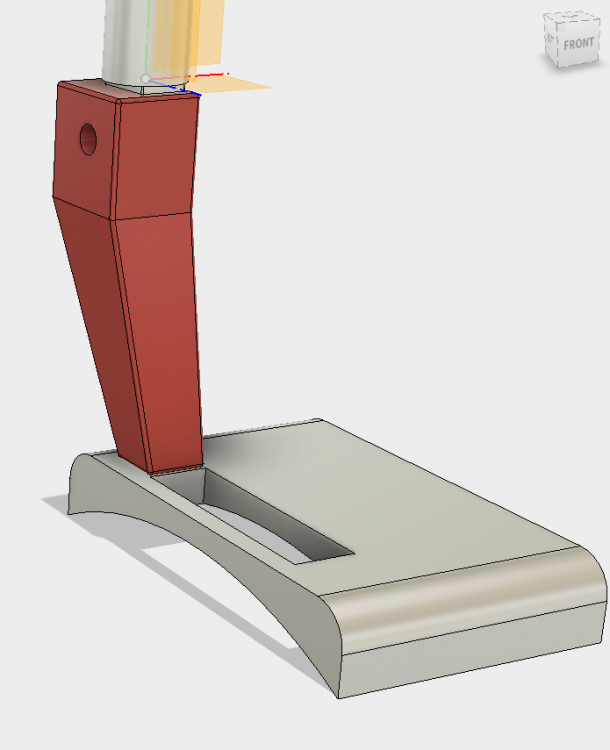
After an evening of beating Adobe Fusion 360 into submission, I finally have a CAD model of the in-line presser foot I plan to make for the 441 class of machines:

-
That Juki LS-341N is a nice machine! It's one of my favorite medium duty cylinder arm designs, actually ( I have a Juki LS-341 - no "N"). Get the best machine you can afford. OEM brands generally hold their value better than clones. The LS-341 class of machines is next on my list for developing a flatbed attachment.
-
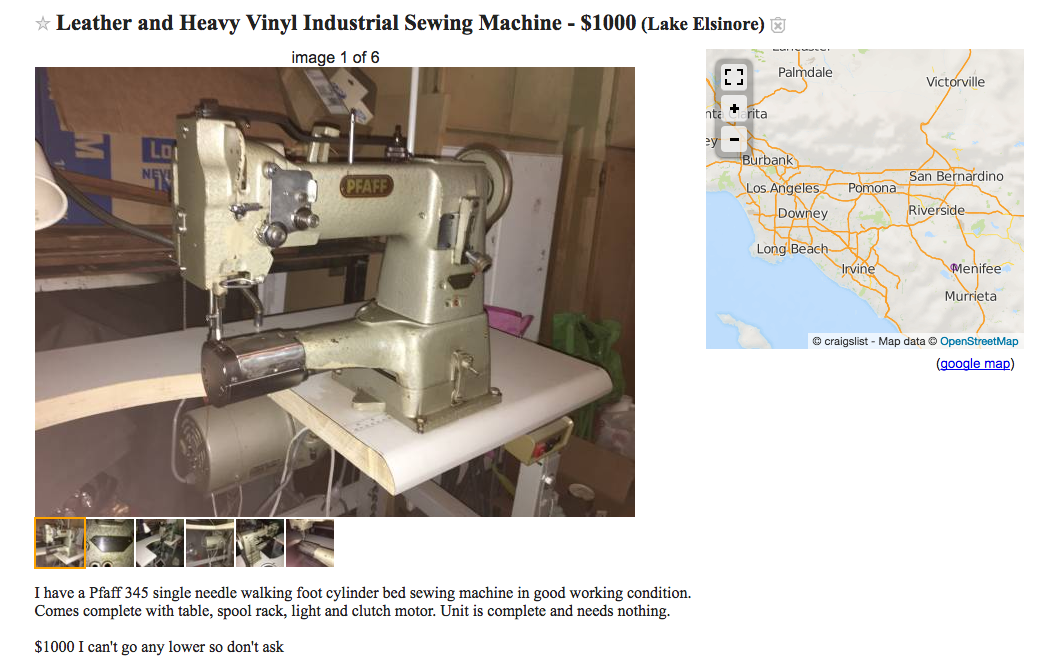
If you have a grand to spend, I'd go look at the Pfaff 345 for sale in Lake Elsinore You'll get triple feed with full feed dog motion, big bobbin, reverse, seriously good engineering and manufacturing quality. Parts like throat plates and feet are available from good quality aftermarket maker like Kwok Hing and won't cost a fortune.

-
I'll vote for the triple-feed cylinder arm plus flatbed attachment recommendation, especially if you have limited space. It's the most versatile single-machine solution in my mind. Buy new if you can afford it. Candidates are Juki LS-341 or 1341, Adler 69, 169, or 269, Pfaff 335 or 345, TechSew 2750, among others. I make and sell a few flatbed attachments on Ebay.
-
For learning the basics and starting out with industrial sewing machines I'd recommend one of the very popular designs like Singer 111W155, Consew 225/226, or Juki 562/563, etc. They're great machines and parts are readily available and cheap. The Singer 78 may be a capable machine, but I had never even heard of it before today, and I've been paying attention to sewing machines for a few years now.
-
pressor foot mods. Post any that you have done
Uwe replied to Gregspitz's topic in Leather Sewing Machines
The Juki Parts lists include screw sizes, which is super helpful. The Juki TSC-441 parts list shows a 3/16"-28 spec for the screws that hold down the throat plates. -
Problem with a Singer 112W139 Thread Controller
Uwe replied to tmitch's topic in Leather Sewing Machines
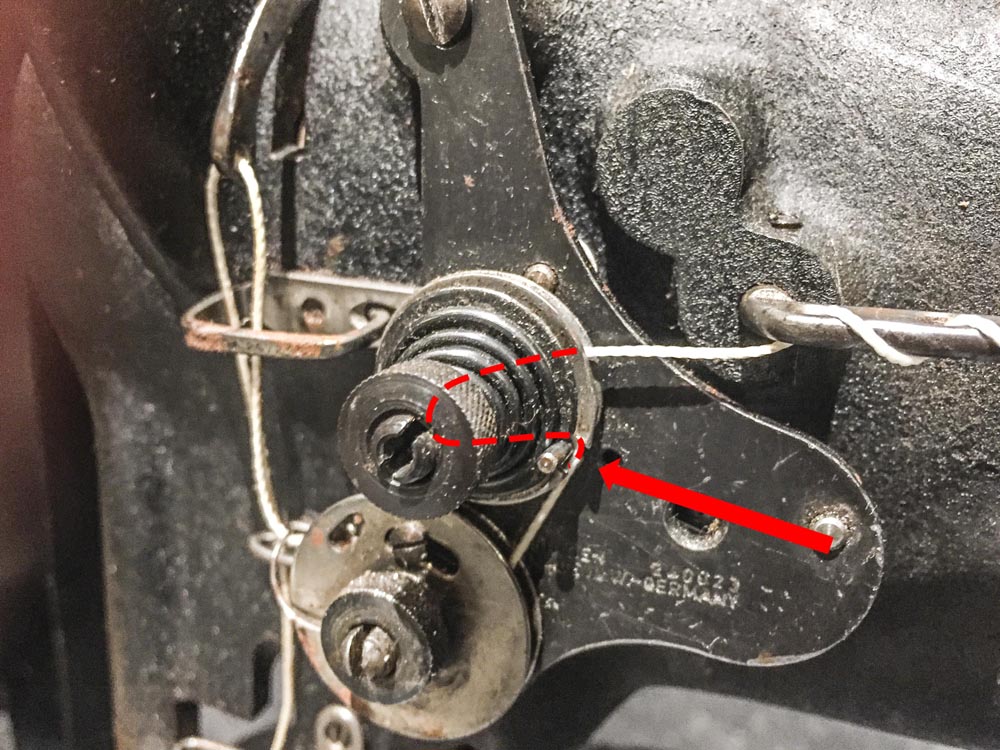
Also, on your threading path, it looks like you don't have the check spring threaded quite right. The thread needs to go up inside the channel past a little hook and then come back down towards the check spring. -
Problem with a Singer 112W139 Thread Controller
Uwe replied to tmitch's topic in Leather Sewing Machines
With these style hooks (both single or double needle) you have to hold the threads taught for the first few stitches, otherwise you have good chance of things getting tangled up underneath, even on a perfectly adjusted machine. Here how I do it on a similar single needle machine: -
pressor foot mods. Post any that you have done
Uwe replied to Gregspitz's topic in Leather Sewing Machines
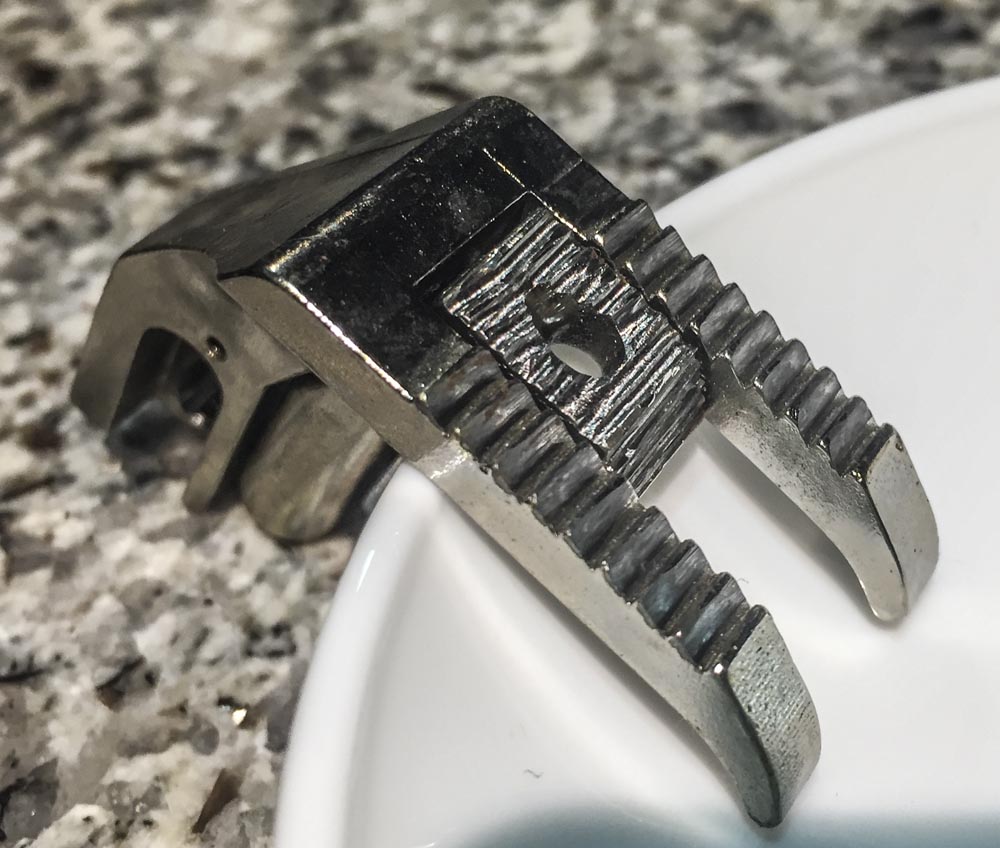
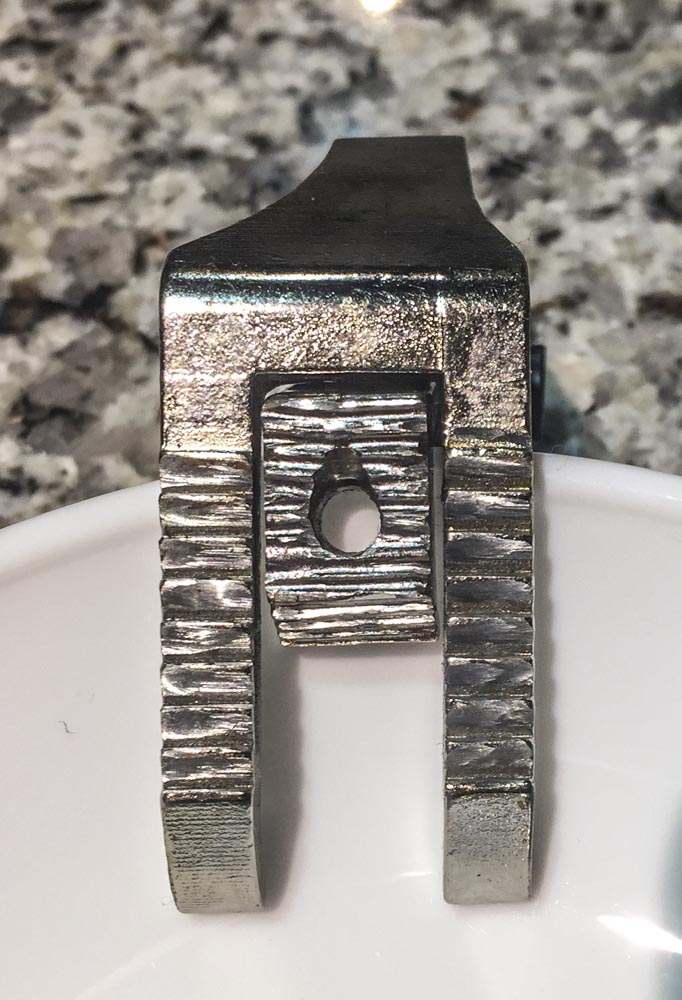
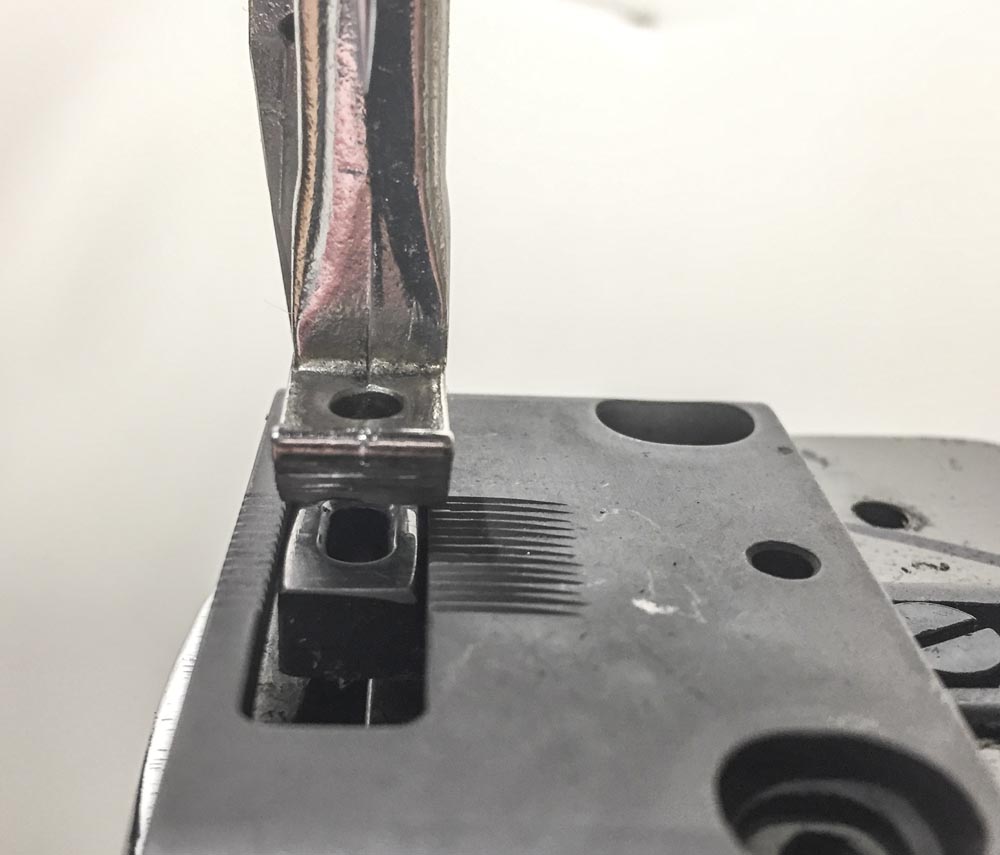
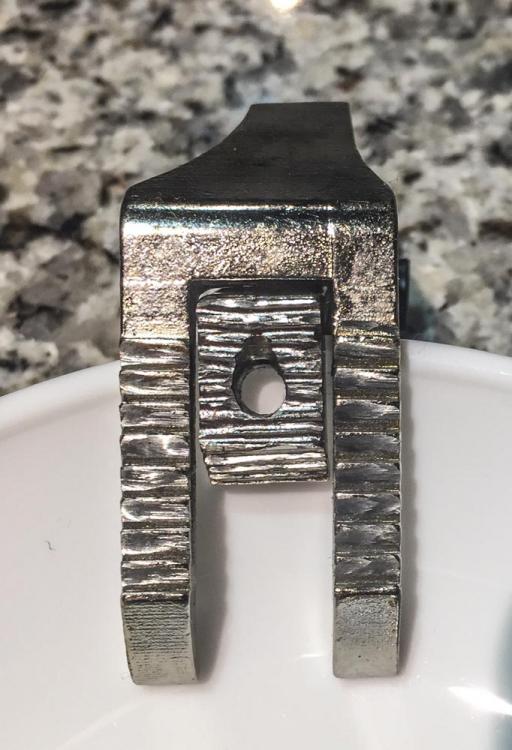
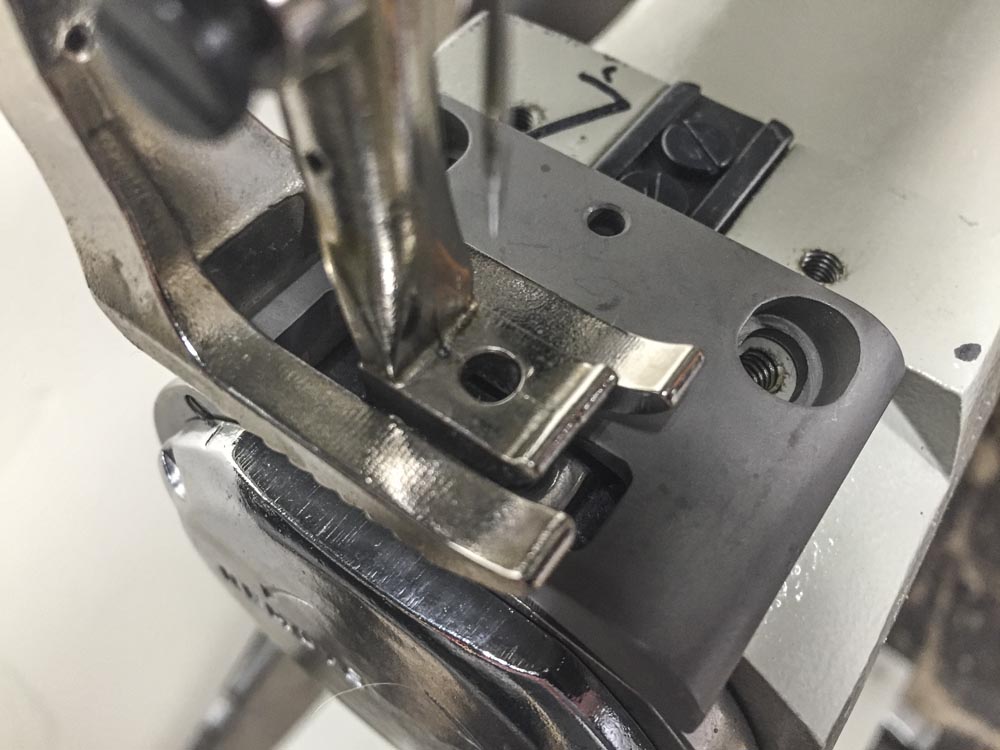
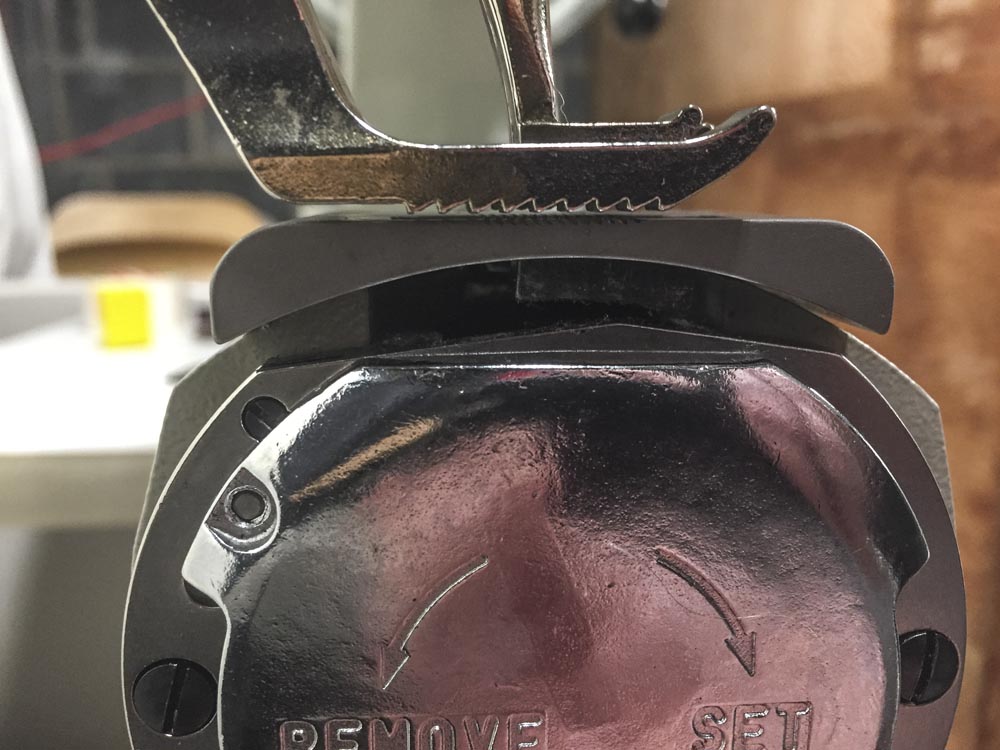
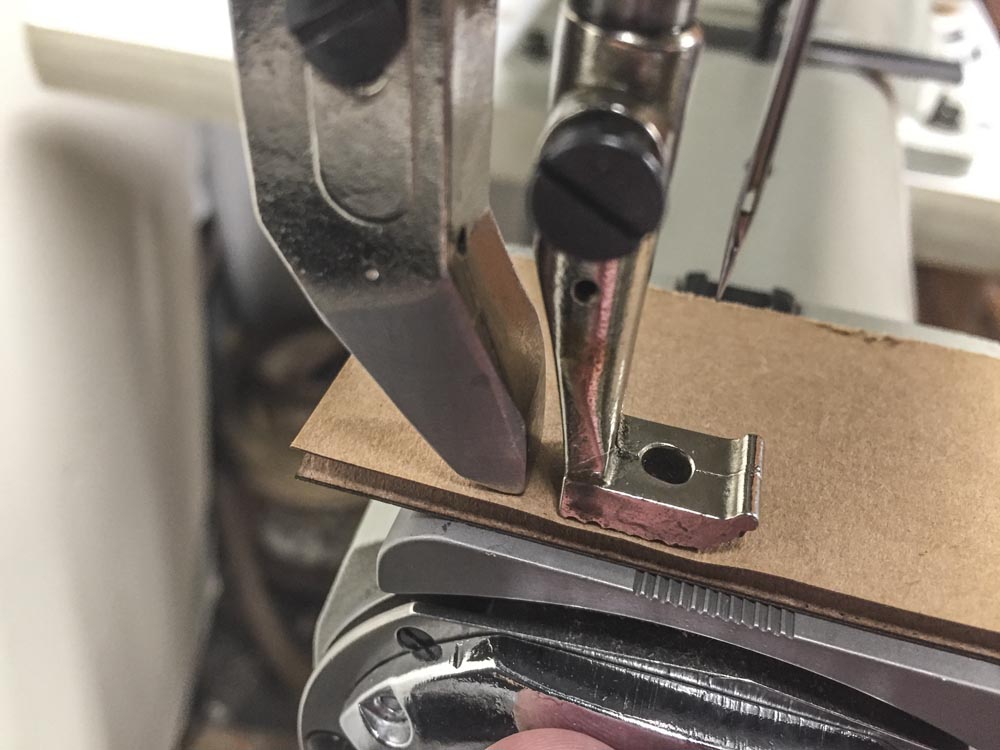
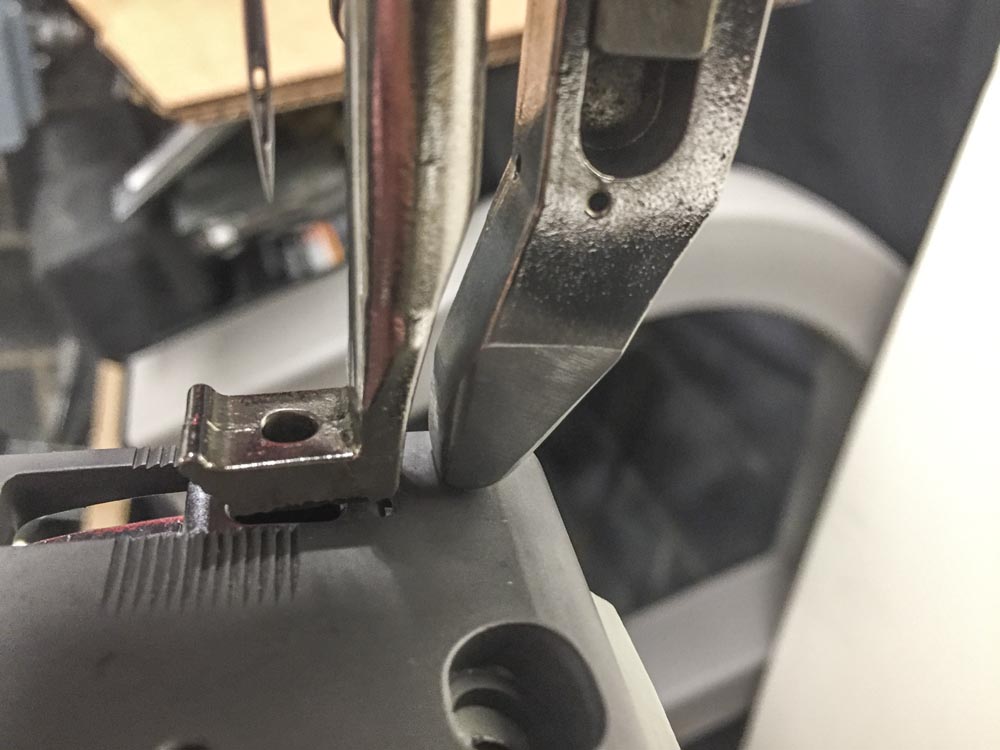
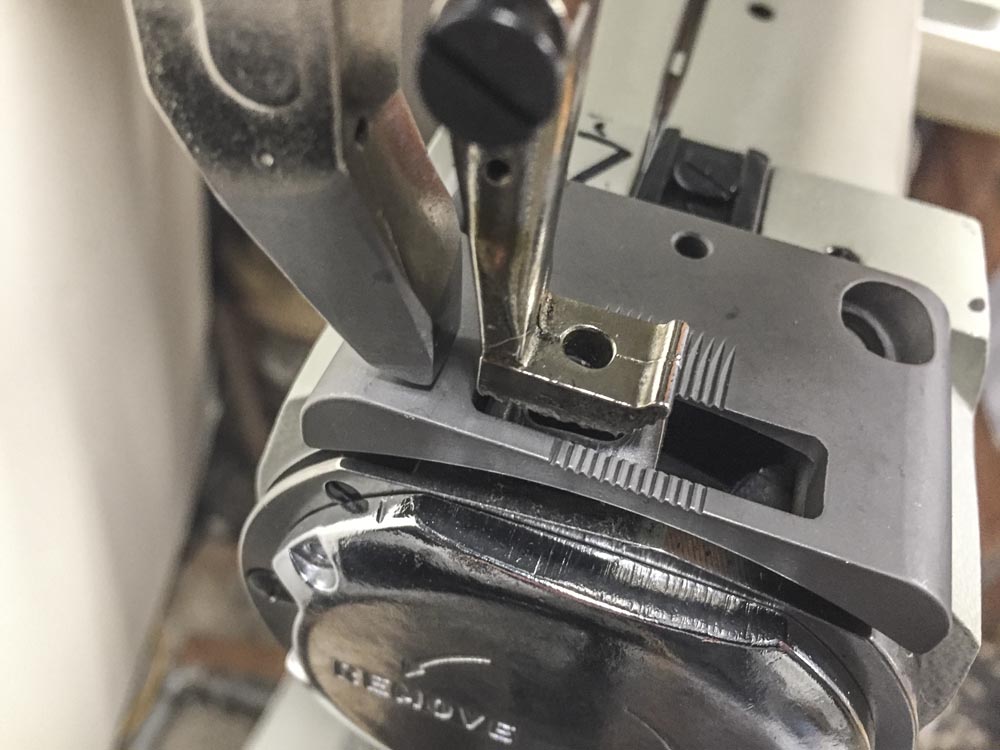
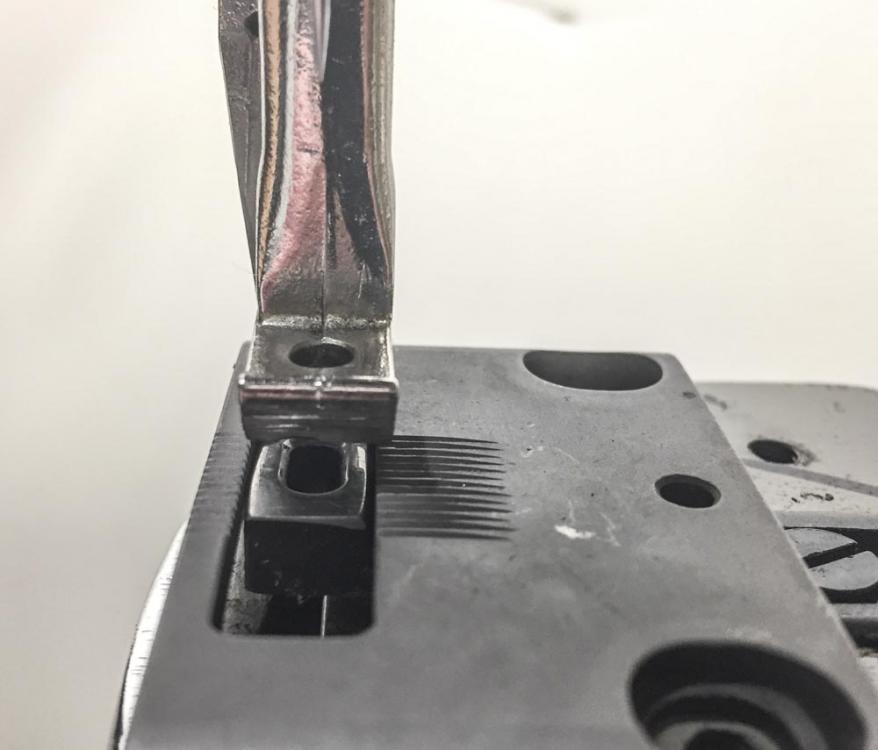
GPaudler: great job on those custom feet! OLDNSLOW: The inline feet I showed in the video only work on Pfaff 545 class machines and foot mounts. Those exact feet will not work on a 441 class machine. However, I do think certain Juki TSC-441 style feet (Cobra Class 4, Cowboy 4500, etc.) can be modified to make in-line versions as well. The blanket feet are a good candidate, which have a similar foot print to the Pfaff feet I had used, just larger. All you need is some foot print directly behind the inner presser foot (and a flat-top throat plate for that rear foot to rest on). Nobody on this forum seems to use the blanket feet anyways, so it seems like a good candidate for a modification into something more useful. You may need to combine this with a flat-top throat plate to give the outer binder foot something to rest on. (45 minutes later ...) Since I had nothing better to do right now, I took the blanket foot from my Cowboy 4500 and modified it for in-line foot. Worked out quite nicely, actually. It turns out the Adler 205 flat-top harness maker throat plates I have (UT205HM) also fit the 441 class of machines - yay! (I just have to find new 3/16"-28 screws or suitable washers - the original screw heads are too small and fit right through the larger mounting holes of the UT205HM throat plate. The foot shape of the 441 style mount seems easy enough to machine from stock. I think I'll just try to make some from scratch and see how they work out. Here are some before pictures with the blanket foot set and the flat-top throat plate (just sitting on the arm, not screwed down right now): After cutting, grinding, and polishing the outer blanket foot like the Pfaff version shown in an earlier post, it looks like this: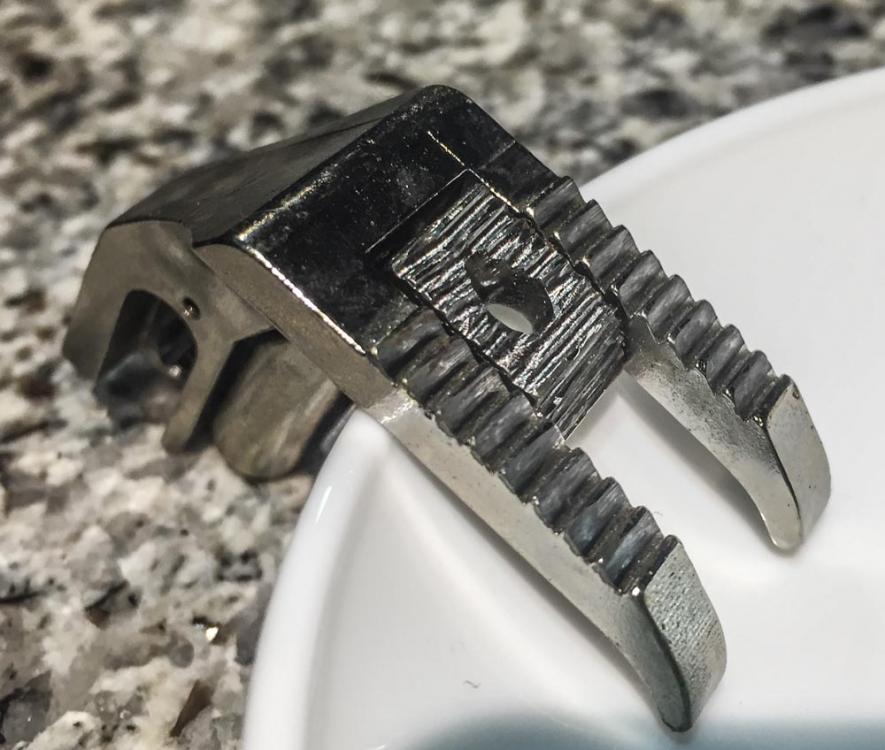
-
The short answer is "no", unfortunately. If your Juki Lu-563 does not have reverse, it is the "Subclass 3". You're enjoying a longer maximum stitch length because there's no reverse mechanism to get in the way. If you need reverse, it'll be much cheaper and quicker to just buy a regular LU-563 and then sell your LU-563 Subclass 3.
-
Problem with a Singer 112W139 Thread Controller
Uwe replied to tmitch's topic in Leather Sewing Machines
Each of the large hook gears has two set screws. One of those two set screws on each gear has to be sitting in the grove on the shaft. If neither of the set screws is in the groove the gear may rotate on the shaft as soon as the going gets tough and you have an instant mess on your hands. I recommend taking a break and a step back. Disconnect the belt until things are right again. You can do a lot of damage running a machine under motor power when things are not right. Consider having a sewing machine mechanic put things back the way they're supposed to be. Then you have a clean starting point. It's hard enough getting a single needle machine to work right. A double needle machine is even more complex and not really an ideal candidate to learn the finer points of sewing machine maintenance on. Also, have your son help you figure out how to attach pictures (look for the "Drag files here to attach" in the editing window.) You may also have to learn how to resize picture files so they're not too large to attach here. Without the ability to post pictures it will be nearly impossible to do proper remote tech support. We're all sitting in front of computers, not crystal balls. -
Problem with a Singer 112W139 Thread Controller
Uwe replied to tmitch's topic in Leather Sewing Machines
Post a few close-up pictures or, better yet, a brief video of your threading path and what's wrong with your machine (ask your son to be cameraman for a moment.) There may be something else going on but it's hard to figure it out without seeing it. -
The top looks like it's a copy of a Singer 119-2, but I can't find the flatbed version that uses that same top. The Singer 119-2 manual should explain how the top portion of the machine works. Not worth a 3-hour drive perhaps, but if you're in the neighborhood and the machine works, it might be worth a closer look. Might be hard to find parts for - it's not exactly a super popular machine from what I can tell.
-
This looks a lot like a repainted Singer 31-17 to me. It's hard to tell for sure without seeing the underside hook and transport mechanism. Manual: https://www.manualslib.com/manual/364529/Singer-31-17.html
-
That Chandler C-241 likely started life as a Juki DNU-241HS (or a Nakajima 280L). Chandler sold re-badged machines from various manufacturers over the years. The Juki DNU241HS manual, should be a good starting point. The Juki DNU-241HS Parts List should help identify part numbers of missing bits. Your machine will likely have some stamped metal parts underneath or inside that will give you a clue as to the original manufacturer.
-
Problem with a Singer 112W139 Thread Controller
Uwe replied to tmitch's topic in Leather Sewing Machines
You are probably talking about the check spring on your thread tension assembly. If by "turned the controller back and forth" you mean turning the little thumb screw nut on the check spring split post, that unfortunately is NOT where you adjust the tension for that spring. That thumb screw nut is more of a lock nut that holds the check spring discs in place. Your check spring should be able to move freely. Sometimes the spring gets caught under the thumb nut as you tighten it - that prevents the check spring from moving freely and operating properly. Make sure your check spring moves freely and then see if your problem persists. The tension of the check spring can be adjusted, it's just not obvious how it works. I was motivated and made a video that hopefully explains how the check spring adjustment works: -
In my experience welding can be very tricky and requires rather expensive gear. You don't really want to melt the part, which will definitely affect its hardness or any tempering. Personally I found it much easier to do silver soldering. I made some custom binder parts a while ago and used silver solder to connect the pieces. The best silver solder option I've come across on this side of the pond is called Stay Brite silver solder and the Stay Clean flux liquid. I bought mine at the local heating and refrigeration supply store. I don't know if this brand is available in Europe. The nice thing about this particular silver solder is that it melts at a comparatively low 430˚F (221˚C), which is well below the temperature that would affect hardness or tempering treatments of any metal part you're repairing. Practice on some other parts first. Clean the parts to be repaired with some acetone, then hold the part in a metal clamp and put the broken part in place. Heat the whole thing up with a cheap torch like a propane torch for making plumbing repairs. Drip some flux liquid on the cracks and heat it to just above the melting point of the silver solder. Remove the flame and touch the silver solder wire to the cracks. The hot metal part should melt the silver solder as it touches and suck it into the crack by capillary action. Sounds like a good candidate for a demo video.

-
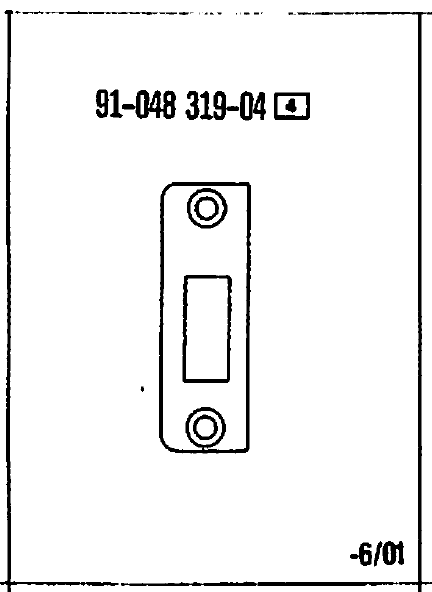
A new part (Pfaff # 91-048319-04/002) will cost you around $350-$400 (OUCH!) based on pricing info from my sources here in the U.S. Generic vs. OEM pricing is very close, too. This would be a good time to read up on hard soldering, brazing, silver soldering etc. Looks like a clean break and should be repairable. The part is listed on page 4 of the Pfaff 595 Unterklassen-Ausstattung document.
-
Make sure your bobbin case opener is adjusted properly. The bobbin case tab in the throat plate cutout needs enough wiggle room to let the thread through. The tab wants to rest against the far edge of the cutout because of the clockwise rotation of the hook. The tab needs to be pulled back (counterclockwise) at the right moment just long enough to let the thread pass on the rear. The bobbin case opener arm does this. To adjust it, turn the handwheel until the bobbin case opener arm is at its right-most position. Keep the handwheel in this position. At this point the bobbin case tab should be pulled far enough from the rear edge of the throat plate cutout to let the thread pass through. The bobbin case itself should have only a tiny amount of play without binding between hitting the bobbin case opener arm and hitting the front edge of the throat plate cutout. If that's not the case loosen the screw that hold the bobbin case opener arm and slide the bobbin case opener arm until the tab is almost, but not quite, touching the front of the throat plate cutout. The bobbin case should be able to wiggle a tiny bit to make sure it doesn't bind. I had one new throat plate that just didn't have enough of a cutout and I had to file and enlarge the cutout and polish it to let thread pass through properly. Don't start filing until you're positive it's necessary and don't file the throat plate while it's mounted in the machine! Lots of words, sorry. Perhaps this video (about a different topic) shows how the bobbin case opener pulls back the tab just as the thread needs to slip through.
-
Sometimes that big tension release pin is just worn at the tips and not long enough anymore. I've made my own replacement pins from piano wire of same thickness and rounding/polishing both ends - worked beautifully. That pin should slide through the body front to back very easily. There's also a teeny-tiny pin inside the post that holds the tension discs. It often gets lost when people disassemble the tension unit. That pin is so tiny you hardly notice it when it makes its escape. Without that tiny pin, the tension release will not work at all. The two tension disks are also not identical. One has a hole in the center, the other has a hole with a bar across the center. That center bar is what the tiny pin pushes against to separate the tension disks. If the disks are reversed, or both have a hole, or both have a bar, tension release will also not work at all.
-
By the way, the pin that goes through the machine to push the tension discs apart when you lift the foot is really optional and more of a convenience feature. The tension release pin should have no effect while sewing - in fact it shouldn't even be touching the back of the tension unit while sewing. Most machines sew just fine with that pin removed. The tension release pin just makes it easier to remove the material when you stop sewing, because you're not yanking on the thread while it's still has tension applied to it.
-
That 1508 has the exact same tension unit as your 562 - it won't solve your slippery thread problems. I'd experiment with thread path variations before giving up on the 562 and throwing money at something essentially identical. This is how you normally thread the tension unit: If your thread is too slippery to stay between the tension discs you can try this variation, looping the thread around the pin that keeps the tension discs from spinning: If that still doesn't work you can rotate the thread guide down (loosen set screw, rotate, tighten) to bring the incoming thread closer and lower to the tension discs: If your thread is still popping out from between the tension discs, then there's something else going on. Take the tensions discs out and inspect them . They should be flat on the inner part and only have and flare/curve on outer edge.


-
Instruction and adjustment manuals for modern, new casting of the Pfaff 1245: ba_1245_05-12_e.pdf Pfaff-1245-Adjustment-Manual.pdf
-
I don't think the Singer 211G165 has an oil sump or a pump. It has little oil reservoirs that need to keep filled. It may have an oil drip pan, but it's not for recirculating the oil, it just catches the occasional drips. A gallon of Lily While Oil will work fine for lubricating your machine and last you a lifetime. Get a little oil bottle with a long thin spout to reach tight places. Spend some quality time with the Singer 211G165 Manual - Just read at first and don't start turning screws until you understand what's going on. Feet and such are readily available from many of our vendors that advertise in the banner ads - you'll get some free advice to go along with your feet.