-
Posts
2,221 -
Joined
-
Last visited
Content Type
Profiles
Forums
Events
Blogs
Gallery
Store
Everything posted by Uwe
-

nubbies on the bottom when turning and other headaches
Uwe replied to longun45's topic in Leather Sewing Machines
Those nubbies/nibs/nubs/knots look kind of frayed, too. Perhaps your top thread is getting roughed up as you sew. A larger needle size may help. A brand new needle will fix many problems, too (the best $0.25 you will spend while sewing.) Also check for burrs on your feed dog or elsewhere in the thread path. Pull your thread through the feed dog hole by hand back and forth at various angles - the thread should slide smoothly and not get frayed. Many new few dogs need to be de-burred and polished to work well. Also, I have no clue which machine you are using. Did I miss something? At the corners, perhaps lift the foot only enough to clear and turn the material, but not enough to release top thread tension. Make sure your needle is in the material when you make turns. Make sure you use new, good quality thread, not some old bargain bin special. Lumpy thread will cause all kinds of problems. Make sure the thread pulls off the spool very smoothly without snags. A poorly wound or sticky cone of thread will be trouble. Springy thread that falls off the cone also causes trouble (use a cone sock or sleeve). In general, make sure your thread path is PERFECT! Make sure your bobbins are wound perfectly, too. Thread should pull off the bobbin very smoothly without lumps or snags or changes in tension as you pull with your fingers. Run some tests on scrap leather making "square spirals" with various needle and thread sizes and see which combination works and looks best before you sew more precious belts. Take notes and use the combination that actually worked. Report back with what you found. -
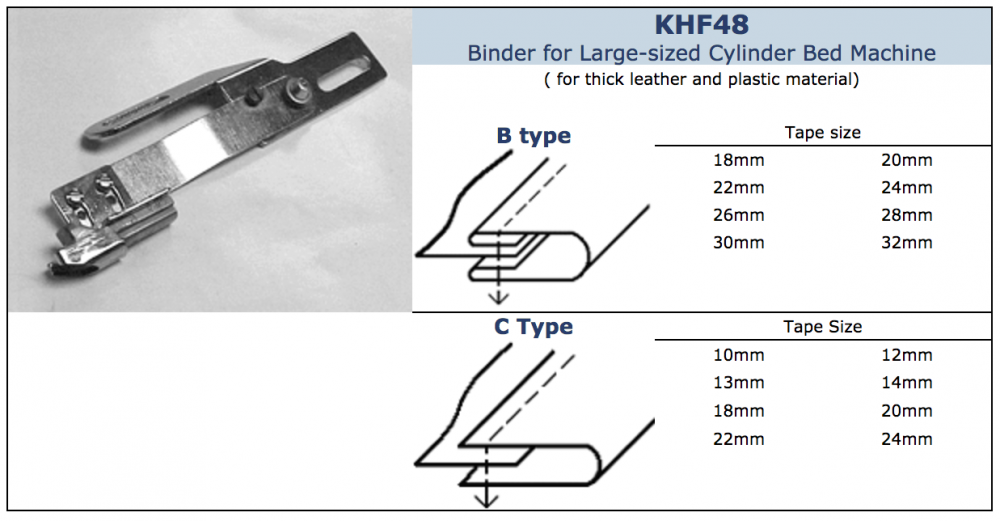
The closest thing I could find is the Consew 227R-2 manual . Consew machines were made by Seiko for many years and the Consew 227R-2 should be nearly identical to the Seiko CW-8BV. You can always try to contact Seiko directly and see if they have more info, or an original manual. I don't know much about the binding options for the LCW-8BV, but it likely uses something that looks like this generic KHF48 binder attachment made by Kwok Hing:
-
The Cowboy CB-4500 is just one of several available machines that are copies/clones of the original Juki TSC-441, which is still in production. The clone machines are nearly identical and the whole group is generally referred to as "441 Class" machines. "Cobra Class 4" and the "Techsew 5100" are among the other options you can choose from. The various vendors use very different names and paint colors for the machines they sell, but they all are essentially identical, well regarded machines with different stands and accessory packages.
-
Only you can judge in what condition these machines are and what features you care about. Personally, I care about reverse and adjusting stitch length without having to turn the handwheel. Looking at a finished stitch line, nobody can really tell which of these three machines it was sewn on. Only you can tell how enjoyable or painful the experience was. Pick one and start sewing and learn how to maintain the machine. Assuming they're all in good working condition, the Pfaff is the most valuable in that $300 trio. Wear parts like hooks, feet, tension units, needle bars and the like are all available from aftermarket sources at reasonable prices for all three machines. Cheap really is overrated, though, especially if the parts don't work or fit. I bought three different "cheap" tension units for the Singer 111 class until I found one I actually liked (an original Juki LU-562 part - it cost more but is worth every penny and it's the only one I actually installed on a machine.)
-
Thanks! I used my iPhone 6 for the most recent video snippet. My main video gear is a Canon 70D with either a EF 24-105mm f/4L or the EF 100mm f/2.8L macro lens (when I want to get really close.)
-
Normally, if everything works just right, you should be able to sew material that just fits under the feet in the highest manual foot lift position. When you lower the foot lift lever, the feet would stay at the same height, but the tension release "slider" would go down and re-engage thread tension. There's a spring between the slider and the clamping block that separates the two and pushes the slider down to release thread tension even if the presser bar clamping block (and feet) stay up.
-

Video: Lower Needle Guide for Juki TSC-441 class machines
Uwe replied to Uwe's topic in Leather Sewing Machines
Thanks for adding some pictures of the Ferdco original, Tor! I've had a piece of stainless steel angle iron sitting in my garage for months now. I bought it intending to machine some of these needle guides from scratch. I may still do it. The part looks simple enough, but making a few dozen with the required precision is not so easy in my experience. I have a contact in Taiwan who is looking to make custom sewing parts, but their minimum order quantity is 300. That may be more than Ferdco ever sold of these things - I think you'd be lucky to sell 30 of these over a few years. -
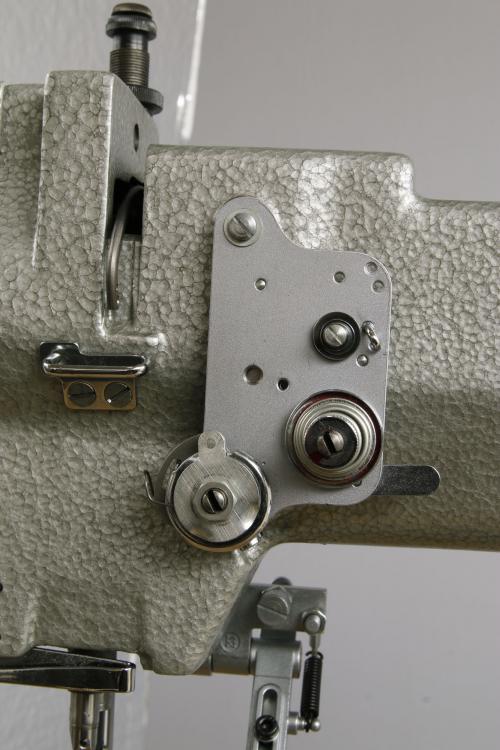
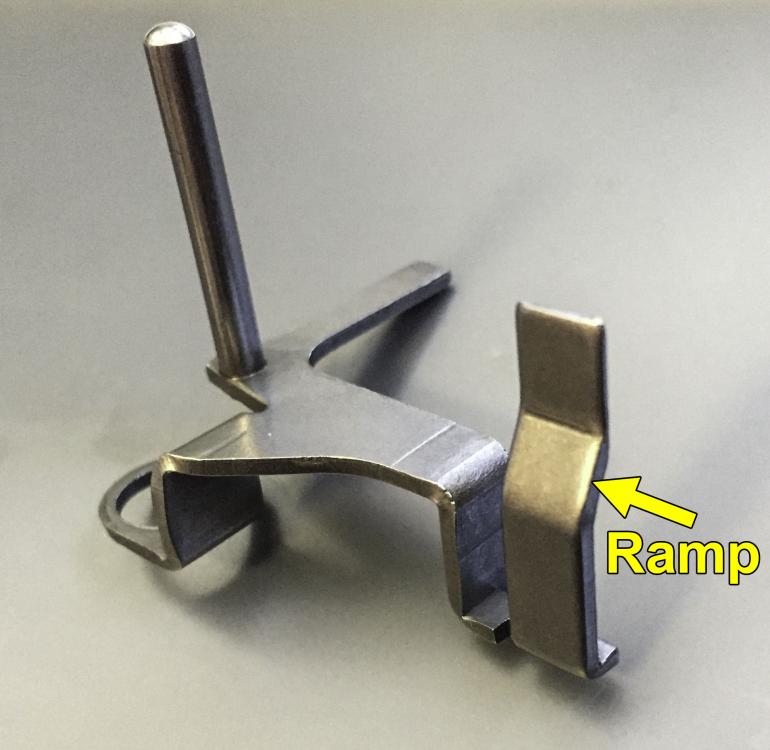
Can you post some close-up pictures of your tension release unit and also the back of the machine? There were some subtle variations on the Adler 69 over time and I'm not sure exactly what your machine has installed. The problem you experience may actually have to do with the thread tension release slider on the back of the machine. It looks similar to this Juki version: This part slides up and down as you lift the feet. The ramp indicated in the picture pushes a large pin through the body to release thread tension up front. There's nothing you can adjust here. The position of the ramp determines when your thread tension starts to release as you lift the feet, and also when thread tension engages again as you lower the feet. This unit may be worn or it may have been replaced at some point with a similar one that works, but isn't quite right. If the ramp position is too high, it will release tension too early as you lift the feet, and tension will re-engage too late as you lower the feet,which sounds a lot like what you're describing. In the long run it may be worthwhile replacing this unit with an OEM new part. The part is itself is cheap but replacing it requires major surgery (I made a video once about replacing this unit on a similar machine: https://www.youtube.com/watch?v=4aSNYzUTnW4 ) The video also shows how this slider works. This may end up being your long-term fix. As an interim work-around to get you back in business sewing thick dog collars, you can disable the automatic thread tension release. If your machine has the convenient manual tension release tab on the bottom right like this unit: ... then you have the option of disabling the automatic tension release while keeping the convenient manual tension release. You'll loose a minor convenience feature but in return gain maximum sewing functionality. In reality the automatic thread tension release does not work on about half of the project machines when I start working on them. Many people never notice that it doesn't work. To disable the automatic thread tension release mechanism, you can remove the big pin that goes from the back to the front of the machine. This disables the automatic part but keeps the manual tab functional. Removing the big pin is not very hard to do and takes about two minutes. I tried it out on my project machine with an Adler 69 head:
-

Video: Lower Needle Guide for Juki TSC-441 class machines
Uwe replied to Uwe's topic in Leather Sewing Machines
@dikman It's really the slotted throat plate and removing the feed dog that turns the machine into a needle+top feed machine. The addition of the lower needle guide is just a small improvement on that. @Constabulary It is the inner presser foot that helps feed the material, the outer presser foot just holds the material in place. @RockyAussie The hole size in the needle guide is a balancing act. It's exactly the same size as the feed dog, so it's no worse than the original feed dog in that regard. The smaller that hole, the bigger the chance of the needle striking the edge, which is usually a show-stopper. That slim in-line feed dog you described sounds interesting and like a good candidate for some prototyping. My smooth feed dog has a much larger, elongated needle hole compared to the toothed feed dog - that's why I decided to use the toothed feed dog as a starting point. The addition of the lower needle guide only helps feed the material in extreme situations where the needle gets deflected enough to make contact with the guide/brace. It's like the weight lifting spotter buddy in the gym - they don't help at all and just watch you suffer unless you get really wobbly. It's an incremental improvement - better than having nothing at all underneath to help feed occasionally, but not a good as a proper feed dog. -
I've been meaning to make a lower needle guide similar to the ones Ferdco used to sell. I have some spare toothed feed dogs and fired up the grinder and polishing wheel. I think it worked out okay and it certainly seems functional. I'm still wondering how the Ferdco version described in Ferdinand Jeanblanc's patent (which expired in 2003) really differs functionally in real life. In case somebody actually wants to make and use one of these things, I made a video showing how it works and some before-and-after shots of the feed dog turned lower needle guide. Here's the video for your entertainment:
-
Here's one more candidate that comes close to your specs (except for price): HighTex 9204ZZ Full specs are on this page: http://www.cowboysew.com/product4.htm Here it's sewing a zigzag over a thick rope:
-
If the price is right and it's in good condition, just get it. It'll be a good "original" reference machine to judge other machines by - you'll be hard pressed to find something better engineered in that class and vintage. Page 9 of the Pfaff 145/545 manual (Pfaff 145 545 User Manual.pdf) shows the needle sizes supported by the A/B/C/D versions of this Pfaff 545 H4 machine. The Model "C" version you are looking was designed to support needle sizes 110Nm-140Nm.
-
This Hightex Model 9366-12 is probably close to what you are talking about. I, too, have little hope that this is available for AU$3,000 (US$2,200) or less. This Hightex/Cowboy copy of an Adler 366 has 14mm foot lift and up to 12mm zig-zag width. On the plus side, there's a service manual available: https://www.duerkopp-adler.com/export/sites/duerkoppadler/commons/download/public/366/s_366_gb.pdf If you find one of these things new or used and within your budget, you might want to also play the lottery, because that will be your lucky day for sure.
-
Has this machine ever worked in this configuration? Perhaps the previous owner sold it in frustration because he couldn't make it work. Your machine is very likely is a Pfaff 146/546 class machine (Flyer: pfaff-0546.pdf) and was designed as a dual needle machine. This means it had special feed dogs, throat plates, needle holders and various other two-needle specific parts. I'm not convinced that this two-needle design can be made to work properly if all the two-needle parts are replaced with single-needle parts. Hopefully I'm wrong and it will work, but sometimes mix-and-match parts combinations add up to a no-go configuration that cannot be adjusted to work properly. The partially removed automation parts are adding to challenge. The parts manual for the Pfaff 146/546 (Pfaff 546 Parts List.pdf) has a whopping 132 pages, hinting at the complexity and number of variations covered by this general design. You might be able to narrow down what subclass your machine is by looking for tell-tale odd parts (e.g. that bent-looking horizontal manual foot lift lever). The Pfaff 146-546 users manual (Pfaff 146 546 User Manual.pdf) may help answer a few key questions, too (needle system etc.) That bobbin and cap in your picture don't quite look right. Are you sure you have the right size bobbin? The bobbin+cap should fall into place inside the bobbin basket and the center lock tab should flip down to hold the cap in place.
-
I had ordered from aaasew.com on a few occasions. They do have parts nobody else seems to carry, but it took 3-4 weeks for parts to arrive. Your order may be quicker, of course, but you're still dealing with international shipping from Canada.
- 4 replies
-
- industrial
- singer
-
(and 1 more)
Tagged with:
-
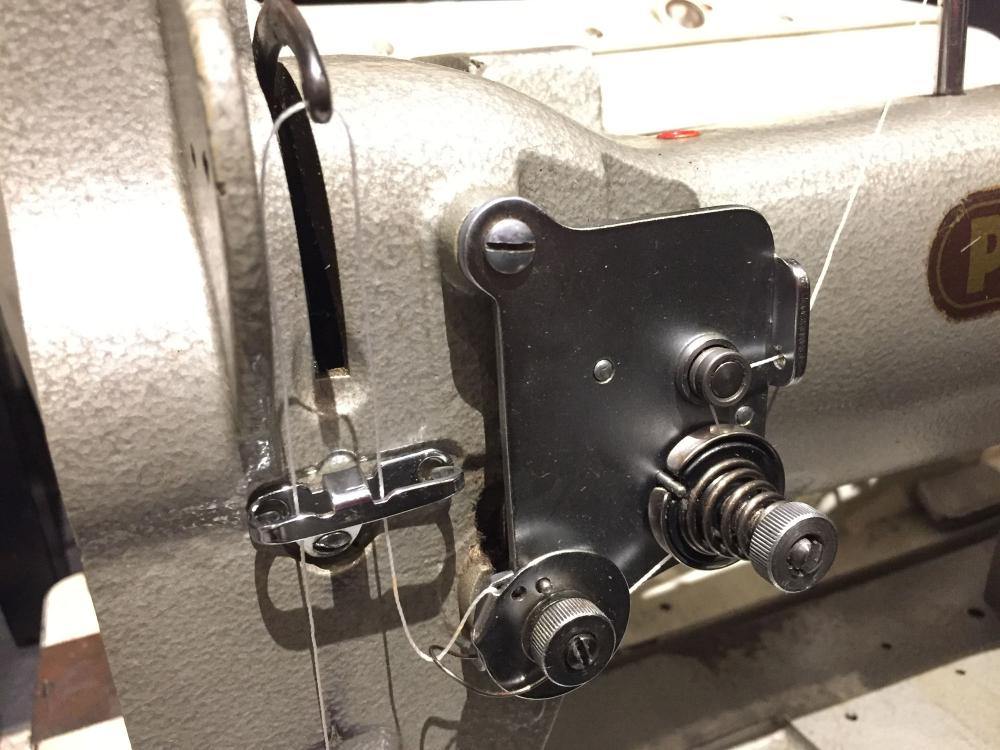
Welcome to Leatherworker.net Stanislav! There are MANY possible reasons that top thread tension may not working properly. Please post some pictures of the back, hook area and underside of your machine - it may allow us to narrow down what model your machine is. It's not a standard Pfaff 545 - of that I'm quite certain. Your machine looks like a two-needle machine that was converted to single-needle. Your thread tension assembly is also a dual needle tension unit with parts removed. The thread tension unit on my single needle Pfaff 545 looks like this (also Pfaff 145 and Pfaff 1245): On the two-needle thread tension units the tiny pins inside the post that push the tension disks apart are NOT the same length. If the tiny pins get swapped or the wrong length is used, they will not work right (I just worked on a two-needle Pfaff 120 where exactly that was a problem.) Make sure your tension disks are not permanently pushed apart by a pin that is too long. The tension disks have to press against each other to put tension on the thread. Make sure the threading is correct and that all the thread tension parts actually work the way they are supposed to work. The top thread may get caught somewhere and cause it to get pulled and loose tension. Open the right slide cover and turn a few stitches by hand. Observe the thread getting wrapped around the hook - it should be smooth, not snapping. I made a video with a Pfaff 1295 post bed machine recently. The Pfaff 1295 post bed machine has a different bed than yours, but the top portion of the head and the hook are the same as the Pfaff 545. The threading, bobbin loading, and thread tension release (pushing the tension disks apart when lifting the presser feet) should also be the same as your Pfaff 545. Some tension release parts on the back of my Pfaff 1295 are customized, but the effect of pushing the tension disks apart and letting them close again is the same (see 7:58 mark in the video below.) Make sure your tension unit works the same way when you lift the presser feet - your tension disks may be stuck apart for some reason. Here's my Pfaff 1295 video - compare top and bobbin threading, thread tension release, and hook movement to your machine.
-
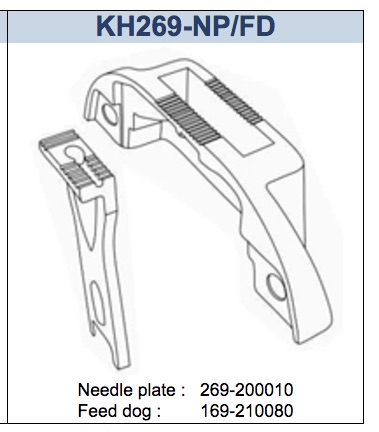
I'm not aware of any clones of the DA 269 design. The 269 series is still in production, so you can get original DA parts (the 269-20-00-10 throat plate should come in under $200 retail). College Sewing the U.K has a few 269 parts listed as well, including throat plates and feed dogs. Kwok Hing makes some aftermarket parts for the DA 269, including a standard feed dog and throat plate. KH parts are usually nice quality and considerably cheaper than OEM.
-
Nice machines! There's a topic discussing this machine That topic mentions a general price range of $2000-$3500, depending on condition. With machines that hefty, location also factors heavily, so to speak, since shipping will be an issue. Just like real estate, they are worth precisely whatever a buyer is ready, able and willing to pay at the time you put it up for sale.
-
-
Sounds like something I would say, too.
-
The are no new machines in that class and price range unless you live in southeast China. The cheapest new machine (short-arm 441 style machines) that covers your application range in the U.S. runs about $1,600 before shipping. You may be able to find a used one if you're extremely lucky. Without knowing where you live, it's hard to make more specific product suggestions.
-

I NEED ADVICE ON THIS ADLER SEWING MACHINE
Uwe replied to jollins's topic in Leather Sewing Machines
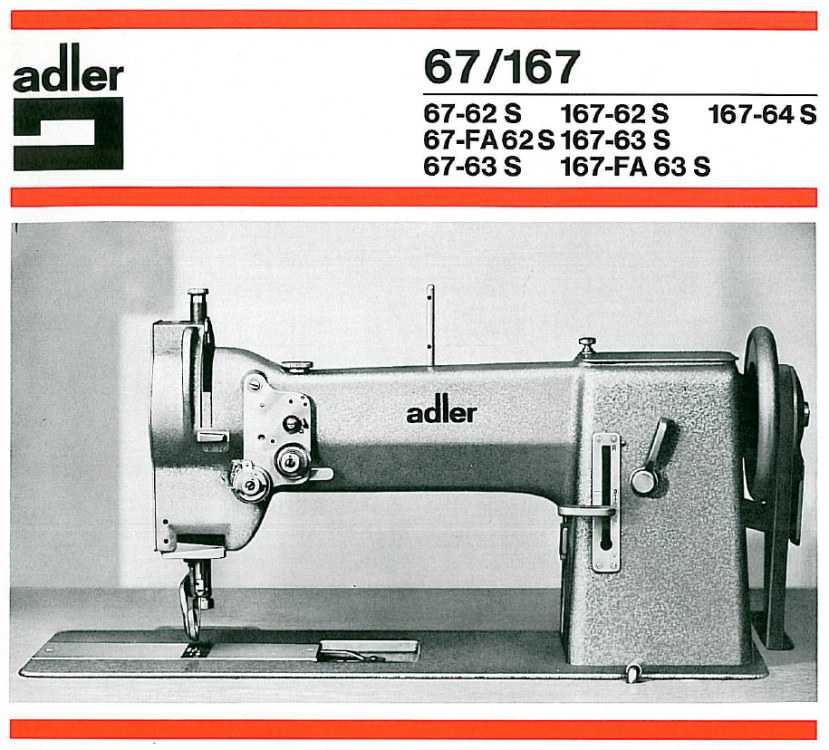
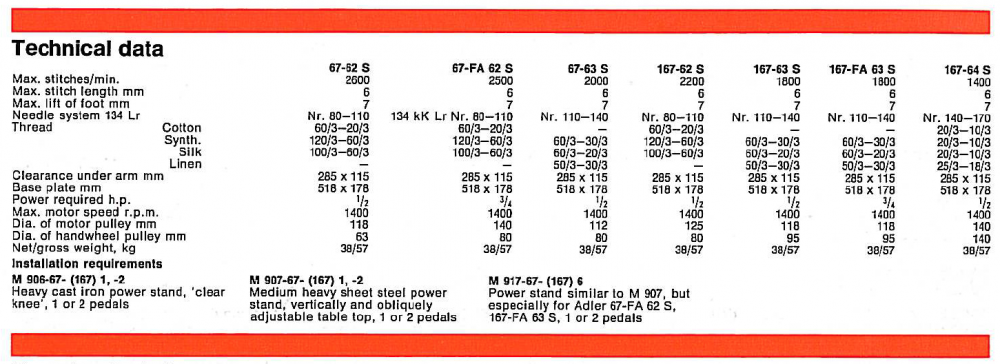
The Adler 167/67 model brochure leaflets (Leaflets_Adler_Class_67_part2.pdf ) show this machine on pages 15/16. There are seven different sub-classes that belong to this group with slight variations in technical details. The big hook makes it one of the "167" models. The Adlers are generally very nice machines. -
A simple inquiry to the Oracle on Mount Ebay (a.k.a. search for "Juki 241 feet") reveals listings that suggest that the Juki DNU-241 shares feet with: ARTISAN : 618-1, 4400RB BROTHER : B837 CONSEW : 206RB, 225, 226, 226R, 277 JUKI : DNU-241, DNU-1541, LU-562, LU-563, LU-1114, LU1508, LU-1510, LU-1560 MITSUBISHI : DU-100, DU-105, LU2-400, LU2-401 SINGER : 111G, 111W, 153K101, 153W101, 153W103, 168W, 211G, 211U, 211W TACSEW : T111-155 YAKUMO : 260L
-
Probably not. The flat-top plate and the standard curved throat plate have the same thickness in the middle.
- 12 replies
-
- adler 205
- juki tsc-441
-
(and 3 more)
Tagged with:
-

Sewing machine for up to 14oz of leather
Uwe replied to ClassicBlock's topic in Leather Sewing Machines
If you're worried about pitfalls and condition of used machines, get a brand new Consew 206RB5 with a servo motor from Miami Sewing. It should be very close to your price target (you can get one shipped from California for $1350 on Ebay so local pickup hopefully will be a cheaper.) The Consew 206RB5 is a very good, capable design and a great starter machine. Having a dealer and service option within driving distance is a big deal. Go local if you can.


