MADMAX22
-
Posts
3,201 -
Joined
-
Last visited
Content Type
Profiles
Forums
Events
Blogs
Gallery
Store
Everything posted by MADMAX22
-
That sounds like quiet the ordeal. Wonder if they will remember that for next time lol. And Tkleather I know all about healers, great dogs but man are they stubborn, pain resistant, and love killin critters. I think the family had about 8 of them as a kid.
-

Hand Sewing Gun Belt...Wet or Dry?
MADMAX22 replied to dmr400's topic in Gun Holsters, Rifle Slings and Knife Sheathes
If I stitched something when wet it would look like a tazmanian devil got to it. I do my stitching when the leather is dry, usually just before dying or after words. I have found that even with my awl being very sharp and polished smooth it helps to have a little block of wax ( I have some parafin/bees wax 50/50 that I use for this job) that I stick the awl in. Basically after the first few holes it warms the awl and then I just poke the wax and then start doing the leather, after about 10 stabs I poke the wax again and go back to the leather. There were some others that did the stitching the proper way with a stitching horse and had the awl on one side and a awl looking handle on the other side that had a wax head on it and they would poke thru the leather into that and it would wax the awl everytime. For me though I prepunch usually so the block works fine. As for rouge any polishing compound can work, there are various different grits of it but it seems if you look for rouge good luck finding it but if you look for polishing compound you have far better luck. -
http://en.wikipedia.org/wiki/Kydex I really first saw its use in variouse cases and then in holster manufacture several years ago, not sure when I first saw it as I never really cared much about it back then, probably 10 yrs ago or so. I think its been big in holster making for that long hence when it first started getting popular in this field. Mostly anyplace offering it for sale for public (non business) was mainly for holsters.
-
What do you use for knife sheath?
MADMAX22 replied to DG Leather's topic in Gun Holsters, Rifle Slings and Knife Sheathes
Ganonymous I did a quick tutorial for ya. Should get you started in the right path. http://leatherworker.net/forum/index.php?showtopic=19840 -
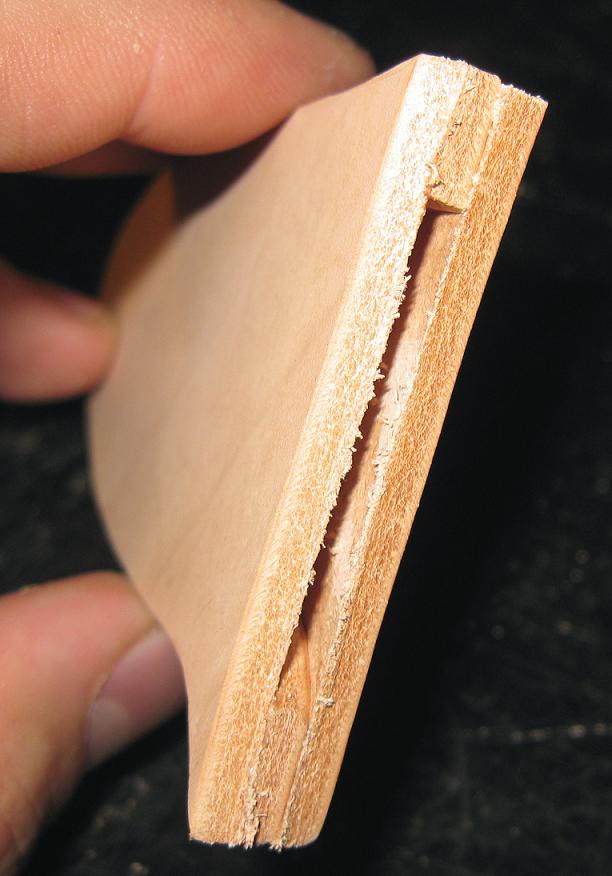
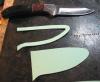
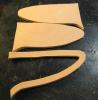
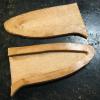
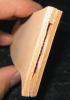
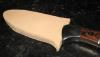
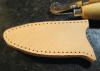
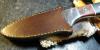
There was a couple of questions on making knife sheaths so I figured while I made a simple knife sheath for my utility knife thats on my bench I would take a couple of pics. This whole thing was done in about an hour if that so it was quick, simple, and to the point. I wasnt to worried about overall quality so its not as clean as something you would say sell to someone or as good as a gift. Just something so I dont cut myself while Im working. Trace the outline of the knife and then add about 5/16" to the outsideof it. This allows for some extra and allows for the stitch line. This will be the welt, Now trace the whole outline and add same distance for your overall pattern for both sides. You use one of these and flip it over for the other side. Make sure you do that if you want grain side out on both sides. Use some contact cement and glue your cut leather together kind of like a leather sandwich with the welt in the center. I used a dremel to dress up the edges a little. Now I trimmed it to mate with the lines of the knife better as you can see from the photo. I prepunched on this one, I usually do on my sheaths, its just easier for me. Stitch, dye, and finish your edges. I applied some sno-seal. And walla youve got a simple sheath. Now you can add belt loops, inlays, tooling, straps for retention, little pockets for sharpening stones, whatever you so desire.I know there are about 1001 different ways to make sheaths for knifes and this is just one of them but it can get some people an idea to get started with maybe. Feel free to add to it with other ideas and how toos.
-
Really cool idea, and looks really good with that color.
-
Thanks, thats a cool sale, had to call it quits at $70. If I had the money could of spent alot more.
-
The only thing I know about shark prices is it is pricey lol. Theostrichmarket that DCknives highly recommends has it for sale http://www.theostrichmarket.com/ I guess you could use there pricing as a starting point. You gotta click the shop on line link and it will give you prices. If you call and mention Dave maybe they will give you a small price brake.
-
Al stohlmans books on case making has several ways of making them. Its a 3 book series and worth every penny.
-
Hey Ukray Angster has done alot of mugs and may be able to help ya out. I know he did a tutorial in the reenactment section.
-
2 new Leathersheath
MADMAX22 replied to Handwerker's topic in Gun Holsters, Rifle Slings and Knife Sheathes
Excellent looking work and nice knives as well. I like the detail in the belt keepers how you shaped them to follow the shape of the sheath. -
You can still get unwaxed linen thread from other places then tandy. The thing with the wax thread is that to get the ends nice and pointy to thread thru the needle you need to take a dull knife and scrape the wax off to thin out the thread. Other wise you end up having to use a larger needle then necessary. I still use wax thread as I have a bunch left. I recently started playing with making my own wax/rosin mix and tried it out on some hemp thread and it is working very nicely. It allows better control over how much wax you end up putting on. Waxed linen thread will work just fine, I have also used waxed nylon and it works pretty good as well I just prefer the linen better. Some people will swear by different threads and use different types depending on there projects. If you look in the sewing subforum there is a thread on threads (lol) that has alot of good info on this subject.
-
Finished Holster - need Advise
MADMAX22 replied to particle's topic in Gun Holsters, Rifle Slings and Knife Sheathes
There was a thread a while back about the squeaking you are talking of. Had alot of info but ya gotta search for it. Other then that the guys covered any advice I would give ya. -
Personally I like the waxed linen thread. The others I have tried and they dont feel or look as good IMHO. Well the sinew has some good uses but the tejas is overly waxed and the braided cord is the only one I havent used. I really like linen. It looks great and is easy to use.
-
I have no suggestions for ya as far as keeping the thread from dying also however if you have the tools you could always use that headstall as a pattern and make your own just dye it the correct color to match the saddle. Probably wouldnt be any harder in the long run then taking that one apart and putting it back together again. I know its not cost effective though.
-
Now thats a cool case.
-
Wet molding and Boning a holster
MADMAX22 replied to jlopez's topic in Gun Holsters, Rifle Slings and Knife Sheathes
Just wanted to bumb this thread as I am working on my second holster and its gonna have more boning in it then my first one. The info here has been very useful, wish I would of searched for it before I started. -
Looks pretty good, I like the color. The lacing looks interesting as well. As far as myself Ive only done one round braid lace type and did the whole thing as I went along. I didnt think of going around several times. I just followed the instructions in "Encyclopedia of rawhide and leather braiding", great book if you dont allready have it, its well worth the money.
-
Great tutorial thanks a bunch. I had totally forgotten about that thing with making your own awl, had read there write up on that a long time ago and filed it away lol.
-
Test it out first. I know what you mean about the wet weather up here. Infact its raining right now lol. I would try your technique out first on some scrap if you have it and see how it works out. The biggest concern I would have is the anitque is more of a stain I guess but they dont penetrate the leather like dye does. I would definatly think of some kind of sealer like tan kote or similer then once thats dry put your wax on top of that. Im sure some others on here have experimented with this so hopefully they will chime in.
-
Just my little bit of experience as I handstitch all my stuff and have made 4 double layer belts and am working on another. The first one is a pain in the butt, you will realize quickly the above comments how helpful they are. The first one will be a pain, the second one will be alot easier but still kind of a pain, by time your on your third itll be like lets watch a movie and do some stitching. One good thing about doing a few belts, itll make stitching a sheath or something smaller seem like a piece of cake.
-
New Holster and Motorcycle Seat with Tool Bag
MADMAX22 replied to luckydevil's topic in Motorcycles and Biker Gear
All looks really good. Sure you had some happy customers. -
Those are some great looking combos. Love seeing your work. Looks like ya took it right out of the past. That beading looks amazing, gotta try and learn that one of these days (Ill add it to the list lol).
-
Case For New Gungher Shears
MADMAX22 replied to Storm's topic in Purses, Wallets, Belts and Miscellaneous Pocket Items
Nicely done Storm, very clean work. -
I think they are chrome tanned right, or similer. Dont think they will take to dying very well but I have not tried it.