


Thor
-
Posts
1,038 -
Joined
-
Last visited
Content Type
Profiles
Forums
Events
Blogs
Gallery
Store
Everything posted by Thor
-
Flip-Flops and Sea Turtles
Thor replied to SmokeyPoint's topic in Shoes, Boots, Sandals and Moccassins
I guess I would make the thong piece from full grain leather, but then again knee pads on general purpose saddles are often made from suede leather. Since people won't only walk on the beach, but also on asphalt on the parking lot, down the road or wherever, yes, the leather and the thread will wear in time. Most manufacturers account for this and glue an extra layer of sole over the threaded piece. If you don't want to do that I guess you could make the groove deeper in the sole. If you're worried that the thread will wear, what about the tooling on your sole? I think people have to be aware that it's a shoe and shoes do wear off no matter how nice they look. BTW. I really like your flops. -
Every practice is good practice, even if the final product could have been done different or better. There are definitely things you have to learn. We all have to. Some more, some less.
-
Don't know where you get this Pearson from, but you're maybe right and I have no clue what machine I was working on. I doubt Todd would use the patcher in his shop. Instead of just looking at pjctures, reading might help at times. He's selling 3 Singer patchers. BTW this is not even half of his shop you see in the pictures. Currently I'm in Scotland and will look up my pictures next week.
-
Once I'm back home I'll go find a picture of the old Pfaff the Bailey saddlery uses. It uses such a large needle. Don't remember the model but it's definitely a Pfaff and older than I am.
-
Yin some not so bright person must have used a jewelers file to sharpen it and of course the diameter was wrong. You will have to bring the large groove that same distance back and re-polish the edge. You can either use sandpaper on a whatever matches the diameter of that groove or find a file that diameter. CSO sends sharpening tools with there edgers and bevelers.
-
Sorry, never got around to do it. I could take my clamp apart and mail it to you. Just a few more things that need to be added to it. I can take a few pics and email you. I can always make a new one if I need one again.
-
For a daily ride I would consider a few more things. There will be lots of rain and exhaust particles. Not that they wouldn't be there with every seat but it will be a lot more. Making sure the water doesn't run off into your seams. The one in the linked video wouldn't really work as the water will stand on the seam an penetrate into the foam in time. Neoprene will help with that. However, having the top run over the sides instead of the other way is much better. Usually I'm not a friend of chrome tanned leather, but in this case it might be the better option unless you want to carve something into your seat. Probably referring to this video http://www.sailrite.com/How-to-Make-a-Pleated-Seat-Cover-for-a-Motorcycle-Video looks well explained. However, see comment above.
-
Thanks Dave. For the right amount I'd be happy to send it to any place on the globe Thanks alfredleatherworks. 3.5 mm converts to about 9 to 10 oz. If there's no tooling involved it doesn't have to be that thick at all. something with around 2 mm will do. So somewhere of around 5 ounces. What I've learned from the seats I've done thus far is that you should ad a 2 mm liner of neoprene to the padding. It gives the whole padding more stability without losing the softness.
-
very nice, what are the dimensions on this?
-
Cause he's obviously looking for help with the design. In general I think it looks okay. There are a few things I believe could be improved. The center flower seems to be smaller than all the others. I think it should be the same size or larger. The vine work usually has no real end along the stems but yours does several times. The right side seems to be more fluent and better designed while the left side doesn't. Especially the background areas are larger on the left than on the right. Fixing the vine work lines a bit should do the trick. Also check the upper right hand corner. It looks like this vine work is coming from out of nowhere, cause 2 lines don't really fit in there. The best design to me is your bottom right. There's a great book by Bob Park (Hidepounder) https://www.facebook.com/Bob-Park-Custom-Leather-131291347030087/ this should solve most of your design issues.
-
It's embossed most likely. Good job, keep the student going!
-
LOL, I did write about that, but deleted it again to not confuse him about this and didn't include the fact, that even chrome tanned leather can be tooled if that property is included in the tanning process, but is very expensive. Same goes for dyeing chrome tanned leather. There are some that can be dyed and others will not accept the dye and bleed forever. Latigo leather would be the classical example for re-tanned leather. I believe there's an overview on leather types on this board as well, but I couldn't find it right now, so here is another one http://oldmillleathercrafts.thewesternsource.com/about-leather/
-
Some experience and close observation will make a boiling test unnecessary for about 95% off all leathers. Try learning something about the tanning process and the various uses for the individual type of leather. Also there's not only chrome and veg tan. It has become a rare find, but there's also alum tanned leather out there. Most chrome tanned leather is drum dyed and a lot softer than veg tan. If they are tanned only and not dyed yet, they are called wet blues and this will be found in most chrome tanned leathers. It's a grayish or blue core. However, if they are drum dyed the will be dyed thru in many cases (it really depends on the tannery and what time they take with it). Some nutcase believes that this makes the leather more durable. Can't see how color will make a leather more durable or more tensile. The person is a great salesman, but not very knowledgeable about leather.
-
Sheath for a Viking seax
Thor replied to Harry Marinakis's topic in Gun Holsters, Rifle Slings and Knife Sheathes
Looking excellent to me. -
All it takes is a household sewing machine and the right pattern. Of course some measuring will be needed as well. Those patterns and advises should help you https://www.pinterest.com/pin/AW6XfTv5MAeRB66KP8qTn7VqqjxW-k7ufghqVSYfAvvm_fVn0MPqRLo/ https://www.pinterest.com/pin/557461260106963529/ https://www.pinterest.com/pin/557461260105785811/ http://hubpages.com/art/Leather-Work-How-to-Make-Leather-Mittens-Leather-Gloves Including a how to video Good luck
-
Since I made a few seats for bikers with skulls on them and some person/s seem to be offended by this I like to join this conversation. If one is offended by a skull that one is imho offended by mankind. It's simply a part of the body and nothing special. They aren't my favorite, but it has been a part of human artistry for ages already and has been posted on this forum for a long long time already. I could further this to insignia/logos of government organizations around the globe. Since most of my information resources are German of course I just googled this one for you https://en.wikipedia.org/wiki/Skull_art and this one https://en.wikipedia.org/wiki/Catacombs_of_Paris. The later is even published in multiple books and part of school lessons in France. And if I remember correct skulls and bones are even an important part of the catholic religion especially in the process of canonization. To give this another point of view. I'm truly not believing in god, Allah, Buddha or whom ever is believed to be out there. I'm staying away from religions as far as I possibly can and I'm still not offended by any of the bible phrases on here. It's a matter of tolerating others in the way they are. Hope you don't take this as an offense, as it isn't meant to be one. Especially since I have nothing but respect for you and your contributions Dwight.
-
In case you didn't notice Kingsmere Crafts is back online, but under new URL go to http://kingsmerecrafts.info/ please.
-
Don't really understand why the use of skulls on a biker item would offend anybody. It's rather standard and to me boring at times, but definitely not offending. Seen other things that would offend me, but certainly not a skull. Anyhow, the bag is nice, but what I really enjoyed is the video. I like to see how others are making things and how they approach certain tasks. There's always something to learn I guess what really got me curious is the combination of biker and makeup. Sounds a bit odd to me
-
Long Road Bike Glove Box?.JPG
Thor commented on RockyAussie's gallery image in Gallery- Our Leatherwork
 Wow, must have been huge pearls then. Would be quite pricey too.
 -
Long Road Bike Glove Box?.JPG
Thor commented on RockyAussie's gallery image in Gallery- Our Leatherwork
That's an interesting headstall. It definitely has something to it. I'm pretty sure you could get or even just find a Brumby skull some place to make things like this. On the other hand if you make custom bridles you'll have to measure them or have them measured anyways. Reminds me on the bridle I have to make for my old boy. Noticing the buckles on the headstall, are they of decent quality? I was thinking of ordering those already but was uncertain of the quality. -
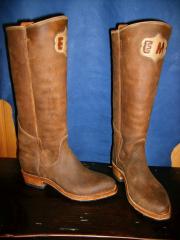 Boot making is something I would really like to learn some day. It's on my list for sure. Do you have any process pictures?
 -
Long Road Bike Glove Box?.JPG
Thor commented on RockyAussie's gallery image in Gallery- Our Leatherwork
Thanks for the compliment. Looks like you're having a nice sized saddlery shop there. The stuff you're making is really nice. I didn't notice the quick release buckles on the first picture. That's a good idea. One suggestion though. If the straps don't fit back into the holders I would ad a loop to get the rest out of the way, or are they meant to be cut off once the roll is fitted to the bike? -
Long Road Bike Glove Box?.JPG
Thor commented on RockyAussie's gallery image in Gallery- Our Leatherwork
Cool, I like that tool roll a lot. -
Sketch pad (with build process)
Thor replied to niniquesvk's topic in Purses, Wallets, Belts and Miscellaneous Pocket Items
Both thumbs up! And thanks for taking the time and sharing your process pictures. -
Pretty cool! Wish I could do that.