-
Posts
283 -
Joined
-
Last visited
Content Type
Profiles
Forums
Events
Blogs
Gallery
Store
Everything posted by mattsh
-

My First Inlay
mattsh replied to electrathon's topic in Gun Holsters, Rifle Slings and Knife Sheathes
I would say for your first inlay it looks really good. Very functional sheath. What can you tell us about the knife? -

First Three Holster
mattsh replied to TISCo's topic in Gun Holsters, Rifle Slings and Knife Sheathes
The gum backed leather is a finish on the flesh side which is the inside of your holster. They apply a "gum" product of some sort, not sure technically what it is, but they apply it and buff/sand the flesh side so that it is nearly perfectly smooth. Most times any of the tanneries will have it on their grade A shoulders, but you have to ask to make sure. If you tell them what you want and tell them that you are making holsters they will help you find what you need. I used to get my leather from Zack White and lately I have got it from Springfield Leather. Basically the gum back will get rid of the scraggly "fleshy" look on the inside of your holsters. -

First Three Holster
mattsh replied to TISCo's topic in Gun Holsters, Rifle Slings and Knife Sheathes
Looks pretty good for your first holsters. The stitches space look good. The design looks good, I like the curvy lines they really help a holster look good. The color of the third holster appeals to me most I really like it. The color and finish of the holsters looks good. I like the simplified boning of the gun, not too much and not too little, as long as it is enough to make retention good. A couple of critiquing points: stitching around the trigger guard might need to be a little closer, my opinion is that you might find that particular area starting to get loose after a while since there is such a distance of unstitched leather that could stretch; the stitching looks to be done by hand (possibly saddle stitched?) and the thread in the pics looks like it is not a waxed thread, if you are going to stitch by hand it would probably be best to use waxed thread; the edges look pretty good, might round the edges a little more to help it look a little more "finished"; the leather you used, is it gum-backed? if not it would be a good idea to get that type of finish on your leather, this will also help it look more "finished". Just my .02, others might have different views than mine. Since you looked at Particle's video, hopefully he will chime in. All in all a very nice job for your first holsters. -

Some Sheaths With Inlay
mattsh replied to Rocky's topic in Gun Holsters, Rifle Slings and Knife Sheathes
Absolutely gorgeous! That is some excellent work. I love the smooth lines and colors. The edges are very well done. Those knives are really nice as well. Those are some beautiful damascus blades with hidden tang and I really like the handles. -

Ostrich Holster, Mag Pouch, Light/baton Holder
mattsh replied to Tac's topic in Gun Holsters, Rifle Slings and Knife Sheathes
Nice looking setup. -
Very cool design. I like it. One question; does the clearance between the grip and the holster allow you to grip it effectively ?
-

New Tooled Avenger
mattsh replied to particle's topic in Gun Holsters, Rifle Slings and Knife Sheathes
Particle - dude - that is some fine looking leather. Awesome job and very cool look. -
That looks really good for the first holster. Awesome job!
-

Elephant With Airbrush Fade
mattsh replied to mmirob's topic in Gun Holsters, Rifle Slings and Knife Sheathes
Neat effect on the fade. Very nice 45 you have there. Is that the Caspian Damascus slide? -

Questions About An Old Holster
mattsh replied to ferretface's topic in Gun Holsters, Rifle Slings and Knife Sheathes
You might check out Brigade Gunleather. They have a model M-3 that looks a lot like what you have here. Brigade M-3 I do not have personal knowledge of their holsters, but I have read their process they use and it seems very sound. Good Luck in your search. -

Pancake - Glock 22
mattsh replied to JeffGC's topic in Gun Holsters, Rifle Slings and Knife Sheathes
Very,very nice. Clean lines and good stitching. I like it. -

Mexican One Loop & Cross Draw 2009 002.JPG
mattsh commented on tEN wOLVES's gallery image in Our Leatherwork Galleries
-
Hicks - you might look at the Holster Design post pinned in this forum on the second page, post #25. It might give you some guidance. When I do my sight channels I saran wrap the dowel in place. I have not had issues with it moving. You typically do not want your sight channel to run the full length of the gun as this can cause issues with having a secure fit and over time will cause the holster to not fit very tightly.
-

My 2Nd Solo Completed Sheath
mattsh replied to jeffc's topic in Gun Holsters, Rifle Slings and Knife Sheathes
jeff - not bad for only your second piece. When you say you broke 6 needles, what kind of stitch were you doing, was is lockstitch or saddle stitch? As RH pointed out there is an adjustable groover that can help with stitch lines, but I see what you were going for and understand how the stitch line looks the way it does. In theory not a bad idea but won't always work depending on the style of knife you are making the sheath for. -

Sharkskin Rocks!
mattsh replied to BigRiverLeather's topic in Gun Holsters, Rifle Slings and Knife Sheathes
BRL - that is just plain gorgeous! -

Paddle Rig For Walther Ppk
mattsh replied to troop's topic in Gun Holsters, Rifle Slings and Knife Sheathes
very nice! -

My First Cowboy Rig
mattsh replied to mattsh's topic in Gun Holsters, Rifle Slings and Knife Sheathes
Denster - thanks BRL - not sure about a different set of feet. If there are that would be great, but I don't know. It's been difficult to find any information on this machine I have. So until I can figure out a different way to make this work I am going to be sure to leave plenty of material to the "waste" side of the stitch so the feeddogs will not try to basically push the leather unequally and cause the stitch line to get crooked (if that makes sense). -
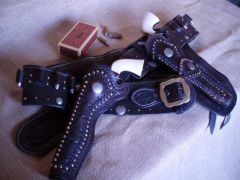
Here is a pic of my best effort at a Duke rig. The belt stitching was challenging. It was a learning experience with my machine. It's the first time I have used it to stitch anything. Learned a lot in setting up the machine. It's a consew 733-r2. I had no (what I would call) real user manual. Took me hours to set it up so it would stitch and make the lock correctly without bunching up the thread. Finally got it figured out and it did really well. However I did not account for the fact that I needed more material between the stitch and the edge so the feeddogs would work correctly, but oh well, now I know for next time. There are 26 loops (5 reloads + 1 rifle round as the marker ). The gun is a .357 Colt SAA. It was a lot of fun working on this and I learned alot. I'll take more photos later. It was a cloudy day but I still had issues with some glare.
-

First Post Of My Work
mattsh replied to mdmorgan's topic in Gun Holsters, Rifle Slings and Knife Sheathes
Looks good. Nice Makarov as well. -

New Holster Challenge
mattsh replied to mattsh's topic in Gun Holsters, Rifle Slings and Knife Sheathes
BRL ---- thanks for offering to post pics. I am looking forward to seeing them. I have looked at Brigade and all their pictures, but I am still puzzled by how the leather that wraps around the mouth and is reinforced does so without making a seam. At least in the pictures on Brigade it seems that there is not a seam where the front and back pieces of leather come together. I see that the the piece that reinforces the mouth also stitches to the back piece to reinforce and form the sweat shield. Definitely looking forward to seeing the pictures. Can't wait to see them. Thanks again everyone and thanks BRL. -
A friend of mine asked me to try to build him a holster like the one pictured below. I have never seen one in person. Can anyone shed light on how the front and back pattern come together with that front "wing" like it is. I can't seem to picture in my mind how the pattern works out. Thanks for the help.
-

Getting That Even Shade Of Brown
mattsh replied to dickf's topic in Gun Holsters, Rifle Slings and Knife Sheathes
I have to agree with Rhome. In years past Lou was a great tutor and he told me the same thing. He always did the dye before forming and did it by dipping. Since I have not purchased enough dye to do dipping I simply spray brown, which my current project is the first one I have actually done with the intent of using brown and spraying has worked wonderfully. In the past I have always done black simply because I could not get brown to do what I wanted.


