


dikman
-
Posts
4,838 -
Joined
-
Last visited
Content Type
Profiles
Forums
Events
Blogs
Gallery
Store
Everything posted by dikman
-
Glad it worked out ok, banjo. I found even the 3/4 hp has plenty of grunt, particularly when used with a speed reducer pulley set or a larger pulley in place of the handwheel.
-
Info on the G model seems a bit rare, I could only find the 111W116 (I was curious what it was).
-
As far as I know the "footprint" for mounting an industrial sewing machine motor is fairly standard (at least for every one that I've seen), i.e. 3 bolts in a triangular shape. If you have this configuration then a servo motor should be a straight swap, although you may need a different size belt too. This is the link to the manual for the Singer - http://www.manualslib.com/manual/522893/Singer-236w.html - should help with the oiling.
-
Mcqueen Holster - Sort Of....
dikman replied to dikman's topic in Gun Holsters, Rifle Slings and Knife Sheathes
I've made belts using the same weight leather as you use (minus the suede) but I find them too stiff for my needs. Because I use a cross-draw rig the strong side (right hand, in my case) holster I tend to sit lower so that the belt is angled down across my body. The cross-draw holster is sitting higher, of course, but that doesn't matter. If the belt is too stiff it won't stay put where I want it! My holsters are also hard and the guns slide out easily - as long as I don't catch the front sight, but I'm learning! On the subject of suede, I originally intended to use it as you do, but after discussing it with the chap where I buy my leather I decided against it. I don't know if our suede is made different to yours, but he said it's pre-coloured (as it doesn't accept dyes) and the colour has a tendency to bleed out if it gets sweaty. Still, I might use it sometime just to try it out. The biggest problem I have is that I don't make them for sale, and there's only so many holsters I can make for myself . -
Steve Mcqueen Holster
dikman replied to dikman's topic in Gun Holsters, Rifle Slings and Knife Sheathes
Sorry goertzen, I can't help as I'm referring to a revolver holster (as used in The Magnificent Seven). -
Darren, if you're referring to me my wife asked me if had enough machines when I brought the last one home (the free one). I said I really only need one more, something for doing really thick stuff! I don't think she was too impressed. Maybe one day, if the right deal turns up......
-
Just tried the braided #138 on the Singer G166 and it works fine on that machine. I had a feeling that it might like the vertical shuttle design better.
-
Mcqueen Holster - Sort Of....
dikman replied to dikman's topic in Gun Holsters, Rifle Slings and Knife Sheathes
The (almost) finished product. Taking the photos against the green has made it look lighter than it is. This whole exercise was partly an experiment to see how the leather would look "natural". Although it doesn't show on the photos, the neatsfoot oil application came out a little patchy, something to watch out for in future. The belt is only a single layer of 8-9 oz veg (the thickest I had) because I didn't want a stiff belt, I wanted something that would tend to mold to the body and I wanted the rough side in to give a little friction. Only problem I think I can see is with the tongue, it may be a little thin for the overall weight of the rig. I may glue a piece of Kangaroo onto the inside of the tongue to reinforce it, as the Kangaroo is very thin but extremely tough for it's weight. The belt only has a single line of stitching around the edge for now, as I'm not sure what I want to do with it. I may stitch a pattern on it or just run a second line of stitching around it. Still thinking.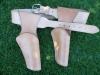

-
I watched the movement carefully under a magnifier and there's no sign of the material being moved backwards. Everything seems to be functioning correctly, so I figure I've got it as good as it's going to be. My 111WSV77 will do 4 1/2 spi, but it doesn't have reverse (which I've gotten used to!) and the 166 just feels a bit smoother overall. The 77 also has a left-toe-only foot, and I just found out it will fit the 166, so now I'll be able to get a bit closer to the edge on belts. Oh, one other thing, I also have a long-slot feed dog for the 166 - when would you use this?
-
Interesting point. The dog is set according to the manual, but I'll check with the magnifier again. I might as well have a play with the height as it's about the only thing I haven't adjusted yet!
-
Taking Eric's advice I started examining the feed dog area (it wouldn't have occurred to me to check that otherwise) and have got it down to 6spi. I don't think I can get any better. When the needle entered the feed dog it was centred ok, but I noticed, under a magnifier, that as the needle came out it was being pushed against the front edge of the dog! I re-adjusted the dog, but there was always a point where it wasn't centred! Much scratching of my bald head and I finally saw that as the centre foot was at the rearmost position, foot down, it was actually being pushed forward slightly by the outer foot which caused the needle/bar to also move. It was very, very slight, but it obviously didn't need much movement to be a problem. This machine came fitted with a large, thick left-toe-only outer presser and I left it on because it meant I could get closer to the right edge of the material when using an edge guide. It also came with a couple of spare feet, one of which is a "standard-type" foot (wide left toe/narrow right toe) so I fitted this. Result, down to 6spi and no more rubbing of the inner/outer feet. I ground off the "high" part of the offending foot to stop it binding, but I'll probably leave the other foot on for now. Eric, the feed dog doesn't show any movement back towards me. I watched it very carefully with a magnifier and couldn't see anything untoward. I just ran a line of stitching around the edge of a gunbelt and it worked fine, so I think 6spi is as good as I'll get. Thanks again, mate, if you hadn't pointed me to the feed dog I wouldn't have found it and I could have had wear problems further down the track.
-
That makes sense, it certainly hasn't been drilled and if someone had actually knocked it out I would expect there to be lots more damage because it's cast material.
-
This is one for the experts, 'cos I'm stumped. The manual states that the 166 can do down to 5 spi - the best mine can do is 7spi. I've pulled the stitch length regulator mechanism apart and it's working fine. When it's doing 7spi there is no more adjustment left in the regulator, so I can't see how I can get it to 5spi. So I'm puzzled. What am I missing here?
-
I only mentioned it because until I came across that list yesterday I hadn't found anything to indicate how many 111WSV models there may have been (I only knew of a couple). I know that there are/were quite a lot of KSV models, and I think I saw mention of GSV models somewhere. There may very well be old Singer books somewhere with info on the SV models, but unless people put it on the 'net it's almost impossible to find out much about them.
-
As it's in the 111 class, there's bound to be similarities - overall size, body shape, thread tensioner, feet etc. The trick is to match what you do have to other models (the W100 appears to have the stitch length adjuster in the end of the handwheel, for instance, whereas the W151-155 is adjusted by turning the handwheel itself). Darren made a good point about the W100 being the first one listed in the 111 class, whereas this site - http://www.strima.com/needle?page=255 - lists needles for WSV model numbers from 36 to 88!! Unlikely to be prototypes, I would think, with so many models, but who knows?? All very perplexing......
-
While it looks like it's now working ok, I'll take your and Bob's advice and re-check the timing and give the shuttle area another (closer) once over - just to make sure.
-
Sounds like a visit there could be as fascinating as the firearms museum in Cody! I smiled when I saw Seiko on the shaft in the second photo.
-
Slight mistake in my previous post, it is called a compound feed, i.e. needle and feed dog feed the material together. This is a manual for a 111W100, which looks like it might be the same machine? http://www.manualslib.com/manual/364307/Singer-111w100.html Looks like it's meant for material, oilskins and possibly very light garment leather - doubtful if you'll be doing holsters on it! If you search you may find parts lists too.
-
Stitch Length Setting For Timing A 335 Hook
dikman replied to Hockeymender's topic in Leather Sewing Machines
Old or new machine? The info I have is to set the feed regulator to 3 on a "new" model and 0 on the old ones. -
You'll be struggling to find specific info on a WSV machine. I bought a 111WSV77, and couldn't find any mention of it anywhere! Looking at various photos of 111 class machines, I noticed that it appeared very similar to the 111W151-155 models, so I downloaded the manuals and started comparing parts/fittings and what sort of clearance I could get under the feet. My best assessment is that it's a 111W153. You will probably have to do the same thing to try and find out your machine's capabilities. One thing I noticed is that yours is a needle feed and doesn't have the inner foot that a compound feed walking foot will have. SV stands for Special Version (I'm guessing that you've seen the same video on youtube that I first saw? The guy uses the term "special variance" which is incorrect). Singer made a LOT of SV versions of many of their models, and no-one appears certain just what the SV models were for - some think they were prototype models, prior to a production run, or models built for a specific function (mine seems to disprove the latter, as it seems identical to the W153). Best guess is that some of the parts are/were slightly different for some reason that we may never know. The W models were made at Bridgeport, in the US, and there aren't any records available for them so unlike other Singers you can't use the serial number to try and trace a specific model.
-
Knowing that it should work, I figured I'd buy some different thread to try. I bought a small spool of Serafin size 20 (138, same size as the other thread). Cranked it over by hand and after four stitches it caught and broke! Ok, try again, this time it did a dozen with no issues so I turned on the power and did about 20 or so, with no problems. Did another run and it too was fine, so it looks like there's basically nothing wrong with the machine. Comparing the threads was interesting. The Serafin is twisted poly, so pretty normal, the other thread, however, is a braided polyester. I picked this up as cleared stock from a bootmaking factory that had closed. Nice thread, really strong stuff, but I'd hazard a guess that my machine doesn't like the braided thread - maybe the braids are opening slightly when it's down in the bobbin area? Doesn't really matter, at least I can get it working. I'll try the braided stuff on the Singer flatbeds, It might work better with a vertical shuttle.
-
How To "test Drive" A Used Industrial Machine.
dikman replied to nascenta's topic in Leather Sewing Machines
Eric, thank you for that, fascinating stuff. For those like me, who struggle along trying to keep things slow and manageable, it's awesome watching (and hearing) what a walking foot can actually do! An amazing piece of engineering when you think about all those shafts, gears, eccentrics etc. hammering away at high speed! Wiz, adds new meaning to the term "smokin'!". -
Scout Carry Sheath
dikman replied to tossik's topic in Gun Holsters, Rifle Slings and Knife Sheathes
That's a very interesting design for a sheath, nicely done. -
Mcqueen Holster - Sort Of....
dikman replied to dikman's topic in Gun Holsters, Rifle Slings and Knife Sheathes
I was only trying it at the suggestion of the chap where I bought it, he said it should lighten the colour a little (which it did, but it also brought out the red in it). I can see where thinning the dye could cause problems due to the reduced colour content. I intend to experiment a bit more later, but at the moment I'm making Holster #9, to match the last one. It will be natural (oiled and waxed only) and definitely not as well-finished as yours, but that doesn't matter as they're only for me and I'm hoping they'll quickly get an aged/used/knocked about look about them. The gunbelt is causing me some indecision. My thoughts are for a single layer (I don't want it too thick), rough side in with an Eastwood style buckle and tongue and stitched along the edge. I don't want to stamp it, but am undecided about stitching in the "gunfighter" pattern. Trouble is that it might look pretty plain with just the natural finish. I'll just have to make it and see what it looks like, I guess. -
How To "test Drive" A Used Industrial Machine.
dikman replied to nascenta's topic in Leather Sewing Machines
You make me feel ignorant! Two of mine I bought from a chap selling off excess, no longer used surplus machines from his business. He'd run them to prove they stitch and I turned them on to make sure they worked! I may have been lucky, I guess, as he was a nice bloke and the machines had been serviced regularly. The next one I made sure it turned over by hand and that was it. The machine hadn't been used for a few years (?) and the motor and table were cheap **** - but it was a very good price for the head unit. The fourth one (head only) was free, I turned it by hand, which was fine, so figured it was a good price!! Like I said, I may have been lucky as there were no broken bits (just one very worn shuttle).

