


Sheilajeanne
-
Posts
2,752 -
Joined
-
Last visited
Content Type
Profiles
Forums
Events
Blogs
Gallery
Store
Everything posted by Sheilajeanne
-
If you have a microsoft machine, no doubt you also have MS Paint, which has a picture resizing option. You can choose either pixels or percentage, and once you resize it in one dimension (height or width) the other dimension will automatically be resized by the same amount. I use the mail it to myself option for resizing photos on my phone.
-
Glad I took 2 years of Home Ec. in school, plus my mom taught me how to use her machine... Still, it's been a learning curve!
-
Ohh, never thought of doing that! (I'm not a big soda drinker, and I need the beer boxes to take the empties back) :D I do use Cheerios boxes for patterns though.
-
Yes, decorative cuts need to be done AFTER stamping, as otherwise the pear shaders, crescent shaders, etc. will close up the cuts. The swivel knife work looks pretty good to me, though some of the cuts could be deeper. It looks like you have good control of your blade, though. How did it feel when you were cutting with it? If the leather is properly cased, and the knife properly sharpened and stropped, it should just glide through the leather, like a hot knife through butter. If it sticks, either it isn't sharp enough, or the leather is too dry.
-
For a project like this, I imagine a stitching pony would be a real help, too. Some ponies have magnets on them, so you can put your needle there and not get things tangled up when you need a break, or if you need both hands to help sort out a problem!
-
LOL, Scoobie! Yeah, I've had a lot of problems opening some of those bottles! And sometimes the darn things spill or leak during the struggle! I've now gotten into the habit of wiping down the bottles and caps before re-sealing them, as that seem to help keep the caps from getting seized up.
-
When I buy a bottle of dye or some other liquid needed for leather work, the store always seals it in a ziplock bag. The bags are big enough to hold 3 bottles of dye. So, I keep them in the bags. The bags are then stored in a Rubbermaid container that is just a little taller than the tallest bottle. Currently, one container is so full the bottles can't fall over, and I have a second that contains the non-dyes, and it's getting pretty full too! Even if the containers do fall over, the bags will contain any spills/leaks. You'd think the companies that make the dyes could design a leak-proof container but noooo.....
-
Putnam, can't help but notice in the topic title you say you were using Tandy Edge Kote, but in your text you say it was Fiebing's. Which one was it?
-
That is GREAT work! I recently did several pieces using Fiebing's antique paste and Resolene, and the Resolene caused the antique to streak, despite me diluting the Resolene 50/50 with water, and waiting more than a day for it to dry. What sort of resist do you use?
-
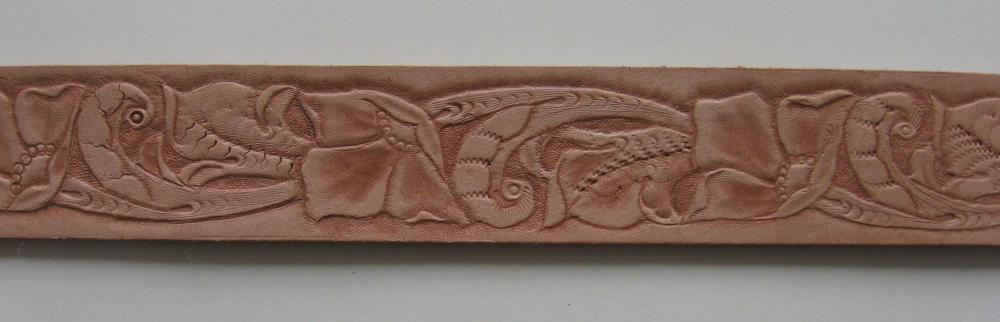
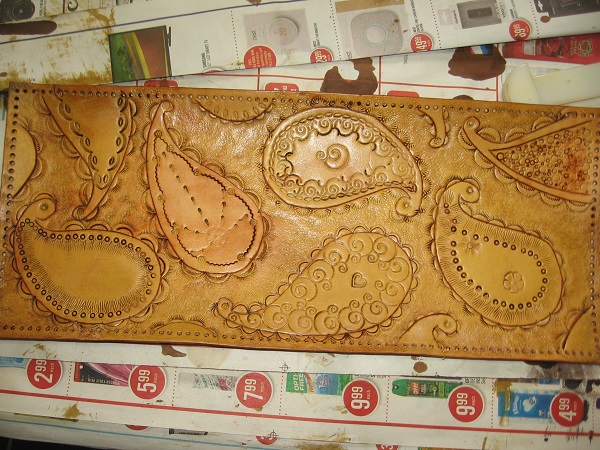
Yin Tix, very nice! And i did get creative with the paisley pattern, and did not stamp exactly the way I was supposed to. Once you have the paisley figures outlined, you can do pretty well whatever you please with them. You can definitely see the difference in crispness between my Tandy tools, and whatever tools the maker of that strap used:

-
Doesn't suprise me, JLS! Their two-pocket coin purse (now also discontinued) had holes that were hellish hard to line up, and they did NOT tell you which hole to start your stitching with! I had to rip the whole thing out and start over again, twice, because I was a hole or two out on matching the inner and outer pieces together! Also the inner flap on some of the purses had the snap fastener installed the wrong way - dome side out, when it should have been the male side out! No biggie - I will just cut my own flap when I decide to do one of these purses! It's just a small piece of leather, and the clear-out price was too hard to resist, so I bought a bunch of them!
-
JLS, one small consolation is I got the bag kit at approximately half the usual price, as it was discontinued. That was one of the reasons I didn't buy it before: even when it was on sale, the kit was usually around $90, then when I checked to see if I had all the tools I needed, I discovered there were something like THIRTEEN tools that I didn't even own yet! By the time I'd accumulated the required tools, they'd taken the bag out of production, and I couldn't find one! I just REALLY liked that paisley pattern, though, so I kept hoping I'd stumble across one somewhere. And now that I have it, I've made templates out of cardboard, so I can do the bag again whenever I want! Need to go back to my template, and move those strap holes, though!!
-
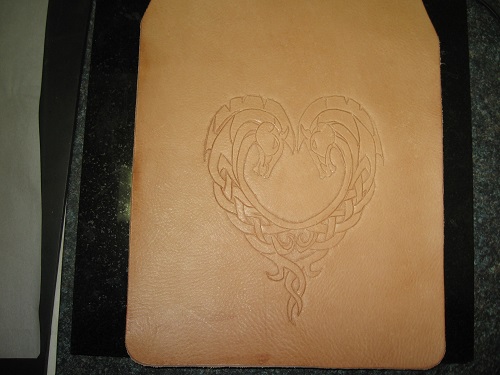
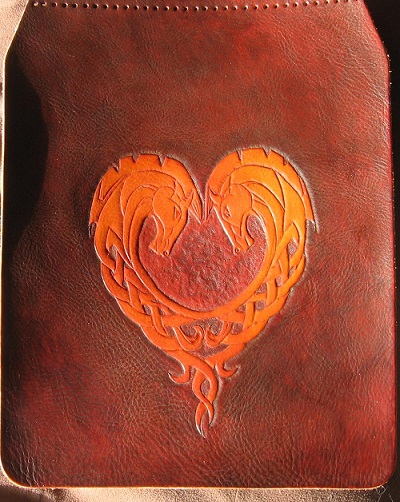
One of the other boards I belong to has a 'kvetching' thread for life's non-life threatening annoyances. Wish we had one here! Soo, the backstory - you may remember I was looking for Tandy's Molly tote bag for a number of months, and was extremely pleased to find one in the local Tandy's a couple of months ago. Tandy has discontinued this particular bag, so I wasn't sure I'd ever be able to find one. I completed the basic tooling fairly quickly, dyed and antiqued everything, then got stuck as I wanted to put some pockets and a liner in it, but couldn't decide the best way of going about it. Did I just want to hang a pouch and some card slots on one side of the bag, or was I going to go for a full liner? Did I want to put a divider in? All this had to be decided before completing the assembly. I finally decided to go with a full liner, to be installed after the bag was fully assembled. Last night was the last push to finish the stitching. This morning, I went to put the handles on. Uh-oh. Now I think I know why Tandy discontinued this bag. The idiots who were responsible for cutting out the pattern can't do a decent job! The holes for the handles are so close to the center panel that the two pieces of leather overlap each other! I got one end of one handle sewed in place, then ripped it out, and tried to figure out just what to do. If I used my strap cutter to shave a piece off each side of the strap, I'd not only come dangerously close to the stitching holes, I'd also have to refinish the edges of the strap. I removed the top 2" of stitching, then tried cutting out a piece of the center panel next to the strap. Didn't like it. It's a dangerous route to go, as a slip of the knife would permanently damage the appearance of the bag. (The center panel is the one with the nice tooling on it, too, so don't want to take chances.) Well, there is a third option. The picture on the box shows the center panel lying on top of the two side panels, so of course, that's how I did the assembly. If I totally rip out the stitching on this panel, and resew it underneath the side panels, my problem will be solved. It will also hide the chunk I shaved out of the panel. It will be a PITA to do, but it can be done without ripping out ALL of the stitching. I just need to remove the stitching on each side, and enough of the bottom stitching that I can knot the thread once the center panel is removed. Thinking some REALLY bad thoughts about Tandy right now... this is NOT going to be fun!

-
Le Cuir. Compositions Decoratives Pattern book
Sheilajeanne replied to DebHop's topic in Patterns and Templates
There are some awesome designs in that book! -
One of the most amazing leather artists out there was Al Stohlman. I've heard from people who've been to the Stohlman museum that the tools he used to produce gorgeous leather artwork like what you see in his books were very basic, and some of them were home made. Give me the most expensive tools in the world and I am STILL not going to produce work like his!
-
Billin, Sheridan style would be what's carved on that belt I did above. It's a combination of leaves, scrolls, flowers, seed, etc. This cell phone case I did is a good example. See the link for more examples. The figures always flow outwards from an imaginary central point in the design. If you want to do figure carving (animals) you REALLY need to get Al Stohlman's book on figure carving. You can download it directly from the Tandy library, buy a paper copy from them, or search the web for a used copy: https://www.leathercraftlibrary.com/product/1140/figure-carving-finesse-by-al-stohlman That starter set of 9 stamps sounds like a good deal! Fred, you are probably right about the stamps. But I've heard enough reports about tools bending that it's made me cautious! Hmm...need to go back and burnish some edges! I didn't know how to do it back when I made that case! https://www.google.ca/search?q=sheridan+style+carving&tbm=isch&tbo=u&source=univ&sa=X&ved=2ahUKEwiG96XLg_jdAhXF6IMKHTvXAGQQsAR6BAgBEAE&biw=1236&bih=562

-
Fred, one problem I'd have with buying stuff off e-Bay is not known where it was made. Those COULD be Tandy stamps, or they could be some really cheap knockoffs with metal so soft the handles will bend in the middle! If you can find Craftool stamps that are older, say 15 years or so, I understand they were better quality than what Tandy has now.
-
I use Tandy stamps, as I'm in Canada, and import duties jack up the prices of more expensive stamps. They are perfectly adequate for the work I do. The only stamp I ever bought that had a defect was quickly replaced by Tandy, no questions asked. The more pricey stamps may make cleaner, crisper impressions, but I've done some pretty nice work without them. Some people have talked about stamp handles bending in the middle, due to being made of such cheap metal. This is not something I've had a problem with. Tandy often has sales, especially around Christmas time, when you can buy their stamps for just a couple of bucks. Also, I recently heard they are discontinuing their Craftool Pro line, and have those stamps on sale right now for $10.99 Canadian. They are very decent quality stamps, and once they are sold out, that will be it. Here's a few of my better pieces: The only thing I have to complain about was when doing the paisley pattern for the tote bag, it was hard to get the larger stamps like the heart and flower to give a crisp impression, no matter how hard I hit the stamp with the mallet. I didn't have much of a problem with the Celtic design stamps, though.
-
Lovely work! I'd be proud, too! So, I think you're saying the bottom of the flap is stitched to the edge of the wallet, so there's just the one line of stitching for the flap and the inner and outer pieces of the wallet?
-
Well, they say the only really dumb question is the one you don't ask... I have a set of tubular punches from Tandy. The one I use most frequenty (1/8th inch) has gotten so dull from use that I can barely get it to work anymore! Is there any way these can be sharpened? I was thinking maybe a rat-tailed file or something similar.... Also, how much use would you expect one of these punches to take before it would no longer do its job? Since this is something I use frequently, it would maybe make sense to get a better quality set, but if this can be sharpened, I'll probably keep it going as long as I can. It has taken quite a lot of use, and I always used a Poundo board underneath to protect the edge.
-
Very nice! I am envious of how much space you have! I had to do some serious moving of furniture and books in order to fit a sewing machine into my Tiny Perfect Leather Working Station, a room I share with my office desk, the washer and dryer a large dog crate, and my library! Oh, and the trap door to the cellar also takes up a big piece of the floor... Yeah, I thought the black things looked like spool holders. I just couldn't imagine a machine needing that many!
-
cardinal, two questions: what is the thing with the 6 round, black circles on it? And is someone in your family into sewing garments? (Looks like you have male and female busts for fitting.)
-
Slicking and Burnishing
Sheilajeanne replied to FlatwaterLeatherGuy's topic in Leatherwork Conversation
The last two items I've had that were fuzzy were both straps on bags, so I would be worried about the wax rubbing off on someone's clothing. -
Slicking and Burnishing
Sheilajeanne replied to FlatwaterLeatherGuy's topic in Leatherwork Conversation
Okay, just want to take the opportunity to ask what's the best way to deal with crappy, fuzzy leather? Sanding doesn't seem to work - it just gets fuzzier! With my most recent project, I shaved a lot of the fuzz off with my skiver, then dyed it and applied gum trag, followed by Fiebings Atom wax and leather balm. That seemed to work pretty well, though the leather is now pretty stiff and is going to need a good coat of neatsfoot oil to soften it up. -
Cherr, I think you need to be a bit more specific. Are you wanting a tote bag (open at the top) messenger style bag, hand bag, travel bag...the list goes on! Pictures would be helpful, too, if you have one of your ideal bag!

