


Sheilajeanne
-
Posts
2,753 -
Joined
-
Last visited
Content Type
Profiles
Forums
Events
Blogs
Gallery
Store
Everything posted by Sheilajeanne
-
You can use a leather burning kit: https://www.tandyleather.ca/en/product/leather-burning-tool-set?ip_lookup_country_id=CA&loadedFromCookie=1&session_id_token=fdc3c12121a068a8fecbea6d2e1e622923d2d311 I have a wood burning kit which I inherited from my late husband. I haven't tried it on leather yet, but I think it would probably work just fine, if you'd prefer not to give Tandy any of your money! P.S. - chuckling at your signature! Yes, we do make a mess sometimes, especially when dyes are involved, and scraps certainly come in VERY handy, especially when testing out something new! :D
-
Ruined My First Project!! Or, Help Me Fix It Please:-)
Sheilajeanne replied to MarkInKy's topic in How Do I Do That?
My SIL made a Roman blind for their living room. She pieced together 3 swathes of upholstery fabric which were left over from recovering one of their couches. The first time I saw it, I told her how beautiful it was and what a wonderful addition to the room it was with the way it matched the couch. She told me I had NO IDEA of the struggles she went through making that blind, and how awful she thought it was. The main problem was the fabric stretched as she was trying to sew it. so the blind turned out uneven. I had to look at it VERY closely to be able to see what she was talking about. -
Jayker, please see the video in my post above, which shows a man using this splitter. Hope that helps!
-
Cowboy machine dealer in Canada?, Ontario?
Sheilajeanne replied to plinkercases's topic in Leather Sewing Machines
In this case, I have a friend who lives 20 minutes from the guy with the machine, and there's another friend in Detroit who wants a piece of my time too. I also want the seller to show me how to set up the machine and the ABCs of using it. This will be my first leather sewing machine! It also happens I am currently unemployed/semi retired. -
My bat belt equipment
Sheilajeanne replied to plinkercases's topic in Gun Holsters, Rifle Slings and Knife Sheathes
You guys are TOO funny! -
Yes, it sticks up way too high. I have shortened it, but that isn't the best way of doing things, as it was designed to be much taller. There is only so much wood I can take off and still have it work the way it is supposed to.
-
Cowboy machine dealer in Canada?, Ontario?
Sheilajeanne replied to plinkercases's topic in Leather Sewing Machines
Okay, if I am out of the country for more than 48 hours, I can claim goods with a value of $800.00, and not pay duty or taxes. I will only pay duty on the portion that exceeds the $800. If the goods are manufactured in Canada, or covered by NAFTA, duty does not apply. -
Cowboy machine dealer in Canada?, Ontario?
Sheilajeanne replied to plinkercases's topic in Leather Sewing Machines
The machine I'm buying is a used Seiko. I imagine the 'no duty'' rule only applies to machines directly imported from the country of manufacture. -
I previously mentioned that I didn't like the conventional stitching horse design, where you were supposed to hold it between your thighs, as that meant I had to back away from my leather working table, and didn't have enough light to see well. I've been browsing E-Bay, and found there are stitching horses designed specifically for table top use: https://www.ebay.com/itm/Beech-Leather-Retaining-Clip-Wood-Tools-Sewing-Stitching-Lacing-Treatments-Craft/292328958964?epid=21009401028&hash=item441029ebf4:g:XMIAAOSwldRaCV1e Sooo, if you're like me, and prefer this design there ya go! (No, I have no link to this seller - this is just FYI.)
-
Cowboy machine dealer in Canada?, Ontario?
Sheilajeanne replied to plinkercases's topic in Leather Sewing Machines
I mentioned this to my family when we were together for Christmas, and my brother said there would likely be import duties if i was planning to use the machine for business (i.e. to make money.) If I can convince them my leather working is just a non-profit hobby (which it currently is, but am hoping to change that!) I might be able to get it across without paying duty. Anyway, that was what he told me. -
Anyone near Colorado Springs?? Just what you need?
Sheilajeanne replied to Sledzep01's topic in Leatherwork Conversation
Wow, cool piece! Auctions are tough. Last time I won one was because e-bay crashed just as the auction was expiring, and no one was able to out-bid me! -
Cowboy machine dealer in Canada?, Ontario?
Sheilajeanne replied to plinkercases's topic in Leather Sewing Machines
I am planning to pick up a machine from Ohio as soon as I can get my passport sorted out. What do I need to get it back across the border? (I'm driving, of course, and hoping there won't be any blizzards!) -
This is SO interesting! Please keep us posted! Making a pair of shoes is not something I'd ever have the guts to tackle. I draw the line at moccasins, and even those aren't as easy as you'd think. I sometimes go to cons (am interested in writing sci/fi and fantasy) and I have some friends that are into cosplay/anime. Though it's not my thing, I love watching them show off their costumes! You have a machine for stitching the straps, right?
-
Harness for a lil guy named bo
Sheilajeanne replied to Stetson912's topic in Collars, Cuffs, Leashes and Leads
Very true, roo! (Though I don't agree with the double leash method. If a dog is walking properly on the leash, there is no pressure on the collar. If it starts to pull, it corrects itself. As for the prong causing pain, put a prong collar around your wrist, and jerk on it. The sensation is not comfortable, but it's not painful, either. (And we don't have a nice thick fur coat the way a dog does.) Anyway, something else that should be added: prongs absolutely should NEVER be left on the dog when the walk or training session is over. Worst thing you can do is tether a dog using a prong. They can catch a hind foot in it when scratching, and it is also possible for the links to come undone. The ends of the prongs should be smooth, not sharp. Cheap prongs made in China can have sharp burrs on them that will hurt the dog's neck. If you see photos on animal rights sites showing holes in a dog's neck from a prong, that's the sort of prong that was used. I have never, ever seen that sort of damage from a prong, and I've been using them since the 1980's. Most of the people I train with also use them. I have a Herm-Springer prong - paid $50 for it. Quality doesn't come cheap! -
I think it may have to do with the lower part of the boot being subject to friction, which would scuff off any waxes used in finishing the leather. Uppers aren't as subject to scuffing, so the waterproof coating lasts longer.
-
Harness for a lil guy named bo
Sheilajeanne replied to Stetson912's topic in Collars, Cuffs, Leashes and Leads
Yep! -
Harness for a lil guy named bo
Sheilajeanne replied to Stetson912's topic in Collars, Cuffs, Leashes and Leads
Glad to be of help! I was just looking at your photos of the harness. Where /how did the D ring fail? Did the leather break, or did the D actually break? A D ring you use for something like this would have to be a solid piece of metal, with no joins in it. Cheaper D's have a join along the flat part, and will just pull apart under strain. If it was the leather -oops! Even with 3 layers on the centre section of the strap, the D ring attachment still only has 2 layers, so not sure it would hold. Anyway, shortening the middle strap will help the chest strap take a lot of the pressure, and you may be okay with the redesign. Hope so... Plannning to do a leather harness for my younger dog sometime soon, so this has been helpful to me, too. The dog in the photos turns 11 the first week of January and she is still very active and can be a real PITA sometimes! -
Ah, okay, hay bag. Should have know it wasn't a cinch, as there would have been a bar at the top to distribute the tension evenly. But still, the COLOURS!!
-
Harness for a lil guy named bo
Sheilajeanne replied to Stetson912's topic in Collars, Cuffs, Leashes and Leads
Can't go wrong with that approach! Only rivets don't work too well on nylon.... -
Well done! Very nice! As a former horseperson, the purple and pink thing in the background of the third and fourth pictures caught my eye. Is that a saddle girth?? (Sorry, am used to girths being just plain ol' white, or made out of leather! (Yeah, I'm old...) Interesting to see how equipment changes over time!
-
Harness for a lil guy named bo
Sheilajeanne replied to Stetson912's topic in Collars, Cuffs, Leashes and Leads
Stetson, I mean just what I said: if I look at the top strap, the one that goes along the spine, it is THREE layers thick when viewed in X-section. The midline strap that goes along the belly is not as thick, and has a sliding buckle in it that can be adjusted for the size of the dog. But it is not the one that takes all the stress. If you look at the photo of my dog, you will see it's the strap with the Dee in it that takes the dog's weight. Which is exactly why the Dee ring pulled loose on the harness you made. Imagine looking at the harness from the top. It forms the letter H, with the bar across the middle being the strap along the spine, and the two vertical pieces being the straps that wrap around the chest and belly. The D ring sticks out right where the middle bar is - if the dog's head is to your right, the D is on the far left of the harness. Imagine the strap along the spine starts flush against the flat part of the D ring. It then goes forward, wraps around the chest piece, then goes underneath it, and wraps around the belly piece. It then goes forward again, and ends just before the chest strap, with the final bit of strap sandwiched between the top and bottom wraps, to make 3 layers. The strap is then zig-zag stitched on the top in 5 places. Yeah, it's not coming apart any time soon! Edited to add - the strap along the spine is only 2 thicknesses where it wraps around the front strap and belly strap: one layer on top of the strap, and one layer on the bottom. It is three thicknesses in the middle section. The strap begins and ends just before it gets to the chest and belly straps. In this photo, you can clearly see the line about an inch and a half in front of the snap on the leash where the strap begins, as I've described. (The D ring doesn't really show up in the photo, because it's painted black.) The black thing on the belly strap is a plastic buckle that can be opened by squeezing the sides. All the buckles on the harness are plastic. I've been using this harness for 10 years, and nothing has ever broken on it.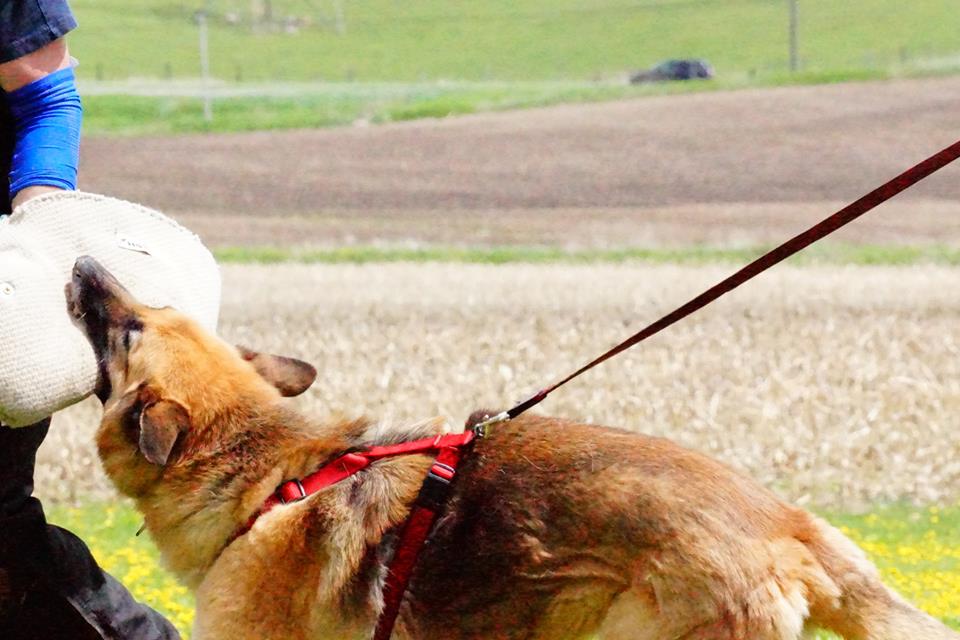
-
Harness for a lil guy named bo
Sheilajeanne replied to Stetson912's topic in Collars, Cuffs, Leashes and Leads
Steston, looking at my own training harness, which is made of nylon, 3/32 of an inch thick (Equivalent to 6 oz leather) ... The centre strap along the spine is triple thickness. The midline strap goes from the rearmost end of the front breast strap, around the D ring then back around the breast strap and ends just in front of the belly strap. The belly strap is also stitched in place, so it doesn't move. You need to take the slack out of the midline strap, as when the dog lunges forward, there will be a sudden jerk on it before the breast strap takes the force of the lunge. Akitas are very strong dogs. There were a couple at the kennel that had to be kept separate from the smaller dogs, or they would kill them. Two of them went after one of the corgis one day, and both the corgi and the kennel helper were seriously bitten trying to break up the fight. They do have a reputation for being dog aggressive, so Bo's owner really needs something that can control him. Sheltatha, what works for a pom may not work for a dog the size of an Akita. I am all for using positive methods whenever I can, and did try lemon juice to rehab a dog-aggressive German shepherd I'd rescued from a shelter. It didn't work with her. I also tried a shock collar on low voltage (tested it on my own arm). It was one that gave several warning beeps before shocking, and she'd ignore the beeps and the shocks. She eventually had to be euthanized after she escaped from her kennel and killed someone's shi-tzu. Worst day of my life... Large dogs tend to have a much higher pain threshold than smaller ones. This same dog once went after my own male GSD, and latched onto his hind leg. I could not get her to release her grip - shouted at her, jerked the prong collar as hard as I could, kicked her. She only released when the person in charge of my male let go of his leash, because he was in so much pain he bit her. Then, of course, he turned on the female, and nailed her. She finally released his leg, and we were able to get them separated before they did any more damage to each other. I wound up having to take both my male GSD and my helper (the groomer) to the hospital. Groomer was bitten on the hand and leg, and missed several months off work. I was also bitten by my own dog, but fortunately, suffered nothing worse than a graze across my forehead. When dogs are in pain, they will lash out at the nearest target, and many dog owners get bitten when breaking up fights. My suggestion to Bo's owner is that she consult with a trainer that is used to training strong, confident dogs like Akitas and German shepherds. It's not the equipment that will give her control, it's the training. The equipment is only the tool she needs to use to prevent the dog from pulling her off her feet until she is able to learn how to train it to respond to her. -
Harness for a lil guy named bo
Sheilajeanne replied to Stetson912's topic in Collars, Cuffs, Leashes and Leads
You can read his full story here: http://www.pedigreedatabase.com/community.read?post=862489-its-time&p=2#862507 You might want to get the tissues out... Still miss him something awful! -
Harness for a lil guy named bo
Sheilajeanne replied to Stetson912's topic in Collars, Cuffs, Leashes and Leads
I'ts all in how the collar is used. What's even crueler is having your dog totally out of control, and attacking another dog, then having to be put down. Or pulling its owner off its feet, causing broken bones, then running out into traffic and getting hit by a car. I know people who have had all of these things happen to them. I have been in the dog business a long, long time. But I don't have little lap dogs that cringe if you raise your voice to them. I have big, strong dogs that can be too much for the average person to handle on a flat collar. Yes, there are haltis, and Gentle Leaders, but some dogs can't stand those - the just keep fighting them until they are exhausted. I adopted a 85 lb. male GSD that had NEVER been leashed trained. He was far too strong for me to have been able to control using a regular collar, so I used the prong on him until he understood what I expected of him. The prongs are blunt, and only come into play when the dog pulls. They do not hurt the neck. After about a month using the prong, he was walking on a totally loose leash, and I was able to transition him to a flat collar. It's a tool, and any good dog trainer has more than one tool in their toolbox. What works for one dog may be a total flop with another. This dog was not trained using fear. I rescued him from life on the end of an 8 ft. chain, and an owner who said he didn't want him and was going to shoot him. He became my hearing ear service dog. -
Harness for a lil guy named bo
Sheilajeanne replied to Stetson912's topic in Collars, Cuffs, Leashes and Leads
Yup, supposed to look like this: Another problem with harnesses: they don't give you very much control over the end that bites! Of course, in this photo, that's the whole point of using a harness...