


Sheilajeanne
-
Posts
2,773 -
Joined
-
Last visited
Content Type
Profiles
Forums
Events
Blogs
Gallery
Store
Everything posted by Sheilajeanne
-
And it aint even April Fool's yet ...
Sheilajeanne replied to JLSleather's topic in Marketing and Advertising
Reminds me of when I used to work for a well -known nursery in Canada (Weall and Cullen) and a customer asked me if I could cut a foot off a 6' Christmas tree, and sell it to her for the same price as a 5' tree... She actually made me go and ask my manager if this were possible. Of course, the answer was a big, fat NO! -
Another dog person here! My first leather working projects, other than Tandy kits, were some dog leashes and collars! My dogs are German shepherds, and we train for schutzhund.
-
I purchased a sewing machine recently, too. I drove down to Ohio, and picked up the CW 8B Seiko Ferg had for sale. One thing I'm finding out, though, as I enter the world of sewing machines, is you have to be careful not to get addicted. One person I talked to said they had around 30 machines in their basement. The guy who teaches the leather working course I attended this morning has 13. Oh, and he recently bought a clicker, too! I'm fortunate that I live in an old two-bedroom house with a basement that leaks sometimes, and very little extra space, which puts a curb on any addictions I might want to develop...
-
ROTLOL! I like the Tudor roses. That's going to be my next project! I think it would look great on either a wallet or a belt bag like the one I did recently with the Celtic horse design.
-
Very nice! Just curious to know how you cut the oval window? Did you have a die or punch of some sort?
-
Sheridan Tooling pattern needed
Sheilajeanne replied to Killerwork's topic in Patterns and Templates
Just a useful tip for you. Many patterns you get will be in PDF format. This makes it easy to adjust the size to fit the piece of leather you are using. Here's how to do it: Pattern must be in PDF form. If not, scan it and save as a PDF Click on pattern to open it Click printer icon Select ‘custom scale’ and enter percentage you wish to resize it to. To save on toner, select ‘save ink/toner’. Print pattern If size is what you want, select ‘save changes to PDF’ when closing document. I found this out when I had a pattern in .jpg format I needed to resize. No matter what changes I made to it, and what changes I made to my printer's programming, the printer would ALWAYS scale it back to the original size! -
[fist bump back] BTW, I have Robert Hardy's book on The Longbow. I just checked it out on Amazon, and it is out of print, and a good used copy is selling for a minimum of $143.00 Canadian! Won't be parting with mine anytime soon... They had just discovered the longbows and arrows from the Mary Rose at the time it came out. What a marvelous time capsule that ship was!
-
Leder, I no longer have that recurve bow. My husband gave it away to my nephew. I now have a 'broomstick' wood laminated bow, made by Checkmate Archery (used to be in B.C., has since gone out of business.) No gewgaws or gimmicks - I don't even use a sight, and it would be a cold day in H*E*L*L before you'd catch me using something with pulleys and wheels on it!

-
Stormdevil, chemical reactions are highly dependent on temperature, so it's quite likely that's what slowed down the chemical reaction of your vinegaroon solution. Your window sill is probably pretty chilly at this time of year!
-
Here's the answer to your question. I had to use Google, as the search function on the site only returned this same thread! http://leatherworker.net/forum/topic/73637-my-guide-to-the-best-vinegaroon-youve-ever-made/
-
Very nice! Is the eagle done with paint or dye, and did you do it before or after applying the vinegaroon? And how did you apply the vinegaroon? We wants DETAILS!
-
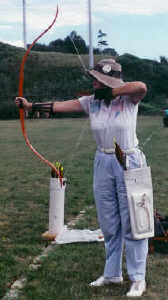
Cyberwolf, it's been a long time since I've smacked my elbow with the string. I was just a beginner at the time I made this arm guard. My bow had about a 20 something draw weight. My current bow is 40 plus. That would be on VERY serious 'ouch' if it happened now!
-
Hi, can you ship to Canada? Would like to get some thinner stuff, 4-5 oz or so to practice on. Thanks! Edit: e-mail sent.
-
Leder, the pain in my fingers helped reduce the pain and bruising I got on my arm from that bowstring, so it was worth it in the end! (This is obviously NOT the arm guard I made, and yes, I'm a southpaw...)
-
My archery arm guard and leather finger tabs were the first leather work I ever did, back when I was 12 or 13 years old. Both were made out of a pair of old leather calfskin gloves, For the tabs, I just cut the ends off the fingers, and for the arm guard, I sewed the palms together to get enough length, and attached it around my arm with elastic sewn to the leather. (You know, the sort of elastic used in waist bands and sleeves, not elastic bands!) I used to whack myself on the inside of my elbow, so the guard was full length, and the elastic above my elbow had a dome fastener in it that I snapped closed for a snug fit. All of it was hand-sewn with my mom's sewing needles and some button thread... A thimble came in VERY handy for pushing the needle through the leather! I wonder if I still have them tucked away in a drawer somewhere... :D
-
Amen to that!!
-
Machine is sold and now (FINALLY!) in its new home.
-
So, am now the proud owner of this machine: Thank you, Ferg! Will post a picture when I finally get it set up in my shop. It was great meeting you, your wife, and your Sheltie collies!
-
Reposting this, just for you!
-
You know, I decided to buy a cutting mat the other day. Tandy only had the one size, 24x36, and I thought it was a bit too big for my tiny perfect leatherworking nook, so I went to Staples instead, and got a smaller mat for much less money. The following week, I was at Tandy's again, and saw they now had their mats on sale, and the price was a lot cheaper than any of the other stores that stocked this kind of mat. I took a look at their mats, and they were much thicker and more substantial than the one I'd bought at Staples. They also weren't quite as hard and slick, and would be kinder to whatever knife you are using for cutting your leather. I am sure they will also stand up to more wear and tear than the other mat too! I paid $59 (Canadian) plus tax, brought the mat home and it fitted my work space PERFECTLY! And Staples was happy to take their mat back, as I hadn't used it.
-
Yup, both Tandy. One is their regular Craft tool stitching chisel, the other their Craft tool Pro!
-
Jake, had to Google 'tin cloth'. Had never heard of it before. Wow, as my hubby used to say, 'It's a bad day when you don't learn anything new!" It was invented in Alaska by a company that outfitted loggers: https://www.filson.com/tin-cloth.html
-
I've had the business pricing almost since I started with Tandy, because of my kennel business. The kennel is no longer in existence, but they never bother asking me to reconfirm my tax ID information! Maybe one day, if things go well, I'll get another business license for my leather working...
-
Here I pay .05 for grocery bags, and I do it willingly. I use 'em for dog poop, dog hair, regular garbage, etc, etc. and don't know what I'd do if I had to go to the reusable ones. Guess I'd be buying Glad Kitchen Catchers instead! Next time I need to replace my shower curtain, I am going to save a big piece of it for dyeing and gluing my leather work. Waxed paper just isn't big enough to cover everything, and if you use several sheets, dye can leak through the gaps if it spills. Oh, and I have a ball of cheese wax from some Edam cheese that I use to wax thread ends when I'm sewing and they start to separate on me! Also works for waxing bow strings!
-
Make it yourself? If you get seriously into this hobby, your collection of tools will very quickly outgrow whatever roll you buy. I've been at this about 2 1/2 years now, and already have around 70 stamps, plus assorted awls, punches, knives and bevelers! If you look at the "Show Your Shop' thread you'll see most of us store our tools in a wooden rack of some sort with holes bored into it.