


Sheilajeanne
-
Posts
2,770 -
Joined
-
Last visited
Content Type
Profiles
Forums
Events
Blogs
Gallery
Store
Everything posted by Sheilajeanne
-
Buff the leather really, really well, then apply a top finish like Super Sheene or Resolene. What are you making?
-
Side Quiver, first post!!
Sheilajeanne replied to CalanColeman's topic in Archery Quivers and Bow Cases
I shoot a 40 lb. draw weight laminated composite wood bow. It would be a 'broomstick' bow, except unlike medieval bows, it has an arrow rest. No sight, no gimmicks - I shoot bare bow. Oh, and left handed, too... Curious to know what you keep in the utility bag! Let me think - bowstring wax, spare bowstring, broken nocks and arrowheads which are still undamaged enough to be remounted, glue and thread for anchoring fletching that has come loose, maybe a small first aid kit and your finger tabs? It's not big enough to store an arm guard, but that could go inside the quiver itself when you're not shooting. Very nice piece of work! -
LOL! Mine is a piece of 2x4. I've already used up all the space on it, so I bought a cheap plastic Tandy tool rack to supplement it during their pre-Christmas sales. I think they charge a ridiculous amount for their tool racks, but I don't have a drill bit large enough to drill holes for the hefty handled tools, so I though it was worth the on-sale price. The alternative would be using my largest drill bit to ream out multiple holes in another piece of 2x4, a time-consuming process. Most of the new tools I've purchased lately have hefty handles.
-
Backpack
Sheilajeanne replied to awnova's topic in Purses, Wallets, Belts and Miscellaneous Pocket Items
Gorgeous bag! And yeah, I was going to comment about how open it is at the top, but someone else beat me to it. I have had stuff fall out of a bag I used to own with a similar design, due to the lack of a drawstring. But you foresaw that problem. Stellar piece of work! The contrast between the deerskin and the dyed veg-tan is really eye-catching! -
What Is This Piece of Hardware?
Sheilajeanne replied to Big Sioux Saddlery's topic in Hardware and Accessories
English stirrups DO have two bars on the tread portion. It's so they can hold a rubber tread that's designed to fit in between the bars (see full sized saddle - there's a tread on that stirrup.) i think they could still be decorative mini stirrups, and the hook at the top is so they can hook onto a chain or a small strap of some sort. -
What Is This Piece of Hardware?
Sheilajeanne replied to Big Sioux Saddlery's topic in Hardware and Accessories
And, the full-sized version.... https://www.amazon.com/Brown-Purpose-English-Riding-Saddle/dp/B00S8S01I2 -
What Is This Piece of Hardware?
Sheilajeanne replied to Big Sioux Saddlery's topic in Hardware and Accessories
I can't tell you how to fix the picture, but I can see enough to tell you those are miniature English saddle stirrups. The are often used as decorations on shoes and purses. Some people who love horses even use them as pendants on necklaces or charm bracelets. https://www.etsy.com/ca/listing/545908019/miniature-leather-stirrup-keyrings-ltd?ga_order=most_relevant&ga_search_type=all&ga_view_type=gallery&ga_search_query=miniature stirrups&ref=sr_gallery-1-4 -
My dad was a public school principal. He kept one strap in his desk at school for official use, and one in his desk at home. I never got strapped at school, but I got to feel the one he kept at home more that a few times! He never hit you very hard, though!
-
Thanks, Clinker! There's a Princess Auto not too far away. Will see if I can find some. If I'm going to use my stitching horse on the bench, rather than sitting on it, I am going to need some clamps.
-
Notice my use of the past tense. Us old farts remember it well, though.
-
Had to look this up - I had no idea what a tawse was! Turns out it's the equivalent of what we called the strap in the North American school system!
-
Wow! And I thought I had a lot of stamps! :D What are those clamps you are using to hold your cobbler's last and stamp press down? I have never seen anything like that before! I think I could use a couple of those! Do you have to crawl underneath the table to attach them?
-
That's exactly what I've done, Plinkercase. It's given me some good ideas! My workbench is fairly high off the floor, which is good for tooling, but not so good for stitching, where I prefer to have my arms at waist level or slightly above. So, even a table top stitching horse that's only 8 inches tall is too tall for me. Going to try to make something where the height can be adjusted.
-
It might work to use a hole punch instead of a lacing chisel. I am not familiar with applique braiding, but when I looked it up out of curiosity, some pictures showed round holes rather than the diamond shaped holes punched by a chisel.
-
I have just taken apart the Tandy stitching horse, and am figuring out how I can alter it to suit my needs. I REALLY like some ponies I've seen where you can change the angle of the clam - have it either vertical or horizontal, depending on the height of your table and the size of the project. Am going to try to do something like that! All you need to adjust the angle would be a wingnut and a bolt and a couple of washers.
-
Looks a lot like my workbench when I have a project on the go!
-
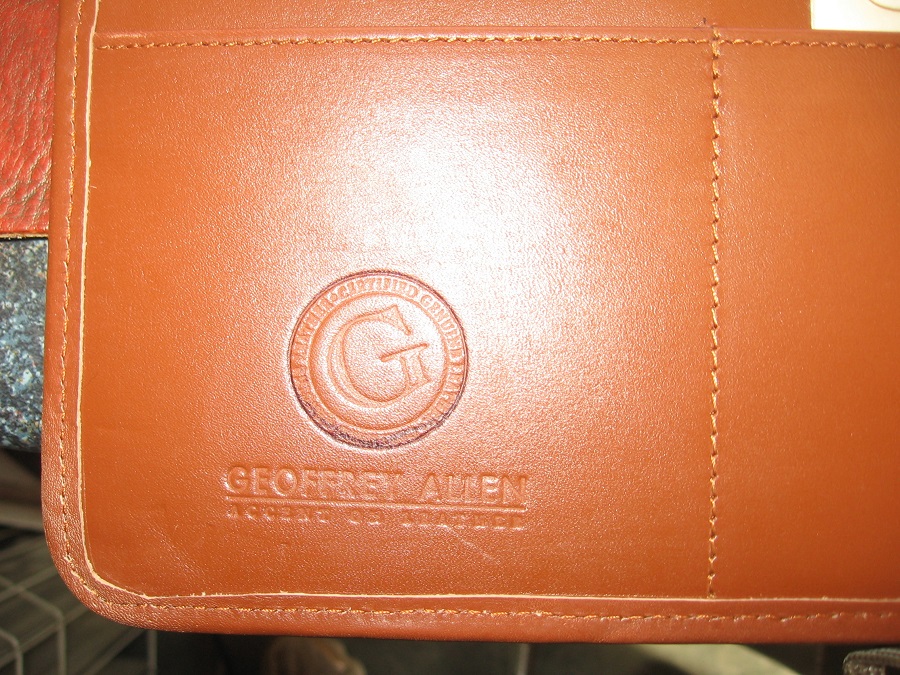
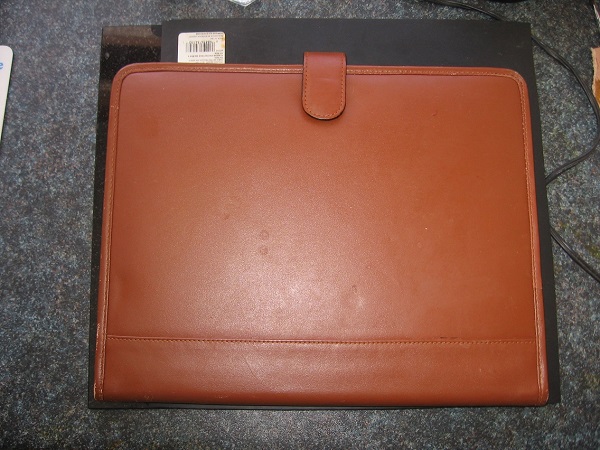
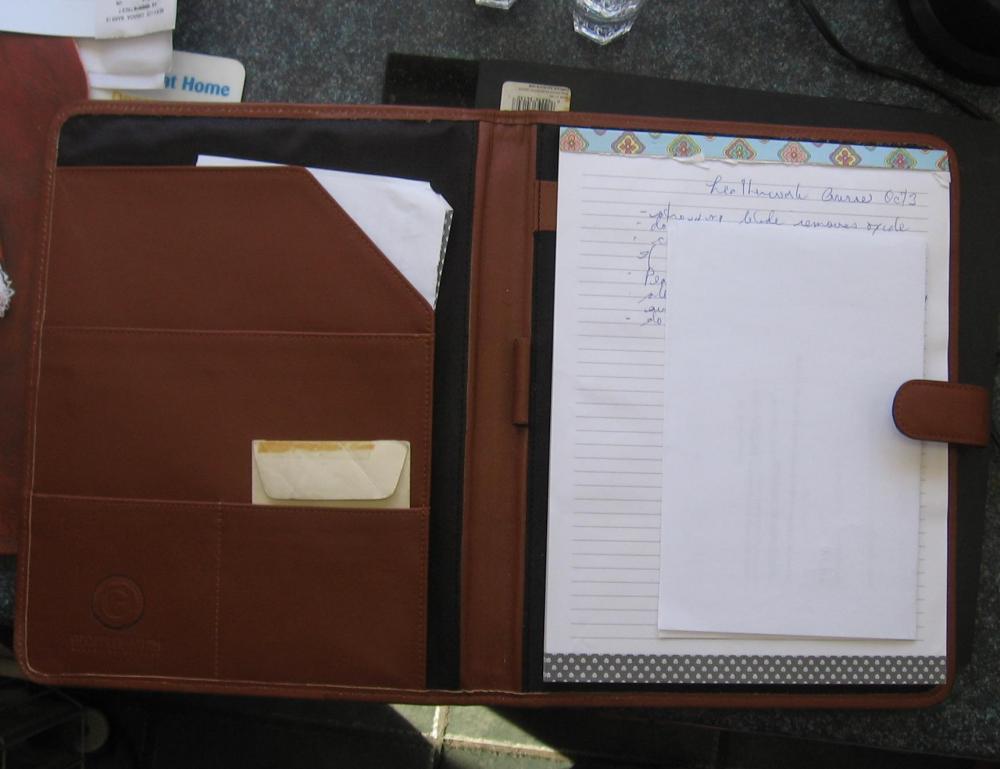
Speaking of pad folios, I have one that I am quite fond of, and am planning to use it as a guide when I do one for myself. I've had it for quite a few years, and don't remember where it came from, except it was a gift. I just took a closer look at the way it's made and spotted something that really gave me a surprise. I'd assumed all this time it was made of plastic. NICE plastic, but plastic nonetheless. Then for the first time, I noticed the maker's stamp. It's LEATHER!! And someone must be a master craftsman, because the way this is made is NOT something I'm prepared to tackle! The edge binding and folded edges are beyond my skill set right now, though I do plan to copy the basic layout, and may choose to line it with fabric rather than leather, which is what Geoffrey Allen has done with this pad folio.
-
How wide a piece of leather will it handle?
-
Many moons ago, when I was in High School, I had a summer job working for a company that made school supplies. My job was making binders using a hot glue machine. The first thing you did after you glued the cover was put three pieces of cardboard on it. Plastic binders were made exactly the same way, only with a different machine that sealed the plastic using an electric current. So, yeah, my pad folio, when I get around to doing it, will have cardboard stiffener. Rossr, the leather on the spine looks a bit puffy, as though there's an extra layer there. How was it done? Was the whole pad one piece of leather, with a second layer added to the spine?
-
Wish there were more shows... There's NOTHING here in Canada!
-
Dun, I've never actually used the stuff, so can't answer that question. Going to make a trip to Tandy soon, so I may look into it while I'm there!
-
Billin, they would most likely be referring to the sticky threads posted at the top of that forum by master leather craft people like Hidepounder (Bob Parks).
-
LMAO at this thread, and the comments! We REALLY need a 'like' button for posts! Greetings from frigid Canada, Rocky Aussie, though I hear parts of Oz are having a really cool summer. Tandy sells a bag stiffener in sheets: https://www.tandyleather.ca/en/product/bag-stiffener?ip_lookup_country_id=CA&loadedFromCookie=1&session_id_token=154aa076e69dcb57e061d096e623b6ec29e3ade3 There's even a video out there, showing how to insert it (NOT done by Tandy) Oh, heck, here's the whole page of Google links when I did a search for 'bag stiffener! Ya never know which ones might be useful! Be aware there are different kinds and weights: https://www.google.ca/search?q=tandy+bag+stiffener&rlz=1C1GGGE_enCA377&oq=Tandy+bag+stiffen&aqs=chrome.0.0j69i57j0.4647j0j7&sourceid=chrome&ie=UTF-8
-
Heh, heh, we all have things we're not willing to try...I feel the same way about basket weave as some of you. I have 2 stamps, and don't think I've ever used them. I love to carve leather, while others on this board don't... Very nice! I want to do a padfolio (never heard that term before, but it's a very accurate description!) for myself at some point, so this is an inspiration to me. I want to try one of the Tandy catalogue designs. Hope I'm not being too ambitious, but ya never know until you try something! :D Tandy-Leather-Buyers-Guide-186-2012.pdf
-
Would anyone happen to have a pattern for this Tandy tote they'd be willing to share? I always wanted to have one of these, but was put off by how many new tools I'd have to buy to do the tooling design! And by the time I gradually accumulated the tools, they'd taken it out of production! If someone is able to give me the finished dimensions of the bag, or the size of the pieces, plus the tooling patterns for the centre panel, I am sure I can cut the leather and make it on my own. If someone has one they are willing to sell, that would work, too! https://www.ebay.com/itm/292280540589
