


fredk
-
Posts
5,974 -
Joined
Content Type
Profiles
Forums
Events
Blogs
Gallery
Store
Everything posted by fredk
-

Tandy Leather. Nickle Plate Wide Double Cap Rivets.
fredk replied to Allen Hiltbrand's topic in Leatherwork Conversation
Not so much as wear off but as they age and/or get wet the nickel plating will come off as rust forms under the plating I rarely use nickel plated steel rivets. Mostly I use nickel plated brass or plain brass rivets -
I mix my edge paints all the time, whenever I need a colour thats not standard ie, purple; dark and light, lavender et cetera
-
I think so, I hope so. That game went to new home. I've not had any bad words about it come back to me. I can't see any reason why it should not last and be good In Victorian times shellac varnish was used to put a high shine on shoes and afaik the House Hold Cavalry of the UK still use shellac varnish on their boots. Polyurethane varnish is a better modern varnish than shellac
-
I've not tried Vallejo varnish but I have used polyurethane varnish on my leather covered game boards On one board I covered with a pre-dyed chrome tan 'distressed blue' but working with the board the blue seemed be coming off. 2 coats of varnish settled it
-
How do I/we do that? I know the first step is to cook me a chuck to get the fats
-
You should ask this in the Leather Sewing Machines section. You'll get a proper answer there as the LSM people hang out there Is there perhaps a lock preventing its movement? or maybe you need to pull it out or push it in to move it?
-
Probably with a dedicated press
-
Run a file or fine saw on the outside parts of the blade slot to widen it and give more 'squeeze' room there. Make sure the captive nuts aren't turning as you tighten the bolts
-
I meant to post this a couple of weeks ago I got a piece of veg tan and smeared it in chicken grease/fat. Not too much, just a good coating with excess wiped off. It didn't last a week! It was really rotten to smell and so sickening I didn't bother to see if the leather was affected by the rancid chicken grease/fat Meanwhile, back at the ranch; No changes to any of the other test pieces, except a slight lightening (bleaching out) of the darker pieces I'll do a 'proper' report at the weekend
-
Cos we don't have bears I miss read the title as 'Hair spray' Show us the container and we will come up with at least a dozen designs
-
looking to stamp some cheap chrome tanned 3oz leather?
fredk replied to bodily_carried_technology's topic in Stamping
You can. I have done it. But with a press rated at 1.25 ton. More tonnage would be better -
I always wet/dampen leather for dying. No matter the type of dye. And I always recommend it to others Wet or heavily dampened leather helps the dye seep through the leather avoiding 'hot spots' or uneven coverage
-
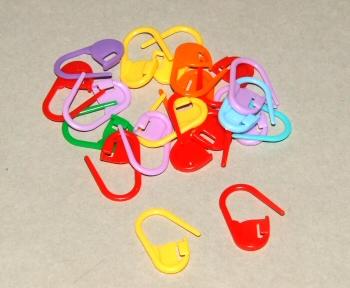
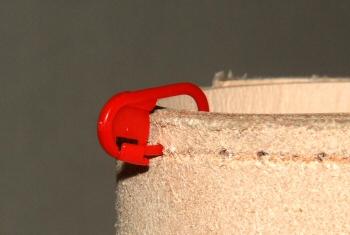
I was getting some things on TEMU and had to bring my order over the minimum value amount. Looking around for something cheap and possibly useful I came across these; they are stitch markers for knitters. I got 80 for about 50p (40c ?) They will keep two pieces of leather in alignment for sewing up
-
Fixed Stirrup leathers - parts questions
fredk replied to ZiggyP's topic in Saddle Identification, Restoration & Repair
Is that a standard brass rivet? It looks like it to me -
I've used those Tandy converters and I've had to re-tap the threads on the conchos I keep M3 and M4 taps handy for re-cutting threads. I also buy in M3 or M4 flanged head bolts to use. 25 bolts of each size cost me about £2.50 (each) ($3?)
-
Reduce profile fragments and increase messages per page?
fredk replied to AEBL's topic in Feedback and Suggestions
The length of the posted messages doesn't matter. The system is set up so that, long or short, a page has 20 (?) massages on it then it turns to the next page. Shortening the profile bit won't get more on the page, just be less to scroll thru to read them all -
That last line of your is the key; I use mapping pins into small cork block to align sewing holes or you can use these;
-
This is a clever idea What thickness of leather are you using for your stamping pad?
-
Two hunters hire a pilot to fly them into the Canadian wilderness, where they manage to bag two big bull moose. They come back to the plane and start loading it, but the pilot tells them it can only take them, their gear and one of the moose. "That can't be right," say the hunters. "Last year we shot two as well, and the pilot let us take them both. And he had just the same sort of plane as you." The pilot doesn't want to be outdone by his rival, so reluctantly he gives in and they stuff both moose into the plane. The pilot lines up, opens the throttle, and starts the take-off run. The plane bounces into the air, but it just doesn't have enough power, and down it goes, crashing into the trees. Somehow, surrounded by the moose and all their clothing and sleeping bags, the two hunters survive. They clamber out of the wreckage. "Any idea where we are?" one of them asks. "I think we're pretty close to where we crashed last year," the other replies.
-
S'alrite. I've done nothing lately. But I've cooked a chicken and I've plenty of fat This was one of the ways that leather armour was made, from the early Roman times up to the 19th century. see cuir bouilli,
-
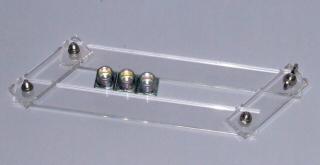
I made a couple of the jigs from off-cuts of acrylic, some small bolts & nuts and a few wing-nuts. I made two just cos I had enuff material. Together they cost under £8, or under £4 each ($5?) Once I have the letters in this I use a narrow steel plate of 3mm thickness laid across them then use the biggest 3D handle on top to guide my thumps
-
Try rubbing in black shoe polish
-
With a nod to 'Ripley's Believe It or Not!' I thought a thread like this would be fun I'll start with; The B-52 has been in service longer than the period of time between its own first flight and that of the Wright Flyer. From earliest times up to the end of the Medieval period men carried their personal items in a shoulder bag called a Scrip and women carried their items in pockets under their dresses. At some time it all got reversed Belt loops on trousers were not invented until about 1896 So if you see a cowboy film set before this and they are wearing belts through trouser loops they've got it wrong Anyone who has seen the 'Back to the Future' trilogy has seen the scene where modern-era Marty has a gun-fight showdown with Western-era Biff. In that scene Marty wears an iron stove door under his jacket to stop being killed. Its a nod to a Clint Eastman film where the 'man with no name' does the same thing but the script writers of the Clint film were drawing on real life In 1893 to 1896 'Decon' Jim Miller, from Arkansas but living in Texas, some-time lawman, but mostly a cattle rustler and gunman wore a steel plate on his chest under his overcoat, which in a couple of gun-fights with his enemies confounded them on how he could survive a hail of bullets to his chest.
-
What make of needle are you using? and what way do you attach the thread? My needles don't widen at the eye. And I fix the the thread on by piecing the thread and pulling it down so that its locked in line with the needle
-
Use one of these; a saddlers palm, aka a sailmakers palm Available for left or right hand. Handy to have for the occasional use. Generally not expensive but some can be I find on thick leather the needle is reluctant to go through so I use a small pair of pliers to help pull it through