Dwight
-
Posts
5,248 -
Joined
-
Last visited
Content Type
Profiles
Forums
Events
Blogs
Gallery
Store
Everything posted by Dwight
-
When I was working for Uncle Sam (USN, . . . ) all sailors and wannabe sailors had two things for sure: a big "pocket" knife and a marlin spike. They don't make one a sailor, . . . but it kinda makes one look the part. If you are doing any serious braiding, or knot tying, . . . the marlin spike is darn near a necessity. They were both carried in a leather pouch on the belt, . . . the marlin spike had a braided leather "tail" on it, . . . Maybe???? Invest in some Case (two blade) or Buck (single blade) folding knives and marlin spikes to go with them. Offer "custom" belt sheaths for each/both. The knife blades should be in the 4 inch range. Just a suggestion. May God bless, Dwight
-
If I were doing this, it would be with two pieces of hard wood that make a mold. It looks like there are three separate impressions, . . . so it would be made to do all three at the same time. The flesh side would be the male of the mold, . . . having raised portions of wood to imitate the 4 points of the cross. The finish side would be the female, . . . having hand carved and sanded depressions to receive the leather being "formed" into it by the male mold. Wet the leather and let it flash dry for a few minutes, . . . apply the mold and a bunch of clamps (or a long clamp/vise jaws). The trick in this kind of molding is the female portion, . . . it has to be basically super smooth so there are no blemishes left. As said before, . . . for strength, . . . leather dust and glue can be mixed to fill in the voids in the flesh side. It takes a steady hand and a real patience to make those kinds of molds, . . . the male parts being first formed individually, then bonded to a blank board to put them in place. The female is hand gouging, chiseling, and sanding. Ugh!!! May God bless, Dwight
-
Lee, . . . you can do one of two things, . . . one is easy, . . . the other is easier. If you want the "wire" swivel that kinda looks like a bent coat hanger and goes on to a green military belt, . . . simply cut an appropriate length of coat hanger wire, . . . sand the ends smooth, . . . and bend it to form with a couple pairs of pliers. I have made untold numbers of these things when I was in scouting and in the military. Don't use fence wire, . . . it is too soft, . . . you may lose your holster. Heavy coat hanger wire is perfect for this job. A better deal I think though, . . . go to a local military surplus store, . . . tell the clerk you want a couple of sliding clasps that go over the military belt and hold stuff on. He may not have the clasps by themselves, . . . but you can buy a cheap ammo pouch for 5 bucks, . . . it'll have two of them on the back. Just make sure you work them back and forth to see they're not rusted shut. The wire hanger is great for a holster, . . . but if you are going to have pouches (ammo, first aid, compass, canteen, possibility bag, etc. . . .) you probably want to use the sliding clasps on them. The wire hanger has a tendencey to bounce up and down, . . . especially if you are running, . . . makes bunches of noise, . . . and can become un-comfortable. While you are there at the military surplus store, . . . have him show you a nylon butt pack and a pair of "Y" suspenders. I still have mine, . . . use them most any time I go for a "hike" in the woods, . . . got other stuff for hunting. The belt, suspenders, and butt pack make a good foundation for a solid hiking rig. May God bless, Dwight
-
The belt I am wearing right now is made of two 7 oz blanks that were contact cemented together, . . . and the edges sewn all the way around. It is 1 1/2 in wide. I prefer a Western buckle, . . . and it is attached by folding back the outside layer and snapping it just like a standard one layer belt. I carry a full size, all steel, 1911 on that baby, . . . and after about a three week "break in" period, . . . has been comfortable as possible. Any of my customers wanting a "gun belt" get this same treatment for theirs. May God bless, Dwight
-

Holster Mouth Reinforcement
Dwight replied to RVM45's topic in Gun Holsters, Rifle Slings and Knife Sheathes
Personally, . . . I think this whole topic reminds me of a Democrat in congress, . . . inventing a problem so he can take credit for the "solution". I don't know how many IWB holsters I have made in the last 4 or 5 years, . . . but I have yet to put any steel, aluminum, kydex, or anything else around the mouth as a stiffener, . . . except leather. And no one has brought the thing back saying it collapsed and wouldn't stay open. Not saying that no one wants the end product, . . . I just think that the "need" is very much over rated. May God bless, Dwight -
Ya got a bunch of good points there, Lobo, . . . but I done bought my rubber pads, . . . got my 6 ton jack, . . . got the steel backer plates, . . . just haven't welded up the press so I can give my old thumbs a rest. Yeah, . . . I do it like you do, . . . haven't had anyone send one back yet, . . . saying he wanted his professionally cut with a clicker press, . . . May God bless, Dwight
-
WET MOLDING ONE SIDE ONLY.
Dwight replied to zaptoid's topic in Gun Holsters, Rifle Slings and Knife Sheathes
I have to do this at times, . . . I sew down the front of the holster, setting the cant for the rig. I then SOAK the outside piece, . . . and I mean SOAK. After allowing it to drip & flash dry for a few minutes, . . . I position the weapon where I eventually want it to lay, . . . and begin to mold the outside piece of leather with my fingers and thumbs, . . . and a few other tools as needed. Most of the molding is done in less than 90 seconds with my fingers and thumbs, . . . then the outside piece is marked so I know exactly where to put it back down, . . . it's lifted up and the weapon extracted. Move the holster back together and lay aside for 24 hours or so to dry, . . . cut to size, cement, stitch, finish, . . . voila, . . . cash!!!! May God bless, Dwight -
Max, . . . sometimes for one reason or another, I have to line a holster I am making. I "almost" always line them with suede leather from Tandy. ALL of them have both pieces of leather 100% bonded with carpenters contact cement (the smelly stuff that will make you high and give you a headache). I bond all the way out to the edge by making both pieces a bit big, . . . and doing a "dress" trim with a VERY sharp knife, . . . edging the veggy tan side with a smaller edger, . . . and stitching the edges together with a small stitch. I then burnish the edges of both just like it was one piece of the veggy tan. I haven't had any of my customers come back and holler, . . . no separations of the two, . . . and they seem to stay together well. May God bless, Dwight
-
Would you believe two different measurements? Being right handed ????? makes that wrist almost an inch bigger than it's left hand counterpart, . . . Anyway, . . . both hit between 7 & 8, . . . so I counted in as an 8. Hmmmm, . . . you don't suppose some of the girls will be cheating on this thread just so they can tell their friends that they are a "10" on your poll, . . . May God bless, Dwight
-
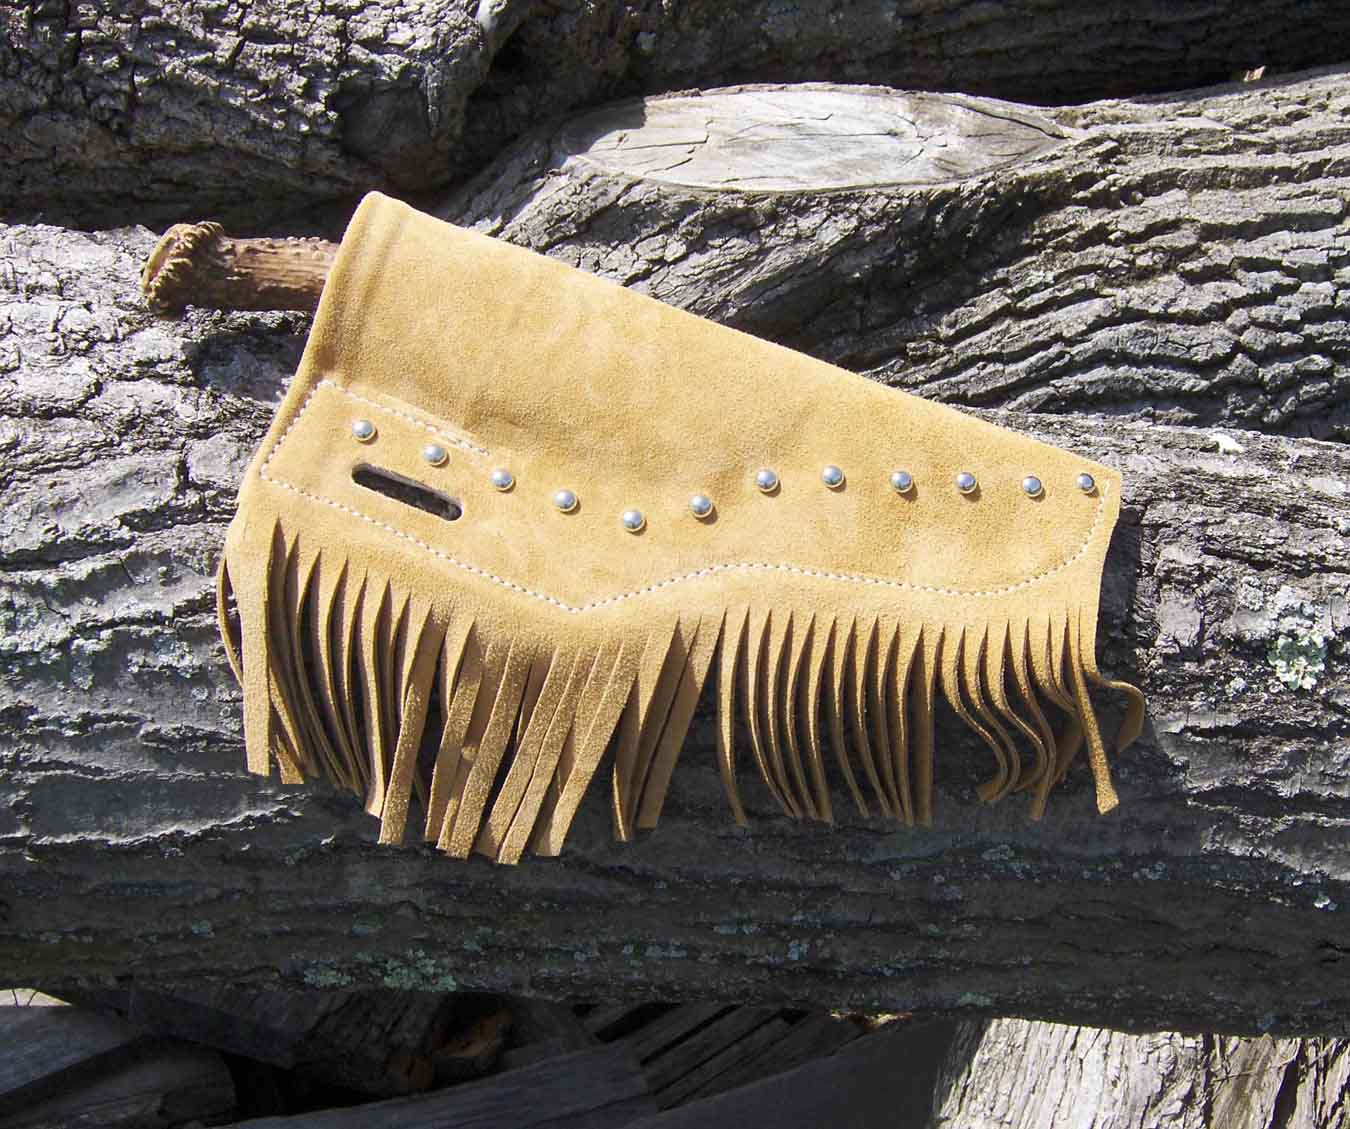
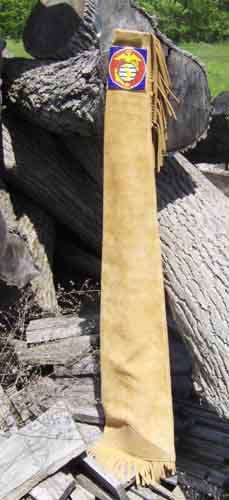
Echo, . . . the long bag with the USMC beads is a gun bag for a rolling block 45/70. Yldbill, . . . it's a white tail antler, . . . my cousin (who gets them both) made it for the handle on a bodacious bowie copy knife. It's cool too, . . . the metal he used was somewhat rusted, . . . so when he finished it, he left some of the pits in it, . . . gives it that "old, left out in the shed for decades" look. May God bless, Dwight
-
On and off, I have been working on these two projects for the last couple of months. Gonna deliver them this weekend at a family reunion, . . . and was really happy with the way they turned out, . . . just thought I would share. May God bless, Dwight


-
Burnishing edges on a holster
Dwight replied to LeatherCaptain's topic in Gun Holsters, Rifle Slings and Knife Sheathes
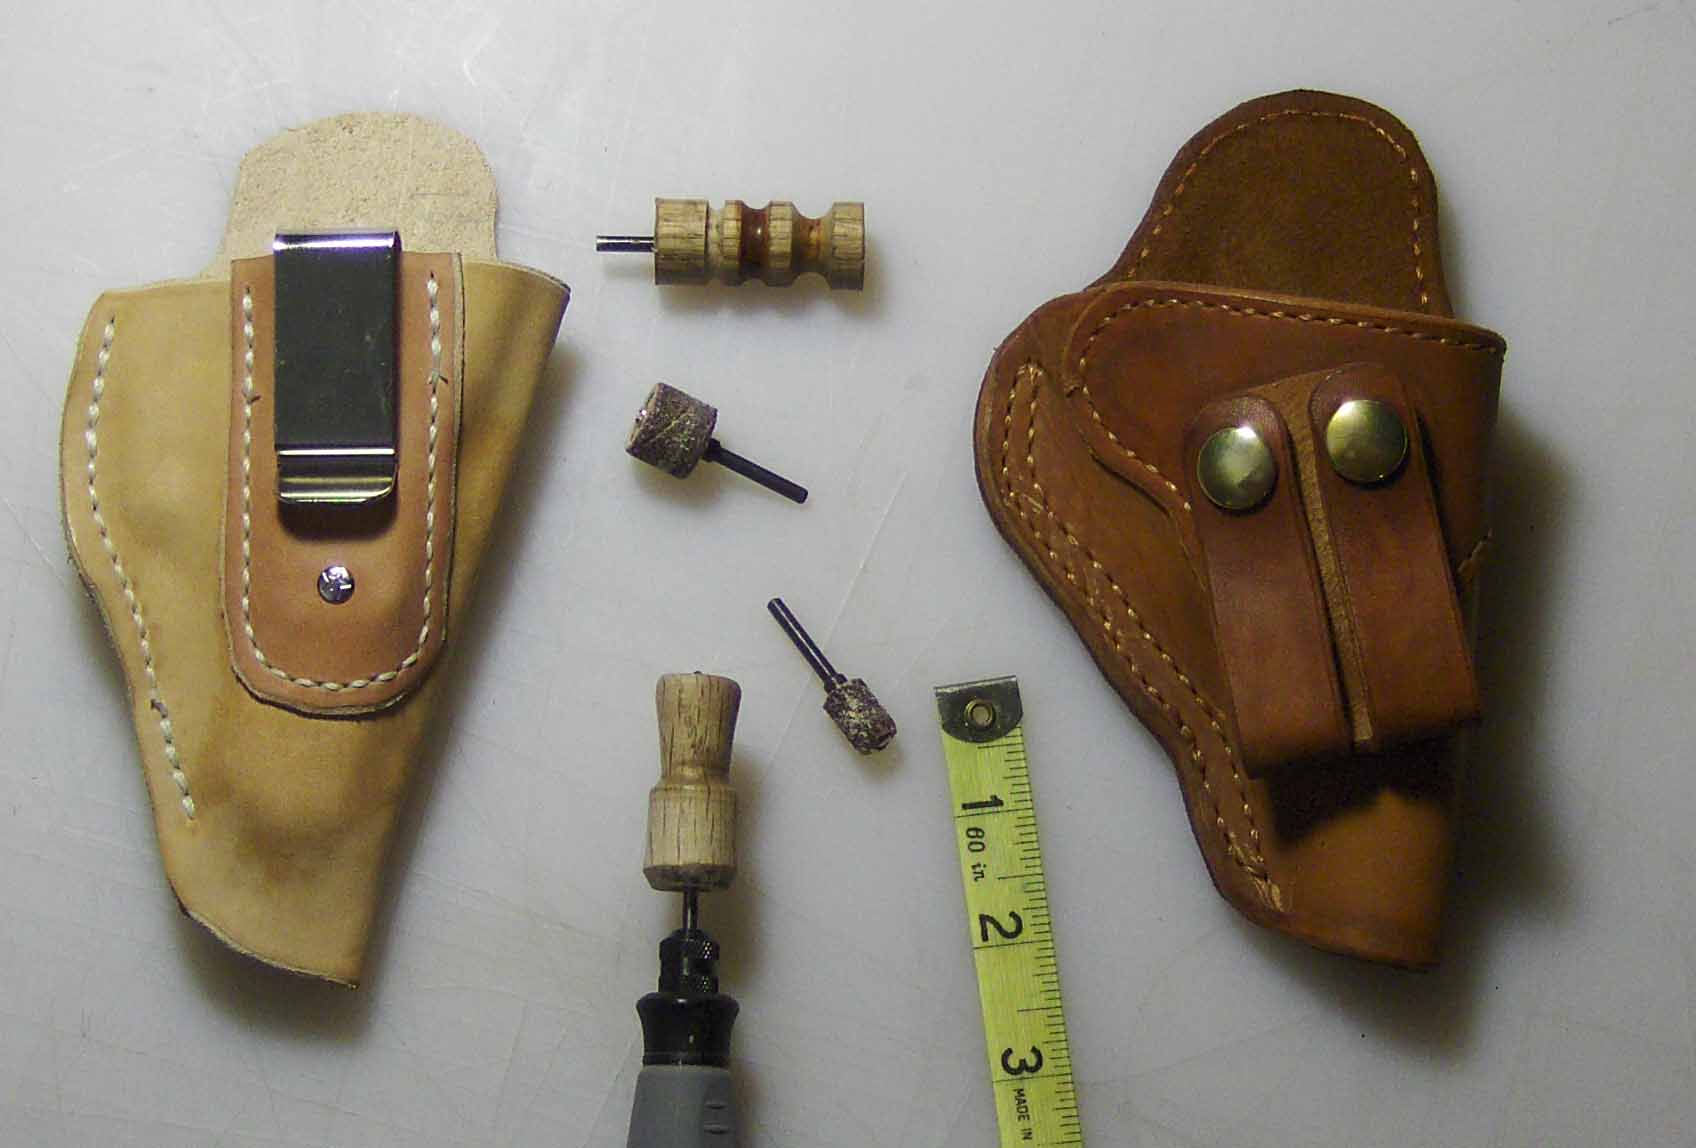
Cornfused, . . . this is a very simple approach to most burnishing problems. Get a Dremel tool. You sand with it, . . . burnish with it, . . . and polish with it. It gives you some real personal control on the piece you can "see". Enclosed is a pic of the rigs I use, . . . they were made by using a 1/8 in drill in the center of a piece of oak dowel for the shaft, . . . put into the Dremel, . . . sanded to shape using files and sandpaper. May God bless, Dwight
-
My belt measures .260 to .280 if you take a mike and check it in different spots, . . . which makes it just over a quarter of an inch in thickness, . . . meaning it had to be 8/9 oz for both pieces. And it is basically a full 1 1/2" wide. I am very happy with mine, . . . it has taken on "My" shape in the years I have worn it (it needed a good couple of weeks to "set" so to speak), . . . and I do not have any other belt I would rather wear, . . . with or without the 1911. May God bless, Dwight
-
FWIW, . . . I make my belts by laying down the liner (having coated both with contact cement and allowed it to dry properly) with the glue up, . . . cover it with newspaper, . . . and starting at the buckle end, . . . lay the "outside" piece of leather onto the liner. I then roll them together with a wall paper seam roller and finish with a rolling pin on a hard counter surface. It is then sewn around the edges, . . . holes punched, . . . dyed and finished, . . . and I have never had a complaint yet. Mine regularly carries a full size, all steel 1911, all day, . . . no problems. I have only had one pair of pants that had belt loop trouble, . . . a $10 pair of jeans from Wally World, . . . and they are just snug, . . . but they go through. My $.02 May God bless, Dwight
-
With my Tippmann Boss machine, . . . I use 277 thread or 346, . . . depending on the "Look" I want, . . . but others use combinations of 277 and 207. The smaller is the 207 and larger is the 346. You will probably have to go to a commercial sewing machine place to get that thread. I buy mine directly from either Tippmann Boss in Indiana, . . . or ST Leather in Missouri. The needle size is easy to figure. Use the needle that has the smallest hole where you can put it on an 18 inch piece of the thread you are using, . . . and holding the string taught between your hands, . . . the needle will slide freely up and down the string when it is held on about a 30 degree angle. May God bless, Dwight
-
Arbor, . . . go to a Tandy leather store, . . . their vest pack of patterns is on sale for $7.00 now, . . . get it. Buy some of their leather for your vest, . . . the manager can show you what you need. It'll cost you probably in the neighborhood of less than $50. Cut your pieces when you get home, . . . and using rubber cement, . . . cement the edges together, overlapping about a half an inch everywhere, . . . and overlap it so it lays flat, not having to be bent back. Try it on and make sure it fits. You can take the rubber cemented pieces apart and re cut, adjust, etc until you get what you want. Then comes the fun: take a piece of quarter inch copper tubing, . . . about 2 inches long, . . . put it in your small lathe, . . . and take a cut on the INSIDE edge of the tubing so the outside edge becomes the sharp edge. You want to make that a long slow bevel like the edge on a butcher knife, . . . not like a chisel. Take your vest apart, . . . lay face side down, . . . use a straight edge and mark off a grid on all the pieces (stay 1 inch from all edges). Chuck up your copper leather chopper into a battery drill, . . . push the speed button to high, . . . and start cutting your holes in the back side. You will want the leather to be on a very smooth, pine 1 x 6 or something similar. You will probably have to re-sharpen several times, . . . or if you have it, . . . stainless steel works even better. After you have all the holes cut, . . . glue it back together and stich it, . . . VOILA!! I use the copper tube for holes in leather, plastic, foam, etc. and it works great for me. Good luck, . . . post some pics when you get it done. May God bless, Dwight
-
Adding a metal belt clip
Dwight replied to ps0303's topic in Gun Holsters, Rifle Slings and Knife Sheathes
Use 3/4 oz leather to hold the clip on, . . . just sew it close to the clip and you should be OK. I usually make sure my clips are deep, as I make them so that they can be used on a belt that it made of two 5/6 oz blanks sewn/cemented together. Just pay attention to that detail when you buy them. May God bless, Dwight -
Just a couple of comments: one being a question. What is the big deal on cutting the leather? If you are doing a finished project, you will want to sand and finish the edges anyway, so why go into a big sweat on whether the "cut" is 90 degrees or 85 degrees, . . . or even on the line you will want to see as the finished project? Secondly, . . . if you have a Stanley razor knife, . . . you can make an improvised strop for it with a 1 by 4 inch piece of scrap leather, . . . rub it with jeweler's rouge, . . . and keep your razor knife sharp with it. Most of the cuts I make would try the patience of anyone with a round knive as they are sharp curves, etc, . . . so my choice has been the razor knife that I keep "razor" sharp (which is about 3 times as sharp as a new blade right out of the box) with my improvised strop. But, . . . regardless of what you use, . . . if it is dull, . . . it will not cut correctly. A sharp knife, . . . regardless of the kind, . . . is what you need. May God bless, Dwight PS: If you really are dead set on perfect cuts, . . . on the line, . . . etc, . . . contact a band saw blade manufacturer through Google or something like that, . . . those that make custom blades will be able to make you one that has a razor edge on it, . . . you can put it on a regular wood or steel cutting band saw, . . . and you can cut leather as intricate as you want with a little practice, . . . and all your cuts will look great. If you do this, however, . . . you will want to be extremely careful with it, . . . it will take finger tips, knuckles, etc off so fast it is almost unbelievable.
-
"IF IT WERE MINE", . . . I would very gingerly razor cut the bottom stitches in this photo, . . . and sew the sleeve on the back to take a stainless "holster" clip you can buy at Tandy Leather. The sleeve should be sewn just about straight up and down according to this picture, . . . and you just put a couple of loops of thread through the hole in the bottom of it to keep it from coming out of the sleeve. Then just sew the bottom back together, . . . voila, . . . a working cross draw holster. It will slip onto your belt as you get ready to drive, . . . and off when you no longer need it. Place it on just the other side of the first belt loop to the left of your buckle, . . . should work great. I "open" them up a bit as they are too tight for me from the factory on anything I make. Oh, . . . yeah, . . . I don't have a box, . . . I just keep a plastic 5 gallon bucket under my working desk, . . . May God bless, Dwight
-
Go to www.pistolsmith.com, . . . scroll down to the holster section, . . . (you may have to sign up, . . . I don't know for sure), . . . use the search function, . . . look for holster presses. There are several pictures on line there, . . . everything from old screw presses, . . . to nice new hydraulic presses. From all the info I could gather (I'm going to build one this summer............maybe) the key to it is the rubber used. It is supposed to be gum rubber, . . . durometer hardness of 40 and can be bought by the square foot from McMaster-Carr, . . . the catalog folks. One fellow on there said he put a gauge on his, . . . used something in the neighborhood of 6 tons of force on his press, . . . FWIW May God bless, Dwight
-
What is the Best Way to Remove the Chrome Off Tools
Dwight replied to ArtS's topic in How Do I Do That?
You can buy Muratic acid at any store that sells bricks for fireplaces and such. The acid is used to clean the brick after they are set. Sulfuric acid in low concentration: battery acid in your car's battery. Oh, . . . and Bree has some good advice on both of them, . . . they will mess you up if you make a mistake, . . . always wear eye protection using them, . . . goggles if you have them, . . . rubber (not plastic, . . . RUBBER gloves), . . . and for what it is worth, . . . wear a pair of jeans you don't want any more. Either of them dropped on denim will make them look like swiss cheese after they are washed (well learned advice from an old Navy battery electrician). May God bless, Dwight -
Looking for a trademark stamp?
Dwight replied to Lobo's topic in Gun Holsters, Rifle Slings and Knife Sheathes
To Lobo, . . . in the words of an old singer, . . . "Thank ya, . . . Thank ya, . . . Thank ya vurry much". My stamp is on its way, Brenda was very helpful, and the whole transaction went smooth as Blue Velvet. May God bless, Dwight -
Like most, . . . I too had a time with these problems, . . . but the biggest part of my problem was solved by a friend who showed me a slick trick for keeping your knife sharp. Take a piece of the grey colored porous cardboard that is like the inside of a cereal box. Cut it to a piece 8 or 10 inches long and 1 or 2 inches wide. Rub it hard with several wide strokes of jeweler's rouge. Then just draw your knife blade along it from time to time (about every 4 or 5 minutes for me), . . . watching to be sure you keep the blade angle flat against the cardboard. It keeps a nice sharp edge on your blade as you cut. Be sure to draw away from the sharp edge and look for the black streak behind you as you go. It tells you that metal is being removed from the blade, . . . sharpening it. I usually do 4 or 5 pulls on each side, . . . then go back to carving. May God bless, Dwight
-
Adding to what has already been said (only for emphasis), . . . a friend of mine wanted to get into the laser engraving business. He and his wife sunk $25,000 into the equipment, training, and a small pile of sample blanks. IT DID DO FANTASTIC WORK !!!!! He also hinted that it was somewhat expensive to operate (no figures just complaints) as it used some kind of containerized CO2 and some other stuff. Anyway, may God bless, Dwight
-
Vacuum bag for forming holsters
Dwight replied to Denster's topic in Gun Holsters, Rifle Slings and Knife Sheathes
FWIW, . . . I know not everyone has the funds to experiment with this process, . . . and if one needs a quick and useable vaccuum source, . . . try your local pick up truck. For a few bucks you can buy vaccuum hose at your local NAPA store, . . . pull a line off your local pick up truck, . . . attach the hose to the bag, . . . start the truck, . . . VOILA, . . . I watched a guy one day pump out my septic tank using this method, . . . he just had a coiled roll of 3/8 inch hose hanging on the side of the big tank, . . . lifted up the hood, . . . started her up, . . . about 10 minutes later the big "HISSSSS" from the pit said it was empty. Paid him $85.00 for the lesson and the cleaning. May God bless, Dwight