CitizenKate
-
Posts
2,672 -
Joined
-
Last visited
Content Type
Profiles
Forums
Events
Blogs
Gallery
Store
Everything posted by CitizenKate
-
checkbook covers
CitizenKate replied to carr52's topic in Purses, Wallets, Belts and Miscellaneous Pocket Items
Your basket weave stamping looks pretty good to me. Thanks for the nice photos. Kate -
For me, it's Lord of the Rings. I read the novel(s) back in the early 80's and suffered through the previous attempts to produce it on the silver screen. When Peter Jackson made his version of it, I thought someone had finally done it right. Before that, it was Star Wars. I haven't played it now for 3 or 4 years, but I used to have an annual SW Marathon! Kate
-
Hmmm... pigeon dung... and at no point does anyone ask, "Isn't there a better way to do this?" Kate
-
small business taxes for the U.S.
CitizenKate replied to esantoro's topic in Marketing and Advertising
Itemized vs. Standard deduction is either/or. You take one or the other. That is fairly clear in the instructions. Kate -
Wish I could be there! Hope you plan on posting photos from that event. Kate
-
What a nice piece of work! Kate
-
Fine work, Deneken - glad you signed in, and look forward to seeing more! Kate
-
Painting with dye
CitizenKate replied to Ian's topic in Dyes, Antiques, Stains, Glues, Waxes, Finishes and Conditioners.
Nope, it peels off easily and leaves nothing behind. The more coats you use, the easier it is to peel off. I used 2 coats for my demo, and it all came off just as easily as you see in the photos. Can't wait to see the results! Kate -
Painting with dye
CitizenKate replied to Ian's topic in Dyes, Antiques, Stains, Glues, Waxes, Finishes and Conditioners.
Hi Ian, I presume you're airbrushing your colors? I use a number of different ways of masking my artwork for spraying dyes. One is to use liquid latex. I posted a photo demo on how to do that here. Another method is to get some of those Avery (or generic brand is fine too) full-page sized labels. Print your artwork on the label, use a Xacto knife to cut out the shape you want to mask, then stick it to the leather. It goes on and off with little problem, and since this material is somewhat absorbent, it prevents bleeding over the edges. You can use a modeling tool to manicure the edges of the mask into your cut lines to help prevent any overspray from drifting underneath. You don't want to spray the dye too heavily; work in multiple light passes until you have the color you want. Cut lines do help stop the spread of dye on the leather, but you still want to go in light passes. Your strategy of starting with lighter shades and going to darker is good. Hope this helps. Kate -
For some reason, the first "Men in Black" movie comes to mind. LOL Cool piece, Tom! Kate
-
pattern from OscarB
CitizenKate replied to leathercat's topic in Purses, Wallets, Belts and Miscellaneous Pocket Items
Very cute, and very nice workmanship! Kate -
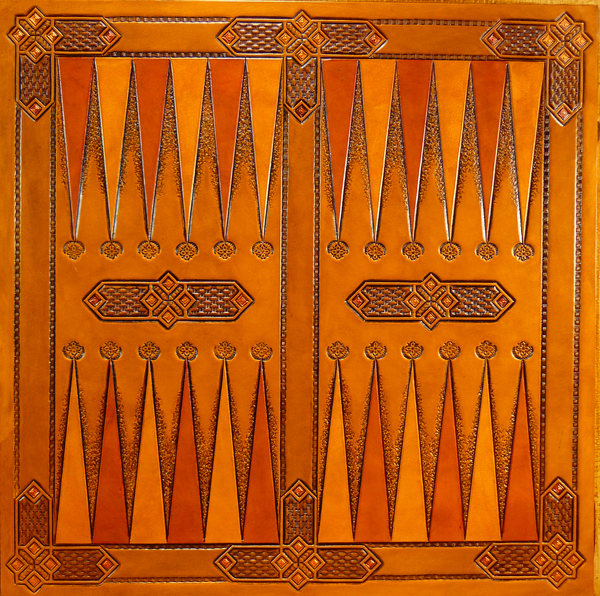
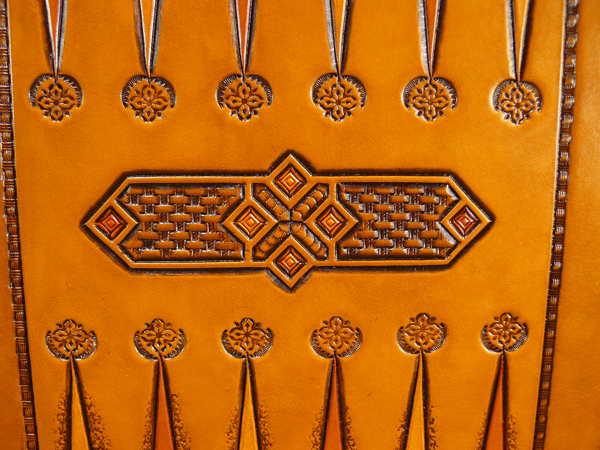
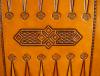
WIP: New Backgammon game board
CitizenKate replied to CitizenKate's topic in Boxes, Clocks and Game Boards
Okay, here's the latest progress. I really intended the colors of the points to be somewhat more intense, but I had to re-apply the antique (for pieces this size, putting on antique is a crap shoot), and the extra work took out some of the color. Still, though, the more subtle shades are nice, too. I painted the little diamond thingies with Createx pearlized paints to create a nice antiqued metal appearance. Kate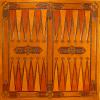
-
That does it. You are now on my list of people to watch. That goes for your wife, too. Kate
-
Ha! You GO, little victim! Kate
-
-
small business taxes for the U.S.
CitizenKate replied to esantoro's topic in Marketing and Advertising
Same here. Dealing with piece-parts is one thing, but dealing with raw material is another. So far, I've been able to set up my program to keep pretty close track of things like leather. Dyes are a little less cut-and-dry. I told my accountant that the amount of dye I use not only varies from one identical piece to another, but for some pieces, I portion it out not in ounces, but in drops. Her response was, then you need to track your dyes by the number of drops. I asked her if she was out of her mind. No way am I going to sit around counting drops of dye all day long - I'd never have time to make anything. (Maybe that's where the term "bean-counter" comes from.) So what I do is estimate as closely as possible, how many ounces of dye I use for each item, and I set up the system to deduct that amount automatically whenever I make the item. Then periodically, I do cycle counts on the dyes I've been using the most, and make inventory adjustments. Kate -
LOL I wish I had four hands! Actually, what I did was set the camera up on a tripod, and set the timer so I was working when the shutter went off. Kate
-
small business taxes for the U.S.
CitizenKate replied to esantoro's topic in Marketing and Advertising
Hi Ed, The built-in tutorials are the best place to start. Those were pretty much all I needed. Kate -
Hey, what are friends for? Can't wait to see what you come up with. Kate
-
Fun with Orange
CitizenKate replied to TomSwede's topic in Dyes, Antiques, Stains, Glues, Waxes, Finishes and Conditioners.
I see what you mean about the separation. But overall appearance has a very nice texture to it. That braided handle is gorgous! Kate -
Yes, in fact I can show you something similar.... take a look at the work of Les & Kimball Beery. Love their work! Kate
-
It also may help to remember to keep your cloth flat while wiping off the excess, so that you don't inadvertently remove antique from the impressions. Kate
-
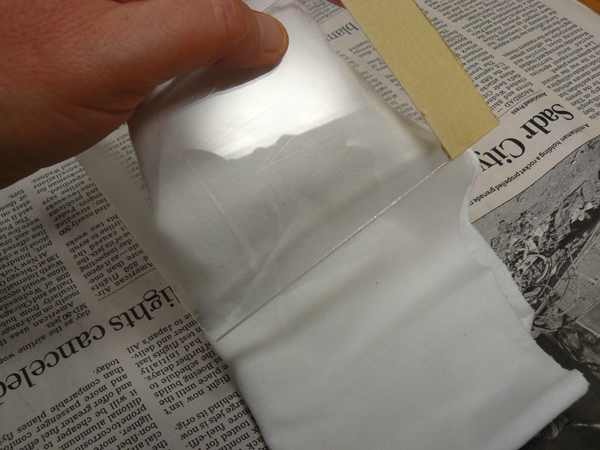
I posted a photo demo here on this topic. Kate
-
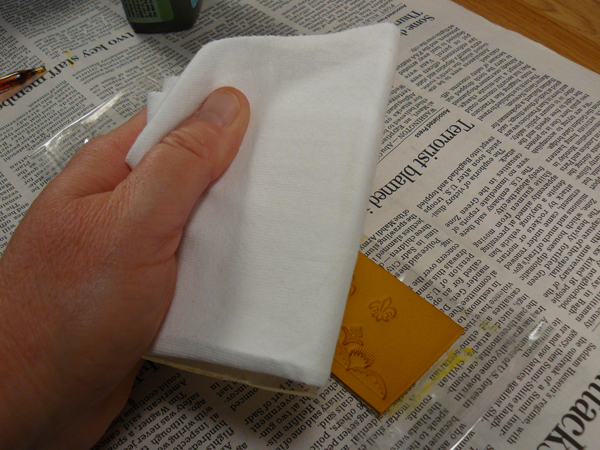
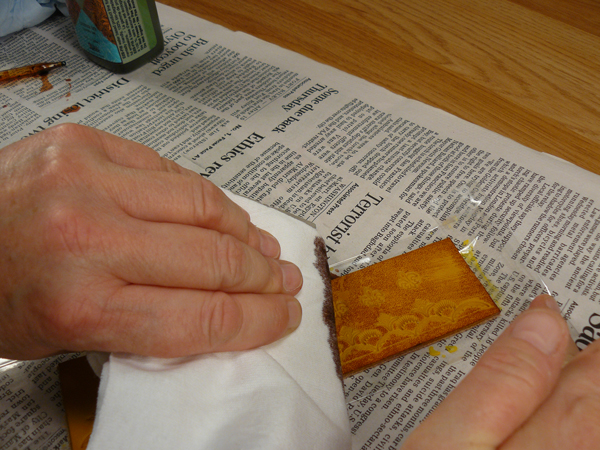
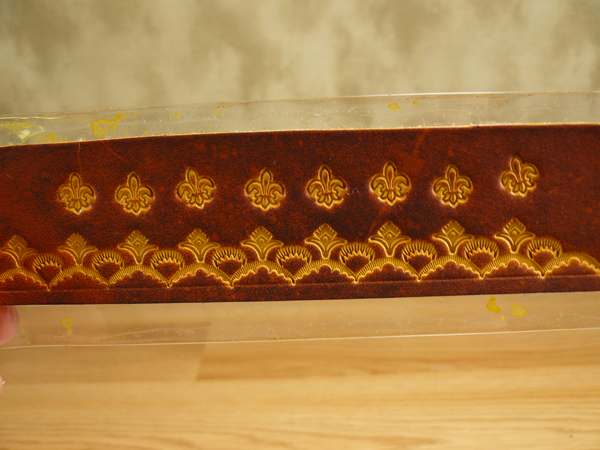
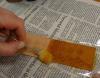
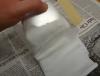
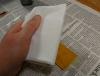
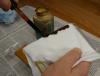
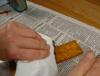
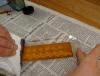
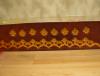
I've seen a few people ask how to dye your projects so the tooled impressions are lighter than the un-tooled areas. Most projects are dyed/antiqued in such a way that the impressions are usually darker than the rest of the leather, but making it the other way around can also be very attractive, as most of you have noticed with the work of Sojourner Leather among others. I found a pretty easy way to do it, so I'm posting a quick little demo to show you at least one way to do it. To start with, I have a piece of scrap with some tooling on it. I'm putting a wash of pure yellow dye on it as a kind of under-coat of color that does penetrate into the depressions. You can use other light colors, such as light tan, or just leave it natural if you prefer. To apply the "top" coat of color, I often use a block of wood, MDF, or anything with a kind of a blocky shape that has a nice straight edge on at least one side. In this case, I found a piece of plexiglas I had laying around. (DO NOT use plexiglas with spirit-based dyes.) Then I take a soft cotton painters rag, or piece of old tee shirt, and wrap it snugly around the edge of the block I want to apply the dye with. Notice here how I am holding the block applicator over the project as I am drizzling dye on it? Well, that's a very good example of what NOT to do! (Just wasn't really watching what I was doing, but fortunately, the drop that fell went onto the newspaper. - whew!) Anyway, just lightly soak the rag with dye. You don't want it to be totally saturated, but there needs to be enough to give you solid color. This was not a particularly good piece of leather, so I really had to work to get some color into it. But the idea is to wipe the edge of your block evenly over the surface of the leather, applying dye to the high parts, and leaving the impressions more or less untouched. And here is the result. It looks a little grainy because of the poor quality of the leather, but this should give you a pretty good idea how the process works. Kate

-
Can you describe a little about the method you used to apply the antique? Also, what kind of antique did you use? Kate