CitizenKate
-
Posts
2,672 -
Joined
-
Last visited
Content Type
Profiles
Forums
Events
Blogs
Gallery
Store
Everything posted by CitizenKate
-
who makes dies for stamping basketweave patterns?
CitizenKate replied to Calleather's topic in Leather Tools
Someone who said they made custom embossing dies and stamping plates left a post somewhere on this forum. Maybe it's in the Tools area? Kate -
I was considering one of those hydraulic presses, but couldn't find any information on how to "rig" them with the right attachments (plates, etc.) for cutting. Not even the local machinist could give me any useful advice. Kate
-
Wow, that's a really tricked-out bike! Beautiful work, Kathy. Kate
-
I usually use metallic acrylic paint over the dye. You can antique and finish over it. I've also used a wax-based metallic product called "Rub & Buff", and gotten nice results from that. It comes in a slightly wider variety of metallic colors than the acrylic. Kate
-
color samples
CitizenKate replied to CitizenKate's topic in Dyes, Antiques, Stains, Glues, Waxes, Finishes and Conditioners.
The water-based dyes are not showing any more propensity for bleeding or fading than the spirit dyes. Possibly less. Any dye should be sealed with a final coat of some kind, to reduce bleeding and fading... acrylic, wax, lacquer, etc. My preference these days is wax (I use Bee-Natural the majority of the time, which is a wax-based finish), or lacquer if I need the best waterproofing possible. Now that Eco-Flo has been introduced, Tandy is now telling us to "stay away" from Neat-Lac and other lacquer top/final coats. In my opinion, if they want us to "stay away" from lacquer, they'd better come up with something that does a better job of protecting from moisture than an acrylic finish. JMO (just my opinion) Kate -
Okay, Wolfie, I'll try that. Thanks for the tip! Kate
-
Beautiful! Is there a shot of the entire bike? Kate
-
Very nice work, indeed! Kate
-
Just got a referral to this web site this morning. Both the site and the work shown are absolutely stunning. Check it out! http://www.art-goldberg.com Kate
-
I tried calling a local monument company and asked for pieces of scrap. They wanted $50/sq. ft. for even their "scrap". I suppose they all have their own policies. Kate
-
color samples
CitizenKate replied to CitizenKate's topic in Dyes, Antiques, Stains, Glues, Waxes, Finishes and Conditioners.
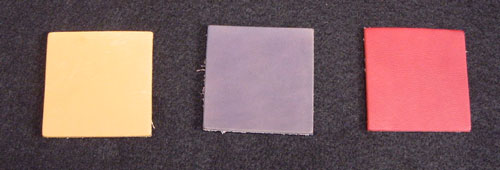
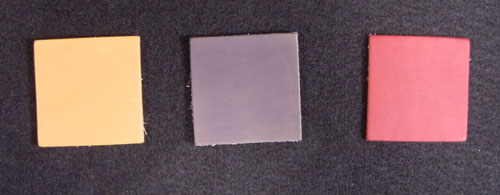
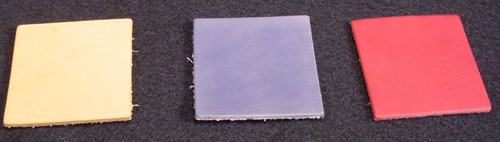
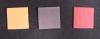
Here's another installment... The swatches have now been sitting in the window for 4 weeks. (The photos are displayed by date in reverse order; i.e., the latest is on the left.) You can see signs of the leather bleaching, but the colors are holding up fairly well. I wish I had thought to make up some samples with spirit dyes to test side-by-side with these. I really think they are holding up better than the spirit dyes would. Kate

-
How ironic! LOL Kate
-
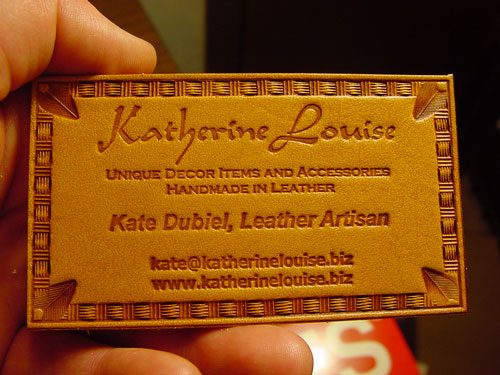
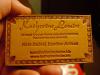
Nick, I've got one made by Lucris ("Series 3"), and I love it. I got it used a couple of years ago for about $600. Very useful for quickly cutting out smaller parts. (Smaller being, about .7 square feet or smaller.) I get dies from Texas Custom. Most of mine are just simple outlines (no holes in the middle), and I've paid about an average of about $30 for each, pretty affordable. I also use it to stamp my business cards, which is done with a custom stamping plate I got from Grey Ghost Graphics (aka Jeff Moseby). A business card sized plate ran about $80. (See the attachment - I added some border stamping of my own to complete the piece.)
-
wallet
CitizenKate replied to Roger's topic in Purses, Wallets, Belts and Miscellaneous Pocket Items
Wonder how old the original is? Kate -
Holy shnikes!!! Just WOW! Kate
-
Azmal, Your stuff is phenominal. Wow. Kate
-
Yeah - what they said! Kate
-
color samples
CitizenKate replied to CitizenKate's topic in Dyes, Antiques, Stains, Glues, Waxes, Finishes and Conditioners.
The yellow and blue (it does kinda look purple in the photo, doesn't it?), do seem a little darker. It looks to me as thought the pigment itself does not seem to have faded much, but the leather has darkened slightly from the prolonged exposure to sunlight, just as it normally does. The red ("cranberry") does seem to have faded slightly. Kate -
Yeah, what they said! Kate
-
Wow, nice! Kate
-
Charley, That is a very realistic looking snake. Between the scale texture and the dye job, it really pops out and has a very natural appearance. Nice work! Kate
-
Hi gang, Just thought I'd share some photos of some color samples I made using 3 different colors of Eco Flo leather dyes from Tandy. The three colors I used are "cranberry", "sunshine yellow", and "evening blue". There has been quite a bit of discussion on the board in regards to colorfastness of various dyes and paints used to color leather, and I really wanted to know how the new water-based dyes stacked up to the others in terms of how much or little they fade with exposure to light. Nobody seemed to have an an answer, so I made up some samples, photographed them, then placed them on the sill of a south-facing window for two weeks. In that amount of time, they have been exposed to several hours of bright, intense, direct sunlight almost every day. I'm planning to leave them there for at least a few months, but I decided to take another photo and let you all see how they're doing so far... Kate


-
Ooooo... coool! Can't wait to see more. Kate
-
Freaking Out
CitizenKate replied to freak's topic in Dyes, Antiques, Stains, Glues, Waxes, Finishes and Conditioners.
I'm still testing the antique/highlighter, still no formal opinion... The dyes... interesting. I've had some color samples (with no sealer or other finish) sitting in one of my south-facing windows for over a week, where they are getting several hours of direct sunlight almost every day. So far, I don't see any signs of fading. They don't seem to be exhibiting the usual signs of "bleaching" either - wonder if the color is having an effect on that. I took a photo of them before placing them in the windowsill... I'll take another photo in another week or two so we have a reference point to compare, and post them so you all can see. Kate -
Marilyn, I'll be interested in seeing how this turns out, since I've been wanting to do a project just like this... I think you can re-attach the hardware after the leather is in place, but you may need to get longer screws than the ones the box came with. I've been using brass fasteners whenever the fastener has to come into contact with the leather, and so far haven't had any problems with leather reacting to it. I think the saddle makers out there can also suggest what fasteners you can use with leather. I would definitely use an adhesive. Either contact cement, wood (carpenter's) glue, or Tanner's Bond should work fine. I've used carpenter's glue to attach leather to wood, and used contact cement to mount the leather for a game board to its backing. Here are the trade-offs: With contact cement, you pretty much have one chance to get your leather cover placed perfectly, but then once it's on, the bond is complete. With the white glues (carpenter's glue or Tanner's Bond), you have some time to adjust the position of the leather on your box before it sets, but you need to be prepared to carefully clamp the leather on the project to keep it in place while it's curing, and keep the area free of excess glue. I'll let someone else comment on the foam, since all my attempts to pad something failed miserably! :scratchhead: Kate