Lobo
-
Posts
1,065 -
Joined
-
Last visited
Content Type
Profiles
Forums
Events
Blogs
Gallery
Store
Everything posted by Lobo
-
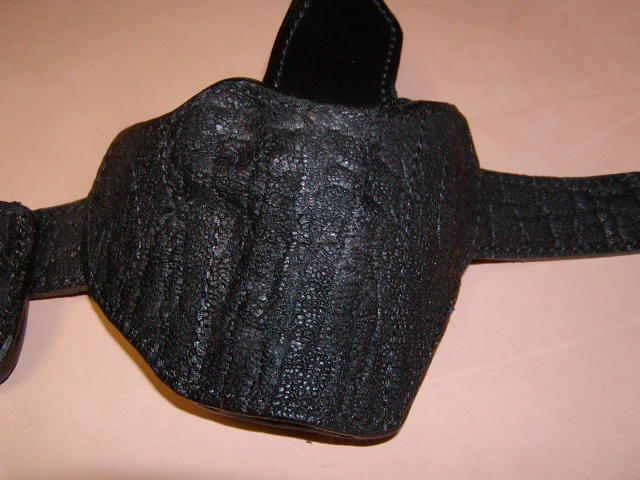
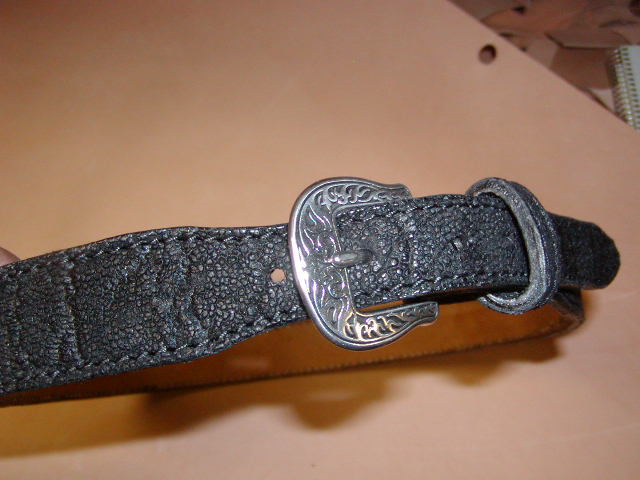
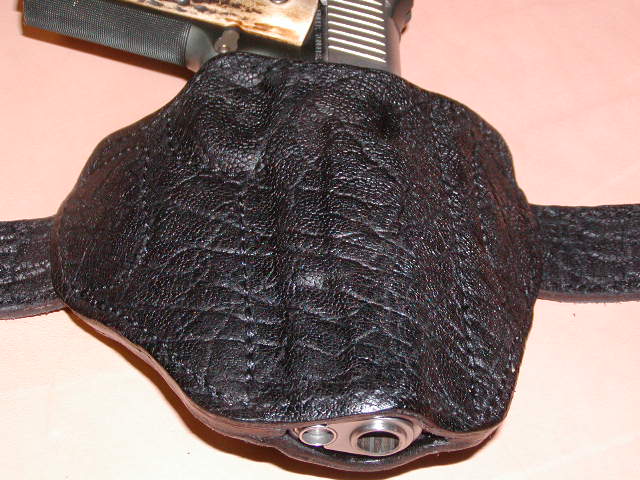
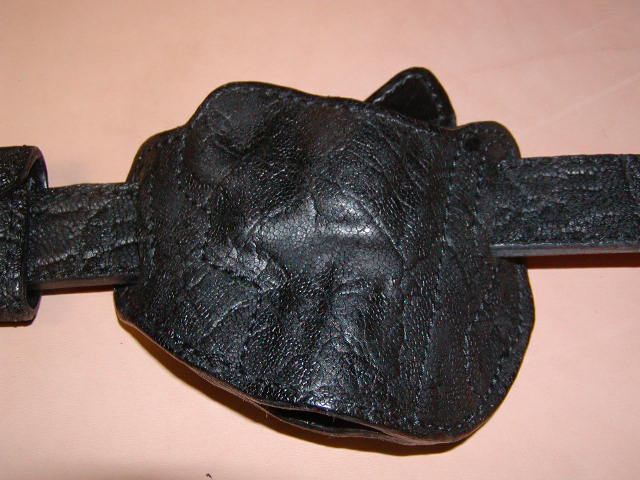
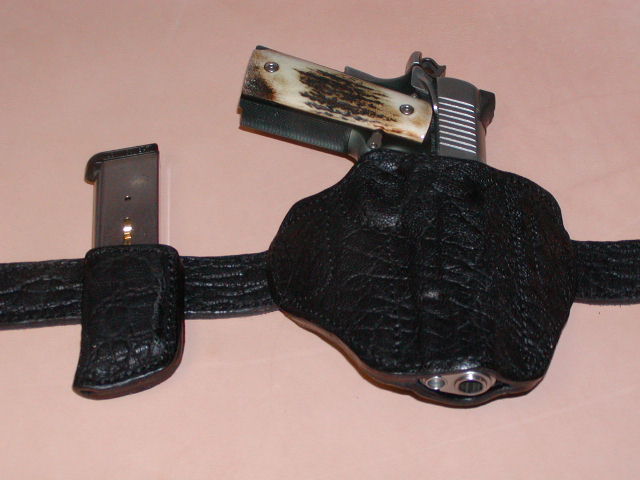
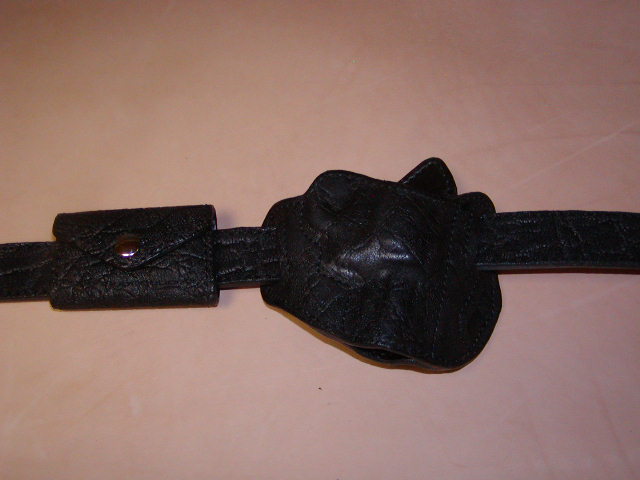
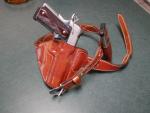
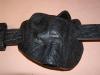
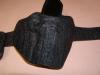
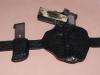
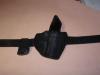
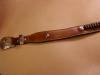
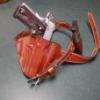 Customer contacted me a couple of months ago, explained that he had a tanned African elephant hide that he would like to have a number of holsters, belts, and pouches made from. I explained the different types of tanning methods, what works for holsters and what doesn't, asked him to send me a small piece of his hide. It was nicely tanned and would have worked very well for garments or upholstery, due to being very soft and flexible, but not suitable "as is" for what the customer wanted. I proposed to use his hide as an overlay on cowhide to produce his order. He liked the idea and sent me a large section of hide with an order for 3 holsters, 3 pouches, and 3 belts. Holster rig #1 is my Enhanced Pancake model with slide shield option, made for the 5" Model 1911 pistol with neutral cant, produced as follows: 1. holster front is of 6/7 veg-tanned cowhide, smooth side in against the handgun, with 4/5 oz. elephant hide laminated to be exposed on the front. 2. holster back is of two layers of 5/6 oz. veg-tanned cowhide laminated flesh-side to flesh-side. 3. matching single pouch is of 5/6 oz. veg-tanned laminated with elephant hide flesh-side to flesh-side. 4. matching belt is 8/9 oz. veg-tanned cowhide laminated to 4/5 oz. elephant on outer side. Holster rig #2 is essentially the same as #1, made for the 4.25" Model 1911 pistol, standard forward cant.. Holster rig #3 is similar in construction, Model 1-D Pancake with Dual Carry Option (strong-side or cross-draw, 3-slot pancake), made for the 2-1/8" J-frame .357 magnum, with 6-round drop pouch. Elephant hide was cemented to the cowhide using Fiebings Tanners Bond cement. Adhesion was excellent and these holsters went through the wet-forming and boning processes with very good results and no delamination at all. The elephant hide has an extreme surface texture. This prevents stitch grooving, but the Cobra Class 4 stitcher set the stitches in so firmly that they are all but invisible in the textured surface. Edge stitching was accomplished using the roller guide. Remainder of assembly stitching was done using a colored pencil line to identify the stitch pattern. The elephant hide as received was a very dark charcoal gray shade. I used Fiebings Black Oil dye on all surfaces to create an even overall appearance. One mistake was made on holster #1. Customer had specified neutral cant, but I made it with standard butt-forward cant. That "mistake" will now be for my assistant's husband (deputy sheriff) Christmas present. Customer also requested that I keep enough of the elephant hide to make a rig for myself, which I will probably get around to one of these days.
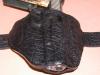


-
Customer contacted me a couple of months ago, explained that he had a tanned African elephant hide that he would like to have a number of holsters, belts, and pouches made from. I explained the different types of tanning methods, what works for holsters and what doesn't, asked him to send me a small piece of his hide. It was nicely tanned and would have worked very well for garments or upholstery, due to being very soft and flexible, but not suitable "as is" for what the customer wanted. I proposed to use his hide as an overlay on cowhide to produce his order. He liked the idea and sent me a large section of hide with an order for 3 holsters, 3 pouches, and 3 belts. Holster rig #1 is my Enhanced Pancake model with slide shield option, made for the 5" Model 1911 pistol with neutral cant, produced as follows: 1. holster front is of 6/7 veg-tanned cowhide, smooth side in against the handgun, with 4/5 oz. elephant hide laminated to be exposed on the front. 2. holster back is of two layers of 5/6 oz. veg-tanned cowhide laminated flesh-side to flesh-side. 3. matching single pouch is of 5/6 oz. veg-tanned laminated with elephant hide flesh-side to flesh-side. 4. matching belt is 8/9 oz. veg-tanned cowhide laminated to 4/5 oz. elephant on outer side. Holster rig #2 is essentially the same as #1, made for the 4.25" Model 1911 pistol, standard forward cant.. Holster rig #3 is similar in construction, Model 1-D Pancake with Dual Carry Option (strong-side or cross-draw, 3-slot pancake), made for the 2-1/8" J-frame .357 magnum, with 6-round drop pouch. Elephant hide was cemented to the cowhide using Fiebings Tanners Bond cement. Adhesion was excellent and these holsters went through the wet-forming and boning processes with very good results and no delamination at all. The elephant hide has an extreme surface texture. This prevents stitch grooving, but the Cobra Class 4 stitcher set the stitches in so firmly that they are all but invisible in the textured surface. Edge stitching was accomplished using the roller guide. Remainder of assembly stitching was done using a colored pencil line to identify the stitch pattern. The elephant hide as received was a very dark charcoal gray shade. I used Fiebings Black Oil dye on all surfaces to create an even overall appearance. One mistake was made on holster #1. Customer had specified neutral cant, but I made it with standard butt-forward cant. That "mistake" will now be for my assistant's husband (deputy sheriff) Christmas present. Customer also requested that I keep enough of the elephant hide to make a rig for myself, which I will probably get around to one of these days.


-
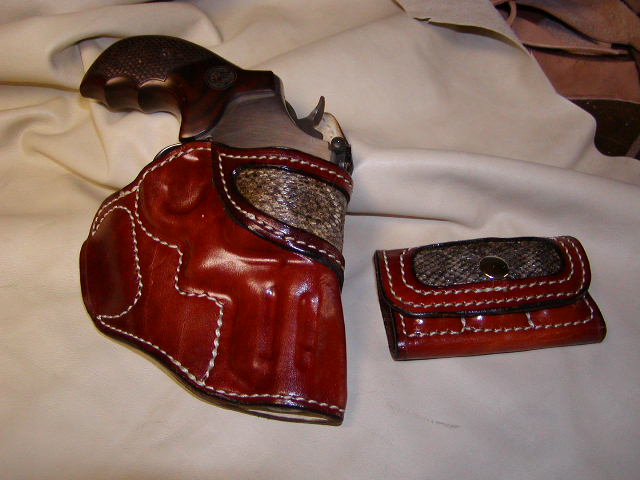
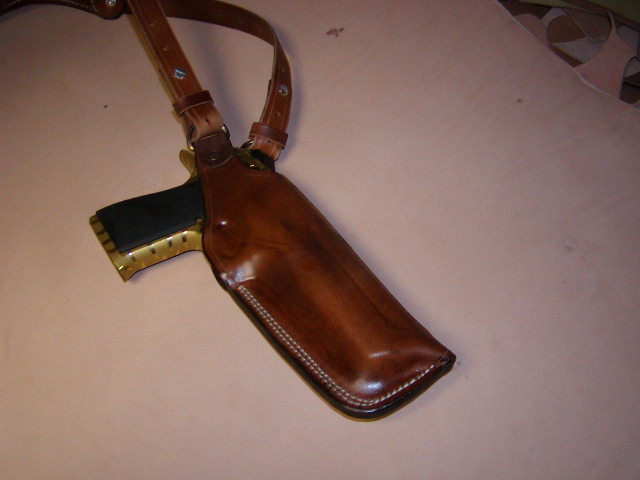
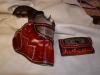
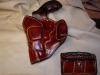
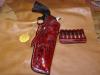
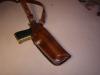
Customer contacted me, said he had seen photos of one of my personal rigs and wanted one just like it for himself. Flattery does not go unrewarded here. Here is my Enhanced Avenger model with holster mouth reinforcement modified for a windowpane inlay which, in this case, is western diamondback rattleshake. Made for the 3" S&W Model 629 in .44 magnum caliber. Pouch is the old 2X2X2 style belt pouch for 6 rounds of .44 magnum.
-
Question On Sig 1911S
Lobo replied to Colt Hammerless's topic in Gun Holsters, Rifle Slings and Knife Sheathes
I just purchased a new Sig 1911 XO Nitron and NOW they offer Blue Guns! Oh well, tax deductible business expense, and one can never really have too many good handguns. -
There are as many holster styles as there are ideas about what a holster should be. There are two general types of holster construction, the pancake style and the envelope style. With pancake construction the holster is made with an inner panel and an outer panel joined together with seams fore-and-aft of the handgun. Holster bottom may be open or closed. Holster top may be open or may incorporate a strap or thumb-break retention device. Mounting to the belt is typically done by using belt slots or loops situated in "wings" consisting of extensions of the holster panel fore-and-aft, but some designs use belt loops mounted to the back of the holster. With envelope-style holster construction the holster is made using a single piece of leather wrapped around the weapon and secured by a seam.The seam is usually located along the rear (bottom of the handgun), but some designs locate the seam forward (along the top of the handgun). Holster bottom may be open or closed. Holster top may be open or incorporate a strap, thumb-break retention, or full coverage flap. Some designs will combine elements of pancake and envelope construction. The Avenger style holster is an example of this, consisting of a basic envelope design extended to the rear to form a wing with belt slot and a belt loop mounted to the rear of the holster. IWB (inside the waistband) designs can be constructed with either pancake or envelope methods. Belt attachment is usually done by belt loops extending around the belt or belt clips mounted on the holster to slip over the belt. IWB holsters tend to emphasize concealment (keeing the bulk of the holstered handgun inside the trousers), and typically offer reductions in accessibility (particularly ease of reholstering the handgun). There are inherent advantages to both general types. The pancake-style holsters can provide good concealability by keeping the handgun pulled snugly into the body, using belt tensioning to apply pressure to the holstered handgun and increasing retention qualities. Comfort can be improved by spreading the weight of the holstered handgun over a wider portion of the belt. The envelope-style holsters can provide better accessibility, offering greater ease of gripping the handgun during the draw as well as allowing the handgun to be reholstered more easily. Everything in holster design involves compromises among the 4 basic factors of comfort, accessibility, security, and concealability. Whenever one factor is emphasized there will be compromises in the other factors. There is no "perfect" holster design for every user or application any more than there is a "perfect" handgun for every use or situation. A holster that is designed for maximum concealability is not likely to provide the greatest accessibility or comfort (a handgun is intended to be comforting, not comfortable). Holsters developed for practical shooting competitions are not likely to be the best choices for discreet concealed carry. Then there are shoulder holsters, ankle holsters, pocket holsters, pouch holsters and probably other types as well. I remember once seeing a neck holster, simple pouch suspended from a strap around the neck and tucked inside the shirt. Probably the best advice I can offer to anyone interested in holster design is to keep in mind the 4 basic factors: 1. Comfort. If it is not comfortable it will not be used. 2. Accessibility. If the user cannot access the handgun when needed the purpose of carrying is defeated. 3. Security. The holster must be capable of retaining and protecting the handgun during all anticipated types of activity. 4. Concealability. When discreet carry is required the holster must be capable of keeping the fact that the wearer is armed as unnoticable as possible. When discussing a customer's needs and preferences it can help to steer the conversation through these 4 topics so as to determine what is most likely to meet the customer's needs. Other things to be considered include the customer's intended or usual activities (possible need for added retention), the customer's usual wardrobe (considerable effect on comfort and concealment), and any physical limitations the customer may have (range of motion issues such as wrist, elbow, or shoulder problems). Covering all of these bases can help the customer make a selection that is more likely to meet his/her requirements. I hope this helps.
-
Another Classic For A Classic
Lobo replied to Frank's topic in Gun Holsters, Rifle Slings and Knife Sheathes
Absolutely beautiful work. Outstanding design and execution. -
That is quite a welt! Very nicely done, sir.
-
When wet-forming and boning the leather you are stretching and compressing the leather fibers, resulting in areas of greater density that absorb dyes differently. There are a couple of things you might try to improve your results. 1. Dampen the leather slightly prior to dyeing. A damp sponge or spray bottle can be used for this purpose. The moisture helps to open the pores of the leather which allows dyes to penetrate more readily. 2. Dye the leather prior to wet-forming. This will just about always result in more even coverage. When using this method it helps to allow the dye to set up completely prior to wet-forming; otherwise you will experience some dye transfer to your hands and tools. Over the years I have used a number of methods for dyeing. I used to form and dry each piece, then dye by dunking in a bucket of dye. Then I dyed prior to forming. Now I dye right after wet-forming using a spray applicator, while the piece is still just damp. There is considerable difference in the results, and even more difference in the time required to achieve the desired results. Dip-dyeing usually requires two or three applications, and a quart of dye usually does about 60 pieces (or about 1/2 oz. per piece). Dip-dyeing can also result in noticeable shrinkage in formed leather holsters and pouches. Dyeing prior to forming adds another step to the production process and requires hours of drying time before production can continue (usually overnight). A quart of dye usually does about 60 pieces (about 1/2 oz. per piece). Spray application on damp leather takes only a few seconds, then the piece can go into the drying cabinet as usual to complete the drying process. Some pieces will require a second spraying after drying to even out the results. A quart of dye usually does about 100 pieces (about 0.3 oz. per piece). Spray application is easily done with an air brush, however there is some time involved in set-up and clean-up with each use. I found a very handy alternative in the PreVal sprayer units (Home Depot stocks these locally, about $6.00 for the complete unit and about $4.00 for the refill compressed air containers). Basically, the PreVal is a self-contained mini-air brush consisting of an 8-oz. jar to hold the liquid to be sprayed, a tube to draw out the liquid, and a spray cannister with push button nozzle like a rattle-can paint sprayer. The glass bottles are reusable and come with a lid to keep contents from drying out between uses. Each "power unit" (compressed air container) will spray-dye about 15 pieces (holsters, belts, etc). The power unit can be changed out in under a minute when it has emptied. We keep several units set up with our different dyes, and use up 3 or 4 power units per week doing 35 to 50 products (holsters, belts, pouches). There is no set-up time or clean-up time required with this method. My cost runs about $12-$15 per week for the power units, in return for which I estimate that we are saving 3 to 4 hours of work during dye applications. The PreVal sprayer functions much like an air brush, but is not to be compared to the better air brushes for special effects dyeing. They work great for general purpose use, but I wouldn't recommend them for artistic applications such as fading, edge effects, etc, that some folks excel at with an air brush. For the hobbyist doing occasional leatherwork or for the small production shop the PreVal sprayers are great.
-
Slot punches are nice. They are also relatively expensive and can be difficult to keep properly sharpened. I prefer an assortment of wood chisels, which are easily sharpened when needed, and a supply of various round punches, which are inexpensive and can be replaced as needed. In the case of a manufacturer making hundreds of products per day specialized tooling makes a lot of sense. For the small production shop or hobbyist the economies of scale dictate the use of expedient methods. I'm making about 2,000 items per year and I'm quite happy to do so without a large investment in specialized tooling. Best regards.
-
Correction on the dimensions of the cartridge slide. Overall length is 5.0", not 7.0" as stated in the original post. My apologies.
-
Lots of folks advertise the Rings Blue Guns, but very few actually stock them. Most are "drop shippers" taking orders, then forward those to Rings for production and shipping. Prices will vary a bit, depending on how small a mark-up the dealer is willing to take. Watch out for low prices coupled with outrageous "shipping & handling" charges that quickly bump prices over factory retail. That said, the real issue with dummies in general, including Rings Blue Guns, is who to order from and receive good service and delivery times. For that I recommend the Blue Gun Store, the owner of which is a member of this forum. You should be able to find links with a keyword search of forum posts. Excellent folks to deal with, great communications, fair prices, and generally much better delivery times. Best regards.
-
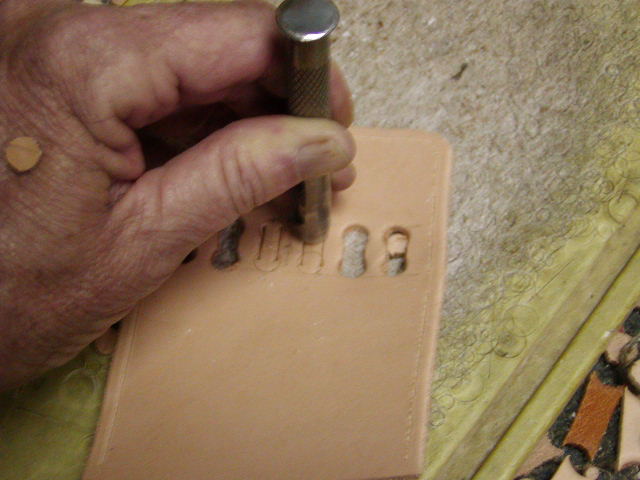
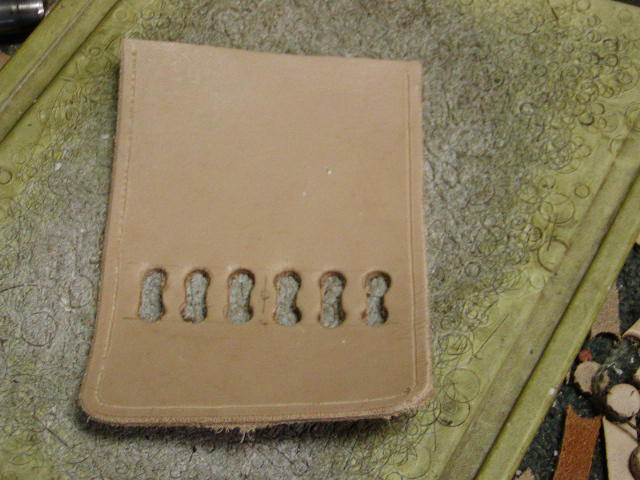
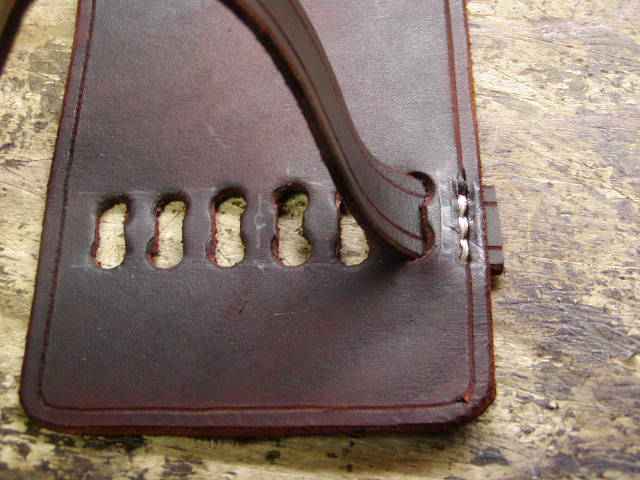
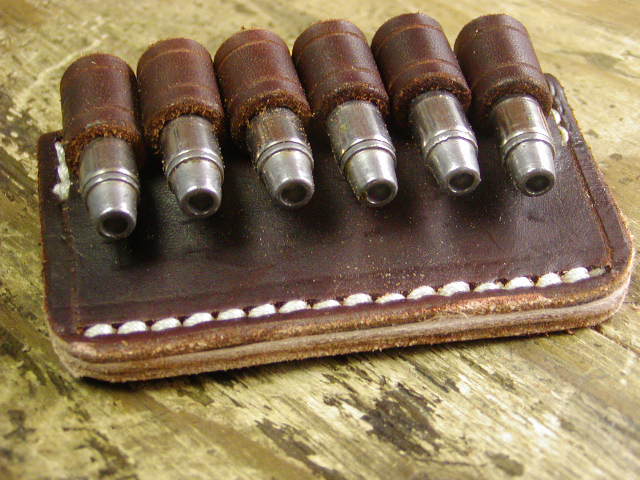
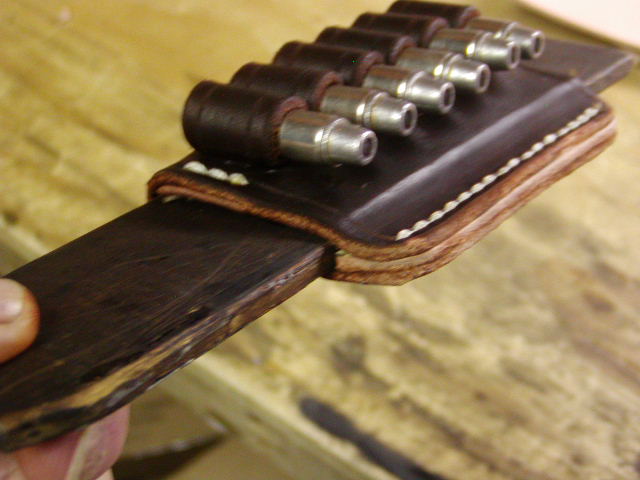
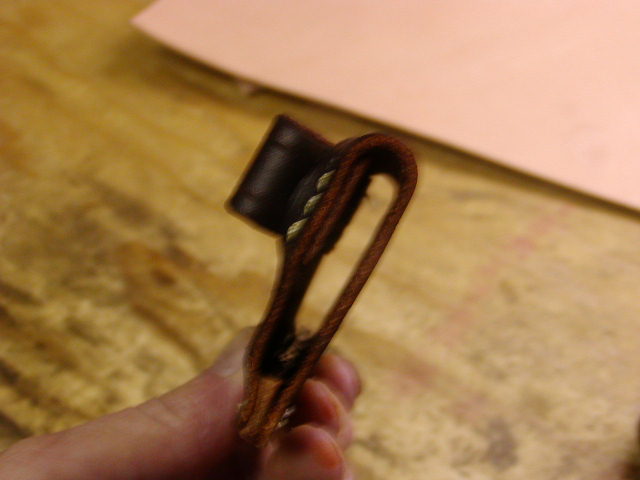
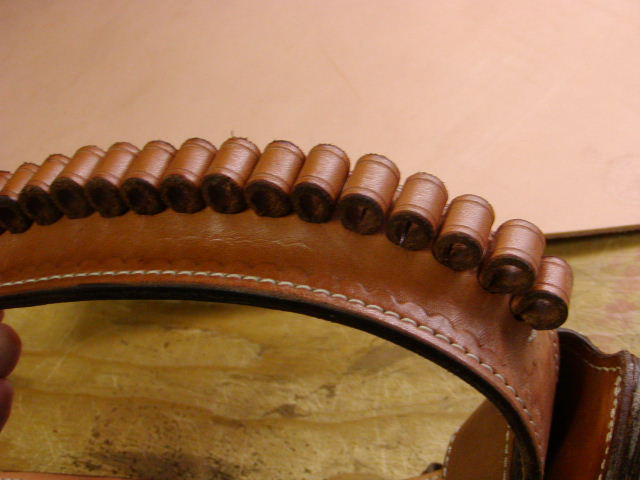
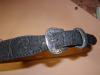
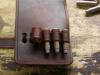
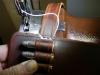
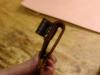
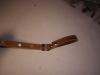
Some folks lay up cartridge loops simply by stitching down a strap to the base (belt, carrier, etc) with predetermined loop lengths and intervals, and there is nothing wrong with that. There is another way to do cartridge loops, and that is what we will look at here. I do my cartridge loops by punching a series of oblong slots in the base (belt, carrier, etc), then weaving the loop strap in and out to form the loops. This produces a pleasing result and is actually pretty quick and easy to do, once you have done a few and gotten a good feel for the work. For illustration I have made a sinple 6-round cartridge slide carrier for .38/.357 revolver cartridges and fitted for a belt up to 1.75" width X 0.25" thickness. Base piece for the carrier is cut from 6/7 oz. veg-tanned, width 3.25", overall length 7.0". This wraps completely over the belt with sufficient space to form the seam at the bottom. A line for the cartridge loops is laid out at 2-1/8" from the bottom line of the front of the carrier. Loop spacing is 0.5" apart. The strap for the loops is cut from 5/6 oz. veg-tanned, 0.75" width. For .38/.357 cartridges you will need about 2.0" of strap length for each loop. Slots for the cartridge loops are cut using a 1/2" wood chisel for the slot sides and a 1/4" round punch for the slot ends. Mark the layout, then tap the round punch at top and bottom to leave a mark, then cut the slot sides with the wood chisel, then finish by cutting the slot ends with the round punch. Now is the time for basic dyeing and burnishing the edges of the strap. Making the loops starts with inserting the end of the loop strap into the end slot, extending beyond the outer edge of the base (carrier), the tacking it down with stitching. Then the loops are formed by going back through the first slot, then on to the next slot. At each loop a cartridge is inserted and the strap is pulled up very snugly before proceeding to the next loop slot. When all loops have been formed the strap is extended beyond the outer edge of the base (carrier) and stitched down. Strap edges are then cut off flush with the base edge. The carrier is then folded over to line up the two ends. In this case I have used a welt 0.5" width between the inner and outer sides, then cemented and stitched the seam. The welt adds strength and rigidity, while also allowing for a nice neat fit over the belt. After stitching the edges can be trimmed as needed, then dressed on a sander, followed by edge beveling. Next the piece is cased (dunked in water for about 5 seconds or so to permit molding) and a wooden mandrel is inserted, simulating the belt. In this case I have used a mandrel 1.75" width by 0.25" thickness. The carrier is molded to the mandrel shape, then allowed to dry thoroughly. It may sound like a lot of work, but it really isn't. I completed this 6-round cartridge slide in exactly 18 minutes, to a point where it is ready for sealing and final finish (which takes perhaps 5 or 6 minutes per piece as I finish 3 dozen or more at a time). The same process can be used for cartridge loops on a belt, or on a strap (such as the Mexican loop style western holsters, shoulder holster strap, etc). When placing loops on a belt that is to be lined and stitched I recommend leaving about 3/8" above the line of the loops to permit easy stitching. As stated, for .38/.357 cartridges the loop spacing I have found to work is 0.5", and strap length needs to be about 2" per loop. For .44 and .45 caliber loops I use a spacing of 5/8", and strap length will need to be about 2.5" per loop. Belts will take just about as many loops as you may find room for. The cartridge carriers work best with no more than about 6 or 8 loops, as wider carriers will not flex easily enough to work around the hip. Best regards.


-
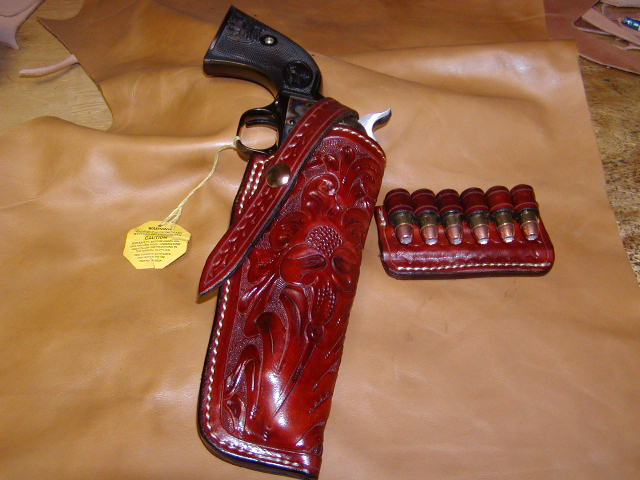
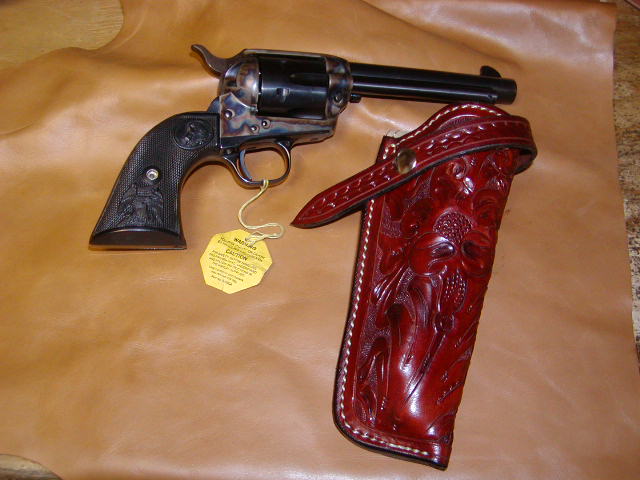
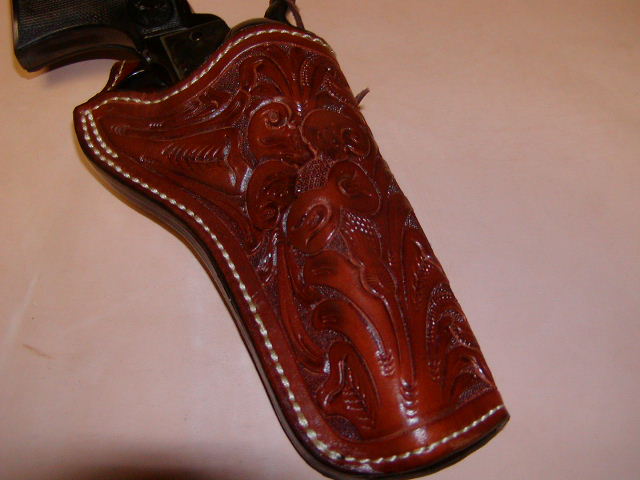
It has now been about 5 years since I started the project of recreating the classic Tom Threepersons' style holsters complete with hand-carving to match the original pattern. This has been very rewarding, and I get to enjoy finishing dozens of these each year for customers all over the world. As usual, I have always intended to complete one or two for myself, but never seemed to get around to it. Recently added a pristine Colt Single Action Army with 5.5" barrel to my collection and, since that was Tom Threepersons' choice in sidearms, decided the time was right. This SAA is a .44 Special by the way, one of the less common calibers in this revolver (for years the .44 Spl. was only available from the Colt Custom Shop). Made over 40 years ago but still in new condition (note the factory hang tag on the trigger guard). Unfired, but I will probably correct that soon.


-
Holster Lining Question
Lobo replied to Ed in Tx's topic in Gun Holsters, Rifle Slings and Knife Sheathes
In my experience those customers wanting holster linings are concerned primarily with protecting the finish of their handguns against excessive holster wear caused by abrasion. Those customers typically have a strong preference for either suede or smooth leather, but in any case what they want is something soft and smooth to baby their handguns. "Soft" means either brain tanned or chrome tanned (try to find a reliable source for brain tanned). "Suede" means chrome tanned. Vegetable tanned leather is never either soft or suede. Veg-tanned can be oiled up to just about any degree one may wish to soften it, but the oiling will migrate over to the holster body and can affect the forming or structure of the holster, so this is not the best possible option. In short, there is no best possible option. Customer wants "soft", customer wants "smooth", customer wants "suede", then the customer has to be made aware of the simple fact that all leather articles will collect, absorb, and retain moisture (from the atmosphere, from precipitation, from perspiration), and any chemical salts remaining in the lining leather from the tanning process may (perhaps probably) will cause oxidation of the handgun finish. I always advise customers to NEVER store a handgun in a leather holster or case, to always remove the handgun after each day's use and wipe it down with an oily rag, and to store holsters separately in an area having sufficient air flow to permit residual moisture to evaporate off prior to reusing the holster. I refuse to offer holster linings in IWB-style holsters or shoulder holsters because of the constant exposure to perspiration in those applications. About one-third of all holster customers want holster linings, so I offer that option in either smooth or suede leather to the customers' preference. I prefer a lined holster myself, with smooth leather being my first choice because it does not share the tendencies of suede for collecting dust, grit, and debris during use that can be far more abrasive to a handgun finish than any natural leather surface. I have used calf, goat, pig, kid skin, deer skin, and others in both brain-tanned (my personal favorite), chrome tanned, and aniline leathers. I don't find much difference for this use, although I prefer weights of about 2.5 to 3 oz. for lining holsters made of 7 to 9 oz. veg-tanned cowhide. Holster linings were called for much more 20 or 30 years ago than today. Back then most handguns were polished and blued or polished and nickel-plated, either of which finishes are far more prone to abrasion wear than most of the modern handguns we see most often today. Today's finishes are typically far more durable and resistant to abrasion than ever before (Parkerized, maganese-phosphate, acrylics, etc). Occasionally I will receive an inquiry from a customer wanting an assurance that their heirloom quality handgun will be absolutely protected against any holster wear. I generally tell those folks to clean it well, oil it well, and keep it in the gun safe or safe deposit box forever. Any handgun used in any holster for any length of time can be expected to display signs of use and wear. The owner of a "safe queen" handgun should never be encouraged to put it into any holster. Best regards. -
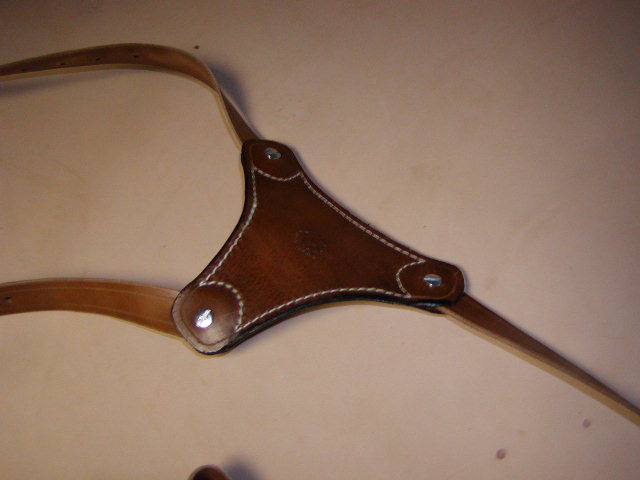
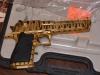
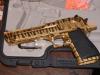
Customer has a Magnum Research Desert Eagle .44 magnum semi-auto pistol, complete with two-tone tiger-stripe gold plate, and wanted a vertical shoulder holster to carry it. He is a pretty big guy so he can probably get away with it, but I wouldn't want to try and conceal this beast (about 4 lbs. loaded weight). Here are the photos. Near vertical carry with muzzle slight to the rear, large support panel rides over the left shoulder supporting the holster via two adjustable articulated straps, strap over off-side shoulder to a belt attachment point to stabilize the rig. Holster also snaps to belt to maintain a constant position. Horsehide construction.

-
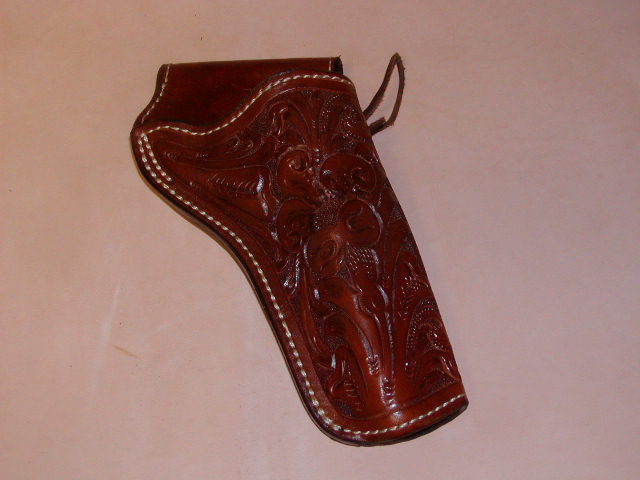
Customer requested a hand-carved western-style holster with reverse cant and a cartridge belt with conchos (customer provided the conchos and buckle set to his preferences). Specifically requested no loop or jock-strap type holster, just a simple envelope-style holster with stitched-down belt loop. Reverse cant (muzzle forward) allows for a very natural hand and arm motion for strong-side fast draw work and can also be used as a cross-draw, so the customer specified cartridge loops at the back of the belt to permit both carry positions. Photos show the result. My carver did his usual impressive work, using the Threepersons' style Texas rose as the basic pattern.

-
Best Way To Attach Iwb Straps
Lobo replied to glockanator's topic in Gun Holsters, Rifle Slings and Knife Sheathes
Thanks for sharing your little pet peeve with us. I've only been doing this little business for 41-plus years, and I only deliver about 2,000 products annually to all 50 US states and 32 foreign countries (so far), so I always appreciate input from those who know more than I do. Best regards. -
Best Way To Attach Iwb Straps
Lobo replied to glockanator's topic in Gun Holsters, Rifle Slings and Knife Sheathes
+1 on this. T-nuts can be stripped out by overtightening the attachment screw. Cross-threading happens with some frequency, ruining both the T-nut and the screw. It has been my experience that hardware failures are the cause of over 90% of all warranty returns, so anything that complicates changing out the hardware seriously complicates the correction. A T-nut can be popped out and replaced in about a minute, as compared to manufacturing another holster. The straps and associated hardware undergo far more wear and tear than any other part of the holster. It makes sense to allow for easy replacement. It also provides the customer with a product that provides much longer service life. As Chiefjason has noted, any hardware placement that results in exposed metal parts inside the holster requires another approach. A good holster should protect the contents, not cause unnecessary wear or damage. -
Speed Loader And Finishes
Lobo replied to Boriqua's topic in Gun Holsters, Rifle Slings and Knife Sheathes
An alternative to Dwight's method above is done using equal portions of beeswax and neatsfoot oil blended together by heating, then applied while still warm and fluid by using a piece of shearling, rubbing into the grain side of the leather, followed by buffing with a soft cloth (old towels work well). This is reportedly one of the methods used by saddle and harness makers for many years. I have used it when making period-correct holsters and gun belts for 19th Century revolvers. It is a bit time consuming when compared to the more modern finishes, but the results are attractive and functional. When working on matching sets, usually made with leather of several weights and from different hides, this method requires working everything to match the darkest shades resulting from the initial application, otherwise there can be considerable differences in finish colors. Also, the finish coloration can be expected to darken with age and exposure to sunlight. Of course, when making black products these are not factors requiring attention. -
It has gotten so bad that I recently saw a politician with his hands in his own pockets.
-
Holster Maker Needed In Kalispell, Montana
Lobo replied to Lobo's topic in Gun Holsters, Rifle Slings and Knife Sheathes
bump. -
Gentleman in Kalispell, Montana has need of a holster maker for an old Hopkins & Allen revolver. This will pretty much require using the original handgun for patterning and forming. If interested please send me your contact information by PM and I will forward to the customer.
-
The small-frame revolvers made by S&W, Colt, Charter Arms, Rossi, Taurus, etc, are all of similar sizes and profiles, however they are all different in actual dimensions. A holster made specifically for one (closely formed, boned, etc) will work properly only with the revolver on which it was made. Others may fit into the holster, but the holster will not function as intended with any of them. It is possible to make a single holster that will accept any of these revolvers. However, at best, such a holster would provide a truly correct fit with only one (and possibly none of them) and be somewhat oversized for all others. The effects of an oversized holster include reduced retention qualities and movement of the weapon inside the holster during use leading to accelerated holster wear caused by abrasion of the handgun finish. This approach has been used by many high-volume manufacturers over the years and, in my opinion, is one of the primary reasons that many of our customers are looking for hand-made holsters properly fitted to their handguns. Best regards.
-
Horse Shoulder Holster
Lobo replied to Josh Ashman's topic in Gun Holsters, Rifle Slings and Knife Sheathes
Horsehide is definitely different than cowhide, no question about that. Vegetable-tanned horsehide can be had either "hard rolled" or with a softer consistency, and that will make a significant difference. Forming horsehide requires more time and some different methods than doing similar work with cowhide. Horsehide requires much longer exposure to water before enough is absorbed to permit forming. Temperatures during the forming operation will make a big difference in the work, with higher temperatures allowing you to mold and form the horsehide more closely and achieve greater detail in boning. There is definitely a learning curve to be overcome when moving into horsehide. Trying to achieve specific results while using techniques that work well with cowhide will usually result in disappointment. For those willing to acquire a new set of skills to achieve the desired results in horsehide the effort can be very rewarding. Formed horsehide holsters can be extremely rigid and hold the shape exceptionally well over extended use, but only when the maker has worked through the learning curve and applies different approaches to achieve the results that horsehide is capable of providing. I have a couple of horsehide holsters that I made up while working through the learning curve, I have used them extensively over the past couple of years, and they continue to retain shape, form, function, and rigidity seldom seen in any other leather products. Horsehide of the quality required for this work is seldom available in significant quantities. There is only one North American tannery producing veg-tanned horsehide (Horween's) and the majority of their production goes out to their regular customers (custom shoe industry is a major market). What comes to be available is generally limited and quality can vary considerably. The horse butts that Springfield Leather has been offering over the past couple of years has generally been very good, but you may have noticed that the prices have gone up considerably in recent months, so the bargain days appear to be over. So, the argument about makers charging more for materials that cost less has much less validity now than it may have had for a very short period of time, and the additional time and labor involved in making horsehide holsters will justify a certain increase in prices. Sometimes opinions are formed on facts determined by experience. Sometimes opinions are formed without the benefit of sufficient experience to determine the facts. Opinions will remain opinions; what counts is producing what customers want to have and are willing to pay for. Best regards. -
Plastic Iwb Cip
Lobo replied to renegadelizard's topic in Gun Holsters, Rifle Slings and Knife Sheathes
Sounds to me like Mr. Customer has gotten it into his head that plastic clips are somehow superior to steel clips and now wants to force you to change your design to suit his preferences. I make my Offset Belt Clip IWB model with a very strong steel belt clip (thicker than normal steel and spring-tempered after forming). I'm sure that the clip could be damaged, but only by an extreme amount of force being applied to it, or by an intentional act. My position would be to replace the clip with exactly the same clip provided when the holster was made, but that I would do that only once without charging for it. Any future repairs would be billed at time and materials. From time to time I've had customers raise what might sound like warranty issues, then on examination found that my product had been intentionally altered is some manner. I have usually restored the product to functional (original) condition, but I have made it clear that the alterations made the warranty void in the future. (I have made exceptions: one case of a customer who cleaned his new holster with gasoline, literally destroying it, and expected me to provide him with a new holster; and another customer who replaced hardware, then complained that it wouldn't function properly and demanded a refund. Those customers received nothing). All kinds of people out there and sooner or later we have to deal with every kind. Best regards.