Lobo
-
Posts
1,065 -
Joined
-
Last visited
Content Type
Profiles
Forums
Events
Blogs
Gallery
Everything posted by Lobo
-
The Classic Tom Threepersons' Style Again
Lobo replied to Lobo's topic in Gun Holsters, Rifle Slings and Knife Sheathes
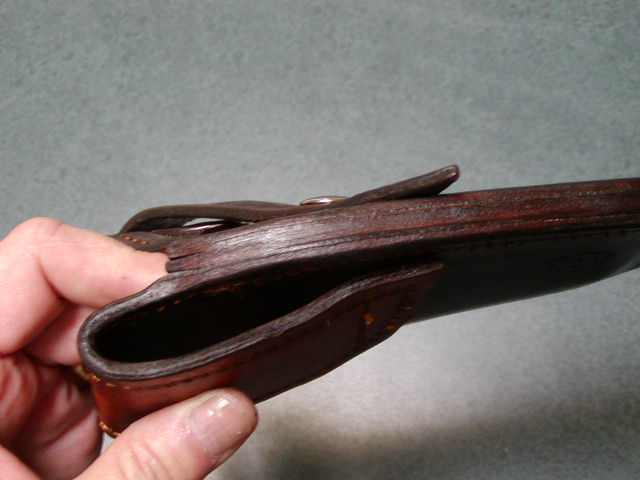
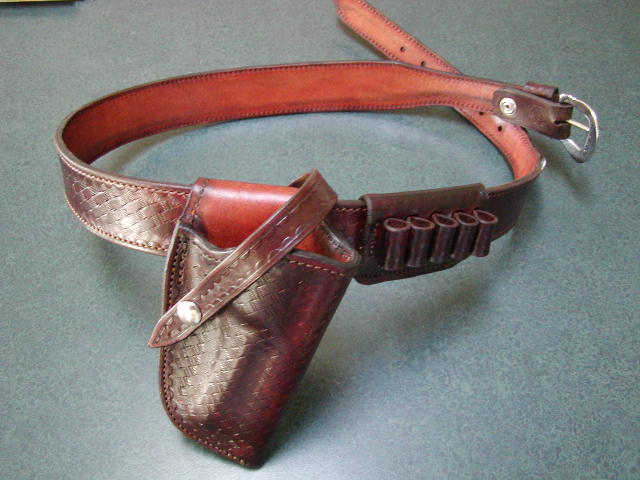
The Threepersons' style is a relatively simple one-piece pattern. The belt loop is integral, folding down and stitched to the back side. On many of this style the loops are made quite large. I prefer to size them for the intended belt, forming the loop on a wooden mandrel as part of the wet-forming process. The main holster seam is assembled with a welt (narrow piece of heavy leather reinforcement between the inner and outer edges) and stitched.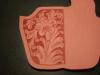

-
The Classic Tom Threepersons' Style Again
Lobo replied to Lobo's topic in Gun Holsters, Rifle Slings and Knife Sheathes
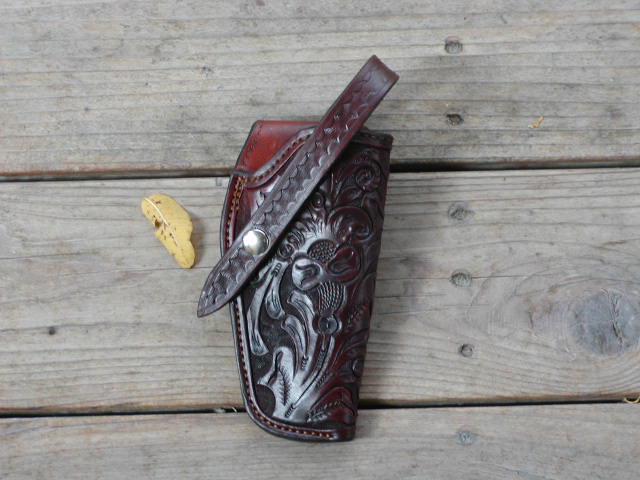
Thank you. The carving work is done for me by a very talented artist in the Sheridan style, who tells me that it takes about two hours overall to carve each holster. I cut the patterns then send them out for carving. When returned the actual assembly, stitching, forming and finishing work are done along with my other regular production. Everything is done in batches of about a dozen pieces at a time over the course of several days, resulting in average "shop time" of about 47 minutes per completed holster. -
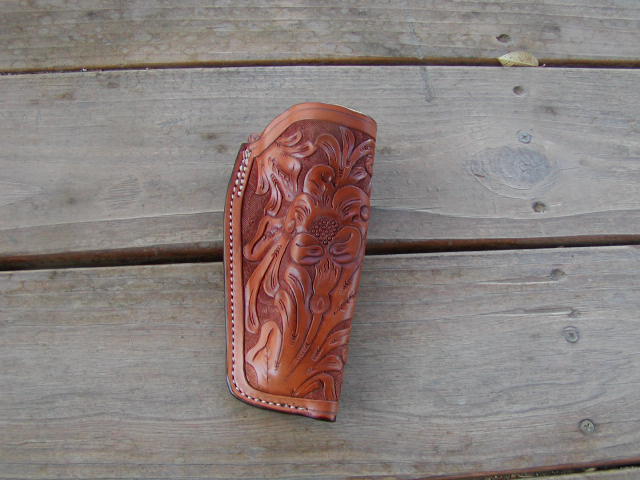
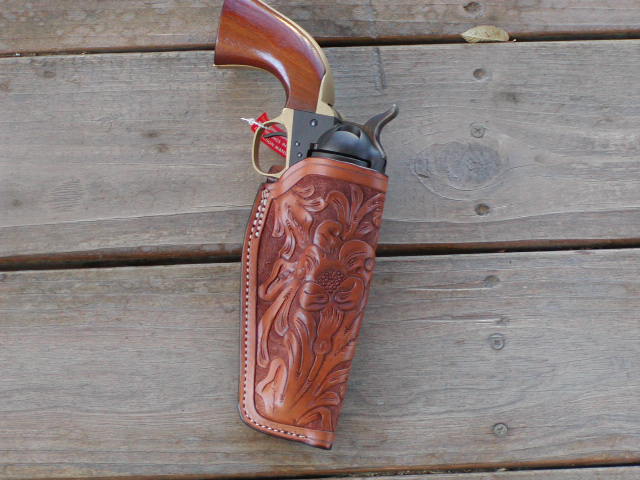
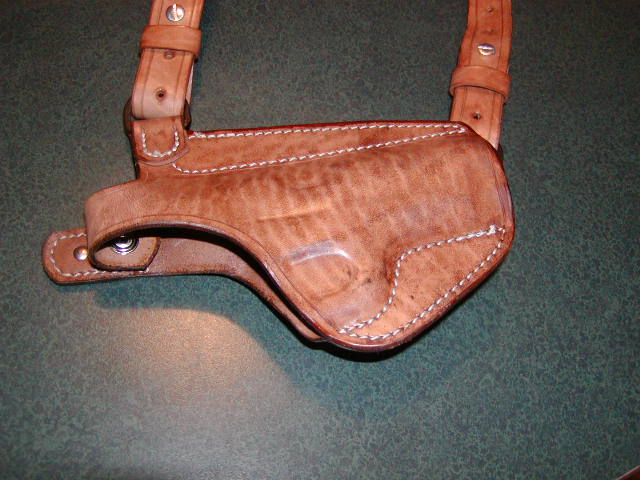
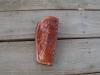
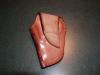
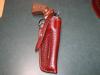
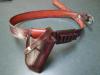
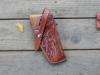
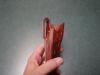
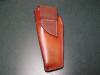
I recently had a request for the Threepersons' style holster, hand-carved to the original pattern, and done as closely as possible to the original. Tom Threepersons' carried a 5.5" Colt Single Action Army in the original holster made by "Tio Sam" S.D. Myres Saddlery, El Paso, Texas in about 1920. The customer carries a 4.75" Colt Single Action Army and lives in Texas. Here is the result. Like the original it is open-top and unlined. Finish is neetsfoot oil warmed sufficiently to incorporate a bit of beeswax in solution, applied with a piece of shearling, then buffed to a soft sheen, which is a period-correct method and very likely what was used on the original. I've been wanting to try that method for some time, and I am pleased with the results.

-
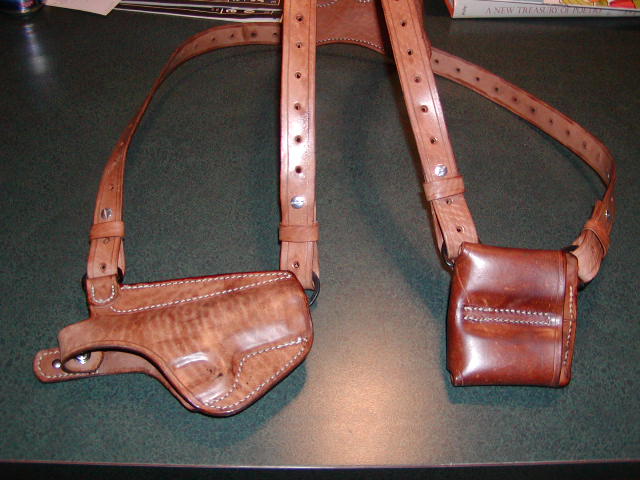
I have received inquiries for a couple of items I don't have forming pieces for, including one that will probably require using the customer's weapon for patterning and fitting: 1. Mansfield, OH. Customer has a Taurus Judge Public Defender, 2" barrel, 2.5" .410/.45 Colt. Looking for a pancake-style, preferably dual-carry (strong-side, cross-draw), which is what I have made for his other handguns. 2. Houston, TX. Customer has a S&W 629 Stealth Hunter, 7.5" barrel with accessory rail, Red-Dot scope mounted. Looking for a bandolier-style shoulder rig, possibly convertible for belt mount cross-draw use for hunting. If you will PM me with your e-mail contact information I will forward it to these customers and you can then discuss specifics direct with them.
-
Any Good Glue That Won't Stink You Out?
Lobo replied to ShortBBL's topic in Gun Holsters, Rifle Slings and Knife Sheathes
Fiebing's Tanners Bond is an old standby for saddlemakers and others. Excellent adhesion, dries clear, no objectionable odor or fumes, remains flexible when cured. Tandy's markets Tanners Bond as their "Leathercrafter Cement" with a quart bottle at less than $20.00, and gallons are around $32.00 or so. Tanners Bond is water-soluable when in liquid form (making clean-up easy) but water-resistant when it has set and cured. Setting up takes about 15 minutes or so, allowing good working time when assembling pieces, and it will be fully cured in under an hour (assuming room temperature and low humidity, your results may vary). I find it to be especially useful when assembling two-layer belts and also for cementing in holster linings. For these chores I use a 1" paint brush, which I keep in a jar of water between uses. A quart of Tanners Bond will easily do up a couple of hundred belts and holsters. Keeping the paint brush in water allows it to be reused indefinitely. -
Exceptionally nice work.
-
Four holsters, two pouches, and two belts today between 9:00AM and 2:00PM (with a leisurely lunch break worked in). Spent the afternoon playing cards and drinking beer on the patio of my club (conveniently located less than two blocks from the shop), sincerely thankful for my Cobra Class 4 machine with automatic bobbin winder as a standard feature. The first belt that I hand-stitched was the LAST belt that I hand-stitched, and that was decades ago! My Tippmann Boss remains in the shop both as a back-up and as a reminder of a couple of years in transition between true hand-stitching and genuine machine-stitching (not to mention what I learned about thread tensioning, machine timing, parts replacement, and machine repair). About 16 months on the Cobra Class 4 now, with absolutely ZERO down time, minimal maintenance, and "Cobra Steve" always ready to answer the phone and walk me through any little glitches (although that has been a minimal requirement). You can purchase what might appear to be quite similar machines from several sources, but I can recommend Leather Machine Company and "Cobra Steve" without any reservations whatsoever. When the time comes, I recommend buying a bit more machine than you think you might need; you will never regret having greater capacity, but you will always regret not having what is required for the job at hand. By the way, don't ever consider "cheap laborers". One of the biggest mistakes any businessman can make is to rely upon someone who does not feel that he/she is being paid fairly for their efforts. When the time comes to employ someone make sure that you are paying that person enough to demand his/her full attention and dedication to your business; otherwise you will learn a very old and very hard lesson. "Cheap labor" requires constant supervision, a day off means another day of re-training, and you will never be able to walk away and expect to have the day's work completed without your presence and attention. Good workers, properly paid and taken care of, will do what is required whether you are there watching or a couple of blocks away playing cards and drinking beer on the patio of your club. Good workers go onto profit-sharing plans; "cheap labor" ruins your vacation plans. Big difference, IMHO. Best regards.
-
Walther PP (Police Pistol), circa 1936 or so. PPK (Police Pistol Short), circa 1959 or so, featuring shortened barrel/slide group and shortened grip-frame. PPK/s, circa 1969, a response to the US Gun Control Act of 1968, featuring the PPK barrel/slide group on the original PP-sized grip-frame. Ian Fleming's novels and the related "James Bond" movies of the 1960's made the PPK very popular in the US. GCA-68 precluded further imports due to the short grip-frame of the PPK "scoring" too low on the "sporting purposes" scale, so Walther created the PPK/s to meet both market demand and US import requirements. The TPH .22LR was an interesting variation (although a bit different overall design). My personal favorite is an early 1960's Manhurrin PP model in .22LR manufactured in France under license from Walther during the Cold War years. Other variations include East German copies (1950's to 1960's, very collectable), the Hungarian clones (military production as well as imports under the FEG tradename), the Korean Daiwoo (close copies), and of course the over-engineered Soviet Makarov pistols (and variations produced in Bulgaria, Poland, Red China, and East Germany). One of the most copied handgun designs ever (imitation being the most sincere form of flattery, or something like that). Lots of history. Lots of variations on the original Walther theme. Relatively little interchangeability in holsters. Lots of handguns in the hands of American shooters, so lots of opportunities for holster-makers. Shooters should take note that the PP and similar designs will NOT permit the high grip we may have become accustomed to (shooting 1911's and other US designs). These pistols will take the skin off the web of your hand as the slide cycles during normal operation unless you learn to grip them properly to avoid this painful lesson. Bloody hands could be a nuisance for "007" while taking out a few assorted SMERSH assassins when it is time for a vodka martini (shaken, not stirred), a few hands of baccarat, perhaps a romantic interlude with a world-class babe. One should avoid being messy when possible to do so (I think Mr. Fleming would agree).
-
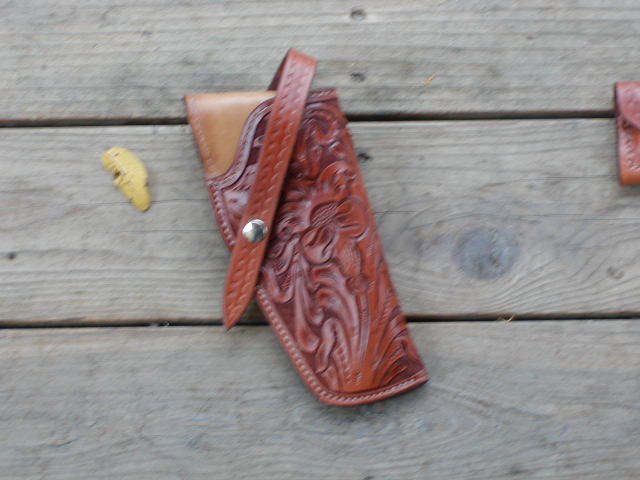
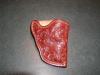
A very good customer recently contacted me with a special request. It seems that his daughter had seen several of the hand-carved Threepersons' style holsters I had made for him, and indicated that she would like to have a holster made for her S&W 642. Being a good dad, he wanted to have one made for her Christmas present. A photograph was provided of the style she wanted, a 1930-ish looking holster as made by H.H. Heiser, S.D. Myres, and others for years, open top, semi-enclosed trigger guard, and floral carving. I made up a pattern and cut the holster blank, then sent it on to my very talented carving artist to apply his magic in the Sheridan style. Here is the result, well in time for Christmas. 7/8 oz. Hermann Oak veg-tanned, lined with smooth soft kid, finish is neatsfoot oil followed by a satin acrylic lacquer finish. Carving detail is outstanding, especially on such a small piece.
-
We have a winner! Asking for tax advice on an internet forum is like going to an automobile mechanic for dental work. Generally speaking, if a piece of equipment is acquired specifically for business use, and is used in generating taxable income, then that item is a deductible expense. The firearms that I purchase specifically to make holsters to fill orders from customers that generate taxable business profit are most certainly necessary business expenses. The accounting methods for deducting durable business equipment vary widely, based upon the useful life of the equipment, and may require depreciation schedules over the course of several years. Also, any subsequent sale of the equipment that generates return of investment and/or profit may result in reportable income (recaptured depreciation, business profit, etc). No two businesses are identical, and no two tax returns will be identical. Now, the fact that I make holsters, and the fact that I have developed a number of unique holster designs, clearly shows the need for me to test such designs and evaluate their performance with various handguns under actual field conditions. So, the fact that I might be carrying a "business" firearm in a "business" holster while on a hunting trip brings up additional interesting questions. Is my holster testing incidental to the hunting trip, which I might have taken otherwise anyway, or is the hunting trip a necessary "field test" of a holster design intended to be suitable for use on a hunting trip? Is the hunting trip itself a tax-deductible business expense? License? Travel expenses? Meals? What about the large critter, butchered and in my freezer, consumed by my family; is that imputed business income? It should be obvious that sound advice from a tax professional (CPA or attorney) is the best means of avoiding problems with Big Scary Government Agencies that have full legal authority to shut you down, seize your assets, and attach your bank accounts.
-
Tom Threepersons As A First Holster?
Lobo replied to weconway's topic in Gun Holsters, Rifle Slings and Knife Sheathes
The Threepersons' style is not a particularly difficult holster to make. There are a few details that can be made easier if you know what to expect at each step. 1. Take a manila file folder and place your revolver inside with the top strap and front sight at the fold. 2. Trace the outline of the revolver on the front side of the file folder, marking the cylinder location clearly, the closer the better. 2. Remove the handgun and lay the folded file folder on your desk or table. Draw a line approx. 1/2" to 5/8"outside the frame from the trigger guard downward to the front end of the frame, then angle downward to a point approx. 1/2" to 5/8" from the muzzle, then continue below the muzzle approx. 3/4" forward of the end of the barrel and continuing to the fold of the file folder. 3. Draw a line from just below the trigger guard curving upward to the rear of the cylinder, then across the rear of the cylinder to the fold of the file folder. 4. Draw a line angling away from the handgun, from the end of the seam below the trigger guard, upward to the top of the file folder. 5. Draw a line upward from the forward point of the rear of the cylinder, angling upward to the top of the folder. 6. Holding the closed file folder, cut the outline including the holster seam and upward angling lines described in 4 and 5 above. 7. Unfold the file folder and cut the line on the outer holster panel from the trigger guard across the rear of the cylinder, around to the upward angling line described in 5 above. 8. The flap created at the upper portion of the inner holster panel will fold down to create the belt loop. Folding down that portion of the file folder to the rear of the holster will allow you to draw the details of the belt loop. Try to keep the belt loop at least 3/4" or so away from the holster seam (to allow room to stitch that seam more easily) and no further forward than the upper line of the cylinder (to allow the belt loop to hold to the belt without pulling the inner holster panel away from the weapon). Belt loop dimensions will depend upon the width of belt you intend to wear the holster with. 9. Lay your new pattern on the leather to be used and trace the outline onto the leather. I recommend 7/8 oz. as minimum for this style, and 8/9 is very usable. 10. Cut your holster pattern from the leather. 11. Bevel all edges and cut stitching grooves as required (holster seam, of course, also holster opening if lining is to be installed), typically 1/8" in from all edges. 12. Any tooling or carving to be done can now be applied. 13. Locate the position for the snap stud to secure the retention strap on the holster face. Try to keep this position away from contact with the revolver frame to avoid scratching the handgun's finish on the snap stud. Install the snap stud. 14. If the holster is to be lined you can now cement your lining leather to the inner holster surface, then stitch around those areas that won't be joined at the holster seam. 15. Fold the belt loop over and, using the belt or a mandrel of equal size & width, mark the stitch-line to join to the holster back. Take a moment to consider how to fold the loop to achieve the holster cant (carry angle) you wish to create. A snap stud can be installed on the rear of the belt loop to attach your retention strap, or the end of the strap can be stitched down, as you prefer (I use the snap attachment method, making the retention strap replaceable in the event of excessive wear or damage). 16. Stitch the belt loop down to the holster back. 17. A welt is commonly used on this style to join the holster front and back together. The welt is a curved strip of heavy leather matching the contour of the holster front at the seam from trigger guard around to muzzle. The welt can be traced using the holster front laid over a piece of leather, then cutting that outline approx. 1/2" width and matching the contour as closely as possible. 18. Cement the welt to the inside of the holster front, carefully matching the contour. I like to leave about 1/4" open at the muzzle as a "drain hole" to permit any precipitation that falls into the holster to drain out easily. 19. Fold the holster body over, carefully matching the front panel, welt, and rear panel. Cement together and clamp until the cement has set. 20. Stitch the main holster seam up. 21. Dress off the edges at the seam. This is best done with a drum sander or belt sander. 22. Re-bevel the edges at the seam. 23. Holster is now ready for forming. Soak in water about 10 to 20 seconds, then force the revolver into the holster pocket and begin forming to the handgun. Some stretching is usually required to accomodate the cylinder bulge. For single-action revolvers be careful not to form closely around the ejector rod and ejector tab, which will make it difficult or impossible to holster or draw the weapon. As the holster dries you may do as much, or as little, boning as you wish (This style is not traditionally boned, but modern tastes have changed on this). 24. As the holster dries it helps to insert the belt, or a mandrel of the correct size, through the belt loop and form it to the final shape desired. 25. Retention strap can be cut about 3/4" width and will need to be about 10 to 12 " overall length. Try to leave at least 1.5" to 2" of strap beyond the snap fastener location. Fit as required. 26. Finish the holster and strap by the methods you prefer. After finishing the snap buttons can be installed on the retention strap and you are done with this project. We make the Threepersons' style all the time. Instructions sound more complicated than the actual work is. Have fun with it. The Threepersons' style is a classic design and very useful for range and field use.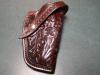

-
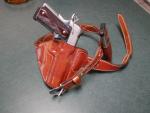
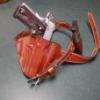
Just finished up a shoulder holster rig for a customer made with horsehide, applied the acrylic sealant and had the most attractive tiger-striping pattern leap out at me. I'm beginning to look forward to the natural finishes on horsehide, and starting to regret putting dye on this pretty stuff.


-
Just received an order from a gentleman who, as a young policeman, knew Roy Baker personally and had several holsters made by Roy. He advised me that Roy had once asked him to try out a new holster design he was working on, a simple holster made from two flat panels of leather stitched together around the outline of the weapon, with 3 belt slots to permit strong-side or cross-draw use. This sounds to me like the prototype for "Roy's Pancakes", one of the most successful (and copied) innovations in concealed carry holsters ever. Another forum member, Eaglestroker, has told me that his grandfather also knew Roy Baker personally. Eaglestroker's first efforts in holster-making caught my eye because of the close similarities to Roy Baker's work (not a bad place to start in this business, I think). Roy Baker continues to have an impact on the business, long after he produced his legendary achievement with "Roy's Pancakes". Everyone who has ever made a pancake-style holster owes tribute to Roy Baker. This customer was also a parachute rigger about the same time I was a paratrooper and Pathfinder in the US Army, so our paths may have been crossing for the past 40 years or so. Interesting little world.
-
I hand-stitched everything for many years and at various times I have tried linen (waxed and unwaxed), polyester, and nylon threads in various weights. Personally, I found no significant advantage with the waxed threads for hand-stitching. The heavier thread weights require quite a bit more effort to pull through, so waxing may be desired for that reason. Polyester threads generally have less stretch than nylon, so may be prefered for some applications. Bonded nylon offers a bit stiffer consistency, so it doesn't seem to get tangled up as easily as polyester when running long stitch lines by hand. Thread is comparatively expensive when purchased in smaller quantities, and Tandy's prices are about as high as they get. You might try a web search for The Thread Exchange (Atlanta, if I recall correctly). I've been purchasing from them for the past several years, getting Linhanyl-brand 277 bonded nylon for about $20 per pound (around 1300 yards). Some other sources offer half-pound cones and 4-oz. spools for those wanting smaller quantities, but unit prices go up quite a bit as quantities are reduced. The bonded nylon runs perfectly on my stitchers, and the occasional hand-stitching requirements are just fine with it as well. For what it may be worth, I used to average about 45 minutes or so to mark, punch, and stitch a typical holster. I do the same work on my power stitcher now in a couple of minutes. The first belt that I hand-stitched was the LAST belt that I hand-stitched, probably 3 hours of work. I do full-length two-layer belts on my stitcher in 10 minutes or less. I realize that any stitching machine would be a big investment for only occasional or hobby use, but I wouldn't be without one for regular production work.
-
Very nice work. Actually, Bianchi's Chapman Hi-Ride series was made primarily for competition use, strong-side with a reverse cant allowing a very natural draw angle when worn at, or slightly forward, of the strong-side hip. They can certainly be used for cross-draw.
-
Let This Be A Lesson
Lobo replied to Eaglestroker's topic in Gun Holsters, Rifle Slings and Knife Sheathes
+1. There are some lessons we just don't forget. -
Beautiful work.
-
Lining For First Holster
Lobo replied to glockanator's topic in Gun Holsters, Rifle Slings and Knife Sheathes
Holster linings have long been popular as a means for protecting the finish of polished and blued handguns from excessive holster wear. Many modern handguns feature exterior finishes that are far more resistant to abrasion, so holster linings are less frequently requested than in years past. Both suede and smooth leathers have been popular for holster linings. I have quite a few customers who will not consider an unlined holster, and many have strong preferences, so I offer both options. My personal preference is for a smooth lining which does not share the tendencies of suede leather to collect dust, grit, and debris in use. For most holster applications I use 7/8 oz. veg-tanned for the holster body. When a lining is requested I will usually drop the holster body weight to 6/7 oz. and line it with 2-3 oz. leather. Linings are cemented to the inner holster surfaces, then exposed edges stitched down, then assembled and stitched as usual. It is best to work on a stable flat surface when lining. The lining leather needs to be laid out and fully relaxed, and some stretching can help to avoid bunching and wrinkles while forming the holster. Contact cement, such as the Barge product, will work well; or Fiebing's Tanners' Bond is very usable for the purpose and a bit more handy as it requires only coating one surface. A roller is handy for bonding the newly cemented pieces firmly together, or a board or book can be applied and weighted down while the cement cures. Further assembly, and especially wet-forming, should be put off for sufficient time for the cement to completely bond and cure, which might take a couple of hours or more depending on temperature, etc. Some lining leathers may not react as expected upon application of dyes and finishes, so experimentation with scraps should be done prior to proceeding with a new project. Our friend and resident expert Katsass likes to use two layers of 4/5 oz. veg-tanned cemented flesh-to-flesh, and that is probably a very good combination (total finished weight of 8 to 10 oz., very sturdy and a smooth interior surface). My typical 6/7 lined with 2-3 has a total weight of 8 to 10 oz. as well. Once the two layers have been firmly bonded together they should function very much like a single solid piece during further assembly, stitching, and forming operations (the principal exception being poorly cemented or loosely bonded linings, which tend to wrinkle badly and separate at open edges). Best regards. -
This Week's Challenges
Lobo replied to Lobo's topic in Gun Holsters, Rifle Slings and Knife Sheathes
I wouldn't call it a typical week; more like examples of things that happen in this business, or any business where we are dealing with the general public. Here is what I told each customer: 1. Your holster was produced to your specifications based on my standard design and options offered. Eyelets and cord retainers are not available as options. Custom modifications of existing holsters are billed at a standard shop rate for time and materials, and such work is done when the schedule allows time. 2. My products are warranted against failures caused by defects in materials or workmanship for a period of one year with repair, adjustment, replacement or refund at my option. This does not appear to be the case. 3. My suggestion would be to offer the holster for sale to someone owning a 4" M&P revolver (there are millions of them in circulation), then order another holster for your 5" model. 4. Making another belt sized at 40" plus 2, minus 2, just as soon as payment arrives. 5. If I receive a firearm in the mail I will report it to the US Postal Inspection Service and cooperate fully in the investigation of felony violations of federal law. -
Beretta 1951 Bluegun Needed
Lobo replied to wes's topic in Gun Holsters, Rifle Slings and Knife Sheathes
The Beretta 1951, including the Brigadier and Helwan (Egyptian) versions, is a relatively uncommon handgun in the US these days. "Dummy guns", including Rings Blue Guns, are generally available only for the more common handguns in current production and having significant market shares. New handgun models are seldom produced as dummies for a year or more after introduction; out of production models are dropped rather quickly. The primary exception is Duncans Outdoors, who will produce cast aluminum dummies for anything you are willing to provide the actual handgun for, and pay the costs of that production run (6 or so pieces). If you have a customer wanting a holster for that model the best suggestion I can offer is to have the customer make his pistol available for patterning and forming the holster, keeping in mind any Federal, state, and local laws that might govern the transfer of firearms. If the firearm crosses state lines the transfer certainly falls under the restrictions of the Gun Control Act of 1968, so licensed dealers will have to be involved. International transfers require US State Department authorization and licensing, as well as the services of licensed importers and dealers. Best regards. -
A few of the little things that have come up this week: 1. Customer ordered a Model 1-D-T Pancake with dual carry option and thumb-break retention for his S&W 3" Model 60 Pro, and it was sent out last week. Received it back in the mail this week with a note indicating the customer has decided to eliminate the thumb-break (reinforcement piece sewn into 2 layers of leather at the thumb release, plus the standard snap fixtures) and have it replaced with two metal eyelets so that he could tie a cord over the hammer when hiking/climbing, then remove the cord when access was needed. Customer enclosed $5.00 for the requested alteration (shouldn't take more than an hour or so, should it?). 2. Customer ordered the Enhanced Pancake model, left-hand, for his S&W Model 642. Received his new holster, sent a message on how pleased he was with it. Two days later e-mailed to say that he'd really rather have another holster model and, since this one was just like new (only put on the belt for a few hours, maybe ten or so practice draws) he'd like to return it in exchange for the other model (IWB-style holster). 3. Customer ordered a flap-style field holster, smooth leather lined, basketweave tooling, for his pre-Model 10 S&W M&P 4" revolver. Holster was produced and delivered, then customer discovered that his revolver was a 5" barrel model, wanted to know if anything could be done? Where did I put that leather stretcher? 4. Customer who ordered a 36" belt (provided specific instructions for measuring from tip of buckle to tongue hole in use) reported his new belt wouldn't fit, requested a 47" belt. I repeated the instructions for measuring a belt he was now using, resulting in a measurement of 40.5" at the tightest hole, but it was still "a little bit loose". Gotta be somewhere between 36" and 40" somewhere, I suppose. 5. Customer with a custom-made one-of-a-kind pistol wants me to make his holster, but he doesn't want to pay FFL transfer fees or FedEx shipping/insurance charges both ways. Why can't he just mail me his handgun and have me mail it back when the holster is done? (Anybody care for a few years making little rocks out of big rocks at a federal penitentiary?) I am producing 25 to 40 items weekly for delivery to all 50 US states and customers in Canada, England, France, Germany, Finland, Denmark, Bosnia-Herzegovina, Australia, Italy, Israel, Greece, Switzerland, Korea, South Africa, Austria, Mexico, Hong Kong, Colombia, Norway, and the Philipines so far. As soon as the Russian Mafia and the Polish Underground Balloon Corps Reserve figure out which handguns will be standard issue I expect a couple of big orders. Back to the grind. Still have to complete the convertible IWB-OWB adjustable cant, ambidextrous double holster rig with triple magazine pouch, handcuff case, iPod carrier, and 6-pack beer cooler for the 1896 Broomhandle Mauser with 2" bull barrel (anybody have the Blue Gun?), scope sight, laser, tactical light, and MP3 player (this one might require training wheels). Rant over.:brainbleach: :poofan:
-
I have no experience with vinegaroon so I can't comment on any possible connections of that with your present difficulties. However, I recall a few years ago when I had spent several hours making an order of IWB-style holsters, then did all the belt straps separately. The straps were cut of 7/8 veg-tan, 1" width and 6" length, then placed into the water to be formed (usually about 15 seconds or so). I forgot about the straps, closed the shop down, and went home. Next morning (about 14 hours later) I found the straps in the water and took them out. They were absolutely soaked, cooked noodle consistency, and they looked different. Measuring them I found them to be 1-1/8" width and 6-3/4" length, and quite uniform in overall dimensions. In that case the leather had expanded roughly 12% in both length and width. My point is that veg-tanned leather will expand naturally with extended soaking in water. It will also stretch considerably while wet. I suggest that you put that holster in a bucket of water and soak it completely. Check it at intervals of about 2 hours or so. I think you will find that sometime during the next 12 hours or so that the holster has expanded in all dimensions noticably, probably enough for you to proceed with forming. Since the experience described above I have incorporated the intentional stretching of leather in several holster designs. Features such as molded-in sight channels can be forcibly stretched in with little or no adjustment to cutting and stitch-lines. Some applications require the use of a rubber mallet to drive the dummy gun into the wet leather, and some require forcing it in an inch or so at a time, then allowing it to stretch out before proceeding to the next inch, completing the stretching a bit at a time. Also remember that leather that has been stretched while wet will shrink back somewhat during the drying period. Many holsters made in this manner require re-fitting after final finishes have been applied due to continued contraction. When this happens a plastic freezer bag can be placed over the dummy gun, then forced into the holster and allowed to sit for 4 to 8 hours (overnight works well). This will consistently result in an excellent fit. Try it. The materials have already been paid for, and you have done all the work to this point. Nothing to lose, but you may end up with a nicely fitted holster after all.
-
New To Me Tippman Boss
Lobo replied to cjcinin317's topic in Gun Holsters, Rifle Slings and Knife Sheathes
Nice looking work. The Tippman Boss is a decent little machine, especially for low-volume production or occasional use, but it can be finicky and frustrating at times. Some tips that might help are: 1. The Boss requires constant attention to timing and thread tensioning. Checking these and fine-tuning on scrap leather similar to what you will be using on each project before starting each project will save you some disappointments. 2. The cast aluminum operating handle attaches to the upper helical drive gear with a cap screw. That screw absorbs most of the stress at the top and bottom of each stroke, and can become fatigued over time and break, usually leaving the threaded portion of the screw embedded in the zinc drive gear. Tightness of that screw can be an issue, and I recommend checking it before each use to avoid a loose screw that adds additional stress in use. Avoid overtightening that screw. I also recommend changing out that screw about once every 30 days (about 125 to 150 uses in my shop, yours may vary) to avoid breakage due to metal fatigue. Keeping a supply of Schedule 8 cap screws, 1/4 X 20 X 1.5" on hand is cheap enough to do, and each one that saves you two hours of work to disassemble the top-end of the machine, remove the drive gear, and remove the broken screw, reassemble, re-time, etc, will be worth far more than it costs. 3. The helical drive gear is a cast zinc part. The screw hole to which the operating handle attaches is very close to one edge, and the part can break at that point due to repeated stress (especially when operated with the cap screw loose, and they do tend to loosen with use). Keeping a couple of spare drive gears on hand will allow you to make repairs right away rather than waiting for replacement parts from Tippman. 4. The drive rack (operated off the top helical drive gear to run the bottom shaft to the bobbin shuttle) is also made of cast zinc and can break due to repeated stress. Keeping at least one set (two pieces) on hand will allow immediate repairs rather than waiting for replacement parts. Changing these out takes only 15 to 30 minutes, but re-timing is then necessary as these parts control the finer timing control. 5. Keep the Tippman Industries phone number handy. A quick call will put you in touch with one of their tech people who will walk you through every maintenance and repair issue. Nice folks. 6. If you don't have the Tippman video you may want to order it from them, or watch it on their website. The advanced portion is very helpful in understanding machine operation, repair issues, timing, and thread tensioning issues, which you will be dealing with regularly. I keep my Boss on hand primarily as a back-up for the Cobra Class 4 that I added to the shop in 2010. You will find it to be a pleasure to use much of the time (especially when compared to hand-stitching), but there will be regular issues with adjustment (timing, thread tensioning) and regular repairs will be necessary (and routine) events. The most significant weaknesses are in the cast zinc used in key operating parts and the otherwise totally unsupported attachment of the operating handle via steel cap screw to a cast zinc drive gear. I hope this helps you. -
Contact Cement Failure
Lobo replied to steelhawk's topic in Gun Holsters, Rifle Slings and Knife Sheathes
Not sure if there is a "fix" for your existing problem, but I'm pretty sure that your problem resulted from pushing your production along too rapidly. Contact cement, or any other appropriate adhesive, requires sufficient time to set up and bond thoroughly. Going into the wet-forming process too soon can cause problems. My first suggestion would be to allow 12 to 24 hours for your cement to set up and bond before doing anything else. -
Smith And Wesson Smith And Sw9Ve 9Mm Pistol
Lobo replied to johnggrg's topic in Gun Holsters, Rifle Slings and Knife Sheathes
+1 on this. Holster patterning is one of the basics in holster making, and you will have to become proficient if you plan on making holsters on a regular basis. Patterning can be one of the more frustrating aspects of this business. Every holster design has to take into consideration the size and shape of the intended handgun, as well as the weight distribution of the piece (complicated further with the hi-cap semi-autos when a full magazine is loaded into the weapon). Determining stitch-lines is critical to achieving a good fit. Determining the location of belt attachment points is critical to obtaining the cant (carry angle) desired, as well as balancing the weight and keeping the holster secured properly. And these are only a few of the more basic elements of patterning. Form must follow function. Function must take priority for a number of reasons, the most basic of which are comfort, accessibility, security (safety & retention), and concealability. Developing the ability to form a mental image of the final result is helpful, but not something that everyone is capable of doing. Your first attempt, or your next 20 attempts, may or may not result in what you expect or need. Eventually, either everything will "click" for you and you will be spending your time productively, or maybe it never will happen. Some people are architects, some design automobiles, some folks dream of the world's best mouse trap, and some are world class chefs. Very few do more than one thing really well. When starting on a new holster design it is not unusual to make and test several holsters before the pattern is finalized. When adapting an existing holster design to a new handgun model the same process is frequently required. It can be frustrating, but it is necessary. It is not difficult to figure out why so many big holster-making companies make "one size fits many" holster models. I offer 9 holster models, with 4 common options, in 4 finish colors, for 103 handgun models, resulting in over 18,000 possible variations. Doing this requires 927 basic patterns, plus additional patterns for variations in cant and other customer requests, filling desk drawers with reams of patterns. Even with all of those patterns on file I still find that I have to do several new patterns every week as I work through my orders. I also add a dozen or more new handgun models every year, so there will be 100-plus new patterns added, and I've introduced 3 new holster models in the past 3 years, with several hundred new patterns required. One new holster model took 7 months and over a dozen prototypes for different handguns, tested by 6 different people, before it went on the market. The short version is that patterning work never really stops, no matter how many patterns you already have on hand. Best regards.