leatherjunkie
-
Posts
172 -
Joined
-
Last visited
Content Type
Profiles
Forums
Events
Blogs
Gallery
Store
Everything posted by leatherjunkie
-
Couple More Just Finished Western
leatherjunkie replied to Treed's topic in Gun Holsters, Rifle Slings and Knife Sheathes
basket weave always a good design. now the other one sea shell design(i think) sure looks like it took a lot of time to lay out correctly. nice as always bobby. leon -
Just Finished Western Rigs
leatherjunkie replied to Treed's topic in Gun Holsters, Rifle Slings and Knife Sheathes
hmmmm. i think that i need to inspect this in person. dang bobby you outdid yourself on this one this time. leon -
http://www.willghormley-maker.com/ check out will ghormley's website. he has some great holster patterns. he did holsters for a few movies such as 3:10 to yuma
-
Another Iwb Holster Question
leatherjunkie replied to glockanator's topic in Gun Holsters, Rifle Slings and Knife Sheathes
pancake better, because the straps used to secure holster to belt will be on the thinest side of the holster keeping the bulge of holster as thin as possible. straps mounted on holster main body will cause more of a bulge where pants go over holster. this will allow holster to be more noticeable. -
Holsters For Ruger Lcp
leatherjunkie replied to leatherworklee's topic in Gun Holsters, Rifle Slings and Knife Sheathes
interesting design. one thing i will say about this design it may help hide the gun in a sturdy way inside the pocket but will not help the person carrying when he needs the gun fast. pulling the gun out for self defense using this style of holster will get the person killed. interesting design but bad design for carrying for self defense. i hope you were just playing with different ideas to see what you can do. i hope that this is the case. -
nice as always kt. myself i think it would look better with darker lace instead. but thats just me
-
the reinforcement at the top of the holster is just leather same thickness as the holster front is made from sewin on. this just helps the holster stay open when gun is not in holster. basic rule of thumb for this type of holster is draw outlne of gun on paper measure thickness of slide divide by half. now add measurement of thickness of 1 piece of the leather thats your stitch line measurment from outline of gun drawing. example 1" thick slide==1/2". leather thickness=1/8" add together 1/2+1/8===5/8 draw 5/8 line away from the outline. thats your sewing line. just shape the pattern to please you. its going to be tighter fit than the western holsters you make so well, so there is going to be more wet forming involved with this style. also read more about this style holster making in the holster forum on this website.
-
New To Leather, Holster Question
leatherjunkie replied to Dieselman's topic in Gun Holsters, Rifle Slings and Knife Sheathes
yep i agree. the trigger area is molded way too much. you get in a hurry and stuff the gun into holster and the molding may cause trigger to go off. very bad for your leg. also you need to stitch around the form of the gun minus the barrell opening and handle opening. the stitching will add retention to the holster and keep gun in place. my holster instuctor said to draw outline of gun on paper. measure the slide thickness divide by 1/2 and add thickness of one piece of leather to that equals the stitch line placement. excample slide thickness is 1" / 1/2 = 1/2+ 1/8'(thcikness of one leather)=5/8" now draw a line 5/8" from outline of gun on paper slide side and trigger side. this is your stitch line. glue and stitch in this area. wet form after glueing and stitching gun will stay put better. also move your belt slots closer to the top of gun more. -
http://www.muzzleloadingforum.com/fusionbb/fusionbb.php this website is what you want for making drinking horns. its more suited towards muzzleloading firearms. drinking horns are more that time period. this forum is mostley geared toward making stuff out of leather not horns. the muzzle loading forum also shows how to make various leather stuff a muzzleloader would use for hunting.
-
Knife Sheeth +Carving
leatherjunkie replied to Svartsmeden's topic in Gun Holsters, Rifle Slings and Knife Sheathes
the leather is carved/stamped after you cut the shape out and before you do anything else. color, glueing, sewing, finishing is the last steps -
Sewing An Avenger Style Holster
leatherjunkie replied to Abram's topic in Gun Holsters, Rifle Slings and Knife Sheathes
my stitching horse is still in the "not completely done " state right now so i just hand sew my items while holding it in my hands. -
nice job. my bench weight i used deer skin and lead shot to fill it. just glued up 3 sides filled with lead shot and glue the last open side. no stitching or special carving just the basic bench weight.
-
try putting the snap into the main leather then line. this hides the snap backs and less leather thickness to go through also.
-
best tip is to get better quality leather and leave the tandy leather for others to use. on belts i usually spray on the dye or dip dye them. this helps me get a even coat of dye. i have just started using herman oak tanned leather and realized that this leather is way better than tandys leather. the herman oak is tanned in the united states(which is great for me). the flesh side is way smoother than tandys and takes dye better than tandys leather. after finding out that herman oak is way better to work with than tandys leather i will nolonger buy tandys leather.
-
Questions About Cartridge Loops On Belt.
leatherjunkie replied to mlapaglia's topic in How Do I Do That?
i use 4-5oz 3/4 wide for bullet loops. punch 5/8 slot and weave my bullet loop(dry) through the slot around the bullet and back through same hole. never had a problem with loops laying over or twisting in place. i use 5/8 bag punch so you dont see the slots after the loops are made. i saw the slots after loops were made when i used 3/4 bag punch. 3/4 wide loops work great for me for pistol rounds. on rifle rounds i would use 1" wide for the loops. -
its a start. its good to no that you are not afraid to try new stuff. I highly recomend that you contact the local tandy leather store and get some toolling classes. another way to get classes is go to hidecrafter's website and order some videos on toolling.
-
i have a henley knife and its great. also have a barry king knife and this one i use the most. you can find barry king swivel knives at barrykingtools.com
-
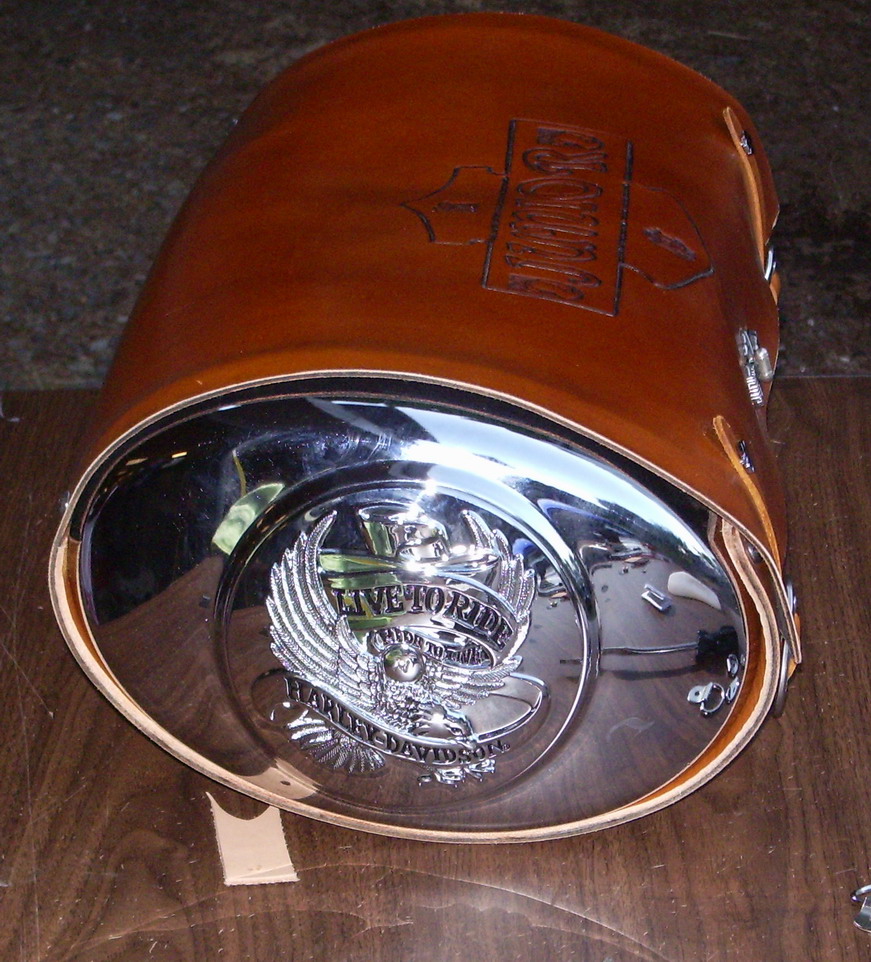
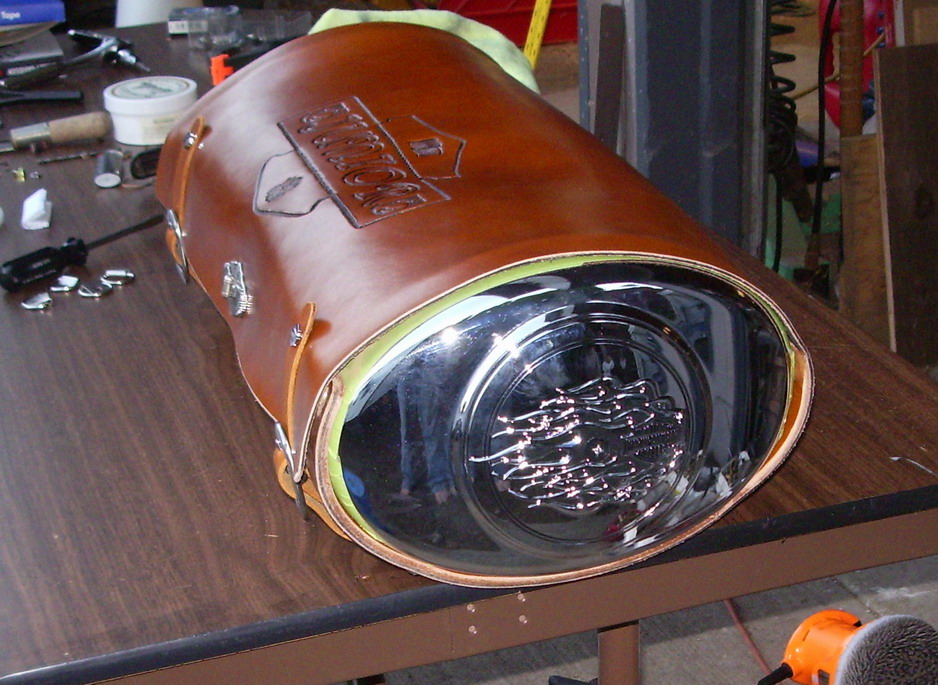
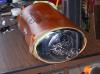
stainless steel bolts and acorn nuts 4 per air cleaner
-
First Gunbelts
leatherjunkie replied to BevJones's topic in Gun Holsters, Rifle Slings and Knife Sheathes
looks great. one thing that you may not have thought of is i only punch one hole per bullet loop. you might wanna try it on some scrap belt to see if you like it. just punch one hole for the bullet loop per bullet that you want on the belt. you will need to feed the bullet loop up the hole around the bullet and back down same hole. works great for me. if you like it it will save you some time punching holes. -
Alternatives To Tandy Tracing Film?
leatherjunkie replied to Urshag's topic in Patterns and Templates
Chan Geer showed us in class to use the sheet protectors that office supply stores sell. just put your pattern inside the sheet protector and lay on leather to trace. u can use notebook paper for your pattern this way -
this is my first luggage bag for the harley. i got the idea of the air cleaner covers from another post on this forum a few months ago. decided to do it for sturgis run this year.
-
i just go to the local store that sells school supplies and get a 3 ring binder then use that as my template. tear apart the binder saving the cardboard stiffners and the ring. line it up with the leather. i usually leave 1/4 to 1/2" of leather on the outside 3 sides of cardboard. you are going to need some space between the center cardboard and the side cardboard. the center cardboard is where you are going to place the ring. i suggest 1/2" space between the center and sides. you can verify the space by tapping the center in place and sides in place then fold up like is supposed to and see how it looks. adjust as needed. then after done glue it in place and lining in place also trim edges and lace or stitch to finish. i use pigskin for lining on mine have also used deerskin, and 2-4 oz veg tanned leather. veg tan leather works great cause you can also tool it. makes a interesting lining this way.
-
first off welcome to the one hobby that is very addictive. as others has mentioned use the search button to find all information on your subject. that said i will also suggest that you contact hidecrafter just do a google search for their website. go through their catalog and look for videos. get the basic carving video. this will explain/show you how to carve using a swivel knife. i no for me its harder to learn how to do stuff just by reading how to books. its way easier to watch videos on the subject to learn how to do something. also after you get to where you understand how to use the swivel knife i highly suggest you order a barry king swivel knife or a henley swivel knife. the basic tandy leather swivel knife is just that basic beginner swivel knife. you will have so much more fun using a good swivel knife and your work will improve 100% with a good swivel knife. after you get a good swivel knife hang the basic one on your tool board for display. after doing basic carving i finally decided to buy tools from barry king, henley, and hides to art. I very seldom use my tandy leather tools anymore. 95% of the time they sit on my work bench as display purposes. its great having a customer come over and see all my tools. they are amazed at how many tools i have on display. only use 30 tools now that i have the barry king, henley and hides to art tools. I personally use the angle blade for my swivel knife. its easier for me to follow the traced line on the leather and i dont have to tilt the knife like you have to with a straight blade. another thing that you need to learn using a swivel knife is strop the blade lots. when in doubt strop the blade. did i mention strop the blade
-
no idea what the tool is you are asking about. i will tell you that tandy craftool tools are ok for a beginner. but you should really consider purchasing better quality tools. i have tandy craftools and can tell you that learning to use the beveler correctly is not going to be easy with craftool bevelers. i highly recommend you look at barry king tools for you bevelers. its night and day using barry king tools on leather. my tandy tools sit on my leather bench and look pretty. people see all my tools and go wow you have alot of tools. they shake their heads when i tell them that i only use 1/4 of the tools on my bench. you will be much happier with barry king tools. kinda like the old saying "i couldave had a v8"
-
yea 8 bucks is kinda high for shipping but i will pay it because the stamps are well worth getting and you cant find them locally just save up some money and order more than one stamp or tool. his hammers and edgers are very like no others out there also. I'm gonna be ordering one of his french edgers in the very near future.